RHINO 6000 Manual de usuario

Rhino 6000
Advanced Labeling Tool with PC Connectivity
Quick Start Guide ............................................ 1
Guía rápida de inicio ........................................ 7
Guide de démarrage rapide ........................... 15
Guia de Início Rápido .................................... 23


English
1
Follow these steps to install your RHINO 6000 label printer and software, and
print your first label.
1. Unpacking your printer
NOTE Do not plug the printer into your computer until asked to do so during the
software installation.
1. Unpack your label printer and save the packing materials.
2. Make sure you have all the items shown in Figure 1.
Figure 1
Power adapter
RHINO 6000 label printer
CD-ROM
Two RHINO
Quick Start and Quick Reference Guides USB cable
label cassettes
Battery pack
Quick Start Guide

2
2. Connecting the power
The label printer can operate using the rechargable battery pack or the AC power
adapter. For temporary backup power, six AA alkaline batteries can be used.
To charge the battery pack the first time you
use the printer, insert the battery pack and plug
in the power adapter. Charging the battery
pack the first time takes approximately eight
hours. Recharging the battery pack will take
approximately two hours.
To insert the battery pack
1. Remove the battery compartment cover.
See Figure 2.
2. Insert the battery pack into the battery
compartment.
3. Replace the battery compartment cover.
To connect the power adapter
1. Plug the power adapter into the power
connector on the bottom of the printer.
See Figure 3.
2. Plug the other end of the power adapter
into a power outlet.
Figure 2
Figure 3
3
3. Inserting the label cassette
Your printer comes with two RHINO label cassettes.
Visit www.rhinolabeling.com for information about purchasing
additional label cassettes.
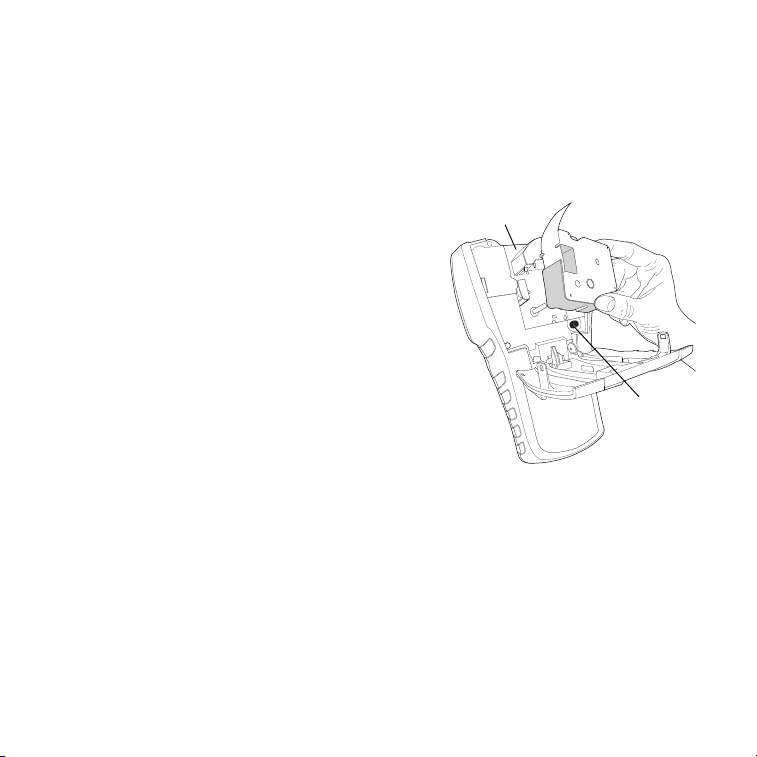
To insert the label cassette
1. Lift the label cassette cover to open the
label compartment. See Figure 4.
2. Make sure the label and ribbon are taut
across the mouth of the cassette and that
the label passes between the guideposts. If
necessary, turn the spool clockwise to
tighten the ribbon.
3. Insert the cassette and press gently until
the cassette is eased into place.
4. Make sure the two blue clips lock the
cassette in place. Refer to the label on
the cassette.
5. Close the label cassette cover.
To remove the label cassette
1. Lift the label cassette cover to open the label cassette compartment.
2. Press the Eject button. The label cassette is automatically lifted.
3. Replace the cassette as described above.
Figure 4
Eject
Button
Lift

4
4. Connecting the printer to your computer
Your printer connects to your computer using the USB connection located on the
top of the printer.
NOTE Do not connect the printer to your computer until prompted to do so during
the software installation.
To connect the printer to your computer
1. Plug the USB cable into the USB port on
the bottom of the printer. See Figure 5.
2. Plug the USB cable into a USB port
ONLY when prompted during the
software installation.
5. Installing the Software
To install the software
1. Insert the RHINO Connect Software CD into your CD-ROM drive. After a
few seconds, the installation screen appears. If the installation screen does
not appear:
a. Click Start and then Run on the Windows taskbar. The Run dialog
box appears.
b. Enter D:\setup.exe (where D is the CD-ROM drive letter) and click OK.
2. Follow the on-screen instructions.
3. When prompted by the installer, plug the USB cable into a USB port.
Figure 5

5
6. Printing your first label with the printer
You are now ready to print your first label. The first time you turn on the printer,
you are asked to select your language and units of measure. You are also asked to
select the width of the tape cassette currently inserted in the printer.
To print your first label
1. Press to turn on the power.
2. Use the up and down arrow keys to select the language you wish to use and
press OK.
3. Use the up and down arrow keys to select the units of measure you wish to
use and press OK.
4. Select the tape width of the tape cassette currently inserted in the printer
and press OK.
5. Enter some text for your label using the alphanumeric keys.
6. Press PRINT.
7. Press CUT and remove the label.
Congratulations! You have printed your first label.

6
7. Using RHINO Connect Software
The following figure shows some of the many features available in RHINO
Connect Software.
For complete details on how to use the software, refer to the RHINO Connect
Software online help.
Change the label
type on the fly.
Add images, barcodes,
symbols, and predefined text.
Use the Data
Editor to enter
label text and
add labels to
the label file.
Preview your
labels exactly as
they will print. Set label
properties to
further
customize
your labels.
Work in two
modes: Create
labels and print
directly to the
printer, or create
labels for transfer
to a RHINO printer.
Quickly create a series of
labels using serialization.
Transfer label
files and custom
symbols and text
to your RHINO
printer.

Inglés
7
Siga estos pasos para instalar el software y la impresora de etiquetas RHINO 6000
e imprimir la primera etiqueta.
1. Desempaquetar la impresora
NOTA No conecte la impresora al ordenador hasta que se lo pidan durante la
instalación del software.
1.
Desempaquete la impresora de etiquetas y guarde los materiales de embalaje.
2. Asegúrese de que tiene todos los elementos que aparecen en la Figura 1.
Figura 1
Adaptador de
Impresora de etiquetas RHINO 6000
CD-ROM
Dos cintas de
Guías de inicio rápido y de referencia rápida Cable USB
etiquetas RHINO
Batería
alimentación
Guía rápida de inicio

8
2. Conectar la alimentación
La impresora de etiquetas puede funcionar con la batería recargable o el
adaptador de alimentación de CA. Se pueden usar seis pilas alcalinas AA
para disponer de alimentación de reserva temporal.
Para cargar la batería la primera vez que use
la impresora, inserte la batería y conecte el
adaptador de alimentación. Para cargar la batería
por primera vez se necesitan aproximadamente
ocho horas. Para volver a cargar la batería se
necesitarán aproximadamente dos horas.
Para insertar la batería
1.
Retire la cubierta del compartimento de
baterías. Consulte la Figura 2.
2. Inserte la batería en el compartimento
de baterías.
3. Vuelva a colocar la cubierta del
compartimento de baterías.
Para conectar el adaptador de alimentación
1.
Enchufe el adaptador de alimentación al
conector de alimentación situado en la
parte inferior de la impresora. Consulte la
Figura 3.
2. Enchufe el otro extremo del adaptador de
alimentación a una toma de corriente.
Figura 2
Figura 3
Tabla de contenidos
Idiomas:
Otros manuales de Equipos industriales de RHINO


