Reed Instruments C-380 Manual de usuario

Refrigerant
Leak Detector
Instruction
Manual
C-380
www. .com information@itm.com1.800.561.8187

Table of Contents
Introduction .................................................................................................... 2
Product Quality............................................................................................... 3
Safety ............................................................................................................. 3
Warning...................................................................................................... 3
Features.......................................................................................................... 4
Included.......................................................................................................... 4
Specications................................................................................................. 5
Instrument Description ................................................................................... 6
LED Leak Indicator Definition .................................................................... 6
Operating Instructions.................................................................................7-9
Power ON/OFF .......................................................................................... 7
Auto Power Off .......................................................................................... 7
Self Test (Performance Check)................................................................... 7
Measuring Procedure ................................................................................ 8
Ambient Concentration Reset.................................................................... 8
Sensitivity Adjustment ............................................................................... 9
Replacing the Sensor................................................................................. 9
Battery Replacement.................................................................................... 10
Applications.................................................................................................. 10
Accessories and Replacement Parts ........................................................... 11
Product Care ................................................................................................ 11
Product Warranty ......................................................................................... 11
Product Disposal and Recycling .................................................................. 12
Product Support........................................................................................... 12
Introduction
Thank you for purchasing the REED C-380 Refrigerant Leak Detector.
Please read the following instructions carefully before using the meter. By
following the steps outlined in this manual the meter will provide years of
reliable service.
www. .com information@itm.com1.800.561.8187

Product Quality
This product has been manufactured in an ISO 9001 facility and has been
calibrated during the manufacturing process to meet the stated product
specications. If a certicate of calibration is required please contact the
nearest authorized REED distributor or authorized Service Center. Please
note an additional fee for this service will apply.
Safety
Read through your instruction manual before operation for correct
and safe usage.
Warning
• Never attempt to repair or modify your instrument. Dismantling your
product, other than for the purpose of replacing batteries, may cause
damage that will not be covered under the manufacturer's warranty.
Servicing should only be provided by an authorized service center.
• Do not operate the meter in explosive atmospheres, such as in the
presence of ammable liquids, gases, or dust.
• Eliminate any organic solvents around the measuring area as the gases
and/or vapors might interfere with the unit's accuracy.
• In order to ensure correct operation and measurement, the unit should
be switched on and warmed-up in a non-contaminated environment.
• Be sure to test the meter (see "Self-Test" for details) often to ensure
safety and the proper use of this unit.
www. .com information@itm.com1.800.561.8187

Features
• Detects all CFCs, HFCs, and HCFCs
• Quick response and high accuracy detects small leaks
• 15" (390mm) gooseneck for hard to reach areas
• Designed for one-handed operation
• User adjustable sensitivity (High/Low)
• Tricolor visual indicator
• Audible (buzzer) and visual (LED) alarm indicators
• Low battery indicator and auto shut off
• User replaceable sensor
Included
• Reference Leak Source
• Hard Carrying Case
• Batteries
www. .com information@itm.com1.800.561.8187

Specifications
Detected Gases: CFC's: R11, R12, R13
HCFC's: R22, R502, R500
HFC's: R134a, R123, R125,
R23, R404A, R407C, R410A
and other halogen based compounds
HFO’s: HFO-1234yf and R514A
Sensitivity: R22, 134A: 6g/year(H), 30g/year(L)
R404A, 407C, 410A: 8g/year(H), 40g/year(L)
General Specifications
Sensor Type: Advanced ionization detector
Display: Tricolor LED bar indicator
Alarm:
Audible (buzzer) and Visual (bar indicator)
Sensitivity Settings: Low and High
Warm-up Time: 10 seconds
Response Time: Less than 1 second
Auto Shut-Off: Yes (after 10 minutes)
Low Battery Indicator: Yes
Power Supply: 4 x AA Batteries
Battery Life: Approximately 40 hours
Product Certications: CE, RoHS
Probe Length: 15" (390mm)
Operating Temperature: 32 to 104°F (0 to 40°C)
Storage Temperature: 14 to 140°F (-10 to 60°C)
Operating Humidity Range: 10 to 70%
Dimensions: 8.5 x 2.6 x 2.2" (217 x 66 x 56mm)
Weight: 9.3oz (265g)
www. .com information@itm.com1.800.561.8187

Instrument Description
1. Sensor
2. Sensor Protector
3. LED Leak Indicators
4. Low Sensitivity Button
5. High Sensitivity Button
6. Low Battery Indicator
7. Power ON/OFF &
Reset Button
8. Battery Cover
9. Battery Cover Screw
LED Leak Indicator Definition
Ambient Concentration Indication
C-380
www. .com information@itm.com1.800.561.8187

Operating Instructions
Some environmental conditions may cause inaccurate readings
such as; high pollutant environments, large temperature variations,
high wind velocity, environments containing combustible gases,
environments containing organic solvents, adhesive vapors,
fuel gases or vesicants.
Power ON/OFF
1. Press the ONON
OFFOFF button to turn the meter on. Press and hold the ONON
OFFOFF
button for approximately 5 seconds to turn the meter off.
2. When powering on, the LED leak indicators will continuously
illuminate while the sensor heats up for approximately 2 minutes.
3. When complete, the meter will emit 2 beeps conrming that it is
ready to use.
Note: The ONON
OFFOFF button not only turns this refrigerant leak detector on and
off but also serves as a reset button for ambient concentration (refer to the
"Ambient Concentration Reset" section in the manual for further details).
Auto Power Off
To preserve battery life, the meter is programmed to turn off after 10
minutes of inactivity.
Self-Test (Performance Check)
1. Turn the meter on and set the sensitivity level to "Hi".
2. Open the cover to the leak-check bottle and slowly move it closer
to sensor tip.
3. If the unit is in working condition the LED leak indicators will light up,
from low to high.
4. Repeat this process to conrm that the closeness of the leak-check
bottle results in the leak indicators to uctuate from low to high.
continued...
www. .com information@itm.com1.800.561.8187

Measuring Procedure
It is recommended to position the tip of the sensor probe within 1/4"
(6mm) of the suspected leak source. Slowly move the sensor probe past
each possible leakage point.
Note: Fast movement of the sensor probe or blowing into the sensor tip
will affect the air ow over the sensor and cause the unit to alarm.
1.
When a leak is detected, an audible tone will sound and the LED
leak indicators will light from right to left; green (low concentration) to
orange (medium concentration) to red (high concentration). Increasing
levels indicates that the proximity of the leak is getting closer.
2. When the meter signals a leakage, pull the probe away from the leak
for a moment and then bring it back slowly to pinpoint the location.
Note: If the leak is large, try setting the sensitivity switch to LOW (see
"Sensitivity Adjustment" for details) as it will make it easier to pinpoint the
exact location of the leak.
3. Always return the sensitivity switch to HIGH before searching for any
additional leaks.
4. When a user is nished testing for leaks turn the unit OFF and store
it in a cool, dry, clean place to protect the sensor and unit from any
possible damage.
Ambient Concentration Reset
This refrigerant leak detector features an ambient concentration
reset function (Zero out) that sets the meter's sensor to ignore
the present level of refrigerant concentration. When the meter
is initially powered on it will recognize the background refrigerant
concentration as 0 by default. Therefore, it is recommended to turn
the meter on in an area with clean and fresh air such as outdoors
allowing the sensor to zero out in a non-affected area. If a user
presses the
ONONON
OFFOFFOFF
button while measuring, it will reset the current
background refrigerant concentration to zero again. This function is
designed to allow the user to pinpoint the source of the leak while
enabling it to register higher concentrations only.
continued...
www. .com information@itm.com1.800.561.8187

Sensitivity Adjustment
This unit provides two levels of sensitivity. When the unit is switched
ON it is set to high sensitivity by default. To change the sensitivity, press
the Lo
Sensitivity button. The two left green LED's will then ash indicating low
sensitivity has been selected. To switch the unit back to high sensitivity,
press the Hi
Sensitivity button. The two right red LED's will then ash indicating
that high sensitivity has been selected.
Replacing the Sensor
To ensure the accuracy of the meter, the sensor must be replaced
periodically. The lifespan of a sensor depends on several factors: the
technology used, environmental conditions and gas exposure. The more
an electrochemical sensor is exposed to gas, the shorter its life. Under
normal conditions and proper care, the sensor life span is approximately
1-2 years.
Note: It is recommended to perform self-tests of the sensor prior to taking
readings to ensure that the sensor is still in working condition.
1. When ready to replace, remove the sensor protector cover from the
tip of the sensor probe. Be cautious when removing the sensor, as
the old sensor may still be very HOT.
2. If the old sensor has cooled down, carefully pull it out and insert the
new sensor into the plug (see below).
3. Place the sensor protector over the new sensor.
www. .com information@itm.com1.800.561.8187
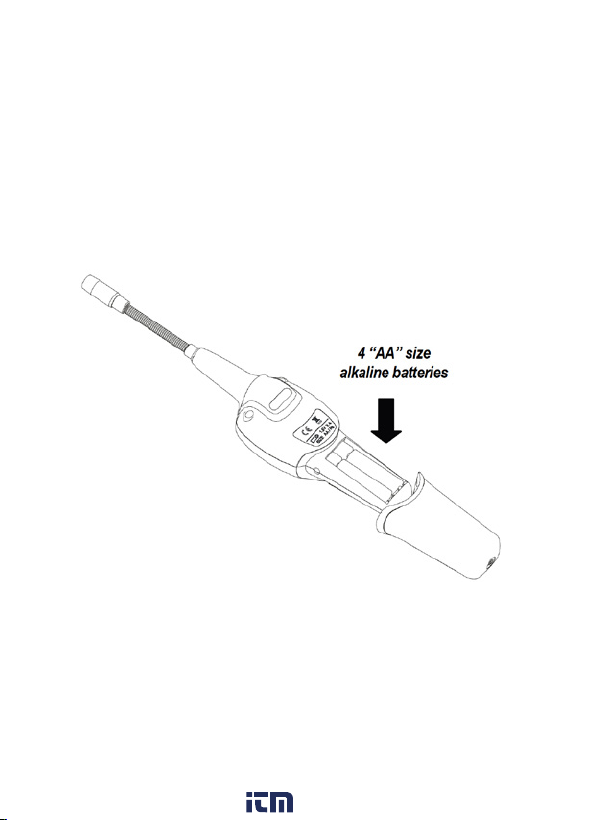
Battery Replacement
When the battery power is running low, the red LED low battery indicator
will illuminate conrming that the batteries will
need to be replaced.
1. Loosen the battery cover screw and remove the battery cover
located on the bottom of the instrument as shown below.
2. Install 4 x "AA" batteries.
3. Replace battery cover by aligning it with the hangle and sliding it
back onto the unit.
4. Tighten the battery cover screw to secure back into place.
Applications
• Testing residential and commercial refrigeration systems
• Automotive air conditioning troubleshooting
www. .com information@itm.com1.800.561.8187
Tabla de contenidos
Otros manuales de Sensor de seguridad de Reed Instruments

Reed Instruments
Reed Instruments R9100 Manual de usuario

Reed Instruments
Reed Instruments R5110 Manual de usuario

Reed Instruments
Reed Instruments R9200 Manual de usuario

Reed Instruments
Reed Instruments 800837005960 Manual de usuario

Reed Instruments
Reed Instruments R5120 Manual de usuario

Reed Instruments
Reed Instruments R6013-NIST Manual de usuario


