Record Power DML250 Manual de usuario

1
Original Instructions
DML250 10” 5 Speed Cast Iron
Mini Lathe
15001 (UK version)
15002 (EP version)
Important
For your safety read instructions carefully before
assembling or using this product.
Save this manual for future reference.
Always wear safety glasses when
using woodworking equipment.
Always read the instructions
provided before using
woodworking equipment.
i
Kg
To register this product please visit
www.recordpower.info
It is important to register your product as soon as possible in order to receive efficient after sales
support and be entitled to the full 5 year guarantee. Your statutory rights are not affected.
Please see back cover for contact details.
Version 3.3
October 2016

2
Contents
1 Explanation of Symbols
2 General Power Tool Safety Warnings
3 Woodturning Lathe Safety Warnings
4 Record Power Guarantee
5 Specifications
6 Contents of the Package
7 Getting to Know Your Lathe
8 Assembly
9 Assembly of the Optional DML305/A Leg Stand
10 Assembly of the Optional DML305/L Extension Support and DML250 Bed Extension
11 Operation
12 Maintenance
13 Intended Use of the Lathe and Basic Woodturning Instructions
14 Dust Extraction
15 Troubleshooting
16 Electrical Connection and Wiring Diagram
17 Parts Diagram and List
EU Declaration of Conformity

3
The symbols and their meanings shown below may be used throughout this manual.
Please ensure that you take the appropriate action wherever the warnings are used.
1. Explanation of Symbols
i
Kg
i
Kg
i
Kg
i
Kg
i
Kg
i
Kg
i
Kg
i
Kg
Mandatory
Instructions
Warnings
Read and fully understand the instruction
manual before attempting to use
the machine.
Indicates an instruction that requires
particular attention
Wear protective eyewear
Use respiratory protective equipment
Use suitable protective footwear
Use hearing protection
Use protective work gloves
Indicates a risk of severe personal injury
or damage to the machine
Indicates a risk of severe personal injury
from electrical shock
Risk of personal injury from lifting of
heavy items
Indicates a risk of severe personal injury
from airborne objects
Risk of fire
i
Kg
i
Kg
i
Kg
i
Kg

4
2. General Power Tool Safety Warnings
WARNING: Read all safety warnings, instructions, illustrations
and specifications provided with this power tool. Failure to follow
all instructions listed below may result in electric shock, fire and/or serious
injury.
Save all warnings and instructions for future reference.
The term “power tool” in the warnings refers to your mains-operated
(corded) power tool or battery-operated (cordless) power tool.
1) Work Area Safety
a) Keep work area clean and well lit. Cluttered or dark areas invite
accidents.
b) Do not operate power tools in explosive atmospheres, such as
in the presence of flammable liquids, gases or dust. Power tools
create sparks which may ignite the dust or fumes.
c) Keep children and bystanders away while operating a power
tool. Distractions can cause you to lose control.
2) Electrical Safety
a) Power tool plugs must match the outlet. Never modify the
plug in any way. Do not use any adapter plugs with earthed
(grounded) power tools. Unmodified plugs and matching outlets will
reduce risk of electric shock.
b) Avoid body contact with earthed or grounded surfaces, such
as pipes, radiators, ranges and refrigerators. There is an increased
risk of electric shock if your body is earthed or grounded.
c) Do not expose power tools to rain or wet conditions. Water
entering a power tool will increase the risk of electric shock.
d) Do not abuse the cord. Never use the cord for carrying, pulling
or unplugging the power tool. Keep cord away from heat, oil,
sharp edges or moving parts. Damaged or entangled cords increase
the risk of electric shock.
e) When operating a power tool outdoors, use an extension cord
suitable for outdoor use. Use of a cord suitable for outdoor use
reduces the risk of electric shock.
f) If operating a power tool in a damp location is unavoidable,
use a residual current device (RCD) protected supply. Use of an
RCD reduces the risk of electric shock.
3) Personal Safety
a) Stay alert, watch what you are doing and use common sense
when operating a power tool. Do not use a power tool while
you are tired or under the influence of drugs, alcohol or
medication. A moment of inattention while operating power tools may
result in serious personal injury.
b) Use personal protective equipment. Always wear eye
protection. Protective equipment such as a dust mask, non-skid safety
shoes, hard hat or hearing protection used for appropriate conditions will
reduce personal injuries.
c) Prevent unintentional starting. Ensure the switch is in the
off-position before connecting to power source and/or battery
pack, picking up or carrying the tool. Carrying power tools with
your finger on the switch or energising power tools that have the switch
on invites accidents.
d) Remove any adjusting key or wrench before turning the
power tool on. A wrench or a key left attached to a rotating part of the
power tool may result in personal injury.
e) Do not overreach. Keep proper footing and balance at all
times. This enables better control of the power tool in unexpected
situations.
f) Dress properly. Do not wear loose clothing or jewellery. Keep
your hair and clothing away from moving parts. Loose clothes,
jewellery or long hair can be caught in moving parts.
g) If devices are provided for the connection of dust extraction
and collection facilities, ensure these are connected and
properly used. Use of dust collection can reduce dust-related hazards.
h) Do not let familiarity gained from frequent use of tools allow
you to become complacent and ignore tool safety principles.
A careless action can cause severe injury within a fraction of a second.
4) Power Tool Use and Care
a) Do not force the power tool. Use the correct power tool for
your application. The correct power tool will do the job better and
safer at the rate for which it was designed.
b) Do not use the power tool if the switch does not turn it on
and off. Any power tool that cannot be controlled with the switch is
dangerous and must be repaired.
c) Disconnect the plug from the power source and/or remove
the battery pack, if detachable, from the power tool before
making any adjustments, changing accessories, or storing
power tools. Such preventive safety measures reduce the risk of
starting the power tool accidentally.
d) Store idle power tools out of the reach of children and do
not allow persons unfamiliar with the power tool or these
instructions to operate the power tool. Power tools are dangerous
in the hands of untrained users.
e) Maintain power tools and accessories. Check for misalignment
or binding of moving parts, breakage of parts and any other
condition that may affect the power tool’s operation. If
damaged, have the power tool repaired before use. Many
accidents are caused by poorly maintained power tools.
f) Keep cutting tools sharp and clean. Properly maintained cutting
tools with sharp cutting edges are less likely to bind and are easier to
control.
g) Use the power tool, accessories and tool bits etc. in
accordance with these instructions, taking into account the
working conditions and the work to be performed. Use of the
power tool for operations different from those intended could result in a
hazardous situation.
h) Keep handles and grasping surfaces dry, clean and free from
oil and grease. Slippery handles and grasping surfaces do not allow for
safe handling and control of the tool in unexpected situations.
5) Service
a) Have your power tool serviced by a qualified repair person
using only identical replacement parts. This will ensure that the
safety of the power tool is maintained.
i
Kg

5
3. Woodturning Lathe Safety Warnings
Safe Operation
Familiarise yourself with the machine
• Machining operations using wood turning lathes have a history of serious
accidents. Most serious accidents resulted from the work piece being
thrown from the lathe whilst turning. Other accidents can be caused by
loose clothing being drawn in to the rotating work piece or hands becom-
ing trapped between the rotating work piece and fixed parts of the lathe.
2. Before switching the machine ‘ON’
• Before attaching a work piece to a faceplate, always prepare it to be as
round as possible. This will minimise vibration whilst turning. For further
instructions please see the section of this manual entitled Intended Use
of the Lathe and Basic Woodturning Instructions.
• Adjust the tool rest to the correct height and distance from the work
piece and check that all fixings are secure.
• Check that the size of the work piece is within the safe working capacities
of the lathe as detailed in the manual.
• Select the correct speed according to the size and type of work piece.
The slowest speed is the safest speed to start any new work piece.
• Always rotate the work piece by hand before starting the lathe to ensure
it does not come into contact with the tool rest. If the work piece strikes
the tool rest during operation, it could be split and thrown from
the lathe.
• When using a faceplate always ensure the work piece is well secured with
screws of a suitable diameter and length.
• Remove any loose knots and bark from the work piece before mounting it
to the lathe.
• If mounting a work piece between centres, always ensure that the tail-
stock is correctly adjusted and fully secure. Check that the locking handle
for the tailstock barrel is fully tightened.
3. Whilst using the lathe
• Do not allow the turning tool to dig in to the work piece, which could
result in the work piece splitting or being thrown from the lathe. Always
position the tool rest at the correct height. For further instructions please
see the section of this manual entitled Intended Use of the Lathe
and Basic Woodturning Instructions.
• Before starting to machine a work piece that is off centre or not perfectly
round, always set the machine to the slowest speed and gradually
increase speed as the work piece becomes more balanced as material is
removed. Running the lathe too fast could cause the work piece to be
thrown from the lathe or the turning tool to be snatched from
your hands.
• Always store turning tools in a safe place away from the work area of the
lathe. Never reach over the rotating work piece to reach for turning tools
or accessories.
• Never attempt to adjust the position of the tool rest whilst the machine is
running. Always switch the machine ‘OFF’ and wait until the work piece
has stopped rotating before attempting any adjustments.
• Do not mount a work piece that contains excessive splits or loose knots
or bark.
• Keep firm hold and control of the turning tool at all times. Use extreme
caution when knots and voids are exposed in the work piece.
• Finish all hand sanding before removing the work piece from the lathe.
Do not exceed the speed used for the last cutting operation. For further
instructions please see the section of this manual entitled Intended Use
of the Lathe and Basic Woodturning Instructions.
• Do not attempt to remount a work piece that has been turned on a
faceplate unless you are deliberately turning eccentric work. You cannot
remount faceplate turned work and expect it to run true, as the timber
will have expanded or contracted.
• Do not remount a work piece that has been turned between centres if the
original centres have been altered or removed, unless you are deliberately
turning eccentric work.
• If re-mounting any work piece, always set the machine to the slowest
speed and gradually increase the speed as the work piece becomes more
balanced as material is removed.
• Use extra caution when mounting a work piece that has been turned
between centres to a faceplate, or when mounting a faceplate turning
between centres, for subsequent machining operations. Always ensure
that the lathe is set to the slowest speed before switching ON.
• Do not attempt to perform any machining operations when holding the
work piece by hand.
• Do not mount a reamer, milling cutter, wire wheel, buffing wheel, drill bit
or any other tool to the headstock spindle.
• Always ensure that the turning tool is in contact with the tool rest and
fully supported before applying the tool to the work piece.
• When the tool rest holder unit is not in use (e.g. when sanding), it should
be moved away from the headstock, and the tool rest removed.
4. Maintenance
• Before attempting any maintenance and particularly when cleaning the
machine, always remove any accessories and tooling from the machine.
• Always ensure that any accessories used on the lathe are kept clean and
free from rust and deposits of resin.
• Keep all turning tools sharp and in good condition. Check that the han-
dles are secure and not split or damaged.
5. This machine falls under the scope of the ‘Health and Safety at Work etc.
Act 1974’, and the ‘Provision and Use of Work Equipment Regulations
1998’. In addition the elimination or control of risks from wood dust is in-
cluded in the above regulations and the ‘Control of Substances Hazardous
to Health (COSHH) Regulations 2002’. We recommend that you study and
follow these regulations.
Further guidance is available from The Health and Safety Executive and
their website www.hse.gov.uk and from the authorised distributor in your
country (details on back cover of the manual).

6
4. Record Power Guarantee
“Products” means the Products sold by Record Power subject to these
terms and conditions;
“Record Power” is Record Power Limited, whose company registration
number is 4804158 and registered office address is Centenary House, 11
Midland Way, Barlborough Links, Chesterfield, Derbyshire S43 4XA and sells
through a network of Authorised Dealers;
“Authorised Distributor” is the nominated importer for your region
who will generally sell through a network of Authorised Dealers. Details of
Authorised Distributors for specific countries can be found in the Product
manual or at www.recordpower.info;
“Authorised Dealer” is a retailer or business authorised to sell Record
Power Products to end users.
1 Guarantee
1.1 Record Power guarantees that for a period of 5 years from the date
of purchase the components of qualifying Products (see clauses 1.2.1
to 1.2.9) will be free from defects caused by faulty construction
or manufacture.
1.2 During this period Record Power, its Authorised Distributor or
Authorised Dealer will repair or replace free of charge any parts
which are proved to be faulty in accordance with paragraphs 1.1
above provided that:
1.2.1 you follow the claims procedure set out in clause 2 below;
1.2.2 Record Power, our Authorised Distributor or Authorised Dealer are
given a reasonable opportunity after receiving notice of the claim to
examine the Product;
1.2.3 if asked to do so by Record Power, its Authorised Distributor or
Authorised Dealer, you return the Product, at your own cost, to
Record Power’s premises or other approved premises such as those
of the Authorised Distributor or supplying Authorised Dealer, for the
examination to take place;
1.2.4 the fault in question is not caused by industrial use, accidental
damage, fair wear and tear, wilful damage, neglect, incorrect
electrical connection, abnormal working conditions, failure to follow
our instructions, misuse, or alteration or repair of the Product without
our approval;
1.2.5 the Product has been used in a domestic environment only;
1.2.6 the fault does not relate to consumable Products such as blades,
bearings, drive belts or other wearing parts which can reasonably
be expected to wear at different rates depending on usage (for full
details contact Record Power or your local Authorised Distributor);
1.2.7 the Product has not been used for hire purposes, by you or by a
previous owner;
1.2.8 the Product has been purchased by you as the guarantee is not
transferable from a private sale.
1.2.9 where the Product has been purchased from a retailer, the 5 year
guarantee is transferable and begins on the date of the first purchase
of the Product and in the event of a claim under this guarantee proof
of the original purchase date will be required to validate the
warranty period.
2 Claims Procedure
2.1 In the first instance please contact the Authorised Dealer who
supplied the Product to you. In our experience many initial problems
with machines that are thought to be due to faulty parts are actually
solved by correct setting up or adjustment of the machines. A good
Authorised Dealer should be able to resolve the majority of these
issues much more quickly than processing a claim under
the guarantee.
2.2 Any damage to the Product resulting in a potential claim under the
guarantee must be reported to the Authorised Dealer from which it
was purchased within 48 hours of receipt.
2.3 If the Authorised Dealer who supplied the Product to you has been
unable to satisfy your query, any claim made under this Guarantee
should be made directly to Record Power or its Authorised Distributor
(for details of the Authorised Distributor in your country please see
your Product manual or check www.recordpower.info for details). The
claim itself should be made in a letter setting out the date and place
of purchase, and giving a brief explanation of the problem which
has led to the claim. This letter should then be sent with proof of the
purchase date (preferably a receipt) to Record Power or its Authorised
Distributor. If you include a phone number or email address this will
help to speed up your claim.
2.4 Please note that it is essential that the letter of claim reaches Record
Power or its Authorised Distributor on the last day of this Guarantee
at the latest. Late claims will not be considered.
3 Limitation of Liability
3.1 We only supply Products for domestic and private use. You agree not
to use the Product for any commercial, business or re-sale purposes
and we have no liability to you for any loss of profit, loss of business,
business interruption or loss of business opportunity.
3.2 This Guarantee does not confer any rights other than those expressly
set out above and does not cover any claims for consequential loss or
damage. This Guarantee is offered as an extra benefit and does not
affect your statutory rights as a consumer.
4 Notice
This Guarantee applies to all Products purchased from an Authorised
Dealer of Record Power within the United Kingdom of Great Britain
and Northern Ireland. Terms of Guarantee may vary in other countries
– please check with the Authorised Distributor in your country
(details of the Authorised Distributor for your country can be found in
the manual or at www.recordpower.info).

7
Unpacking and Cleaning
1. Carefully lift the lathe from the carton and check that all of the components and contents have been
included. Place parts on a protected surface.
2. Clean all rust protected surfaces with white spirit. Do not use gasoline, paint thinner, mineral spirits,
etc. These may damage painted surfaces. Make sure the area is well ventilated and that there are no
naked flames or sources of ignition.
3. Set packing materials and shipping carton aside. Do not discard until the machine has been set up
and is running correctly.
5. Specifications
6. Contents of the Package
Voltage: 230 V
Frequency: 50 Hz
Motor input P1: 0.375 kW
Motor output P2: 0.25 kW
Motor speed: 1400 rpm
Full load current: 1.6 A
Max. bowl diameter: 254 mm (10”)
Max. between centres: 457 mm (18”)
Max. swing over bed: 254 mm (10”)
Spindle speeds: 450, 980, 1550, 1940 and 2640 rpm
Taper: 2 Morse Taper
Spindle travel: 44.5 mm
Size: L902 x D267 x H375 mm
Weight: 34 kg
Spindle Thread: M33 x 3.5
Sound Pressure Level: No load 59.3 dB(A)
Sound Power Level: No load 72.3 dB(A)
Measurement uncertainties: 3 dB(A). Tested according to EN 62841-1.
1 Lathe with faceplate, tool rest holder, tool rest and tailstock installed
2 38 mm spindle wrench
3 46 mm faceplate wrench
4 3 mm hex wrench
5 4 mm hex wrench
6 5 mm hex wrench
7 Revolving centre
8 4 prong drive centre
9 Knockout bar
10 Rubber feet x 4
11 Tailstock hand wheel handle
1
2
3
7
8
9
10 11
456

8 8
1 Motor
2 Motor securing lever
3 Motor positioning lever
4 Motor pulley access hatch
5 Headstock
6 Hand wheel
7 Spindle pulley access hatch
8 Spindle
9 Faceplate
10 4 prong drive centre
11 Tool rest
12 Tool rest holder
13 Tool rest holder locking lever
14 Tool rest locking lever
15 Revolving centre
16 Tailstock barrel
17 Tailstock
18 Tailstock barrel locking lever
19 Tailstock hand wheel
20 Tailstock locking lever
21 On / off switch
22 Lathe bed
7. Getting to Know Your Lathe
12
4
21
5
11 14
13 22
15 1716 18 19
20
8 9
76
123
10

9
8. Assembly
The machine must be unplugged and the power switch must be
in the OFF position until the machine is assembled.
The lathe must not be lifted by only one person due to its
weight. Always lift with care and hold the lathe by the bed.
Installing the Tailstock Hand Wheel Handle
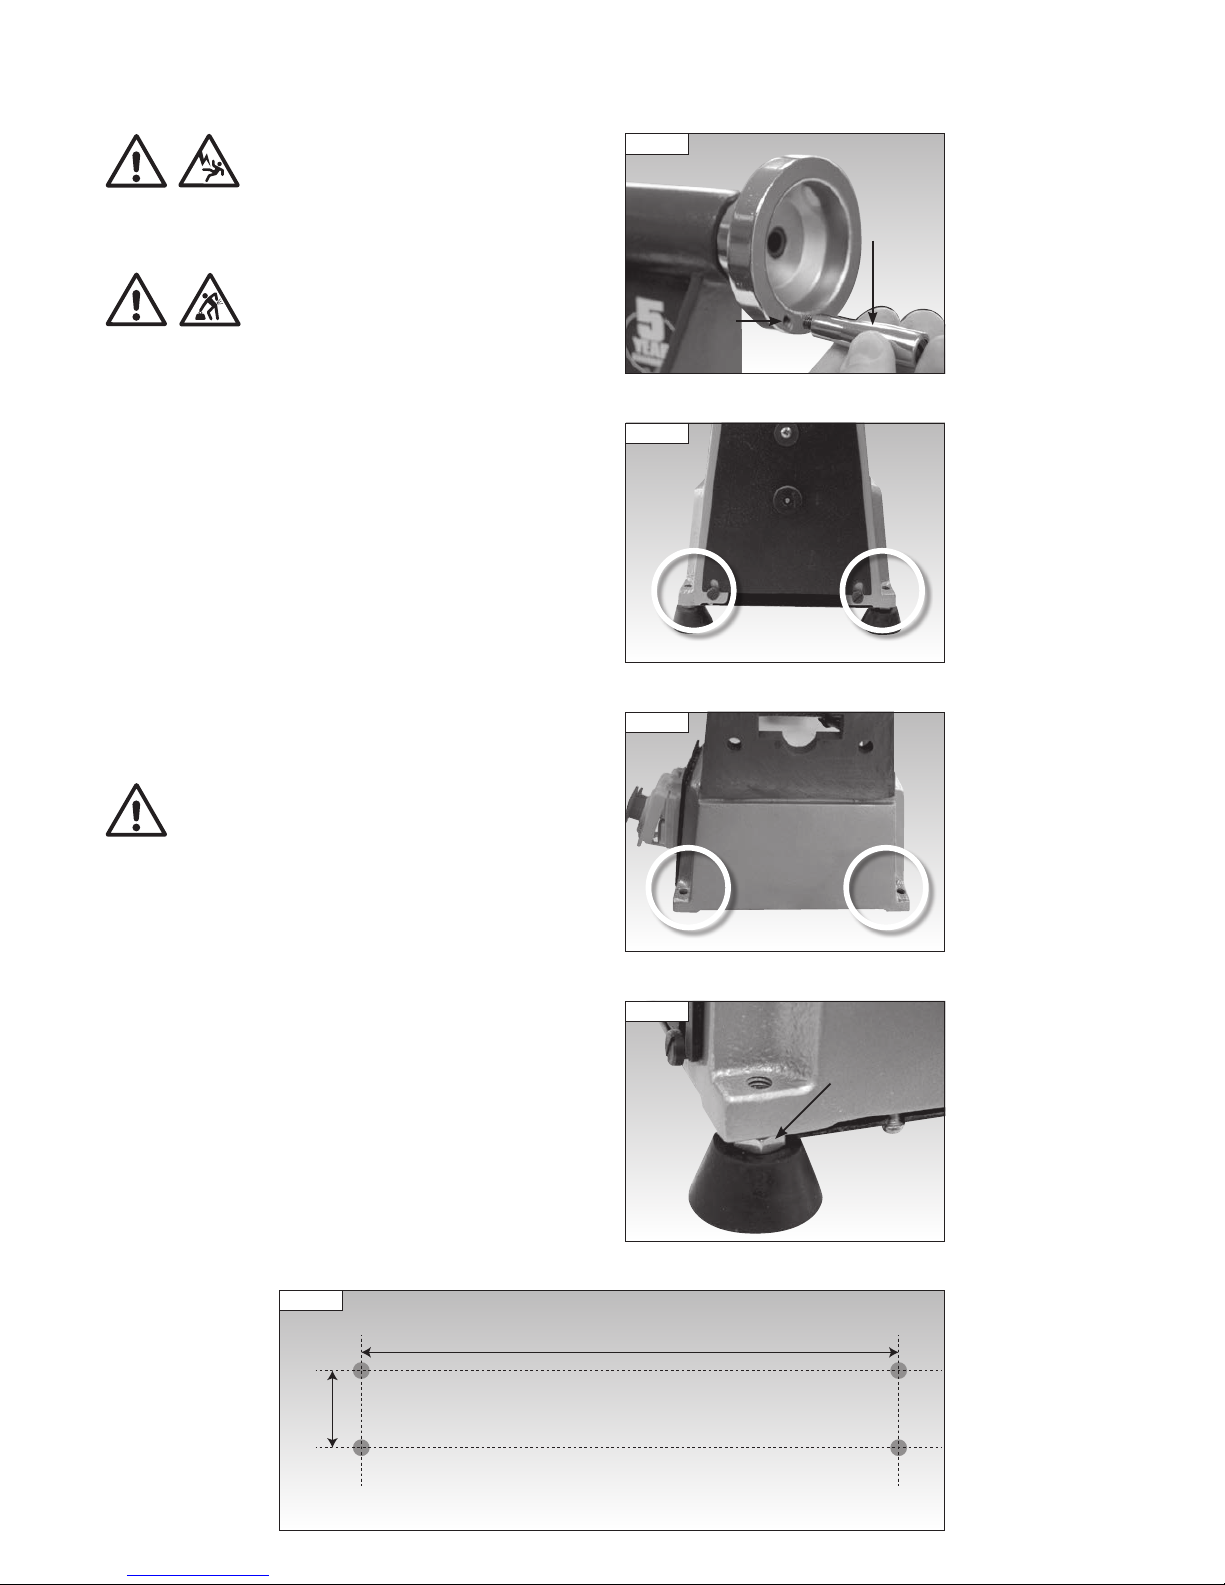
Screw the hand wheel handle into the threaded hole on the rear of the
tailstock hand wheel, Fig 8.1, using a flat blade screwdriver.
Installing the Rubber Feet
The lathe features 4 threaded holes in the base of the casting to hold the
rubber feet, 2 at the headstock end of the lathe, Fig 8.2, and 2 at the
tailstock end, Fig 8.3. Screw each rubber foot to each corner of the lathe
as shown in Fig 8.4. The rubber feet feature adjusting nuts to allow the
machine to be levelled on the surface it is to be used upon.
Securing the Lathe to a Solid Work Surface or Suitable Stand
The DML250 can be used freestanding on a bench. If required, the lathe
can be attached either to a solid work surface at least 25 mm thick, or a
suitable stand, using the 4 mounting holes located at the base of the lathe
as show in Figs 8.2 and 8.3. If mounting to a bench, drill holes in the work
surface using a 9 mm (5/16”) drill bit, following the measurements shown
in Fig 8.5.
The lathe must only be used when secured in a stable position.
Secure the lathe to the bench using M8 bolts, to match the thread size of
the mounting holes. Do not attempt to use bolts of a different size as this
may damage the thread of the mounting holes.
i
Kg
i
Kg
i
Kg
i
Kg
Fig 8.1
Fig 8.5
725 mm
167 mm
Fig 8.4
Fig 8.2
Hand
wheel
handle
Threaded
hole
Adjusting
nut
Fig 8.3
i
Kg

10
If the lathe is to be attached to a bench, spacers of at least 25
mm (1”) depth must be used at each end of the lathe to raise it
from the bench surface and allow for movement of the motor,
see Fig 8.6.
If the lathe is to be mounted to a stand, unless the mounting
plate of the stand allows movement of the motor, spacers must
also be used.
Please note: Use of the DML305/A Leg Stand is recommended.
When oriented correctly, the mounting plates of the
DML305/A allow for movement of the motor, eliminating the
need for spacers.
8. Assembly
Fig 8.6
Bench
Motor
Spacer Spacer
i
Kg
i
Kg
Tabla de contenidos
Otros manuales de Torno de Record Power

Record Power
Record Power MAXI-1 Guía del usuario

Record Power
Record Power DML320 Guía del usuario

Record Power
Record Power cl3b Manual de usuario

Record Power
Record Power DML305 Guía del usuario

Record Power
Record Power DML305-VS Manual de usuario

Record Power
Record Power DML36SH-CAM Guía del usuario

Record Power
Record Power Coronet Series Guía del usuario

Record Power
Record Power CL3-CAM Guía del usuario

Record Power
Record Power DML320-EP Guía del usuario

Record Power
Record Power DML24X-MK2 Manual de usuario


