RCTimer RS900 Manual de usuario

RS900
2014.12
V1.0
User Manual

2
Disclaimer
About
270mm
457mm
126mm
408mm
317mm
349mm
Thank you for purchasing the RS900.
In using this product, you hereby agree to this disclaimer and signify that you have understood all points
completely. When assembling this product, follow all instructions carefully.
The manufacturer and seller assume no liability for any damage or injury arising from the use of this product.
The RS900 is designed for professional aerial photography and cinematography. It is user friendly,
safe,stabilized and easy to fly while its integrated design makes assembly and configuration simple and
fast. Retractable landing gear, vibration dampers, slightly angled arms and a minimalized gimbal mount
allow for a clear 360 degree view from the camera. A patented power distribution board, built-in high-speed
ESCs and motors with high efficiency propellers ensure dynamic stability and maximized power efficiency.

3
Index
Disclaimer 2
About 2
Index 3
Cautions 4
Legend 4
In The Box 5
Load Mounting Gear 6
Mounting the Landing Gear 6
Mounting Frame Arms 7
Mounting Electronics and Wiring 11
Instructions 11
Connecting the flight controller to the center frame 14
Connecting the flight controller and landing gear 15
Installing Battery 16
Setting Up the Landing Gear 17
Mounting the Gimbal 18

4
Cautions
Cautions
Assembly Cautions
Flight Cautions
Others
Legend
Important Hints and Tips
When flying, the rotating propellers may cause serious damage and injury. Please fly safe at all times.
1. Use a bracket to mount the GPS module on the center frame to avoid interference with the power board.
2. Ensure the IMU is mounted with the arrow pointing toward the nose of the aircraft.
3. If using a receiver, attach it under the bottom board of the center frame with the end of the antenna facing
downwards and away from obstructions to avoid signal loss.
4. Ensure frame arms are mounted correctly.
a) Motor mounts with CCW marks should be mounted to the center frame positions with the following
marks: M1, M3 and M5.
b) Motor mounts with CW marks should be mounted to the center frame positions with the following marks:
M2, M4, and M6.
5. Do not remove any glued-in screws.
6. Screws that already have blue glue can be used once without thread locker. On other occasions, apply
appropriate thread locker first.
7. The RS900 should be lifted off the ground when testing landing gear or recalibrating servo travel.
If you have any problems you cannot resolve, contact our customer service.
1. ESCs are not water- proof, please do not fly in rain or snow.
2. Ensure all soft dampers and vibration absorbers are in good condition before every flight. If not, replace
immediately. Otherwise, the flight performance of your aircraft will be adversely affected.
3. Ensure all parts are in good condition before each flight. Do not fly with worn or broken parts.
4. Ensure propellers and motors are installed correctly and propelers are unfolded before flying.
5. Ensure ESC signal connectors and power cable connectors are tight before every flight.
6. When flying, maintain a safe distance away from people, buildings, high- voltage lines, tall trees, water and
other hazards.
7. Use only 6S LiPo batteries for the power supply.
8. Ensure all output signals from M1 to M6 are in proper working order when using the DJI A2 flight control
system to avoid damage or injury.
9. Do not overload the system.
10. Do not get close to or touch motors or propellers when they are spinning as this can cause serious injury.
11. Disconnect the battery and remove the camera during transportation to avoid damage or injury.

5
In The Box
Center Frame ×1 Frame Arms ×6
Landing Skid Tubes ×2
(with Silicone Rubber Dampers)
Landing Gear Legs ×2
GPS Collapsible Mount ×1
Screw x 1 Accessories Package ×1
M4 x 35 (Mounting frame arm)
M3 x 6 (Mounting landing gear)
CW propellers ×5
CCW propellers ×5
Magic tapes × 2
The red knobs ×6
Landing gear leg rings ×4
Tools Required
Tools Usage
2.0mm Hex Wrench, 2.5mm Hex Wrench Mounting screws.
Thread Locker Fastening screws.
Mounting receiver, controller and other modules. Binding devices and wires.
Foam Double Sided Adhesive Tape Mounting receiver, controller and other modules.
In The Box

6
Mounting the Landing Gear
Mounting the Landing Gear
Instructions
M3×8
(socket cap)
Load Mounting
1. Put one landing gear leg ring onto each landing gear leg.
2. Insert the landing gear leg into connection point on the center frame. Affix in place with M3×8 screws.
7
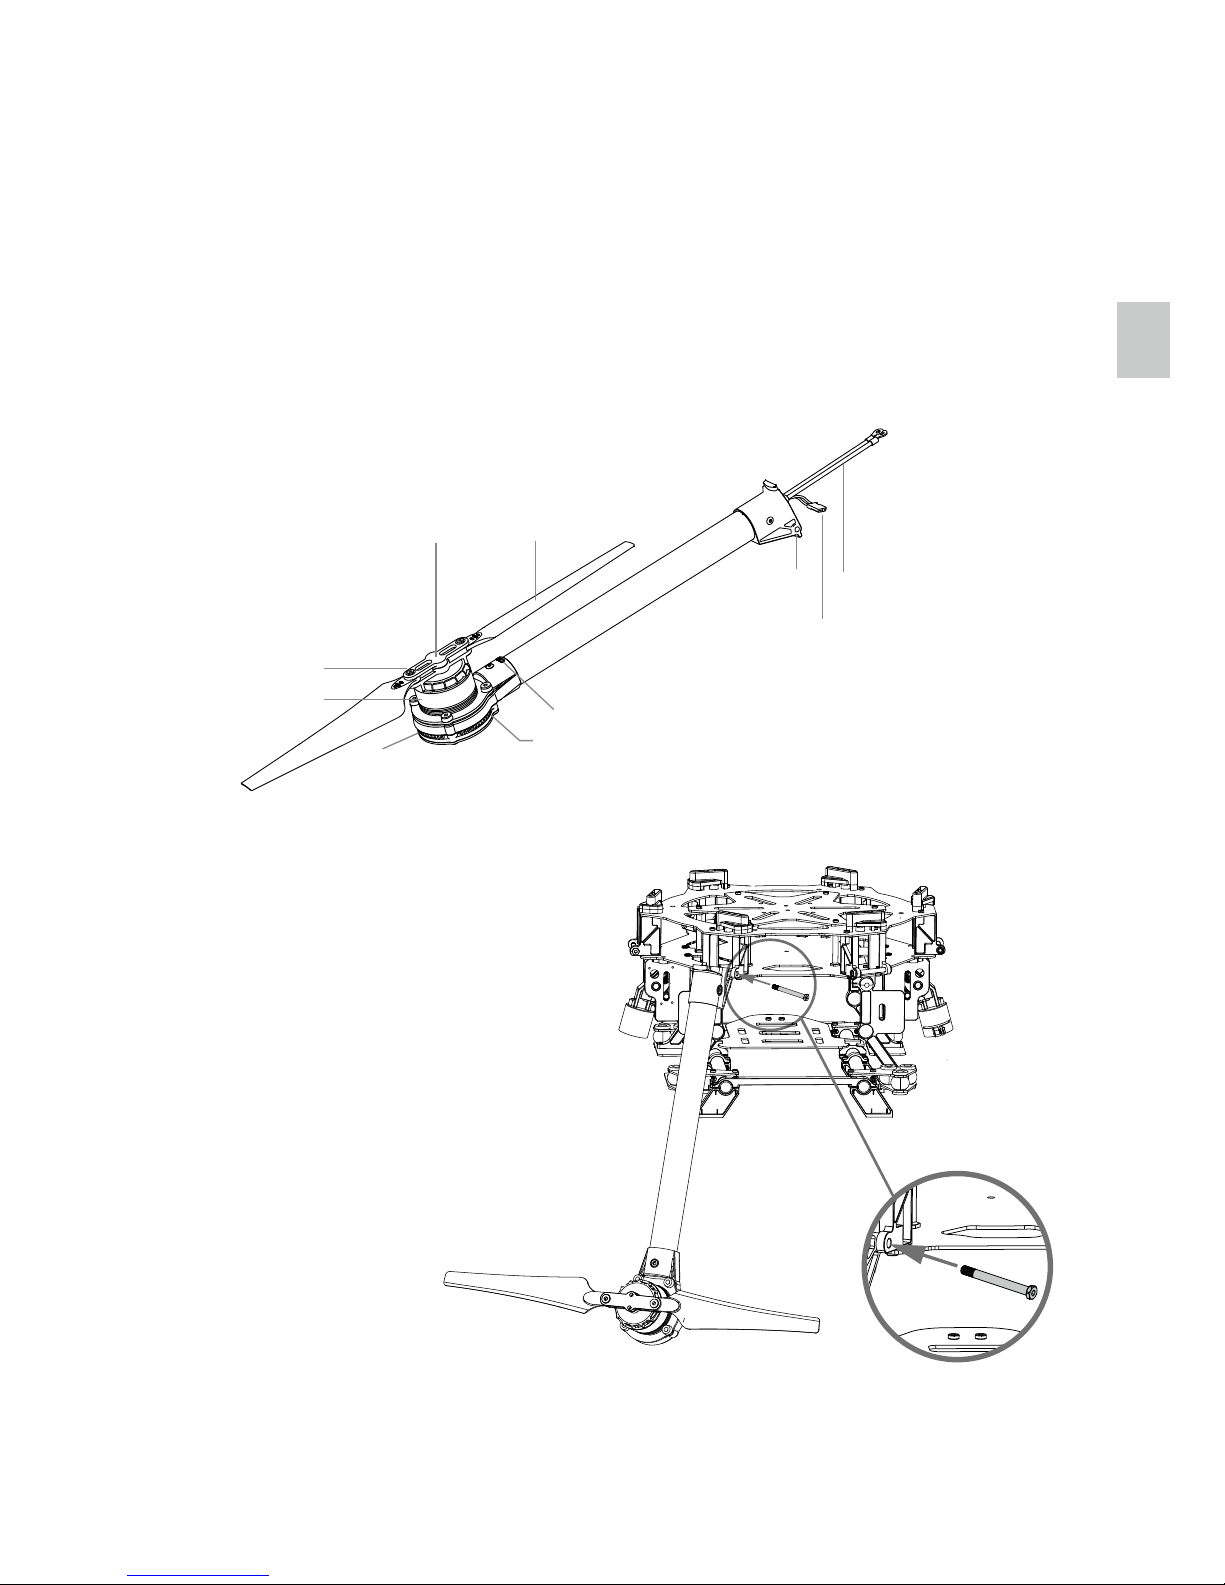
Mounting Frame Arms
Mounting Frame Arms
Instructions
Propeller
Cover
Screw
Motor
ESC
CW or CCW Mark
LED*
Screw Mount Power Cable
ESC Signal Cable
*LED is on after motor started.
1. Prepare the arms.
(1) Check all propellers for cracks, then install and screw each propeller cover on tightly.
(2) Ensure all motors are mounted firmly and rotate freely.
(3) Mount all arms with red propeller covers to M1 and M2 to indicate the nose of the RS900.
(4) Identify the CW and CCW marks on the arms. Mount the arms with the CCW mark to the M1, M3 and
M5 positions of the center frame. The arms with the CW mark should be mounted to the M2, M4 and
M6 positions of the center frame.
2. Insert each frame arm vertically into the mounting
area on the center frame.
3. Line up the screw holes of the frame arm and
center frame.
4. Insert the M4×38 screw from the right of the
frame arm (the thread is located on the left of the
screw mount). Tighten each screw correctly.
Over tightening may lead to connector abrasion.

8
User Manual
5. Gently lift the frame arm.
7. Now unscrew 6 screws (M2.5×8 cheese) on the upper plate of the center frame and remove the upper
plate. Then unscrew the 4 screws (M3×8 self-tapping, found under the center frame) of the round cover
and remove it to gain access to the ESC and power cable installation area.
8. Plug each ESC signal cable into the slot near each arm on the center frame.
6. Twist the red knob to lock each arm in place. Be sure there is an audible click, which indicates a proper
lock. Check the arm for movement. To store, untwist the knob and lower the frame arm.
Mounting Frame Arms

User Manual
9
9. Connect the power cables to the center frame. Each cable must be screwed into a positive (+) or negative (- )
gold bracket. Each bracket will have two cables of the same color screwed into it. Red cables are positive and
black cables are negative.
10. To ensure a reliable connection, rotate the screw until it is both tight and parallel to the connecting bracket.
11. Ensure all ESC cables, and power cables are correctly installed onto the center frame
ESC cables
power cables
Mountion Frame Arms

User Manual
10
12. Replace the round cover of the center plate, and re-tighten the 4 screws (M3×8 self-tapping). Then
replace the upper plate of the center frame, and re-tighten the 6 screws (M2.5×8 cheese).
13. Double check all frame arms. Arms M1 and M2 are the forward facing (nose), arms M4 and M5 are the
tail. Seen from the top, motors on arms M1, M3 and M5 rotate counter clockwise while those on arms M2,
M4 and M6 rotate clockwise.
Tabla de contenidos


