Rasonic RC-S70U Manual de usuario

IMPORTANT NOTE:
Thank you for purchasing our air conditioner. Please read this manual carefully
before operating your new air conditioning unit. Make sure to save this manual
for future reference.
R32 INVERTER COOLING
WINDOW-TYPE ROOM
Remote Controller
Operation Manual
Model:
RC-S70U
RC-S90U
RC-S120U
RC-S180U
RC-S240U

Table of Contents
Remote Controller Specifications
......................................................02
Handling the Remote Controller ....................................................03
Buttons and Functions ...................................................................04
Remote Screen Indicators ..............................................................06
How to Use Basic Functions ..........................................................07
How to Use Advanced Functions ..................................................10
01


TIPS FOR USING REMOTE CONTROL
CAUTIONS FOR USING REMOTE CONTROL
• The remote control must be used within 8
meters of the unit.
The unit will beep when remote signal is
received.
Curtains, other materials and direct sunlight
can interfere with the infrared signal receiver.
Remove batteries if the remote will not be
used more than 2 months.
•
•
•
Inserting and Replacing Batteries
Your air conditioning unit come with two batteries.
Put the batteries in the remote control before use.
1.
Slide the back cover from the remote control
downward, exposing the battery compartment.
Insert the batteries, paying attention to match
up the (+) and (-) ends of the batteries with
the symbols inside the battery compartment.
Slide the battery cover back into place.
2.
3.
BATTERY NOTES
For optimum product performance:
•
Do not mix old and new batteries, or
batteries of different types.
•
Do not leave batteries in the remote control
if you don’t plan on using the device for more
than 2 months.
BATTERY DISPOSAL
Do not dispose of batteries as unsorted
municipal waste. Refer to local laws for proper
disposal of batteries.
The device could comply with the local national
regulations.
These are designed to provide reasonable
protection against harmful interference in a
residential installation. This equipment generates,
uses and can radiate radio frequency energy and, if
not installed and used in accordance with the
instructions, may cause harmful interference to
radio communications. However, there is no
guarantee that interference will not occur in a
particular installation. If this equipment does cause
harmful interference to radio or television reception,
which can be determined by turning the equipment
off and on, the user is encouraged to try to correct
the interference by one or more of the following
measures:
Reorient or relocate the receiving antenna.
Increase the separation between the equipment
and receiver.
Connect the equipment into an outlet on a circuit
different from that to which the receiver is
connected.
Consult the dealer or an experienced radio/TV
technician for help.
Changes or modifications not expressly approved
by the party responsible for compliance could
void user’s authority to operate the equipment.
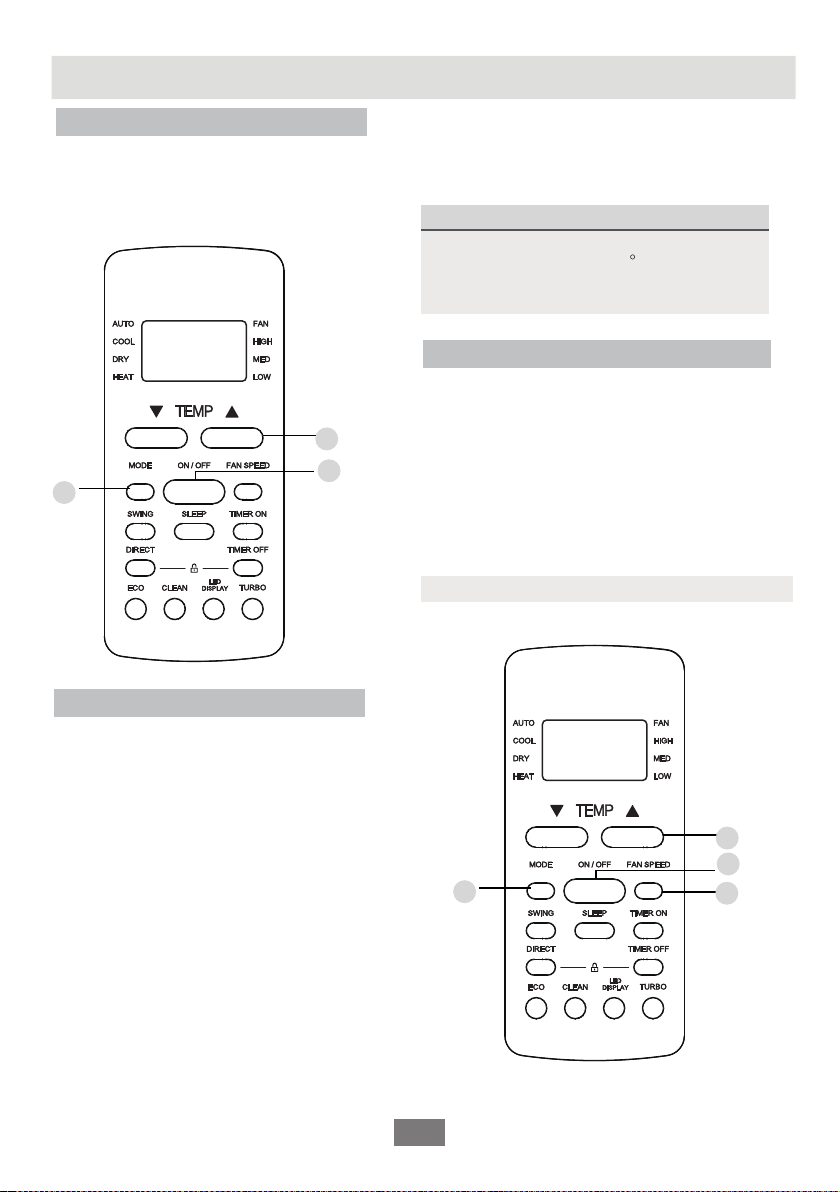
03
Handling the Remote Controller

Buttons and Functions
Before you begin using your new air conditioner, make sure to familiarize yourself with its remote
control. The following is a brief introduction to the remote control itself. For instructions on how to
operate your air conditioner, refer to the How to Use Basic Functions section of this manual.
ON/OFF
Turns the unit on or off.
MODE
SWING
Scrolls through operation
modes as follows:
AUTO COOL DRY
HEAT FAN
FAN SPEED
Selects fan speeds in the
following order:
AUTO LOW MED
HIGH
SLEEP
Saves energy during
sleeping hours .
TEMP
Increases temperature in
1°C (1°F) increments.
Max. temperature is
30°C (86°F).
TEMP
Decreases temperature in
1°C (1°F) increments.
Min. temperature is
17°C (62°F).
DIRECT
Use to set horizontal
airflow direction.
ECO
Use to enter the energy
efficient mode.
CLEAN
04
Model:
RC-S70U, RC-S90U, RC-S120U
Used to start/stop the Self Clean
or Active Clean function.
Starts and stops the
horizontal louver
movement.
TIMER ON
Sets timer to turn unit
on (see How to Use
Basic Functions for
instructions).
TIMER OFF
Sets timer to turn unit
off (see How to Use
Basic Functions for
instructions).
TURBO
Enables unit to reach
preset temperature in
shortest possible time.
LED DISPLAY
Turns indoor unit’s LED display
and air conditioner buzzer on
and off, which create a
comfortable and quiet
environment.
LOCK
Press together DIRECT &
TIMER OFF buttons
simultaneously for 5 seconds
to lock the keyboard. Press
together the two buttons for 2
seconds to unlock the keyboard.
NOTE: Please do not select
HEAT mode if the machine
you purchased is cooling
only type. Heat mode is not
supported by the cooling
only appliance.

Sets and activates your
favorite pre-settings
ON/OFF
Turns the unit on or off.
MODE
SWING
Scrolls through operation
modes as follows:
AUTO COOL DRY
HEAT FAN
FAN SPEED
Selects fan speeds in the
following order:
AUTO LOW MED
HIGH
SLEEP
Saves energy during
sleeping hours .
TEMP
Increases temperature in
1°C (1°F) increments.
Max. temperature is
30°C (86°F).
TEMP
Decreases temperature in
1°C (1°F) increments.
Min. temperature is
17°C (62°F).
DIRECT
Use to set horizontal
airflow direction.
SHORT CUT
05
Model:
RC-S180U, RC-S240U
NOTE: Please do not select
HEAT mode if the machine
you purchased is cooling
only type. Heat mode is not
supported by the cooling
only appliance.
Starts and stops the
horizontal louver
movement.
TIMER ON
Sets timer to turn unit
on (see How to Use
Basic Functions for
instructions).
TIMER OFF
Sets timer to turn unit
off (see How to Use
Basic Functions for
instructions).
TURBO
Enables unit to reach
preset temperature in
shortest possible time.
LED DISPLAY
Turns indoor unit’s LED
display and air conditioner
buzzer on and off, which
create a comfortable and
quiet environment.
LOCK
Press together DIRECT &
TIMER OFF buttons
simultaneously for 5
seconds to lock the
keyboard. Press together
the two buttons for 2
seconds to unlock the
keyboard.
CLEAN
Used to start/stop the Self Clean or
Active Clean function.(not applicable).

Information are displayed when the remote controller is power up.
Note:
All indicators shown in the figure are for the
purpose of clear presentation. But during the
actual operation, only the relative function signs
are shown on the display window.
06
Remote Screen Indicators
Displayed when data transmitted.
Displayed when remote controller is ON.
Low speed
NO display
Medium speed
High speed
Auto fan speed
HIGH
MED
LOW
AUTO
COOL
DRY
HEAT
AUTO
HEAT
COOL
FAN
DRY
Mode display
Fan speed indication
FAN
HIGH
MED
LOW
Displayed when TIMER ON time is set
Displayed when TIMER OFF time is set
Shows set temperature or room
temperature, or time under TIMER setting
Displayed when ECO feature is activated
Indicated all the current settings are locked
Displayed when Follow Me feature is
activated(not applicable)
Displayed when SLEEP feature is activated
Auto mode
Cool mode
Dry mode
Heat mode(not applicable)
Fan mode
07
How to Use Basic Functions
ATTENTION! Before operation, please
ensure the unit is plugged in and power
is available.
1
3
2
13
2
AUTO Mode
In AUTO mode, the unit will automatically
select the COOL, FAN, or HEAT(not applicable
for cooling only model) operation based on the
set temperature.
1. Press the MODE button to select AUTO.
2. Set your desired temperature using the TEMP
or TEMP button.
Set your desired temperature using the
TEMP or TEMP button.
3. Press the ON/OFF button to start the unit.
Press the ON/OFF button to start the unit.
NOTE: FAN SPEED can’t be set in AUTO mode.
COOL Mode
Basic operation
1. Press the MODE button to select COOL
mode.
2.
3. Press FAN button to select the fan speed:
AUTO, LOW, MED or HIGH.
4. 4
SETTING TEMPERATURE
The operating temperature range for units
is 17-30°C (62-86°F)/20-28 C.
You can increase or decrease the set
temperature in 1°C (1°F) increments.

08
1
3
2
1
3
2
Press the MODE button to select FAN mode.
Press the ON/OFF button to start the unit.
Press FAN button to select the fan speed:
AUTO, LOW, MED or HIGH.
DRY Mode
1. Press the MODE button to select DRY.
2. Press the ON/OFF button to start the unit.
NOTE: FAN SPEED cannot be changed in DRY
mode.
FAN Mode
1.
2.
3.
NOTE: You can’t set temperature in FAN mode.
As a result, your remote control’s LCD screen
will not display temperature.

Otros manuales para RC-S70U
1
Este manual sirve para los siguientes modelos
4
Tabla de contenidos


