Range Master RDW459FI/SF Manual de usuario

RDW459FI/SF
Dishwasher
User Guide
&
Installation & Service Instructions
U110143 - 01

Due to our policy of continual improvement, we reserve the right to change specications without prior notice.
Contents
1. Before You Start 1
At Time of Delivery 1
During Installation 1
During Normal Use 1
If a Fault Occurs 1
Caring for the Environment 1
2. Overview and Operation 2
Getting to Know Your Dishwasher 2
Salt 3
Rinse Aid 4
Detergent 4
What you should not put into the
dishwasher 5
Damage to glassware and other dishes 5
Arranging Crockery, Glasses, etc. in the
Dishwasher 6
Washing Dishes 7
Programme Overview 8
Using 3-in 1 Detergent Tablets 9
3. Looking after your Dishwasher 12
Care 12
Overall Condition of the Appliance 12
Solvents or Abrasive Cleaning Products 13
Moving the Appliance 13
Seals 13
When You Go on Holiday 13
4. Troubleshooting 14
Resolving minor problems yourself 14
Problems when the unit is switched on 14
Problems with the appliance 14
Problems during washing 15
Problems with the dishes, cutlery, etc. 15
5. Installation 16
Positioning the Dishwasher 16
Cold Water Connection 16
Drain Hose Connection 16
Electrical Connection 17
Levelling the Dishwasher 17
Fitting the Decor Door 18
Securing the Dishwasher 19
Adjusting the Door Springs 19
Fitting the Plinth 19
6. General Information 20
7. Circuit Diagram 21
8. Technical Data 22

1
1. Before You Start
At Time of Delivery
Check packaging and dishwasher immediately for signs of
transport damage. If the appliance is damaged DO NOT USE.
Contact your supplier or customer services.
Please dispose of packaging materials properly.
During Installation
• Site the dishwasher and connect in accordance with the
installation instructions.
• DO NOT connect the dishwasher to the electricity
supply while carrying out the installation.
• Make sure that the wiring is properly earthed.
• The mains electricity supply must conform to the details
shown on the dishwasher nameplate.
• DO NOT connect the dishwasher to the electricity
supply with an extension cable.
• Built-under and built-in appliances should always be
installed under a continuous work surface attached
to adjacent cupboards. This will make sure that the
appliance is stable.
• After the appliance has been installed, the mains plug
should be easily accessible.
• DO NOT excessively bend or flatten the power supply
cord during installation.
During Normal Use
• The dishwasher MUST only be used for washing
household dishes and cooking utensils.
• This appliance cannot be installed outdoors.
• DO NOT place any heavy objects or stand on the door
when it is open. The appliance may tip forward.
• The water inside the dishwasher is NOT suitable for
drinking.
• DO NOT use solvents of any kind inside your
dishwasher. They could cause an explosion.
• Open the door very carefully if the dishwasher is
operating.
• NEVER touch the dishwasher with wet hands.
• If the appliance is not operating properly or
maintenance is required, disconnect from the power
supply.
• Children should be supervised.
• Keep detergents out of reach of children.
If a Fault Occurs
If the appliance malfunctions, turn o the water supply and
disconnect the plug from the wall socket. If you cannot solve
the problem, contact your service centre.
Only authorized persons should make repairs.
If the supply cord is damaged it must be replaced by the
manufacturer, service agents or authorized persons.
To maintain the eciency and safety of this appliance we
recommend:
• Call only Service Centres authorized by the
manufacturer.
• Always use original spare parts.
Caring for the Environment
Disposing of your packaging
Your new dishwasher was protected by suitable packaging
while on its way to you. All of the materials used are
environmentally friendly for disposal and can be recycled.
Please make a contribution to protecting the environment by
disposing of the packaging appropriately.
Disposing of your old dishwasher
Old appliances still have some residual value. An
environmentally friendly method of disposal will make sure
that valuable raw materials can be recovered and used again.
When an appliance has reached the end of its working life
unplug it from the mains. Cut o the mains cable and dispose
of it together with the plug.
Destroy the door locking mechanism so that children cannot
accidentally lock themselves in.
This symbol on the product or its packaging
indicates that the product may not be treated as
household waste. Instead it should be handed
over your local community waste collection/
recycling centre.
By disposing of this product correctly, you will help prevent
potential negative consequences for the environment and
human health, which could otherwise be caused.
For more detailed information about recycling of this
product, please contact your local council, your household
waste disposal service or the shop where you purchased the
product.
ArtNo.000-0019
Do not bin logo
DocNo.800-0101 - Introduction

2
Getting to Know Your Dishwasher
Dishwasher Interior (Fig.2-1)
Control Panel (Fig.2-2)
2. Overview and Operation
AUpper rack
BUpper spray arm
CCutlery basket
DLower rack
EControl panel
FLower spray arm
GSalt container cap
HWashing lter
IDetergent and rinse aid
dispenser
JWater inlet hose
KDrain hose
LPower supply cord
B
J
A
E
I
C
H
L
D
G
K
F
Fig.2-1
AB F
CD HI JEG KL
Fig.2-2
AON-OFF button
BON-OFF indicator
CDelay start button
DAdditional options button
ETime remaining indicator
FProgramme symbols
GAdditional options symbols
HInlet fault indicator
I Low rinse aid indicator
JLow salt indicator
KProgramme button
LStart/reset button
DocNo.800-0203 - Overview - RDW459 diswasher

3
Salt
The hardness of water varies from place to place. If hard water
is used in the dishwasher, deposits will form on the dishes
and utensils.
The appliance is equipped with a special softener that uses a
salt specically designed to eliminate lime and minerals from
the water.
Loading the salt into the container
Always use salt intended for use with dishwashers.
The salt container is located beneath the lower rack and
should be lled as follows:
1. When the low salt indicator (Fig.2-3) lights, you must ll
the salt. Remove the lower rack and then unscrew and
remove the cap from the salt container.
Note: If you are lling the container for the rst time, ll
it with water.
2. Place the end of the funnel (supplied) into the hole
and introduce about 2 kg of salt. It is normal for a small
amount of water to come out of the salt container.
3. Carefully screw the cap back on.
IMPORTANT: To prevent the formation of rust, load the salt
just before beginning a wash cycle.
Adjusting salt consumption
The dishwasher is designed to allow for adjusting the amount
of salt consumed based on the hardness of the water used.
This is intended to optimize and customize the level of salt
consumption so that it remains at a minimum.
To adjust salt consumption:
1. Unscrew the cap from the salt container.
2. There is a ring on the container with an arrow on it
(Fig.2-4).
3. If necessary, rotate the ring in a counter-clockwise
direction from the ‘–‘ setting towards the ‘+’ sign, based
on the hardness of the water being used.
We recommend that you adjust the salt consumption in
accordance with Table 2-1.
The default setting of the water softening system is:
• If using multi-functional tablets fill the salt dispenser
and set the adjuster to ‘–’;
• If the hardness of the water is greater than 60°fH, set it
to ‘+’.
Low salt indicator
ArtNo.800-0204 -
Adjusting the salt
Table 2-1
Fig.2-3
Fig.2-4
Water Hardness
Level Clarke
degrees °dH mmol/l Selector
position
Salt
consumption
cycle
Autonomy
(cycles/2kg)
10-10 0-17 0-1.7 0
210-25 18-44 1.8-4.4 – 20 60
325-50 45-89 4.5-8.9 MED 40 40
4>50 >89 >8.9 + 60 25

4
ArtNo.800-207 - Dispenser - Removing the rinse aid cap
Low rinse aid indicator
Rinse Aid
This product makes dishes sparkle and helps them to dry
without spotting. The dispenser is located on the inside panel
of the door.
When the low rinse aid indicator on the control panel
(Fig.2-5) and the indicator on the dispenser (Fig.2-6) lights
you must add rinse aid.
Note: When 3-in-1 or similar combination detergent tablets,
the rinse-aid is no longer useful.
Loading the rinse aid
To load the rinse aid:
1. To open the dispenser, turn the cap in a counter-
clockwise direction and remove (Fig.2-7).
2. Pour in the rinse aid, making sure not to overll.
Regulate the amount of rinse aid used for each cycle by
turning the dose adjuster (Fig.2-8), located beneath the cap,
with a screwdriver.
There are 6 dierent settings; the normal dosage setting is 3.
IMPORTANT: Proper dosage of rinse aid improves drying.
If drops of water remain on the dishes or spotting occurs,
the dosage adjuster should be turned to a higher setting. If
the dishes have white streaks, turn the adjuster to a lower
setting.
Detergent
Detergent specically intended for use with dishwashers
must be used. The dispenser must be relled before the start
of each wash cycle following the instructions provided in the
‘Programme overview’. The detergent dispenser is located on
the inside panel of the door.
Loading the detergent
To load the detergent:
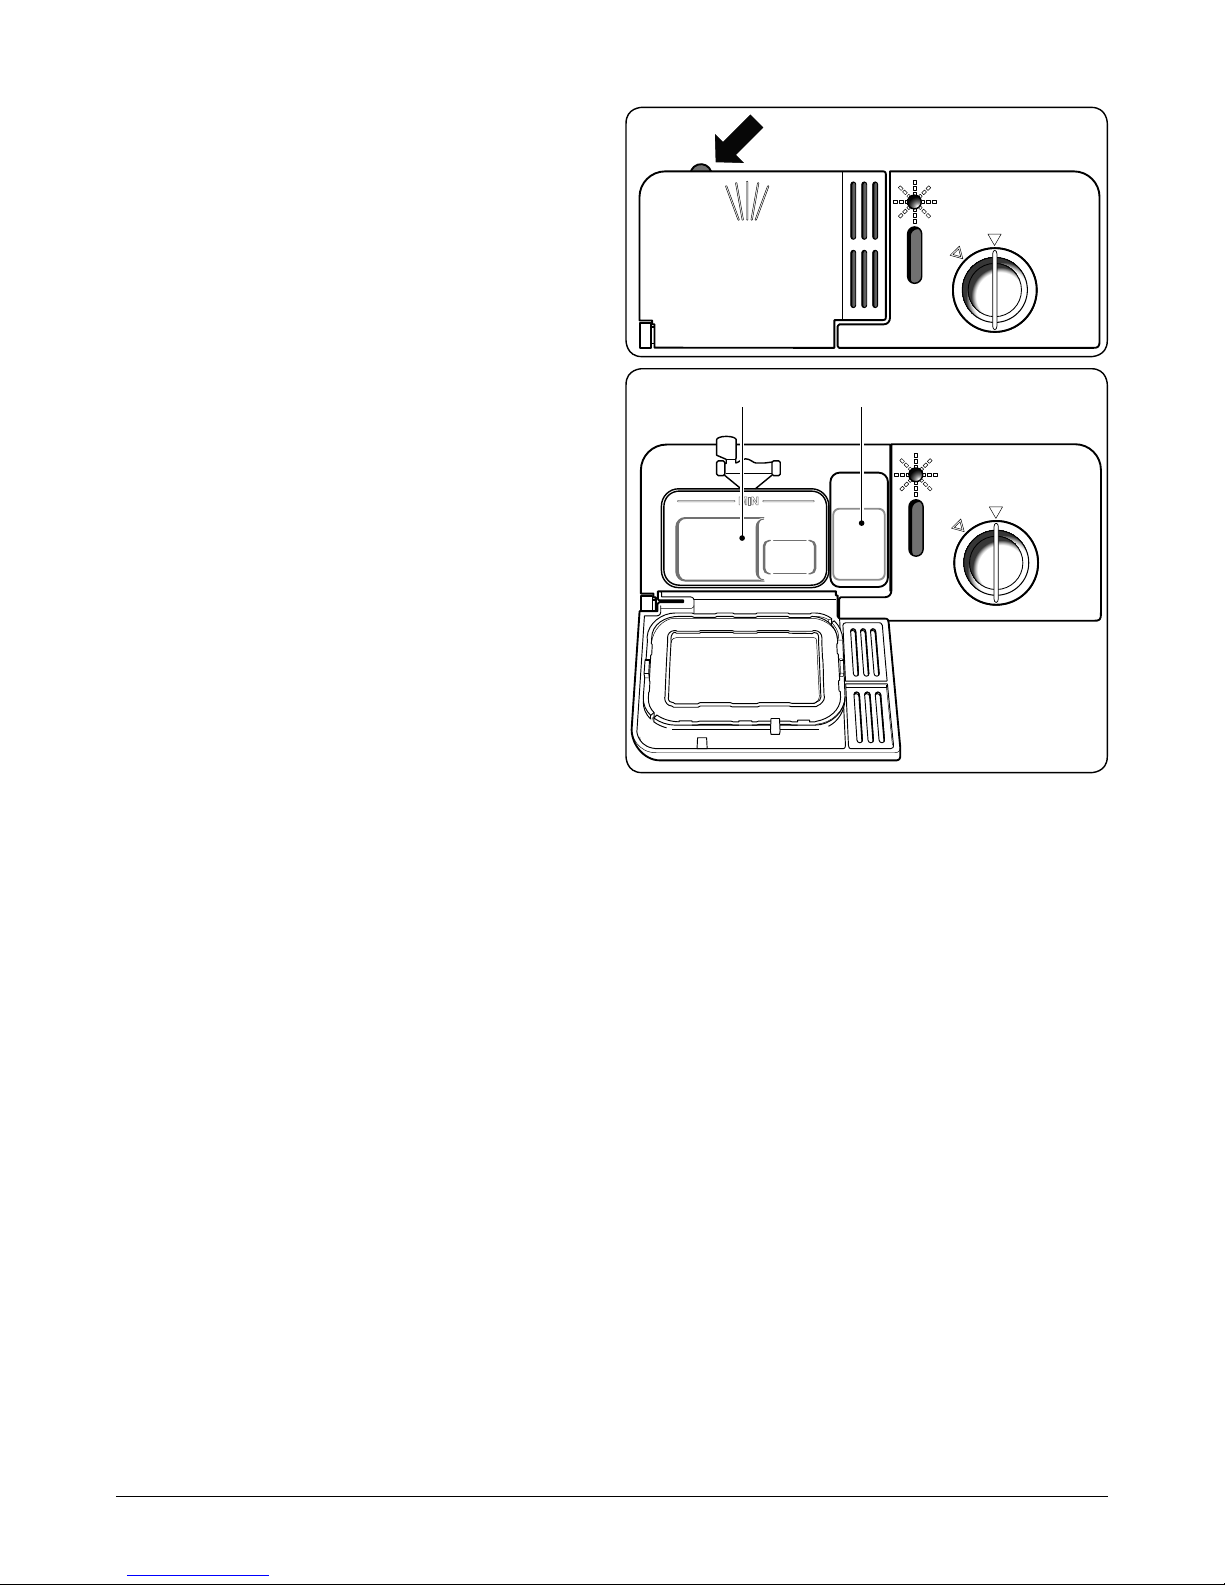
1. Open the cover on the dispenser by pressing the button
(Fig.2-9).
2. Pour the detergent for the wash cycle into compartment
‘A’ (Fig.2-10).
3. Pour the detergent for the prewash cycle into
compartment ‘B’ (Fig.2-10).
4. After the detergent has been placed in the dispenser,
close the cover and press down until it clicks in place.
Note: To allow the cover to close properly, remove any excess
detergent from the edges of the dispenser.
If you are using 3-in-1 or similar tablets, make
sure you select the combination detergent tablet
function.
Fig.2-5
Fig.2-6
Fig.2-7
Fig.2-8

5
What you should not put into the
dishwasher
Cutlery and tableware manufactured in whole or part from
wood. They become faded and unsightly in appearance.
Furthermore the adhesives that are used are not suitable for
the temperature that occurs inside the dishwasher.
Delicate decorative glassware and vases, special antiques or
irreplaceable china. The decorative patterns on such items
will not be dishwasher-proof.
Plastic objects that are not resistant to hot water, copper and
pewter utensils are also not suitable. Decorative patterns
printed or painted onto the surface of crockery, glasses, etc.,
aluminium and silver items tend to become discoloured or
faded if washed in the dishwasher.
Some types of glass can become opaque in appearance after
they have been washed many times in a dishwasher. Highly
absorbent materials, such as sponges and towels should
never be placed in the dishwasher.
IMPORTANT: Dishes or cutlery that have been soiled by
tobacco ash, wax, grease or paint, should not be put in the
dishwasher.
Damage to glassware and other dishes
Possible causes
• Type of glass or manufacturing process.
• Chemical composition of detergent.
• Water temperature and duration of dishwasher
programme.
Suggested remedy
• Use glassware or porcelain dishes that have been
marked ‘dishwasher-proof’ by the manufacturer.
• Use a mild detergent that is described as ‘kind to dishes’.
If necessary, seek further information from detergent
manufacturers.
• Select a programme with a low temperature and a short
duration.
• To prevent damage, take glass and cutlery out of the
dishwasher as soon as possible after the programme
has ended.
A B
Fig.2-9
Fig.2-10

6
ArtNo.800-0308 - Adjusting the upper rack
A
B
C
D
ArtNo.800-0305 - Knife rack
Arranging Crockery, Glasses, etc. in the
Dishwasher
Before placing the dishes in the dishwasher, remove larger
food particles to prevent the lter from becoming clogged,
resulting in reduced performance.
If the pots and pans have baked-on food that is extremely
hard to remove, we recommend that they are soaked before
washed. This will eliminate the need for extra wash cycles.
Pull out the rack to load the dishwasher.
Using the lower rack
The lower rack has adjustable supports that fold down to
allow larger items to be placed. We recommend that you
place the most dicult to clean items on the lower rack: pots,
pans, lids, serving dishes and bowls (Fig.2-11).
It is preferable to place serving dishes and lids on the sides of
the racks to avoid blocking the rotation of the top spray arm.
Pots, serving bowls, etc. must always be placed face down.
Deep pots should be slanted to allow the water to ow out.
WARNING!
Knives and other utensils with sharp points must
be loaded in the basket with their points down or
placed in a horizontal position.
Using the upper rack
The upper rack (Fig.2-12) is designed to hold more delicate
and lighter dishware, such as glasses, cups and saucers,
plates, small bowls and shallow pans (as long as they are not
too dirty).
Position the dishes and cookware so that the spray of water
does not move them.
The upper rack can be adjusted for height (Fig.2-13). Undo
the retaining clips on the telescopic runners (A). Slide the rack
out (B), ret on the lower wheels and push back along the
runners (C). Close the retaining clips (D).
Adjust the upper basket to the higher level and you have
more space to accommodate taller pans and trays in the
bottom basket.
Shelf
Lean tall glasses and those with long stems against the shelf.
DO NOT lean them against other items to be washed.
Place glasses, cups and small bowls on the additional cup
rack. The additional cup rack can be swivelled in or out as
required (Fig.2-14).
Knife rack
The knife rack clips onto the side of the top basket, giving you
the freedom to wash your large sharp knives separately and
out of harm’s way (Fig.2-15).
ArtNo.800-0319 - RDW459 - Lower rack
ArtNo.800-0304 - Using the cup rack
Fig.2-11
Fig.2-12
Fig.2-15Fig.2-14
ArtNo.800-0320 - RDW459 - Upper rack
Fig.2-13

7
On/O button
On-O indicator
Programme indicator Programme button
Start/reset button
Washing Dishes
Programme overview
Time delay
Press for additional options (scroll through):
Upper rack wash function
Lower rack wash function
Combi detergent tablets function
Program select
Start/reset button
Programme selection
The most appropriate programme can be identied by
comparing the type of crockery, cutlery, etc., as well as the
amount and condition of food remains, with the details
contained in Table 2-2, the wash cycle table.
The corresponding programme sequence, duration and
consumption details are shown in the right half of the table.
Example: Use the normal programme for dishes and utensils
that are heavily soiled.
Programme data
The stated programme data are based on standard operating
conditions. The values can vary considerably according to:
• Different amounts of dishes
• Temperature of mains water supply
• Pressure of mains water supply
• Ambient temperature
• Fluctuations in mains voltage
• Machine-related factors (e.g. temperature, water
volume)
Switching the dishwasher ON
1. Turn on the tap.
2. Open the door.
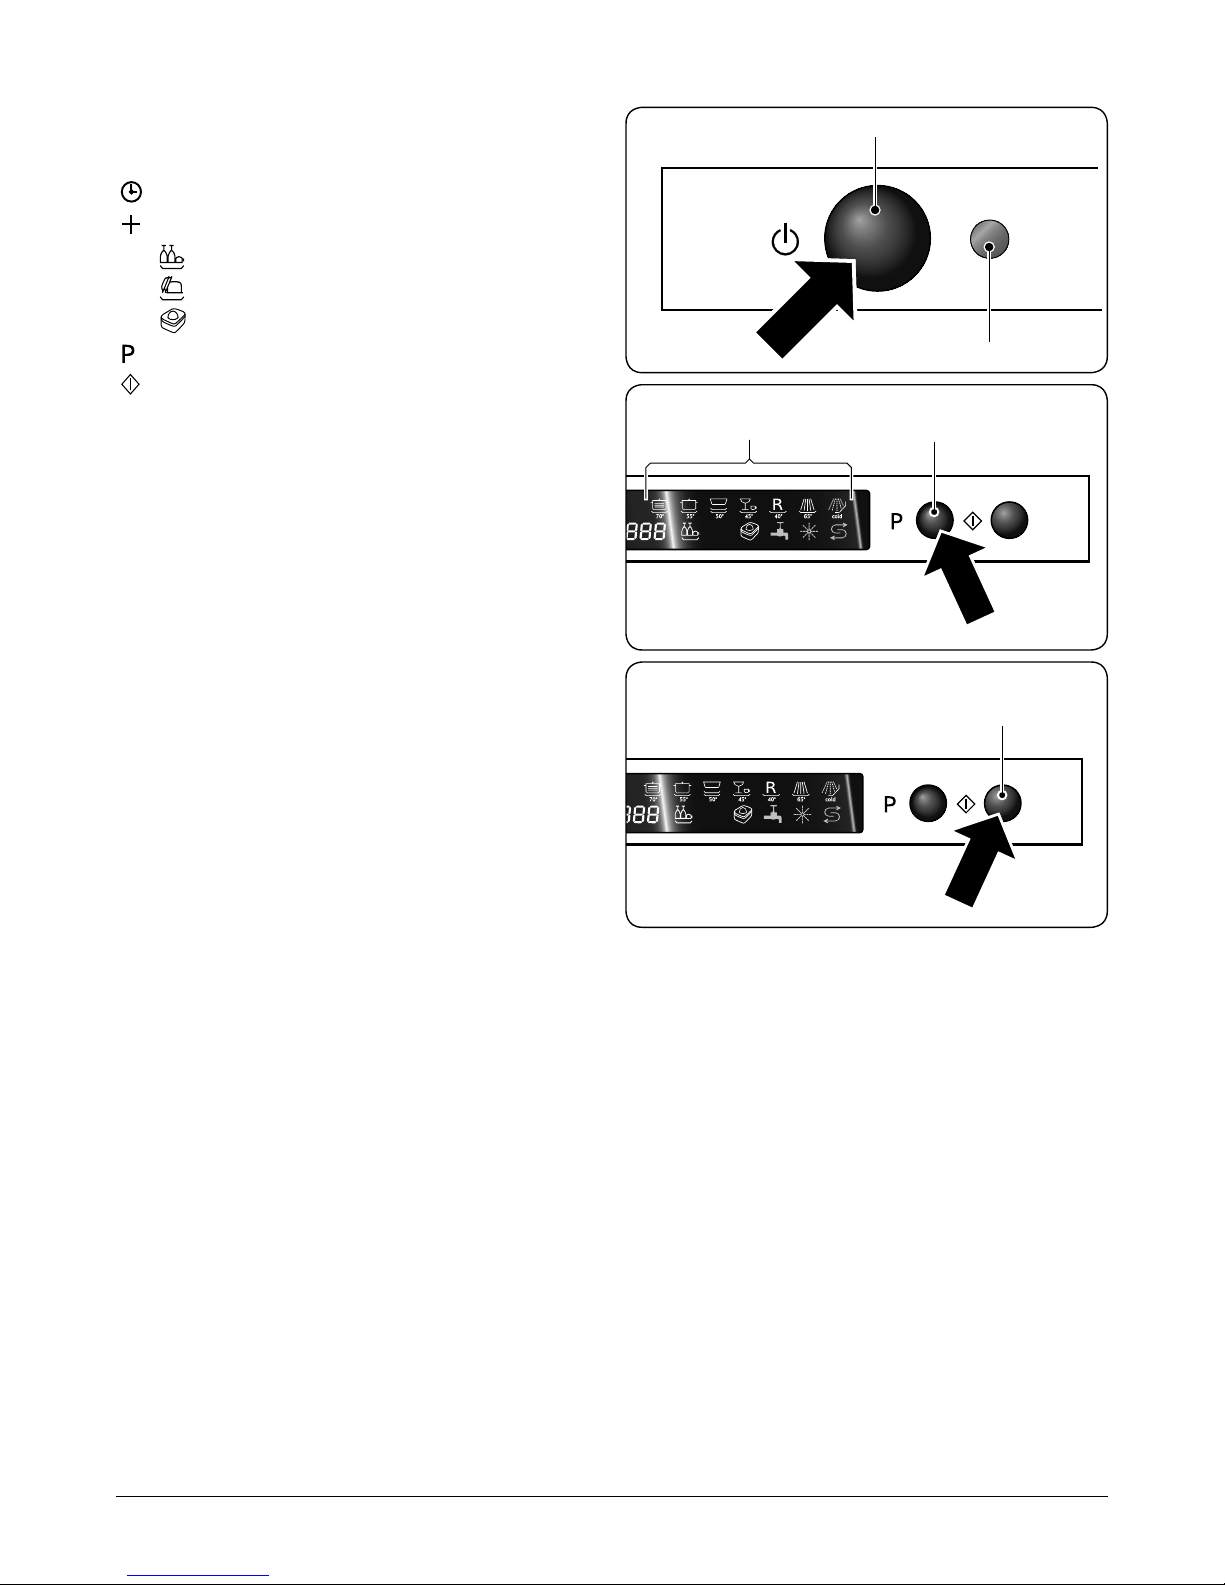
3. Set ON-OFF button to ON (Fig.2-16); the ON-OFF
indicator will light and then all of the programme
indicators will light.
4. Press the programme button ‘P’; the programme
indicator will light (Fig.2-17).
5. Press the Start/Reset button (Fig.2-18); the
corresponding programme indicator will blink.
6. Close the door and the dishwasher will start
automatically.
End of programme
Six beeps will indicate that the wash cycle has nished and all
the programme indicators light.
Fig.2-16
Fig.2-17
Fig.2-18

8
Table 2-2
Programme Overview
Wash
programme
Types of crockery e.g.
china, pots & pans,
cutlery, glassses, etc.
Type of food
remaining
Amount
of food
remaining
Condition
of food
remaining
Description of cycle
Additional options Detergent
Rinse aid Duration
(mins)
Tabs Delayed
start
Upper
wash Prewash Extended
wash
ArtNo.030-0026 - Dishwasher - symbols
70 °C
Intensive wash
Non-delicate
Soups, casseroles,
sauces, potatoes,
pasta, rice, eggs, roast
or fried food.
A lot. Stuck on
hard
Prewash with warm water.
Extended wash at 70°C.
Rinse with cold water.
Rinse with hot water.
Drying.
uu
– 5g 22g u112
u5g 22g u94
ArtNo.030-0026 - Dishwasher - symbols
55 °C
Normal wash
Prewash with cold water.
Extended wash at 55°C.
Rinse with cold water.
Rinse with hot water.
Drying.
uu
– 5g 22g u102
u5g 22g u90
ArtNo.030-0026 - Dishwasher - symbols
50 °C
Light wash
Mixed
Soups, potatoes,
pasta, rice, eggs, roast
or fried food.
A little. Loosely
attached
Prewash with cold water.
Extended wash at 50°C.
Rinse with cold water.
Rinse with hot water.
Drying.
uu
– 5g 22g u162
u5g 22g u140
45 °C
Glassware Coee, cakes, milk,
sausage, cold drinks,
salads.
Very little. Loosely
attached
Wash at 45°C.
Rinse with warm water.
Rinse with hot water.
Drying.
uu
– 5g 22g u92
u5g 22g u82
ArtNo.030-0026 - Dishwasher - symbols
40 °C
Rapid wash
Short wash at 40°C.
Rinse with hot water. u
– – 15g u32
– – 15g u32
ArtNo.030-0026 - Dishwasher - symbols
65 °C
Heat wash
Soups, potatoes,
pasta, rice, eggs, roast
or fried food.
Extended wash at 65°C.
Rinse with cold water.
Rinse with hot water.
Drying.
u
– 5g 22g u54
u5g 22g u48
ArtNo.030-0026 - Dishwasher - symbols
Soak
Rinse o if the dishes have been stacked for several
days in the dishwasher prior to washing.
Short cold wash to prevent
food residue from drying on
the dishes. u
–––
u12
–––
u12
Tabla de contenidos
Otros manuales de Lavavajillas de Range Master

Range Master
Range Master RDW6012FI Manual

Range Master
Range Master RDW1045FI Manual

Range Master
Range Master RDW945FI Manual

Range Master
Range Master P60 Manual

Range Master
Range Master RDW459FI Manual

Range Master
Range Master T60 Manual de usuario

Range Master
Range Master RDW1260FI Manual

Range Master
Range Master RDW6012FI Manual

Range Master
Range Master RDW6015FI Manual


