RainPoint ITV201P Manual de usuario
USER MANUAL
Model No.ITV201P
DeutschEnglish
Email:
seice@rainpointus.com
WhatsApp:
+1 626-780-5952
Free Hotline
US: +1 833-381-5659 (EN)
EU: +44 800-808-5337 (EN DE)
Save the user manual for future reference
If you have any questions, please contact us to get suppo
WARM TIPS
PLEASE READ BEFORE USING
FOR ANY PROBLEMS DURING USE, PLEASE CONTACT US:
Web: www.rainpointonline.com
Email: seice@rainpointus.com
WhatsApp: +1 626-780-5952
US Free Hotline(English):
+1 833-381-5659(MON-FRI 9:30 AM-5:30 PM PST)
EU Free Hotline(English Deutsch):
+44 800-808-5337(MON-FRI 9:00 AM-5:00 PM CET )
Don’t use the water timer when the temperature is
below 37°F(3°C), and please store the timer indoors
to avoid potential freezing damage.
The lter traps di paicles, preventing them from
entering the timer and causing clogging. Please
clean the lter regularly and replace it if worn.
To ensure a longer lifespan, please use 2 new AAA
alkaline batteries (not included). Don’t mix new and
old alkaline, standard (carbon-zinc), or rechargeable
batteries.
Only use with clean cold water.
Please activate the water timer before rst use or
after a period of inactivity (Refer to page 6:
ACTIVATE THE TIMER BEFORE USE).

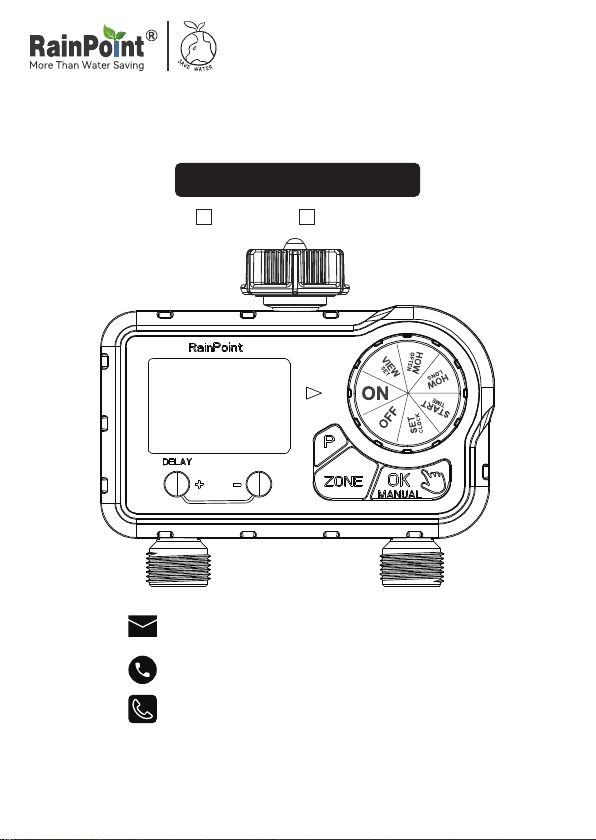
PRODUCT OVERVIEW
At A GLANCE
DIAL
FILTER
HOSE TAP
CONNECTION PBUTION
OK/MANUAL
BUTTON
ZONE
BUTTON
BIG LCD
SCREEN
DELAY/+
BUTTON
-BUTTON
ZONE L
ZONE R
+ /DELAY BUTTON
BUTTON FUNCTION
- BUTTON
P BUTTON
ZONE BUTTON
OK / MANUAL
BUTTON
Use "+" to adjust the time. When the dial is
turned to "ON", press and hold "DELAY" to
activate Rain Delay.
Use "-" to adjust the time.
Use "P" to switch watering plans P1, P2, P3
Switch between ZONE L and ZONE R
Use "OK" to conrm the time. When the dial is
turned to "ON", press and hold "MANUAL" to
water manually.
- 01 -
ENEN

SET CLOCK
START TIME
DIAL POSITION FUNCTION
HOW LONG
HOW OFTEN
Switch 12H/24H and
set the current time
Select what time you would
like to sta watering
Determine how long to
water for each zone
(watering duration)
Choose how often you will
water for each zone
(watering frequency)
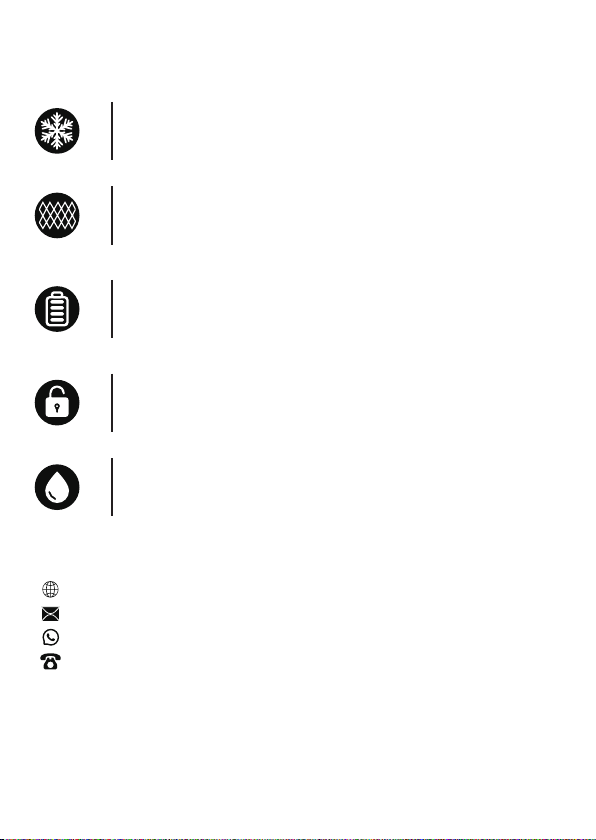
FUNCTION
ON
OFF
Each ZONE of the timer
will automatically water
according to the watering
plan you set
Turn o all watering plans
Low batte indicator
The selected day of the week
Enter Eve_Day watering mode
ZONE L (left zone)
ZONE R (right zone)
The watering plans P1, P2, P3
The watering sta time
The watering duration
The watering frequency (eve 2 days)
Rain Delay 24H, 48H or 72H
Manual watering (1 minute to 8 hours)
Flashes when watering
LCD ICON FUNCTION
EVERY
D
EVERY
D
- 02 -
EN

Max Flow Rate
Waterproof Level
Working Temperature
Watering Frequency
Watering Duration
Water Outlet
Rain Delay
Water Inlet
Power By
0.5bar-8bar (7.25 psi-116.03 psi)
10 Gal/Min (35L/Min)
IP54
37.4℉-122℉ (3℃-50℃)
Eve 2/3/4/5/6 days or the day of the week
From 1 minute to 3 hours 59minutes (4 hours)
NH (US) for 3/4" taps
BSP(EU) for 3/4" or 1" taps
24H, 48H or 72H
For 3/4" standard garden hose
2 AAA (1.5V) alkaline batteries (Not Included)
Working Water Pressure
SPECIFICATION
- 03 -
ENEN

Note:
1. Remove the batte compament
cover on the back of the timer.
2. Inse 2 new AAA (1.5V) alkaline
batteries (not included).
3. Put the batte compament cover
back on the timer and press rmly to
make sure it is completely sealed.
· Install the batte compament cover securely after installing the
batte to ensure waterproong.
· When the timer is not used for a long time, please remove the
batteries and dispose of them properly.
· Replace batteries when the low batte indicator appears on display.
After you done it, please remember to reset your watering plans.
· Don’t dispose of batteries in re. Batteries may explode or leak.
· To ensure a longer lifespan, please use 2 new AAA alkaline batteries
(not included). Don’t mix new and old alkaline, standard
(carbon-zinc), or rechargeable batteries.
PRODUCT INSTALLATION
INSTALLING THE BATTERIES
- 04 -
EN

INSTALLING THE TIMER
1) Turn o the garden faucet.
2) Wrap Teon Tape around the faucet
threads.
3) Screw the timer to the garden faucet and
make the display as veical as possible
to the ground to prevent rainwater from
accumulating and leaking into the interior.
4) Wrap Teon Tape around the threads of
the timer outlet.
5) Screw the garden hose to the timer outlet.
6) Turn on the faucet after programming the
timer.
Tips: If the connection between the timer and the faucet or hose is
not tight or leaking, wrap more Teon Tape(thread seal tape) to make
them tight.
Note:
Please do not use tools, only install the timer by hand.
When expecting freezing temperatures, timers should be removed
from the hose faucet and stored indoors to avoid potential freeze
damage.
Please install the lter properly and keep it clean as follows.
- 05 -
ENEN

Please activate the device before using it for the rst time or after a
period of inactivity.
ACTIVATE THE TIMER BEFORE USE
Activation Steps:
1. Keep the garden faucet turned o.
2. Turn the timer dial to "ON".
3. Press and hold the "MANUAL" button for 3-5s to enter Manual
Watering Mode.
4. Re-pressthe"ZONE"button
twicetoselectbothZONE Land
ZONE R. When the screen ashes,
immediately press the "OK"
button to run manual watering.
5. After hearing 2 "click" sounds or waiting for about 5 secs, the valves
in the timer is opened, and then turn the dial to "OFF" to close
the valves.
6. Repeat the step 2-5 for 3-5 times.
7. Test: Turn on the faucet a little bit, and then repeat the step 2-5 to
check if the water ow out or shut o as expected.
If yes, the timer valve is normal, please use it with condence!
If not, please repeat the above steps several times or contact
RAINPOINT suppo team immediately.
Note:
When testing, please keep away from the water timer outlet to avoid
being splashed and wet.
- 06 -
EN

PROGRAMMING THE TIMER
1)First, keep ZONE L and complete the settings, following the steps
1-4 below. Then turn the dial to "ON" to save the changes.
2)Press "ZONE" button to select ZONE R, and follow steps 2-4 to set up.
Turn the dial to "ON" to save all the plans.
Note: Dual zones operating simultaneously have lower water pressure
than single zone because the water pressure is divided between the
two zones.
This is a two-zone timer allowing you to water two dierent areas from
the same faucet. Each zone can be programmed with independent sta
time, how long, and how often.
STEP 0: UNDERSTANDING ZONES
Please design the program separately for each ZONE:
- 07 -
ENEN

STEP 1: SET CLOCK
1. Turn the dial to SET CLOCK.
2. Use the "+" or "-" button to select 12H/24H mode, press "OK"
to conrm.
· 12H mode: with "AM" or "PM"
· 24H mode: without "AM" or "PM"
3. " " ashing: Use the "+" or "-" button to set hour and press "OK"
to conrm.
" " ashing: Use the "+" or "-" button to set minute and press"OK"
to conrm.
" " ashing: Use the "+" button to select the day of the week, then
press "OK" to conrm.
" " without ashing means "Thursday" has been selected.
4. Turn the dial clockwise to save the changes in this STEP and go to
next STEP.
TIPS:
1. Press and hold the "+" or "-" button can increase or decrease the time
quickly.
2. When the setup of this STEP is nished, please turn the dial to save
the changes instead of press the "OK" button. If you press the "OK"
button after setting, it will return to the previous setting instead of
saving it.
- 08 -
EN
Otros manuales para ITV201P
3
Tabla de contenidos
Idiomas:
Otros manuales de Sistema de riego de RainPoint


Manuales populares de Sistema de riego de otras marcas

Hunter
Hunter Institutional Series Manual de usuario

Cellfast
Cellfast 52-305 Manual de usuario

Tyco Fire Product
Tyco Fire Product Star Galaxy SGQR Manual de usuario

Tyco Fire Product
Tyco Fire Product CENTRAL A Manual de usuario

Oral Care Technologies
Oral Care Technologies Hydro Floss Manual de usuario

Reliable
Reliable F1-300 Manual de usuario


