QQZM PnP Manual de usuario

1
Copyright © Shenzhen Quick Zoom Technology Co., Ltd., All Rights Reserved
Updated on 9 Sept., 2014
Manual for PnP IP Camera
--------IPCameraV
This user manual applies to all the QQZM PnP IP Cameras below:
(1) Home Pan-tilt Wireless IP Cameras
(2) Outdoor Wireless Bullet IP Cameras
(3) Dome/ Cube Wireless IP Cameras
NOTICE:
1. Please use Power Adapter and other accessories come with camera
2. Please CHANGE Camera Password and REMEMBER the New One!
Thank you for reading this user manual, if any problems you find out,
please kindly inform us!

2
Copyright © Shenzhen Quick Zoom Technology Co., Ltd., All Rights Reserved
Content
1. Hardware Installation......................................................................................... 3
2. Software Installation .......................................................................................... 4
3. Access to Camera.............................................................................................. 5
3.1 Login IP Camera Client....................................................................................................................... 5
3.2 Adding IP Camera Device .................................................................................................................. 6
3.2.1 Using Auto Setting Guide to Add Camera in LAN ........................................................................... 6
3.2.2 Using “Add” Function to Add Camera in LAN................................................................................. 9
3.2.3 Using Context Menu to Add Camera in WAN................................................................................. 9
4. Wi-Fi Setting ..................................................................................................... 10
5. PT and Color Setting.........................................................................................11
5.1 PT Control Panel ..............................................................................................................................11
5.2 Color Control Panel..........................................................................................................................12
5.3 IR-Cut Filter Control.........................................................................................................................12
NOTICE: This Function is jut for which has the IR Cut Filter ............................. 12
6. Record, Snapshot and Two way Audio........................................................... 13
6.1 Operation of alarm, snapshot and two way audio..........................................................................13
6.2 Record onto SD Card........................................................................................................................13
6.3 Schedule Record..............................................................................................................................14
6.4 Setting Picture and video file path ..................................................................................................14
7. Playback Video................................................................................................. 15
7.1 Playback Video Recorded onto Local Computer..............................................................................15
7.2 Remote Playback Video from SD Card............................................................................................. 15
8. Alarm Setting.................................................................................................... 16
8.1 Alarm Introduction ..........................................................................................................................16
8.2 Alarm I/O Description...................................................................................................................... 16
8.3 Motion Detection Description.........................................................................................................17
8.4 Alarm Record...................................................................................................................................18
8.5 Alarm Email ..................................................................................................................................... 19
8.6 Alarm Snapshot ...............................................................................................................................20
9. OSD Setting ...................................................................................................... 21
10. Time Setting...................................................................................................... 22
11. Camera Password and Factory Reset ............................................................ 22
11.1 Password of Camera......................................................................................................................22
11.2 Factory Reset .................................................................................................................................23
11.3 Password of Client Software.......................................................................................................... 23
12. Setup Camera over Smart Phone.................................................................... 24
12.1 Download App...............................................................................................................................24
12.2 Use Smart Phone to Setup Wi-Fi Connection Via AP Function .....................................................24

3
Copyright © Shenzhen Quick Zoom Technology Co., Ltd., All Rights Reserved
1.Hardware Installation
Please Connect camera to the Router FIRST and then Power on the camera ,
like the following way:
Use the correct power supply for camera, and connect it to router or switch.
Note: Please check whether the working status of “Network Indicator”and
“Data Indicator”are same with the following description, if not, please
reconnect the power adaptor and network cable again.
(1) P/T Wireless IP Camera Interface Introduction:
(2) Bullet / Dome IP Camera Interface Introduction:
RJ 45
Port
RS485 Port
Audio In, connected to
external microphone
Power
Port
Audio
Output
RJ 45
Port
SD Card
Slot
I/O Port
Power Port
Network Indicator
Data Indicator
Wi-Fi Antenna

4
Copyright © Shenzhen Quick Zoom Technology Co., Ltd., All Rights Reserved
2.Software Installation
(1) Insert the CD into CD driver of your PC
(2) It will pop up the auto installation windows like below:
(3) Click the button of “Install CMS Software”to run the install package; or you
can open the CD directly, find out the folder “1. Camera Monitoring
Software2. PC Monitoring Client Software” and install the software” IPC
CMS Software”.
(4) After finishing installation, the icon like below will display on your desktop
Definition
Description
Network Indicator
Orange color, it is always on when power and network cable are connected correctly
Data Indicator
Green color, it is blinking when data is transmitting

5
Copyright © Shenzhen Quick Zoom Technology Co., Ltd., All Rights Reserved
3.Access to Camera
3.1 Login IP Camera Client
(1) Double click the icon to login in; you will see the following interface
(2) After click “Login”, you will see the client interface as below:

6
Copyright © Shenzhen Quick Zoom Technology Co., Ltd., All Rights Reserved
3.2 Adding IP Camera Device
3.2.1 Using Auto Setting Guide to Add Camera in LAN
The first time running the CMS, setting guide will pop up automatically
(you can click button “Install Wizard” on top right of software on menu
bar);
1. Connect camera to network like the pictures below (Just click “Next”):
2. Click Button “Next (Search Device)”

7
Copyright © Shenzhen Quick Zoom Technology Co., Ltd., All Rights Reserved
3. Select the camera and click button “Next (Modify Network Param)”
4. The camera will be added on the left. After successfully adding the
camera, you can also set up the Wi-Fi next step;
8
Copyright © Shenzhen Quick Zoom Technology Co., Ltd., All Rights Reserved
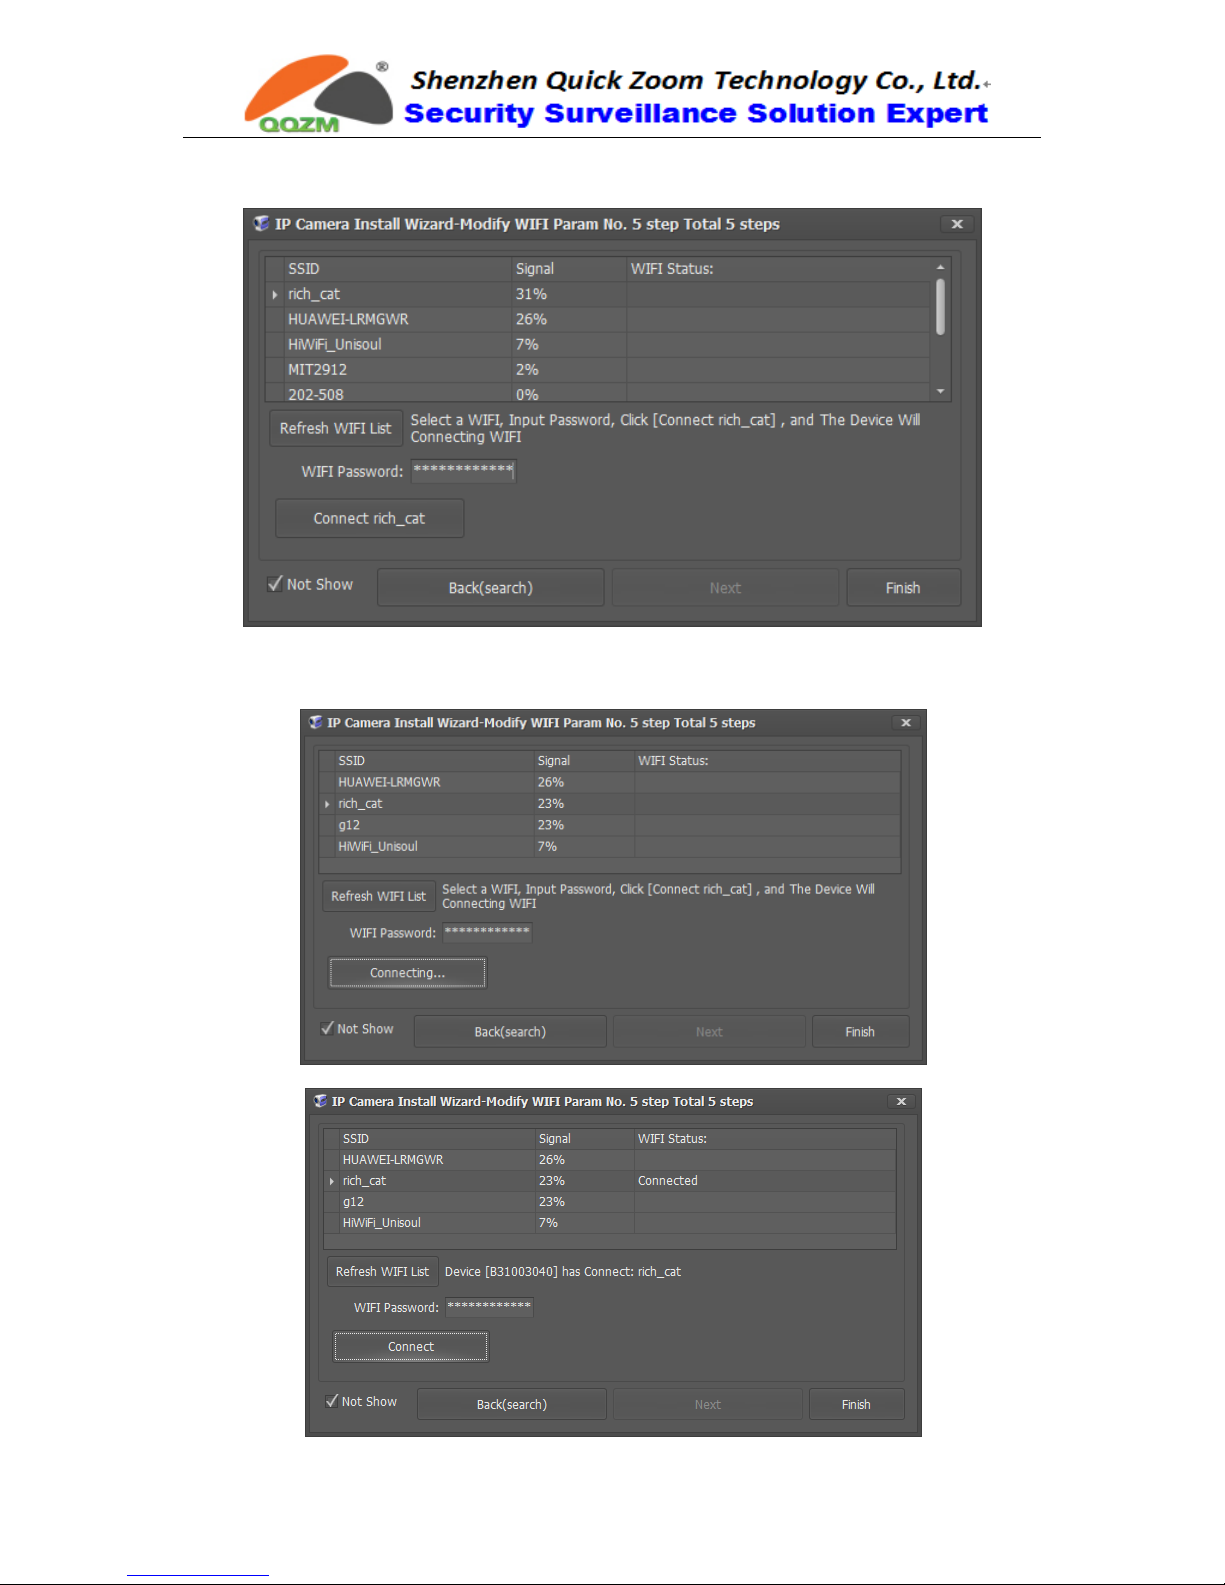
5. Select your SSID on the list and input the Password, click “Connect”
6. After about 5-7 seconds, the Wi-Fi connection will be done

9
Copyright © Shenzhen Quick Zoom Technology Co., Ltd., All Rights Reserved
3.2.2 Using “Add”Function to Add Camera in LAN
1. Click “Add”button, the cameras connected to LAN will be shown in the list:
2. Tick the camera and click “Add”. The camera will be added into the folder
“Cameras”on the camera list on the left side;
3.2.3 Using Context Menu to Add Camera in WAN
You can use this function to add the cameras in LAN or WAN
2. Tick the Check box
of Cameras that
Connected in LAN
1. Click “Add“Button
3. Click to Add Camera
1. Right Click folder “Device”
2. Click “Add Device through ID”

10
Copyright © Shenzhen Quick Zoom Technology Co., Ltd., All Rights Reserved
4.Wi-Fi Setting
4. Click “Next”
6. Click “Finished”
7. Double click the camera
added under the folder of
“Device”, you will see the
video successfully
1. Select the video
of the camera
you want to set
Wi-Fi, right click
the mouse, and
click “Setup”
3. Fill in a name of
camera and any
information you
want to describe it
5. Fill in
Device ID
and
Password
Tabla de contenidos
Otros manuales de Cámara IP de QQZM


