Qomo Quest 84 Manual de operación

Before operating the unit, please read this manual thoroughly,
and retain it for future reference.
Owner’s Operating Manual
Interactive Intelligent Panel

11
15
16
Contents
Security Warning
Connection and Setting
Menu Operation
Maintenance
Prepare to Install
Simple troubleshooting
7

Do not expose the unit to direct sunlight and other sources of heat.
Do not handle liquids near or on the unit.
Never spill liquid of any kind into the unit
Power Supply
LED Screen
Sight Distance
Temperature
Humidity
Ventilation
Earphone
Standby
Battery
Notes for Cleaning
Power Switch Status SignsPower Switch Status Signs
Notes for Maintenance
Do not put the unit near appliances that create magnetic fields.
Do not put heavy objects on top of the unit.
Check that the unit’s operating voltage is identical with your local power supply.
the weather is thunder-storm or lightning. Please unplug power supply and aerial plug when
please unplug power supply, when there is nobody at home or didn't use over a long period of time .
Please keep power cord from physical or mechanical damage.
Please use exclusive power cord, don't modify or lengthen it.
Please check and ensure AC source is connected with the ground.
Never use any other tough or sharp object to replace the written pen.
Unplug the power supply plug before cleaning.
Clean the screen with a soft dustless and dry cloth.
Never use water or the spray type detergent to clean the unit.
For deep clean, contact an authorized service center.
Please don't display the high brightness image on the screen for a long time.
The best distance between audience and screen is 5-7 times that of screen diagonal.
The best watching angle between audience and screen as top and bottom, or so inside 176 degrees.
Do not place the unit near or over a radiator or a heater register.
If your unit is suddenly moved from a cold to a warm place, unplug the power cord for at least.
two hours so that moisture that may have formed inside the unit can dry completely.
Do not expose machine in rain, damp or place near water.
Ensure the indoor drying, cool.Nomal operating humidity is 10~90%.
Keep the ventilation openings clear.
Ensure that the unit has enough space for ventilation around: left, right and back >10cm, top> 20cm.
It will while using the earphone listen noisy sound for a long time.effect the hearing
Before using earphone, please turn down the volume in advance.
It will enter standby mode but not turn off the unit while press the standby key.
Accurate transaction and recall scrap battery after using.
There are heating hole on back cover, do not spray water.
“I” means power on, “O” means power off.“I” means power on, “O” means power off.
This machine can only be maintained by certified engineer.
Please don't let kid touch battery, in case of dangerous don't throw battery into fire.
Normal operating temperature is 0 ~ 40℃.
Safety Warning
Before operating the unit, please read this manual thoroughly,and retain it for future reference.
Do not place the unit on an unstable cart, stand, tripod, bracket, table, or shelf.
Placement

1 Control Panel
HOME button: back to main interface
Return button: return to previous level menu
Menu button: call up function menu
Volume down button: turn down volume
Built-in computer USB interface
USB interface of Android system, which can access storage device to play
Receiving remote control signal, and do not place any objects to block
Volume up button: turn up volume
Items Function description
media files
remote control receiving
Remote control
signal receiver
Tap to enter EnergySaving function
Press at least 2 seconds to enter standby mode
PC
Prepare to Install
2
Connecting and Setting
Installation Menu Operation Troubleshooting Care and Maintenance

2 Terminal Interface
Items Function description
Connect USB devices such as mobile hard disk, U disk, USB keyboard
and mouse, USB drives, etc
High-definition multimedia interface signal input, connect to PC
(personal computer) with HDMI output, set-top box, or other video
device can also realize touch function (HDMI3 can realize MHL function,
Connected to display devices with VGA input function
External computer audio input
External computer image input
External computer touch signal input. Default touch function is available
under internal computer, when connecting external computer, besides
connecting external computer VGA and audio signals, external
computer's USB port needs to be connected to the equipment. Under
the condition that driver is installed, external computer can be touch
controlled through the equipment (touch function is effective in PC,
VGA and HDMI channel by default)
Composite video and audio input
Coaxial output
WAN interface, connecting RJ45 terminals.
(This network port is only used for Android system)
Serial interface, used for mutual transfer of data between devices
Connected to device with headphone input function
Power switch, to open and shut down AC power supply
“ ”is ON, “ ”is OFF.
AC power input, connecting AC power supply
3
HDMI4(4K2K)
HDMI4 can realize 4K2K function)
Connecting and Setting
Installation Menu Operation Troubleshooting Care and Maintenance
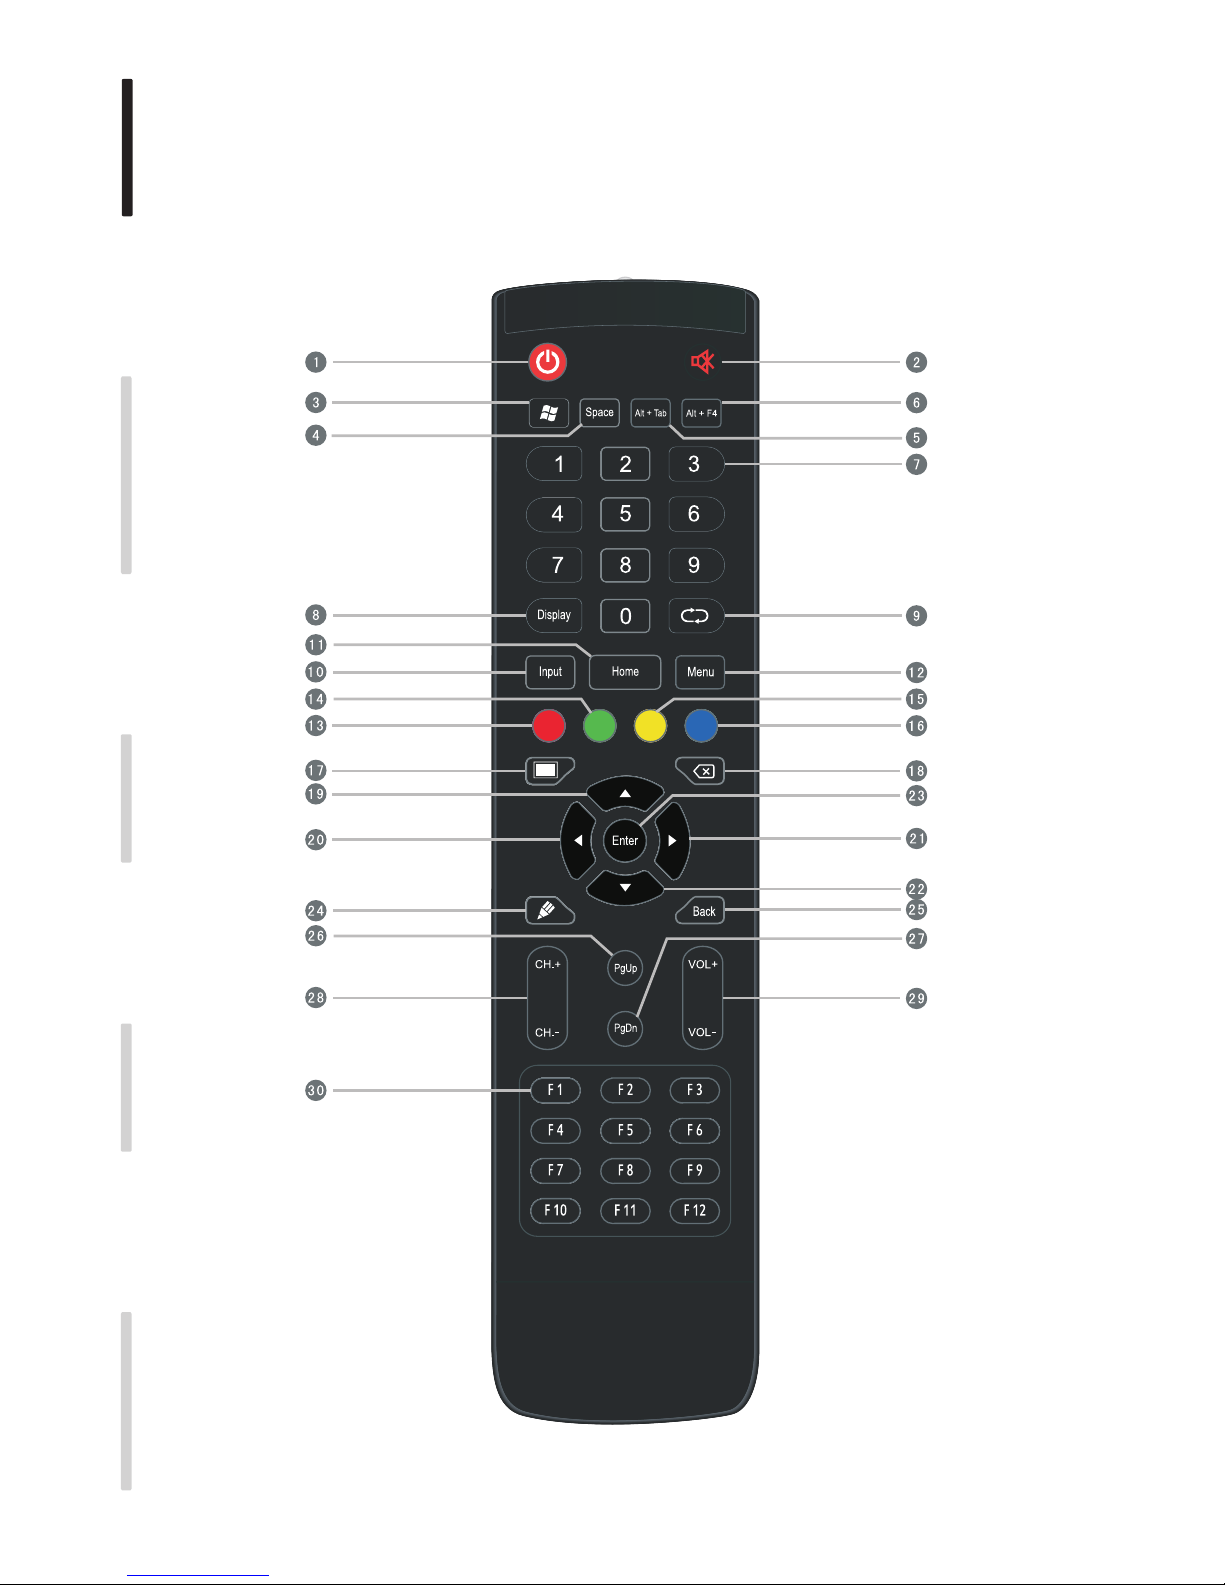
3 Remote control
1). Remote control button instruction
4
Connecting and Setting
Installation Menu Operation Troubleshooting Care and Maintenance

Back
F1-F12:
Home
Detailed function description of remote control buttons
: Press this button to enter standby when power is on; Click this button to switch on
:
:
:
:
:
Mute switch
Built-in computer Windows key
:
:
:
:
:
in standby condition
Built-in computer Space key
Built-in computer spacebar Alt + Tab
Built-in computer program window close button
Numeric keys:TV digital channels input keys
Display channel information
TV channel return key
Input signal source selection key, choose different sourced according to need
Android system main screen button
TV OSD menu button, press this button to pop up TV's OSD menu
Red:
Green:
Yellow:
Blue:
TV channel function button
TV channel function button
TV channel function button
TV channel function button
:
:
:
:
:
:
:
:
:
:
:
:
:
One key for blank screen
Backspace key
Direction key, press this button for upwards selection
Direction key, press this button for left selection
Direction key, press this button for right selection
Direction key, press this button for downwards selection
confirmation key, press this key to confirm selection state
Quickly start writing software.
Return key
Built-in computer page (previous page)
Built-in computer page (next page)
Channel switch key
Volume switch key
Built-in computer F1 - F12 function keys
Some buttons on remote control may be functionless if the panel does not carry on that feature.
5
Connecting and Setting
Installation Menu Operation Troubleshooting Care and Maintenance

Install Batteries
1 Open back cover of battery component on the back of remote control
2 Install AAA type battery according to the corresponding electrode, make sure battery positive
and negative pole are correct ("+"to"+", "-" to "-"), please do not mix using old and new batteries
3 After battery is installed, close the back cover of battery components, and make the following clip buckled to the bottom
Range of remote control
2).Remote control instruction
Remote control can work normally within the range of 8 meters distance, 30 degrees left and right
CAUTION
RISK OF EXPLOSION IF BATTERY IS REPLACED
BY AN INCORRECT TYPE
DISPOSE OF USED BATTERIES ACCORDING
TO THE INSTRUCTIONS
from the remote control receiver; in order to protect environment, please dispose waste battery into
recycling box.
6
Connecting and Setting
Installation Menu Operation Troubleshooting Care and Maintenance

Connection and Setting
For the safety of you and the machine, please do not connect any power plug before connection
1. External Computer and Touch Connection
NOTE:
External computer input, equipment's best resolution is 1920 x1080
External computer can also connect to the equipment through the HDMI cable
Recommended computer configuration:
2.0GBHZ Processor, 1GB Memory More than 256 color display card
1GB Available Hard Drive
VGA-OUT/HDMI-OUT、Audio-OUT、USB Interface
Support Resolution 800*600,1024*768,1920*1080
(5)Press key, and the equipment is powered on.
(6)Press the INPUT key to switch to VGA channel.
(3)After connection is completed, plug in power cord, and switch power to on.
(1)Use VGA line to connect to VGA output port of external computer, and meanwhile use
headphone audio line to connect to external computer audio output interface.
(2)Use USB line to connect to external computer USB port.
(4)Start external computer.
Audio Cable VGA Cable
USB Cable
Computer
7
Connecting and Setting
Installation Menu Operation Troubleshooting Care and Maintenance

Video Game Set-top
Satellite TV receiver
Video recorder
Camera
DVD
AV cable
2. Audio and video equipment
(1).Use AV audio and video lines to connect audio and video equipments with AV output
(yellow for video, red for right sound channel, and white for left sound channel)
(2).After line connection, plug in power cord, and switch power on
(3).Press to turn equipment on
(4).Press INPUT key to switch to AV port
8
HDMI cable
DVD Disc Player
(1).Use HDMI line to connect audio and video equipment with HDMI output
(2).After line connection, plug in power cord, and switch power On
(3).Press to turn equipment on
(4).Press INPUT key to switch to HDMI port (HDMI3 channel can realize MHL function,
HDMI4(4K2K)
/HDMI4(4K2K)
HDMI4 channel can realize 4K2K function)
Connecting and Setting
Installation Menu Operation Troubleshooting Care and Maintenance
Tabla de contenidos
Otros manuales de Pizarra interactiva de Qomo

Qomo
Qomo Interactive Whiteboard Manual de usuario

Qomo
Qomo Interactive Whiteboard Manual de usuario

Qomo
Qomo QRF600 Manual de usuario

Qomo
Qomo HiteVision QRF 700 Manual de usuario

Qomo
Qomo HiteVision QRF 500 Manual de usuario

Qomo
Qomo QIT 300 Manual de usuario

Qomo
Qomo QWB200-BW Manual de usuario

Qomo
Qomo HiteVision QRF 900 Manual de usuario

Qomo
Qomo Hite Vision Manual de usuario


