Purlette PL400G Manual de usuario

Owner’s Manual
Reverse Osmosis Water Filtration System
Model # PL400G
Scan QR code for installation video
or visit www.purlette.com

Congratulations!
You are now the owner of a Purlette System! Purlette is an under-the-
sink water ltration system that makes tracking your water quality
and keeping it clean and drinkable simpler than ever before.
Using the accompanying mobile app, you can monitor the potability
of your water and know at all times exactly how much life your lter
has left in it. You can even order a replacement lter directly through
the app.
With the Purlette system you can rest assured that the water your
family is drinking is safe and clean.

Introduction System Features
Operation Panel
Before Installation
What’s in the Box
2
3
4
5
6
8
9
10
11
12
13
14
16
19
21
Three-Way Valve
Drinking Faucet
Drain Saddle
Water Lines
System Diagram
Flushing the Filter
Network Connection
Replacing the Filter
Warnings and Precautions
Self Troubleshooting Guide
Three Year Limited Warranty
Installation
Maintenance
Safety
Troubleshoot
Warranty
IntroductionInstallationMaintenanceTroubleshootWarranty Safety
2
• Sediment Filter: Traps large sediment such as sand, dirt, silt and rust.
• Active Carbon: Separates volatile organic carbon compounds, pesticides,
and chemicals.
• High Precision PP: Removes ne particles from tap water.
• Reverse Osmosis: Eliminates up to 99% of common drinking water contaminants.
• Post Carbon Block: Improves drinking water taste and gets rid of odors.
General Filter Replacement Intervals
• RO Filter - Replace every 24 months*
• HYBRID Filter - Replace every 12 months*
*Filter life may vary depending upon water usage and source water quality
The Purlette system will enter the auto-cleaning mode periodically. This is usage-based
and will occur randomly. The Purlette system will make an audible sound when it is in auto-
cleaning mode.
If user leaves the faucet turned on, the Purlette system will shut off automatically after two
hours. To exit safety mode, restart the Purlette system by unplugging and replugging the power
cord.
User can monitor drinking water quality, check the remaining lter life, and purchase a
replacement lter through the Purlette mobile app.
Advanced Multistage Dual Cell Filtration
Auto-Cleaning
Safety Mode
Real Time Monitoring via App
Sediment
Filter
Active Carbon
Filter
High Precision
Filter
Reserve Osmosis
Filter
Post Carbon
Filter
Introduction Installation Maintenance Troubleshoot WarrantySafety
3
Network Connection To wake the Purlette system, press and hold the NETWORK button for 3 seconds. The
network indicator light will remain solid (non-ashing) upon successful connection. If a network connection has not
been established, the network indicator light will continue to ash and the Purlette system will attempt to establish a
connection for 10 minutes and then turn off.
Energy Saving Mode The Purlette system will automatically enter the energy saving mode if drinking water faucet
is not used for 3 hours. All indicator lights will turn off in energy saving mode. When drinking water faucet is used,
an operation panel button is pushed, or the system enters auto-cleaning mode, the Purlette system will exit energy
saving mode and indicators will illuminate automatically.
Power-on All indicator lights ash 3 times once the Purlette system is
plugged in.
Operation Mode Filter indicator lights will remain solid white (non-
ashing) while lters are functioning properly. When the service life of
a lter expires, the lter element indicator light for the specic lter will
begin ashing. The other lter light will continue to be non-ashing until
that particular lter requires replacement.
Auto-Cleaning During auto-cleaning, the two lter element indicator
lights are turned on in alternating sequences. The sequence will be as
follows: lter element RO ... lter element HYBRID ... lter element RO ...
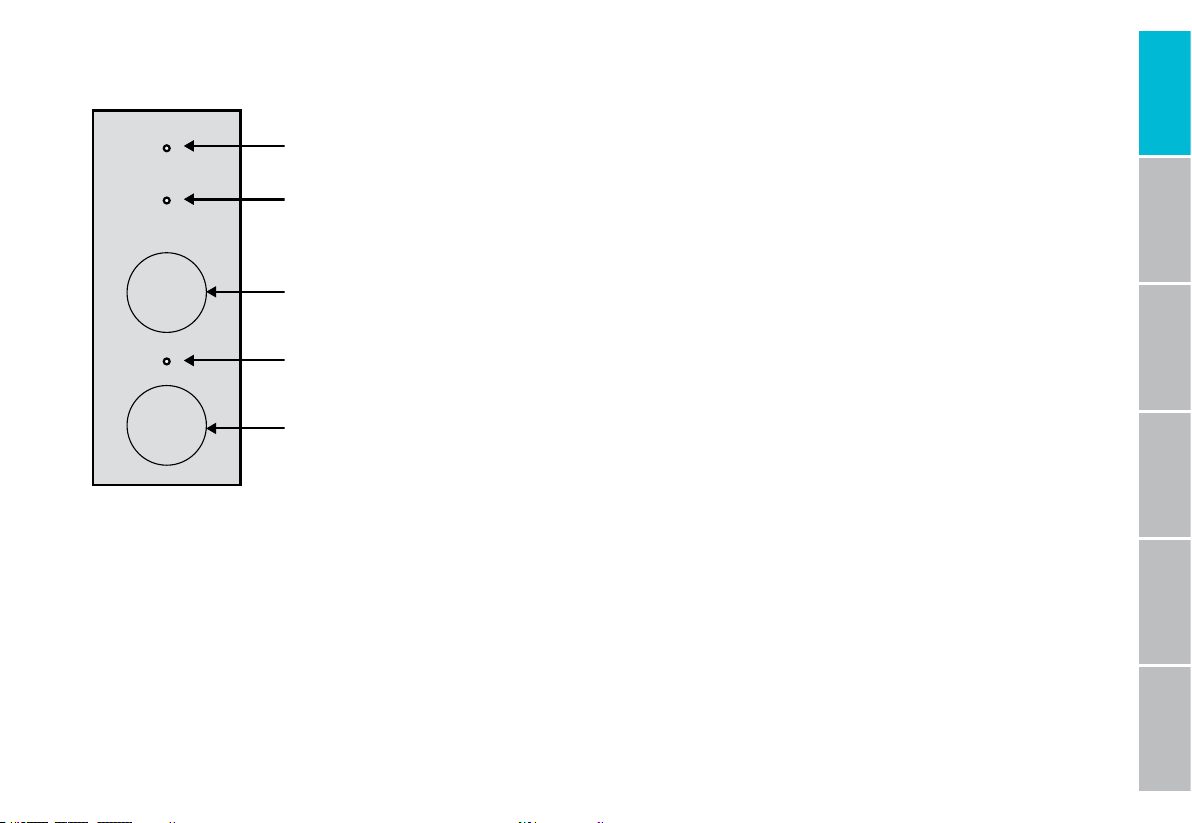
Operation Panel
RO Filter
Indicator Light
HYBRID Filter
Indicator Light
Filter Reset
Push Button
Network
Indicator Light
Network
Push Button
RO
HYBRID
RESET
NETWORK

IntroductionInstallationMaintenanceTroubleshootWarranty Safety
4
Before Installation
Operation Parameters
INDOOR USE ONLY we recommend that the Purlette system installed under the kitchen sink. However, you may install
the Purlette system in any suitable indoor location away from direct exposure to the environment, with adequate
space for the Purlette system to stand upright.
DO NOT USE with micro-biologically unsafe water or water from unknown sources or quality.
APPLICABLE WATER: municipal tap water
APPLICABLE WATER PRESSURE: 14–100 psi
FEED WATER TEMPERATURE: 40–100º F
GFCI VOLTAGE: 100–125 V
Recommended Tools
• Variable speed drill
• 1/4” drill bit (for drain pipe)
• Protective eye gear
• Adjustable wrench
• Phillips-head screwdriver
• Tube cutter (for adjusting PE tube length if desired)
Installation must be performed in compliance with local plumbing codes
Failure to comply with above installation and operation parameters can result in void of warranty

Introduction Installation Maintenance Troubleshoot WarrantySafety
5
What’s in the Box
Purier
Three-Way
Feed Water
Adaptor Valve
Drain
Saddle
1/4” PE
Tubes
Locking
Clips
Quick
Connectors
Silicon
Protective
Cover
Dust Lid RO Filter Hybrid Filter Drinking Water
Faucet
and Parts
Thread
Seal Tape
IntroductionInstallationMaintenanceTroubleshootWarranty Safety
6
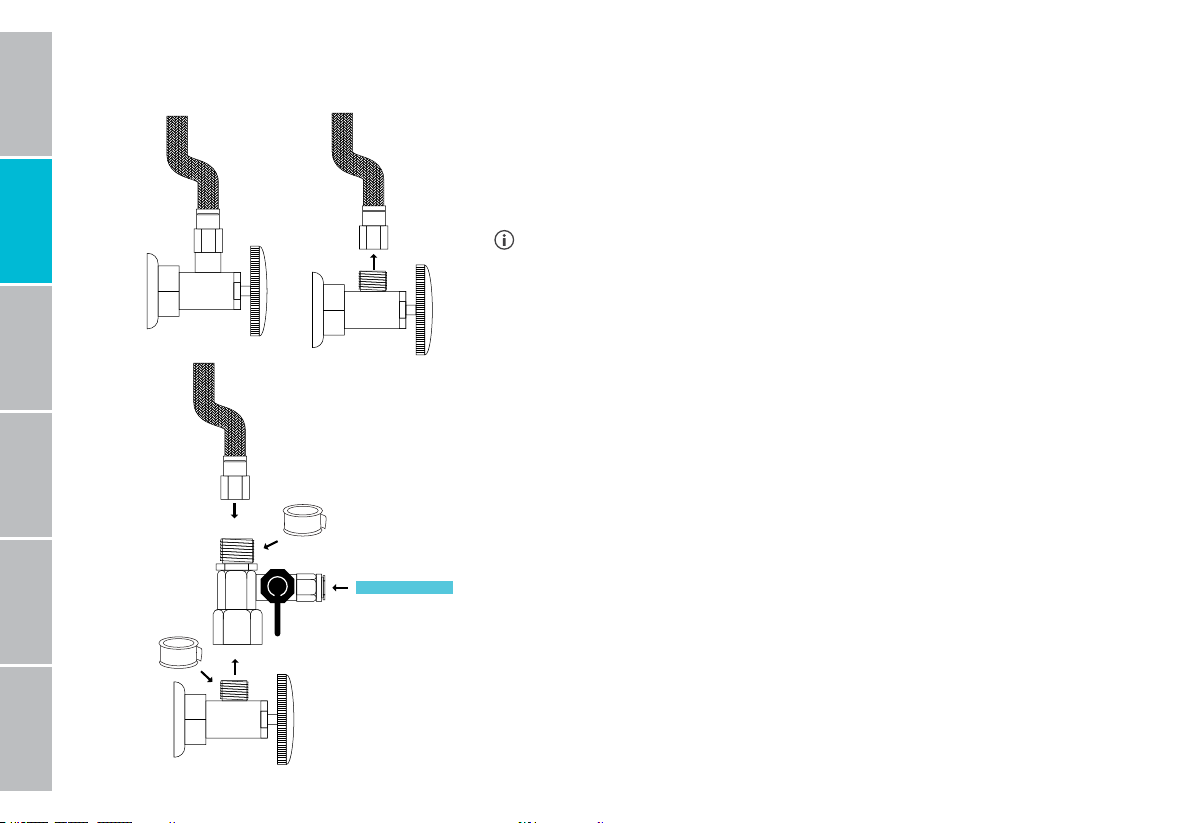
Step 1: Install the three-way feed water adaptor valve
Locate the cold water supply valve under the kitchen sink. Turn the
incoming cold water off by turning the valve clockwise. Turn on the
kitchen faucet to release any pressure and make sure the water has
stopped before proceeding to the next step.
The cold water supply is usually located on the right-hand side.
However, to ensure this is the case, turn the hot water on for two
minutes. Feel both hoses with your palm. The hot water supply riser
hose should feel warm. The one remaining cool is the cold water supply.
Next, install the three-way feed water adaptor valve.
Once you have ensured that the cold water supply is shut off, disconnect
the cold water riser hose tting from the cold water valve that you just
turned off. Using an adjustable wrench, turn the nut counter clockwise
until disconnected. There may be some residual water inside the riser
hose so have a bucket or towel to catch it.
Now install the three-way feed water adaptor valve. The adaptor valve
has a top and a bottom that are threaded nut connectors with a side
quick-connect tting. Use the thread seal tape to wrap the threaded
stem from the cold water valve coming out of the wall and gently screw
the adaptor on over the tape. Next, repeat step above and reconnect the
cold water riser hose. Make sure that both connections are secure, but
do not over tighten or you can damage the ttings.
Apply Thread Seal Tape
Apply Thread Seal Tape
Introduction Installation Maintenance Troubleshoot WarrantySafety
7
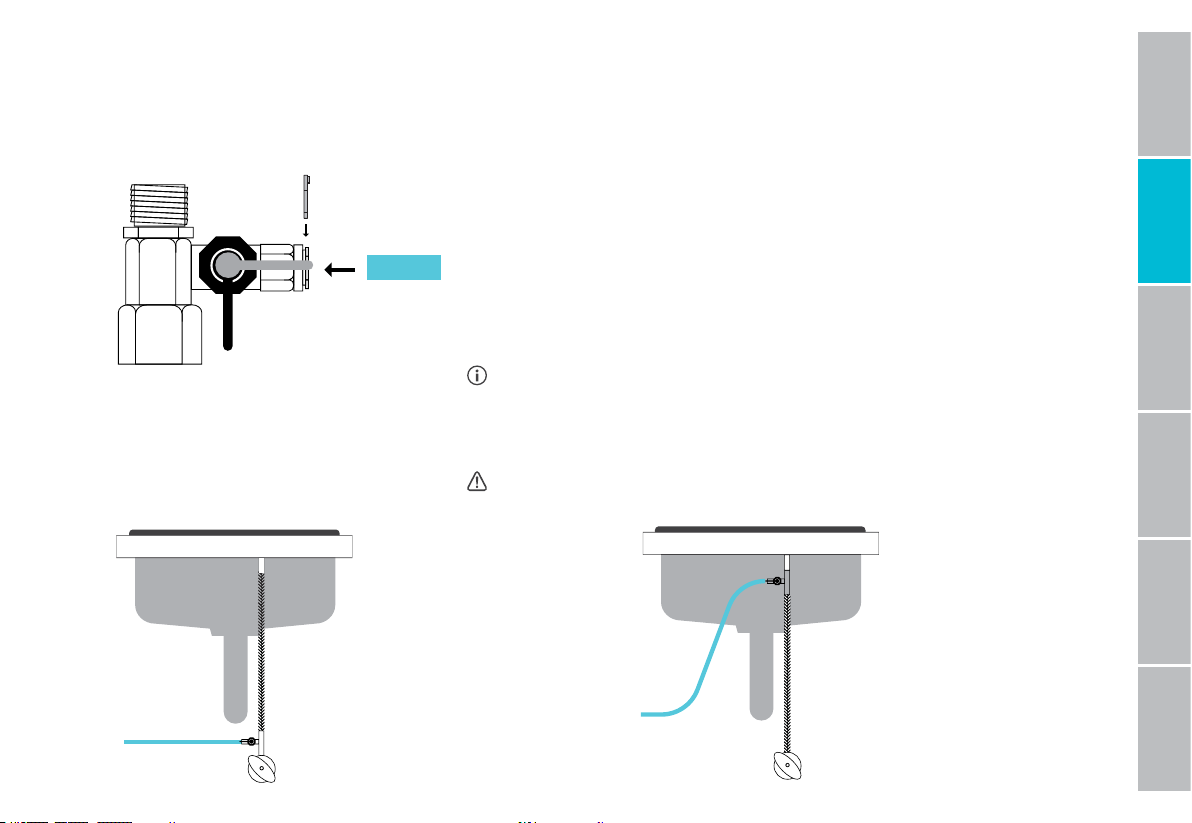
Step 2: Attach water line to three-way feed water adaptor valve
Now it’s time to connect the tap water input line to the three-way feed
water adaptor valve.
Locate the tap water input line (blue PE tube) and connect one end to
the three-way feed water adaptor valve by pressing the one end of the
tube into the quick-connect tting. Be sure to push it in all the way until
you feel it stop otherwise leaks may occur. Then slide the locking clip
into place to secure the tube. Pull gently to ensure that it is securely
attached.
If your pipe connection is 1/2”, the three-way feed water
adaptor valve is 3/8”, but comes with a 1/2”convertor for your
convenience.
Open
Locking Clip
Close
Do not connect the other end to the Purlette system at this time
Optional
Installation
Point
Recommended
Installation
Point
IntroductionInstallationMaintenanceTroubleshootWarranty Safety
8
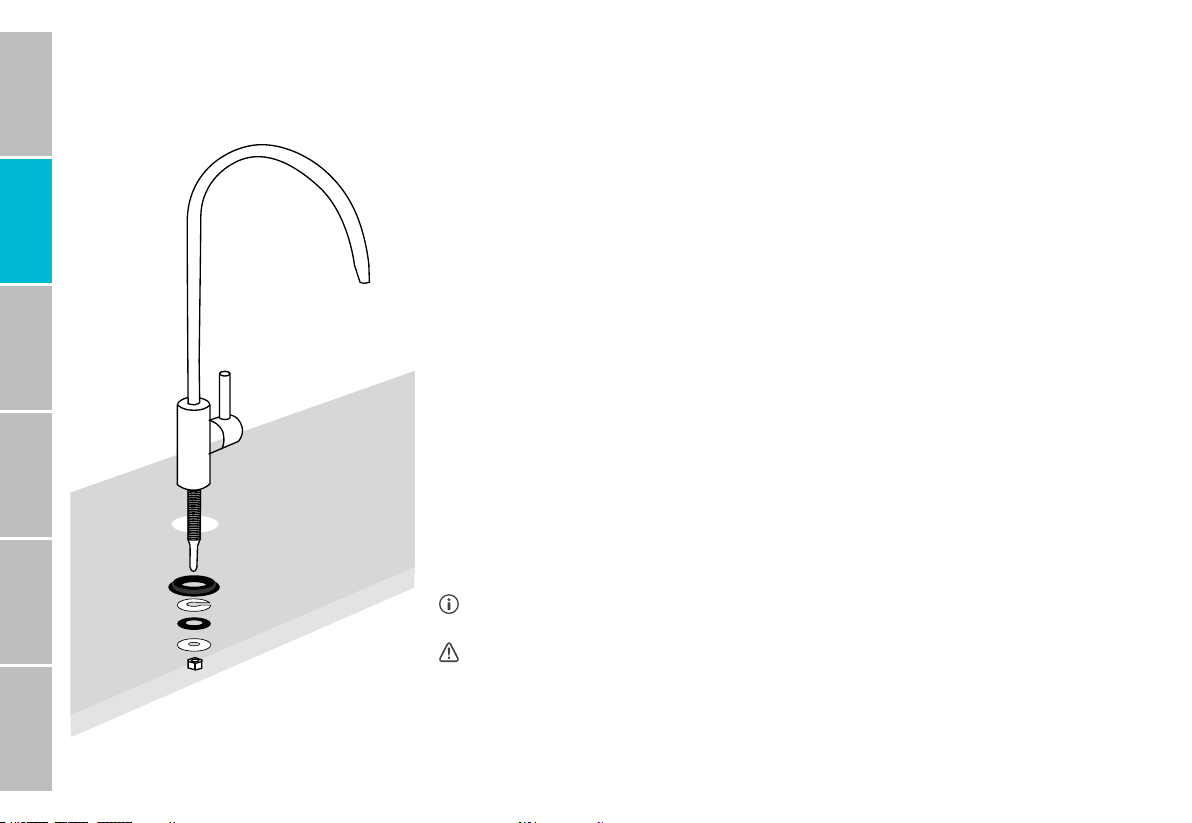
Step 3: Install the drinking water faucet
When installing an additional faucet, many times there are already pre-drilled
holes available. Many sinks have a soap dispenser or spray hose hole that
can be used for this purpose instead, if desired. Please consider hiring a
professional if there is not a pre-drilled hole.
Simply place the drinking faucet housing on the counter or sink where the
pre-drilled hole is separated by the provided rubber gasket. The stem from the
faucet should be accessible from under the sink.
Place 3/4” washer onto the threaded stem and secure under the counter.
Place 3/4” nut on threaded stem and secure by tightening until faucet can’t
move freely. Give the nut a quarter turn with the wrench to ensure to that the
faucet stays in place.
Locate puried water output line (white PE tube) and press into the drinking
water faucet stem quick-connect tting and conrm that it is secure. Once
secure, slide the locking clip into place to avoid leaking
Certain faucet models may not be equipped with a quick-connect tting.
Do not connect the other end to the Purlette system at this time
Otros manuales para PL400G
1
Tabla de contenidos
Otros manuales de Sistema de filtración de agua de Purlette


