Puretone P Series Manual de usuario

Established 1976
V1.0
December 2014
Mini Microphone
User Guide

Welcome
Statement
2
Congratulations on your purchase of a Mini Microphone, a high quality
streamer of speech and sound. Mini Microphone streams speech directly
to your hearing instrument. The line-in functionality of the Mini Microphone
will provide you with a streamed audio signal (mono) from your Hi-Fi
stereo, personal computer, TV or similar device directly to your hearing
instruments. Please read this manual carefully to fully benet from the
Mini Microphone. Ask your hearing care professional if you have any
questions.
For your safety, carefully read the chapter Important Information,
Starting on page 16.
FCC ID: X26SM-1
This device complies with Part 15 of the FCC Rules and IC Rules.
Operation is subject to the following two conditions: (1) this device may not
cause harmful interference, and (2) this device must accept any interference
received, including interference that may cause undesired operation.
Note: This equipment has been tested and found to comply with the limits
for a Class B digital device, pursuant to part 15 of the FCC Rules and
ICES-003 of the IC rules. These limits are designed to provide reasonable
protection against harmful interference in a residential installation. This
equipment generates, uses and can radiate radio frequency energy and,
if not installed and used in accordance with the instructions, may cause
harmful interference to radio communications.

3
Mini Microphone is intended to enable hearing instrument users to better
follow speech or listen to other audio signals. The essential performance
of the Mini Microphone is to transfer signals from the micro-phone or other
audio devices to a wireless hearing instrument.
In the EU: Products are intended for sale in countries within European
Economic Area as well as Switzerland.
Intended Use
List of Countries
Reorient or relocate the receiving antenna.
Increase the separation between the equipment and receiver.
Connect the equipment into an outlet on a circuit different from the receiver
is connected.
Consult the dealer or an experienced radio/TV technician for help.
Changes or modications can void the user’s authority to operate the
equipment.
However, there is no guarantee that interference will not occur in a particular
installation. If this equipment does cause harmful interference to radio or
television reception, which can be determined by turning the equipment off
and on, the user is encouraged to try to correct the interference by one or
more of the following measures:

4
National Restrictions
This product is in compliance with the following regulatory standards:
In EU: The device conforms to the Essential Requirements according to
- Annex I of Council Directive 93/42/EEC for medical devices (MDD) and
essential requirements and other relevant provisions of Directive 1999/5/
EC (R&TTE).
In US: FCC CFR 47 Part 15, subpart C.
In Canada: IC 6941C-SM1
This Class B digital apparatus complies with Canadian ICES-003.
Cet appareil numérique de la classe B est conforme à la norme
NMB-003 du Canada.
Operation is subject to the following two conditions:
1. This device may not cause interference, and
2. This device must accept any interference, including interference that
may cause undesired operation of the device.
Other identied applicable international regulatory requirements in
countries outside EU and US. Please refer to local country requirements
for these areas.
Products are categorized as receiver class 2 according to EN 300 328.

5
Contents
Description
Getting Started
Turning your Mini Microphone ON and OFF
Pairing to your hearing instruments
Start streaming
Stop streaming
Light Indicator (LED)
Using the Line-in
Volume Control
Important Information
General warnings
General precautions
Technical specications
Warranty
Troubleshooting Guide
6
7
8
8
10
12
13
14
16
16
17
17
21
21
22

6
Description
1. Mini-USB connector for charging
2. Microphone inlet
3. Line-in input
4. ON/OFF switch
5. Volume control
6. Light indicator (LED)
7. Clip
8. Pairing button
7
3
8
1
2
4
5
6

7
Getting Started
Charging the Battery
Before using your Mini
Microphone, you need to fully
charge the rechargeable battery.
To charge it, plug the charging
cable as shown in the picture to
the right. Then plug the other end
of the charging cable into a power
outlet.
During the charging process, the
LED indicator will show a solid
red light. When fully charged and
still connected to the charger,
the LED will turn solid green
interrupted by a red blink every 2
seconds.
Charging an empty battery
typically takes about 3 hours.
It is safe to leave the charger
connected overnight – the battery
cannot be overcharged.
• When charging your Mini Microphone for the rst time, leave it to
charge for at least 3 hours, even if the battery indicator indicates that the
battery is fully charged.
• For safety reasons, recharge the battery only with chargers supplied.
Do not charge the
Mini Microphone while
it is on your body.

8
To turn ON your Mini Microphone slide the ON/OFF switch (4 on page 6)
down to the ON position. A white “I” icon will be visible on the switch and
the LED indicator will now blink green every 2.5 second.
To turn it OFF, slide the ON/OFF switch up to the OFF position. The LED
will now stop blinking.
If the battery level is low the LED will blink yellow every 2 seconds.
Note! The following information is intended primarily for your hearing
care professional, who in most cases will complete the tasks that are
necessary before the Mini Microphone can be used with your hearing
instruments. However, the process is designed to be simple and most
people can do it themselves.
It is possible to pair up to three streaming devices - e.g. one Mini
Microphone and two TV streamers (optional accessory) - with a given
pair of hearing instruments. Therefore, channel 1, 2 or 3 must be selected
when starting the pairing process.
Pairing the Mini Microphone in channel 1
1. Make sure Mini Microphone is turned ON. Your hearing instruments
must be OFF – open the battery door.
2. Remove the silver cap from the Mini Microphone. With the tip of a pen
or similar object, press the small pairing button one time on the front of
your Mini Microphone (see page 9). The LED will now blink yellow once
every 2 seconds to indicate that is ready to be paired in channel 1. Your
Mini Microphone will remain in pairing mode for 20 seconds.
Turning Your Mini Microphone ON and OFF
Pairing To Your Hearing Instrument

9
3. While pairing mode is activated, close the battery doors of both
hearing instruments and make sure they are ON. A successful pairing will
be indicated by an audible melody played in both hearing instruments.
You are now ready to use the Mini Microphone!
Pairing the Mini Microphone in channel 2 or 3
To pair the Mini Microphone in channel 2, press the pairing button twice.
The LED will now blink yellow twice every 2 seconds to indicate that it is
ready to be paired in channel 2. Close the battery doors on the hearing
instruments.
To pair the Mini Microphone in channel 3, press the pairing button three
times. The LED will now blink yellow three times every 2 seconds to
indicate that it is ready to be paired in channel 3. Close the battery doors
on the hearing instruments.
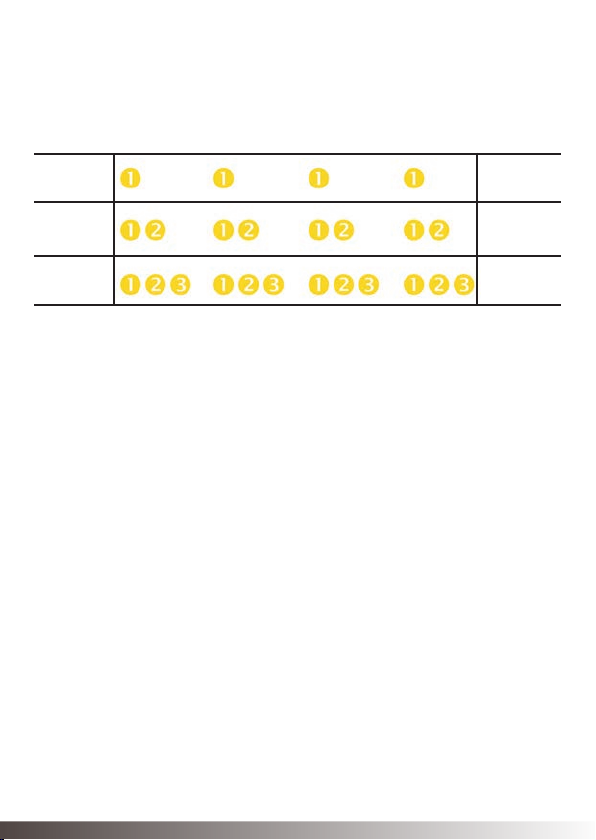
10
Pairing
button
pushes
1
2
3
1
2
3
ChannelLight indicator pattern
Pairing blinking pattern:
Turn on the Mini Microphone and make sure your hearing instruments
are turned on as well. Streaming may be started in one of two ways.
1. Press and hold the push button on both hearing instruments for about
three seconds in order to listen to the streamed audio signal. Once the
Mini Microphone has been connected an audible melody will play in your
hearing instruments and will be followed by the streamed sound.
2. If you have a Remote Control (optional accessory), simply press the
streaming button (not supported by 680 Series). Doing so will briey
show a search icon in the remote control display. Once the hearing
instruments connect to Mini Microphone, a short melody will be played
in both ears to conrm the presence of streamed audio and a streaming
icon will appear in the display. The streamed sound can now be heard in
your hearing instruments.
Start Streaming
Este manual sirve para los siguientes modelos
2
Tabla de contenidos


