Pumpenstein CCM Basic 5 Series Manual de usuario

The Unofficial Manual of the Chipley Custom Machine
Series 5 Basic and the
Series 6 Pump Markers
V 1.4
www.pumpenstein.com

I. Table of Contents:
I. Series 6 Marker Schematic
a. Facing Left Page 3
b. Facing Right Page 3
II. Series 5 Basic Marker Schematic
a. Facing Left Page 4
b. Facing Right Page 4
III. Liability Page 5
IV. Safety and Handling Page 6
V. Quick Start Guide Page 7
VI. A Brief Description… Page 8
VII. Velocity Page 11
VIII. Setting up the CCM Marker Page 12
IX. Additional Adjustments to the CCM Marker Page 14
X. Regular Cleaning Page 18
XI. Maintenance Page 19
a. Tools Needed Page 19
b. Grip Frame Disassembly and Maintenance Page 19
c. Chassis Disassembly and Maintenance Page 22
d. Regulator Disassembly and Maintenance Page 29
XII. Pimpin’ your ‘Ride’ Page 33
a. What Not to Buy Page 33
b. What to Do Page 34
XIII. Troubleshooting Page 35
XIV. Series 6 Parts List Page 38
XV. Contact Information for CCM Page 42
XVI. Additions and Changes Page 43

II. The CCM® Series 6 (Facing Left)
III. The CCM® Series 6 (Facing Right)
Beaver Tail
Bolt Pin
VRA or Vertical Regulator
Adaptor
3/16th Allen Key
Pump Guide Rods
Trigger
Detent Covers (x2)
1/16th Allen Key
Grip Frame
Pump
ASA or Air Source Adaptor
Clamping Feed Neck
5/32nd Allen Key Back Block
Timing Hole
1/8th Allen
Regulator
Regulator Adjustment
3/16th Allen Key
Auto Trigger
1/8th Allen Key Bolt
Grip Frame
Can also
come in .45
style.
Control
Bore
Cocking
Rod
Undertravel
Screw
3/32nd Allen
Key
Grip Frame Screws
3/32th Allen Key
Barrel

IV. Series 5 Basic (Facing Left)
V. Series 5 Basic (Facing Right)
Note: All of the other parts are as named on the Series 6. Besides milling, the pump, and the
detent – the Series 5 Basic is a very similar marker.

VI. Liability:
m, are not sponsored by them, represent them, or speak for
es or any
Pumpenstein has no affiliation with Chipley Custom Machine or Datum Precision
Machining. Likewise, we have no affiliation with WGP or the Autococker®. We
do not work for the
them in any way.
Pumpenstein or any of it’s members does not accept any liability for the handling
of these markers, tools, air tanks, or any other item mentioned in this Unofficial
manual. You, the user accept this sole liability when purchasing and using any
paintball marker. We, Pumpenstein disclaim any implied warranti
responsibility for any errors that may appear in this unofficial manual.
If, as the user of the marker, you do not accept total liability for performing any of
the maintenance, assembly, or work performed in this unofficial manual,
Pumpenstein requests that you do not do anything described in this manual. You
are not to use this unofficial manual unless you accept all liability and release
Pumpenstein and all of its current and previous members of all liability through
use. When using the
p doing dumb stuff, and if you do - not only did we tell you so
do not blame us.
any use or misuse thereof.
Simply by using this manual or using the marker in general you release
Pumpenstein of any and all liability associated with its
marker please adhere to all local, state and federal laws.
What we are trying to say is this. Forget you know us, forget you read this
manual, do not try this at home – we are professionals, do not be a dumb ass, do
not screw yourself u
–

VII. Safety and Handling:
A Paintball Marker is not a toy. Any of the tools in this manual are not toys.
Tools and paintball markers should be used only by adults or with adult
supervision. Respect other peoples’ property and when using any paintball
marker, obey all local, state and federal laws. When entering a paintball field,
for the sport of paintball,
fe direction and dry
er, to keep the muzzle pointed downward with a
egulatory information regarding the carrying
ne, and
hould only be used at a supervised, licensed and insured paintball field.
become aware of their rules and regulations.
It is very important to have the proper paintball protection before going to the
paintball field for play. This includes and is not limited to eye, head, throat, and
body protection. All protection used should be designed
e.g. eye gear designed specifically for paintball usage.
Always have a barrel plug in place and keep the safety ON when handling your
marker. When repairing or cleaning your marker first remove barrel and gas
cylinder, then depressurize your marker by pointing in sa
firing. Always treat the paintball marker as if it were loaded.
When handling the marker, always keep your fingers or any other objects away
from the trigger assembly to avoid accidental discharges. Make sure, when
carrying or transporting the mark
barrel-blocking device in place.
Before transporting your marker through public areas, such as airports, or bus
and trains stations, call ahead for r
and transporting of such an item.
Remember, any paintball marker should never be pointed or fired at anyo
s

VIII. Quick Start Guide:
asic or S6 does not come with a barrel
1. Screw barrel onto marker – if your S5 B
– use a barrel with Autococker® threads.
2. Place barrel blocking ‘Barrel Bag’ device properly onto the marker
CAUTION: Always wear paintball approved eye and face protection when dealing
king rod back until it latches into place. You will hear a click when
. Con
with a pressurized paintball marker.
3. Pull the coc
this happens.
4 nect the air source to the ASA (air system adapter.)
Note: Make sure to always get air cylinders filled by authorized, skilled
and knowledgeable technicians for the correct fill limits of each cylinder.
Do not try to refill cylinders by yourself. Do not use cylinders that have not
portant that
This bolt takes a 5/32 Allen key. Clockwise tightens the band to
our ho
been properly maintained or that are damaged. It is very im
caution be exercised when refilling or attaching cylinders.
5. Attach the loader to the feed port of the marker. The Series 6 comes with a
clamping feed neck. This feed neck either has a lever style clamping feature or
an Allen bolt.
y pper.
Note: Use only 0.68 caliber paintballs in your CCM® Series 6. Do not
modify the paint in any way. If I hear you were freezing paint – we are
going to come to your town, find you, bunker you, and then bonus ball
gulations and field
afety guidelines pertaining to use of paintball markers.
you.
Before field use, ensure the velocity is in compliance with field safety
guidelines. General field velocity limits are usually between 250 fps to 300
fps (fps = feet per second.) Your paintball markers velocity should never
exceed 300 fps. Observe and abide by all local laws, re
s

IX. A Brief Description of the workings of the
Series 5 and 6.
A cutaway of a Series 5 Body with Sear Engaged This is the marker cocked with a ball in the chamber.
When you pull the trigger a sear is lowered which releases a hammer (inside the
bottom tube of the marker). This hammer is under spring pressure (you load a
spring when you pull back the cocking rod or pump the marker). The hammer
strikes a valve, which allows gas to flow through the valve, up through the bolt,
and down the barrel, propelling a ball (if loaded) out of the barrel.
Series 5 Cutaway Sear disengaged, ball being propelled out of the barrel.
You must then manually cock this marker. With your finger off the trigger, grasp
the handle under the barrel and move it back toward the rear of the marker.
Pulling the pump rearward forces the pump arm back. The pump arm is attached
to the back block, which moves the bolt and the cocking rod back as well. The
bolt, when it clears the chamber, allows another paintball to fall into the chamber
of the marker.

Marker being pumped – hammer and bolt traveling to the rear – ball ready to drop in breach.
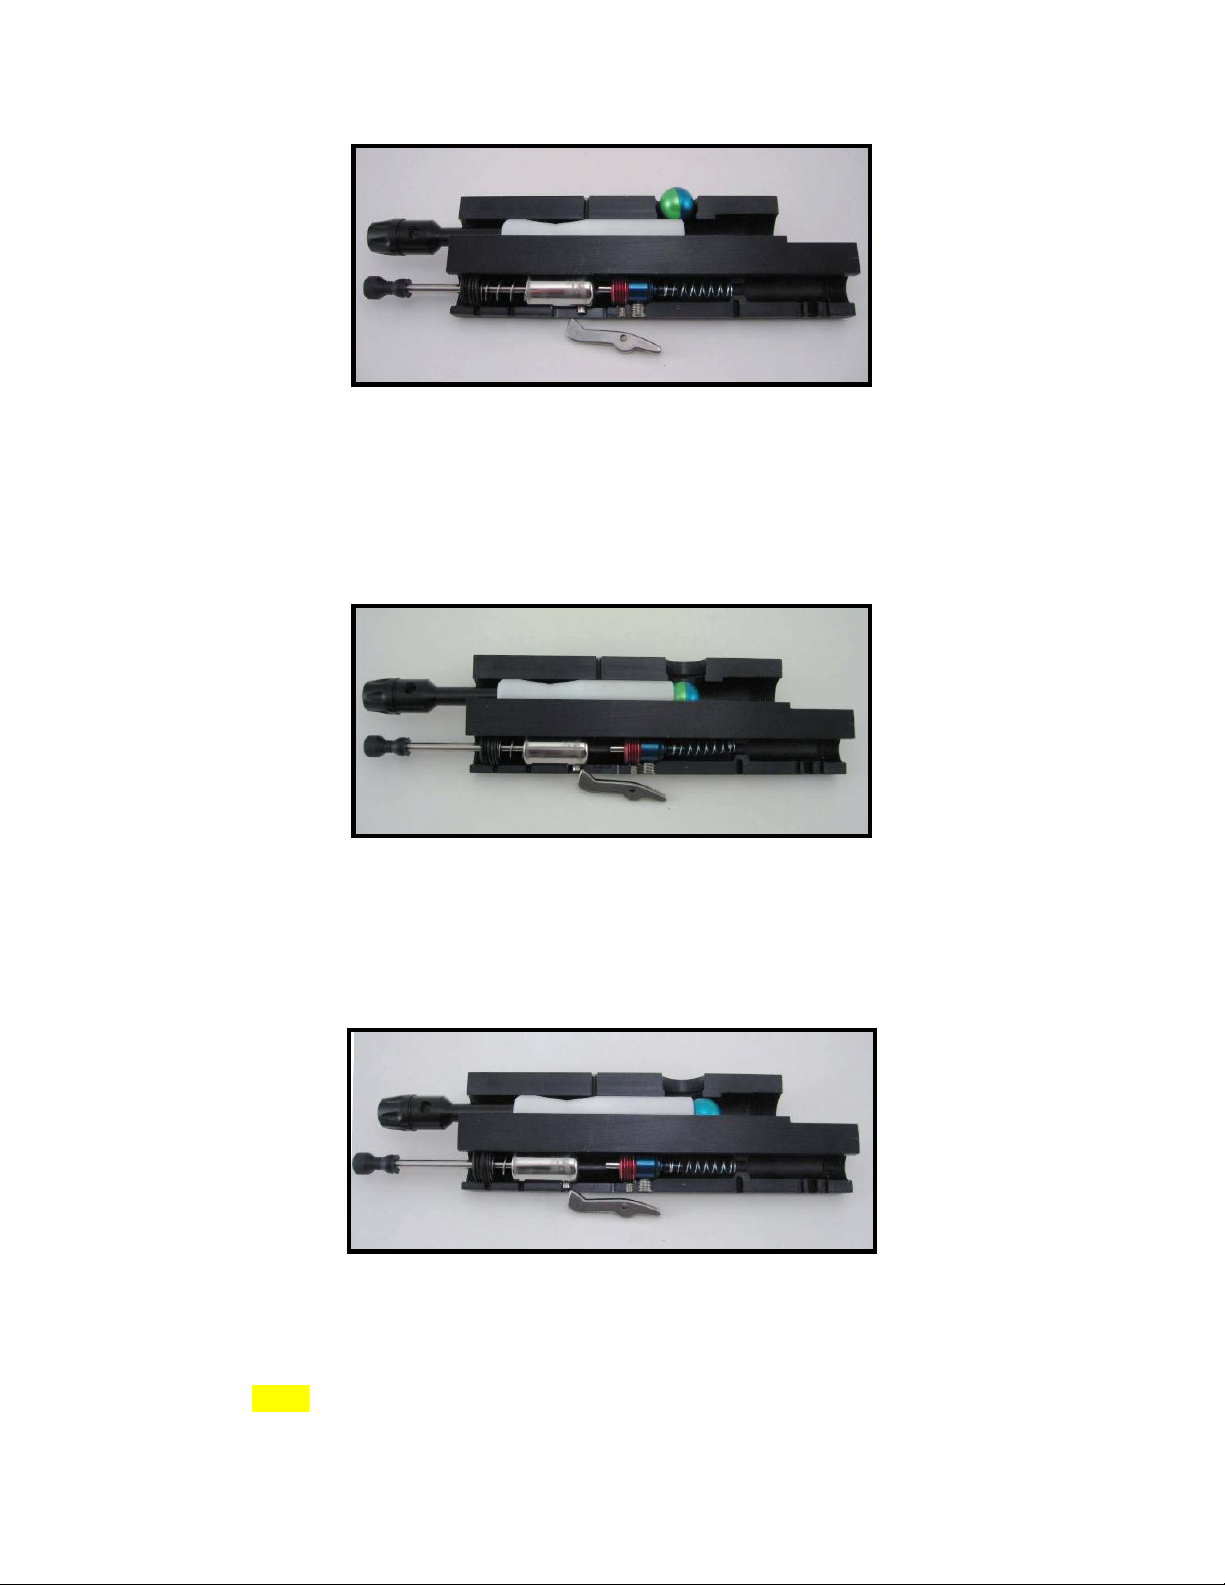
The ball is temporarily held in place by the ball detents installed in your Series 6
marker (they are hidden under the little caps on the side of your marker that say
S6). When the cocking rod (attached to the hammer) allows the hammer to clear
the sear, the sear will catch (with a click).
Sear Engaged, Bolt moving forward ball entering the chamber.
At this point, move the pump forward (away from the rear of the marker). This
will move the bolt forward, which will push the ball past the detents and into the
breach / barrel of the marker.
Sear Engaged, Bolt at rest, ball in chamber.
This is one full cycle of the Series 6.
Note: This marker comes with an ‘auto-trigger’. The auto-trigger allows
the user to hold down the trigger and pump the marker – firing the marker

every time the pump is returned to the starting position. With practice, the
user can fire his Series 6 over six balls per second with accuracy.
The auto-trigger is simply a cam that does not allow the trigger to fire until
the pumping cycle is complete. The cam, behind your trigger, is attached
to the pump arm (via a bolt – that takes a 1/8th Allen key). This allows for
the proper timing of the auto-trigger.
Este manual sirve para los siguientes modelos
1
Tabla de contenidos
Manuales populares de Equipo de paintball de otras marcas

PLANET ECLIPSE
PLANET ECLIPSE EGO LV1 Manual de usuario

PLANET ECLIPSE
PLANET ECLIPSE GEO CS1 Manual de usuario

First Endeavor Paintball
First Endeavor Paintball The Quest Manual de usuario

PMI
PMI Piranha VTL Manual de usuario

Proto
Proto SLG ULTRALITE Manual de usuario

Bob Long Technologies
Bob Long Technologies Alias Intimidator Manual de usuario