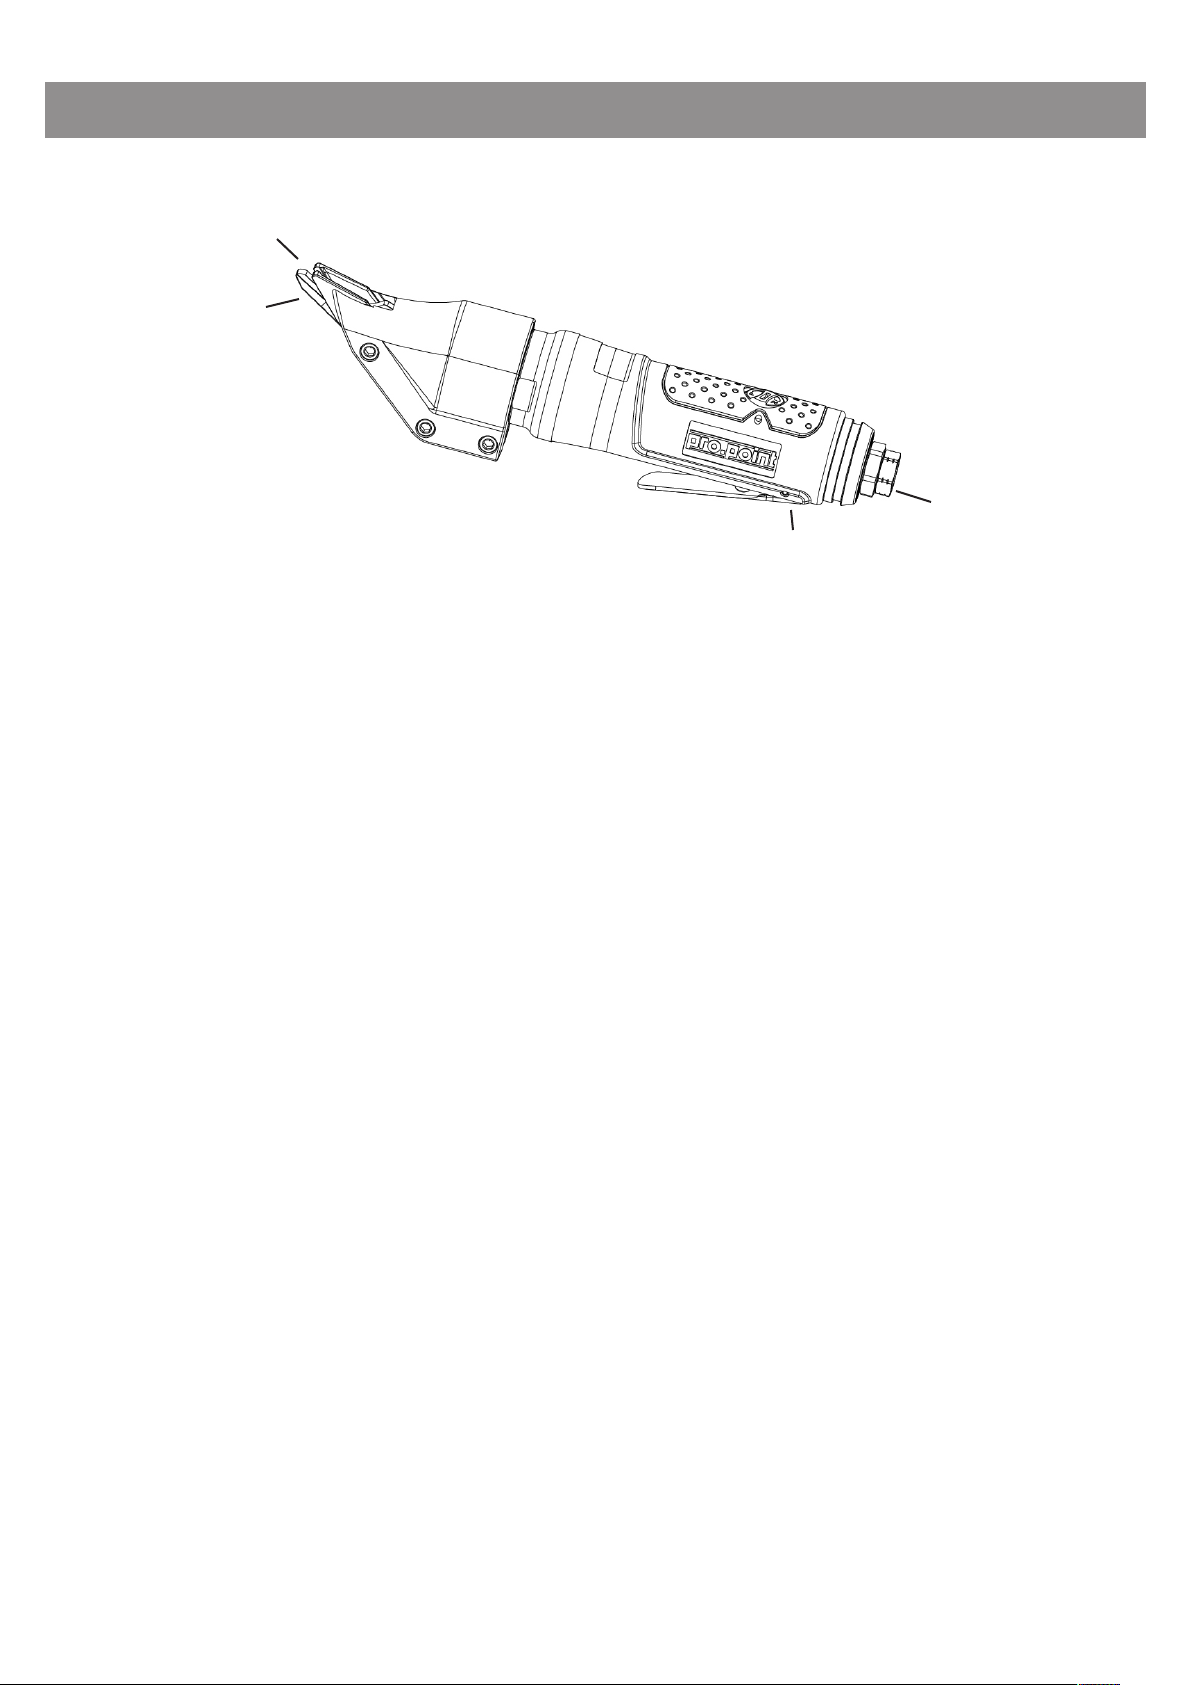
PROPOINT Air Shear Manual de usuario

User Manual
8380198V 2.0
Air Shear
Please read this manual before use.


3
For technical questions call: 1-800-665-8685
Air Shear
8380198V 2.0
SPECIFICATIONS
Air consumption 4 CFM @ 90 PSI
Max. cutting capacity 16 gauge
No load speed 2,500 SPM
Max. air pressure 120 PSI
Air inlet 1/4” NPT
INTRODUCTION
The Straight Grip Air Shear shears plastic, tin, aluminum, steel and other metals and with its heavy duty carbon steel
cutting blades and lets you cut up to 16 gauge steel. It is ideal for body shops, machine shops, and heating and air
conditioning contractors.
IMPORTANT SAFETY PRECAUTIONS
WARNING! Read and understand all instructions before using this tool. Keep this manual for the safety warnings
and precautions, operating, inspection and maintenance instructions. When using this tool, basic precautions
should always be followed to reduce the risk of personal injury and/or damage to the equipment. Note that when
this manual refers to a part number, it refers to the parts list included. Before allowing someone else to use this tool,
make sure they are aware of all safety information.
WORK AREA
1. Keep your work area clean and well lit. Cluttered and dark areas invite accidents.
2. Operate in a safe work environment. Do not use machines or air tools in damp or wet locations. Do not expose
to rain. Do not use power tools in the presence of flammable gases or liquids.
3. Keep children, bystanders and visitors away from the work area. Do not let them handle tools or extension
cords. No one should be in the work area if they are not wearing suitable protective equipment.
4. Store unused equipment. When not in use, tools must be stored in a dry location to prevent rust. Always lock up
tools and keep them out of reach of children.

AIr Shear
4For technical questions call: 1-800-665-8685
V 2.08380198
PERSONAL SAFETY
1. Dress properly, wear protective equipment. Use breathing, ear, eye, face, foot, hand and head protection.
Always wear ANSI approved impact safety goggles, which must provide both frontal and side protection.
Protect your hands with suitable gloves. Wear a full face shield if your work creates metal filings or wood chips.
Protect your head from falling objects by wearing a hard hat. Wear an ANSI approved dust mask or respirator
when working around metal, wood and chemical dusts and mists. Wear ANSI approved earplugs. Protective,
electrically non-conductive clothes and non-skid footwear are recommended when working. Wear steel toed
boots to prevent injury from falling objects.
2. Do not over reach; keep proper footing and balance at all times. Proper footing and balance enables better
control of the tool in unexpected situations.
3. Keep any articles of clothing, jewelry, hair etc. away from moving parts. These can be caught in moving parts,
resulting in damage to the tool and/or serious injury.
4. Stay alert, watch what you are doing and use your common sense. Do not operate any machine or tool when
you are tired, under the influence of drugs, alcohol or medications.
5. Use clamps or other practical ways to secure and support the work piece to a stable platform. Holding the work
piece by hand or against your body is unstable and may lead to loss of control.
VIBRATION PRECAUTIONS
This tool vibrates during use. Repeated or long-term exposure to vibration may cause temporary or permanent physical
injury, particularly to the hands, arms and shoulders.
1. Anyone using vibrating tools regularly or for an extended period should first be examined by a doctor and then
have regular medical check ups to ensure medical problems are not being caused by or worsened from tool
use. Pregnant women or people who have impaired blood circulation to the hands, past hand injuries, nervous
system disorders, diabetes or Raynaud’s Disease should not use this tool. If you feel any medical symptoms
related to vibrations (such as tingling, numbness, and white or blue fingers), seek medical attention
as soon as possible.
2. Do not smoke during use. Nicotine reduces the blood flow to the hands and fingers, increasing the risk of
vibration-related injury.
3. Wear suitable gloves to reduce the vibration effects on the user.
4. Use tools with the lowest amount of vibration when there is a choice between different processes.
5. Do not use for extended periods. Take frequent breaks when using this tool.
6. Let the tool do the work. Grip the tool as lightly as possible (while still keeping safe control of it).
7. To reduce vibrations, maintain tool as explained in this manual. If abnormal vibrations occur, stop using
this tool immediately.
8. This tool will not stop moving immediately. Do not lay the tool down or leave it unattended until it has come
to a complete stop. A part that is moving could make the tool jump or grab a surface and pull the tool out of
your control.

Air Shear
5
For technical questions call: 1-800-665-8685
V 2.0 8380198
SPECIFIC SAFETY PRECAUTIONS
1. The warnings and precautions discussed in this manual cannot cover all possible conditions and situations that
may occur. It must be understood by the operator that use common sense and caution are factors which cannot
be built into this product, but must be supplied by the operator.
2. Install an in-line shutoff valve to allow immediate control over the air supply in an emergency, even if a
hose is ruptured.
3. Use this tool with both hands only. Using tools with only one hand can result in loss of control.
4. Do not lay the tool down until it has come to a complete stop. Moving parts can grab the surface and pull the
tool out of your control.
5. Before using the Shear, make sure the Blades (55, 54, 56) are properly attached to the tool. Be sure the Blades
are not dull, cracked, or bent.
6. The Blades will become hot while cutting. Allow the Blades to completely cool before touching.
7. Allow the Blades to move at full speed before feeding them into the work piece. Do not force the Blades into
the work piece when cutting. Apply moderate pressure, allowing the Blades to cut without being forced. When
turning off the Shear, allow the Blades to stop on their own. Do not press against the Blades to stop them.
8. Always use recommended replacement Blades. The recommended replacement Left Blade (55), Center Blade
(54), and Right Blade (56) are available from Princess Auto LTD.
TOOL USE AND CARE
1. Use the right tool for the job. Do not attempt to force a small tool or attachment to do the work of a larger
industrial tool. The tool will perform better and more safely at the task for which it was intended. Do not modify
this tool or use for a purpose for which it was not designed.
2. Securely hold this tool using both hands. Using tools with only one hand can result in loss of control.
3. Maintain tools with care. Keep tools clean, sharp and in good condition for a better and safer performance.
Follow instructions for lubricating and changing accessories. Inspect tool fittings, alignment and hoses
periodically and, if damaged, have them repaired by an authorized technician or replaced. The handles must
be kept clean, dry and free from oil and grease at all times. A properly maintained tool reduces the risk of
binding and is easier to control. Sharp tools are safer than tools which have become dull because you do not
have to apply excessive amounts of force to make your cuts. Applying excessive force can lead to slips and
damage to your work or personal injury.
4. Remove adjusting keys and wrenches. Check that keys and adjusting wrenches are removed from the tool or
machine before connecting it. A wrench or key that is left attached to a rotating part of the tool increases the
risk of personal injury.
5. Avoid unintentional starts. Be sure that the throttle switch is in neutral or OFF position when not in use and
before connecting it to any air source. Do not carry the tool with fingers near or on the switch.
6. Only use the lubricants supplied with the tool or specified by the manufacturer. Other lubricants may not be
suitable and may damage the tool or even make the tool explode.
7. When not in use for an extended period, apply a thin coat of lubricant to the steel parts to avoid rust.
8. Maintain the label and name plate on the tool. These carry important information. If unreadable or missing,
contact Princess Auto for a replacement.

AIr Shear
6For technical questions call: 1-800-665-8685
V 2.08380198
AIR SOURCE
1. Disconnect air supply. Disconnect tools from air pressure
source when not in use, before cleaning, servicing or
changing a piece or accessory. After disconnecting,
discharge any residual air pressure.
2. Do not use tools if the trigger switch does not function
properly. Any tool that cannot be controlled with the ON/
OFF switch is dangerous and must be repaired.
3. Use proper size and type of air pressure line and fittings.
The recommended air line for a tool with a 1/4” inlet is
3/8” I.D.
4. Always verify prior to using a tool that the air source has
been adjusted to the rated air pressure or within the rated
air-pressure range. Over pressurizing a tool may cause
bursting, abnormal operation, breakage of the tool or
serious injury to persons. Use only clean, dry, regulated
compressed air at the rated range as marked on the tool.
5. Never use pure oxygen, carbon dioxide, combustible
gases or any bottled gas as an air source for a tool. Such gases are capable of causing an explosion and
serious injury to persons. Do not use an air source besides an air compressor to power this tool.
6. Always use an air regulator, an in-line filter and a moisture trap in your compressed air system. These
accessories will increase the tool’s life and keeps the tool in good working condition. 7. Drain the air tank
daily. Water in the air line will damage the tool.
8. Clean air inlet filter weekly.
9. Avoid using too long of an air hose. The longer the hose, the lower the pressure will be at the end of the hose,
to the point that it may not meet the minimum required for the tool. As well, a longer hose can become a
tripping hazard.
10. Keep hose away from heat, oil and sharp edges. Check hose for wear, and make certain that all connections
are secure.
11. Always carry a tool by its handle, never carry the tool by the air hose.
12. Line pressure should be increased to compensate for unusually long air hoses (over 26 ft). The hose diameter
should be 3/8” I.D.
13. Air tool CFM consumption ratings are based upon a 25% duty cycle. If you require continuous duty,
a larger compressor will be required (eg. 4.0 CFM tool at continuous duty requires 16.0 CFM to function at
maximum torque).
See the diagram above for recommended components of an air line.
AIR SOURCE INSTALLATION
1. Set the air pressure regulator on the air compressor to 90 PSI. Do not exceed the tool’s recommended air
pressure. Excess pressure could result in damage to the tool, to your work piece or serious injury.
2. Prepare a standard 1/4” air connector for use with your tool. Wrap the threaded portion of the air connector
with thread tape. Attach it to the tool’s air inlet. Tighten securely.
3. Attach a standard quick connector to the air source’s hose. Attach the air hose to the tool.
Note: If you are not using an in-line oiler, add a few drops of air tool oil in the tool’s air inlet before use. In the
same manner, add a few drops after every hour of use.
4. Check the air line and its connections for air leaks. Do not use this tool until you have repaired all air leaks.
Note: Turn off the air compressor, disconnect the air pressure hose and discharge any residual pressure inside
the tool before changing accessories or making any adjustments to the tool. Failure to do so could result in
severe injury, tool or property damage.

Air Shear
7
For technical questions call: 1-800-665-8685
V 2.0 8380198
LUBRICATION
1. All air tools are packed in grease to prevent corrosion of internal parts during shipping and storage. We
recommend you clean this out to have optimum performance from your new air tool. Add a generous amount of
air tool oil in the air inlet, and then run the tool under no load until exhaust is clear to remove packing grease.
For future maintenance, add only one or two drops of oil daily.
2. It is very important that the tool be properly lubricated. Without proper lubrication, the tool will not work
properly and parts will wear prematurely. Manually dropping a drop or two of air tool oil once a day into the
tool’s male connector is better than using an automatic in-line lubricator, which should only be required when
there are multiple users of the same tool.
3. Keep the in-line lubricator filled and correctly adjusted. It should be regularly checked and filled with air tool
oil. Proper adjustment of the in-line lubricator is performed by placing a sheet of paper next to the exhaust ports
and holding the throttle open approximately 30 seconds. The lubricator is properly set when a light stain of oil
collects on the paper. Excessive amounts of oil should be avoided.
4. Air tool oil is the only recommended lubricant for use in all air tools. Do not try to use other types of lubricants
to oil your tools. Using the wrong lubricant will cause premature tool failure and/or loss of power. Use
only recommended lubricants, specially made for pneumatic applications. Substitutes may harm the rubber
compounds in the tool’s O-rings and other rubber parts.
5. Oiling your air tool regularly is important, but it is also important not to over oil your air tool. Over oiling can
cause premature tool failure. Your tool may not be ruined, but it will begin to experience loss of power that will
continually get worse until it no longer works, at which point the tool will have to be taken apart and cleaned of
excess oil.
6. In the event that it becomes necessary to store the tool for an extended period of time (overnight, weekend,
etc.), it should receive a generous amount of lubrication at that time. The tool should be run for approximately
30 seconds to ensure oil has been evenly distributed throughout the tool. The tool should be stored in a clean
and dry environment.
WARNING! NEVER use WD-40 to clean or lubricate your air tool. WD-40 is a solvent that will break down the
internal grease and cause the air tool to seize up.
UNPACKING
1. Carefully remove the parts and accessories from the box.
2. Make sure that all items listed in the parts lists are included.
3. Inspect the parts carefully to make sure the tool was not damaged while shipping.
4. Do not discard the packaging material until you have carefully inspected and satisfactorily operated the tool.
WARNING! If any part is missing, do not operate the tool until the missing parts are replaced. Failure to do so
could result in serious personal injury.

AIr Shear
8For technical questions call: 1-800-665-8685
V 2.08380198
OPERATION
PARTS IDENTIFICATION
Left Blade (55)
Center Blade (54)
Trigger (4)
Air inlet (5)
INITIAL TOOL SET UP/ASSEMBLY
AIR SUPPLY
WARNING! To prevent serious injury from accidental operation: Do not install a female quick coupler on the tool.
Such a coupler contains an air valve that will allow the air tool to retain pressure and operate accidentally after
the air supply is disconnected.
Note: Air flow, and therefore tool performance, can be hindered by undersized air supply components.
1. The air hose must be long enough to reach the work area with enough extra length to allow free movement
while working.
2. Make sure the tool’s Trigger (4) is in the off position; refer to the “Product Features” section for description of
controls.
3. Close the in-line safety valve between the compressor and the tool.
4. Turn on the air compressor according to the manufacturer’s directions and allow it to build up pressure until it
cycles off.
5. Adjust the air compressor’s output regulator so that the air output is enough to properly power the tool, but the
output will not exceed the tool’s maximum air pressure (120 PSI) at any time. Adjust the pressure gradually,
while checking the air output gauge to set the right pressure range.
6. Inspect the air connections for leaks. Repair any leaks found.
7. If the tool will not be used at this time, turn off and detach the air supply, safely discharge any residual air
pressure, and release the throttle and/or turn the switch to its off position to prevent accidental operation.
Note: Residual air pressure should not be present after the tool is disconnected from the air supply. However, it is a
good safety measure to attempt to discharge the tool in a safe fashion after disconnecting to ensure that the tool is
disconnected and unpowered.
Figure A
55
54
5
4

Air Shear
9
For technical questions call: 1-800-665-8685
V 2.0 8380198
OPERATING INSTRUCTIONS
1. If an automatic oiler is not used, add a few drops of Pneumatic Tool Oil to the airline connection before use.
Add a few drops more after each hour of continual use.
2. IMPORTANT: Before first use, it is recommended to test the Shear on scrap material to determine the cutting
capacity of the Blades (55, 54, 56).
3. Connect the air supply hose to the Shear. Turn on the compressor, and set its regulator to the recommended
120 PSI for the Shear.
4. In order to keep the air supply hose out of the way, hang it over your shoulder.
5. Make sure to hold the Shear with both hands safely away from the Blades (55, 54, 56). (See Figure A.)
6. Place the Center Blade (54) underneath the lip of the work piece. Make sure the Left Blade (55) and Right
Blade (56) are above the lip of the work piece. (See Figure A.)
7. Squeeze the Trigger (4) and allow the Blades (55, 54, 56) to move at their fullest speed. Then move the Blades
slowly along the cut line of the work piece. Either cut completely through the work piece or pull the Shear
back through the cut portion of the work piece before releasing the Trigger. This will help keep the Blades from
getting caught in the work piece. (See Figure A.)
8. If the tool requires more force to accomplish the task, verify that the tool receives sufficient, unobstructed
airflow (4 CFM).
CAUTION! To prevent tool failure, resulting in injury: Do not exceed the tool’s maximum air pressure rating
(120 PSI). If the tool still does not have sufficient force at maximum pressure and sufficient airflow, then a larger
tool may be required.
9. To prevent accidents, turn off the Shear, detach the air supply, safely discharge any residual air pressure in the
tool, and release the Trigger (4) after use. Clean external surfaces of the tool with clean, dry cloth, and apply a
thin coat of tool oil. Then store the tool indoors out of children’s reach.
MAINTENANCE
1. Daily - Air Supply Maintenance: Every day, perform maintenance on the air supply according to the component
manufacturers’ instructions. The lubricator’s oil level needs to be maintained and the moisture filter must be
regularly drained. Performing routine maintenance on the air supply will allow the tool to operate more safely
and will also reduce wear on the tool.
2. Quarterly (every 3 months) - Tool Disassembly, Cleaning, and Inspection: Have the internal mechanism cleaned,
inspected, and lubricated by a qualified technician.

AIr Shear
10 For technical questions call: 1-800-665-8685
V 2.08380198
BLADE REPLACEMENT
To replace the Blades use only recommended replacement Blades (55, 54, 56) for this Shear. (See Figure B)
• Remove the two Screws (52) and Cutter Housing Nuts (51) from the Cutter Housing (50) of the Shear (See
Figure B)
• Remove the Center Blade (54) first then remove the Left Blade (55) Right Blade (56) and the two spacers (53).
(See Figure B.)
• Install the new Blades. Place the two spacers (53) between the new Left Blade (55) and Right Blade (56) and
insert into the Cutter Housing (50) (Figure B)
• Thread in the two screws (52) and tighten the two Cutter Housing Nuts (51) (See Figure B.)
Figure B
50
52
56
53
54
55
52
51
50
Cutter Housing (50)
Screw (52)
Right Blade (56)
Spacers (53)
Center Blade (54)
Left Blade (55)
Screw (52)
Cutter Housing Nuts (51)
Cutter Housing (50)
Este manual sirve para los siguientes modelos
1
Tabla de contenidos
Idiomas:
Otros manuales de Herramientas eléctricas de PROPOINT

PROPOINT
PROPOINT 8844011 Manual de usuario

PROPOINT
PROPOINT 8561185 Manual de usuario

PROPOINT
PROPOINT 8844185 Manual de usuario

PROPOINT
PROPOINT 8836363 Manual de usuario

PROPOINT
PROPOINT 8327835 Manual de usuario

PROPOINT
PROPOINT 9028002 Manual de usuario

PROPOINT
PROPOINT 8354482 Manual de usuario

PROPOINT
PROPOINT 8968299 Manual de usuario

PROPOINT
PROPOINT MAGNETIC DRILL Manual de usuario

PROPOINT
PROPOINT TOOL SHARPENER Manual de usuario


