prologue AV-225 Manual de usuario

Art.no. Model
36-4678 AV-225 Ver.201110
EnglishSvenskaNorskSuomi
ProjectorClock
Projektorklocka
Projektorklokke
Projektorikello

2

3
English
ProjectorClock
Art. no 36-4678 Model AV-225
Please read theentire instruction manual before use and save it for future reference.
Wereserve theright for any errors in text or images and for making any necessary
technical changes to this document. Ifyou should have any questions concerning
technical problems please contact our Customer Services.
Safety
• Do not place naked flames such as wax candles on or near the product.
• Do not place the product on a cramped shelf so that its ventilation restricted.
• Make sure that the wall socket into which the mains lead is plugged is accessible,
since the mains lead is used to disconnect the product from the supply.
• Do not cover the ventilation openings of the product.
• Do not expose the product to direct sunlight or very hot, cold or dusty environments.
Avoid severe vibration and impacts.
• Do not position the product where it is exposed to moisture or splashing water.
Careandmaintenance
Use a soft cloth and a mild detergent to clean the outside of the projector clock.
Never use strong cleaning agents or solvents.
Disposal
Follow local ordinances when disposing of this product.
Ifyou are unsure about how to dispose of this product contact your municipality.
Specifications
Mains supply 230 V AC, 50 Hz, 5 W
Frequency bands FM 87.5–108 MHz
AM 531–1620 kHz
Battery 1 x CR2032 (3 V)
Descriptionoftheproduct
• Projector clock with FM/AM radio.
• Sleep timer and wake-up alarm.
• LINE-IN
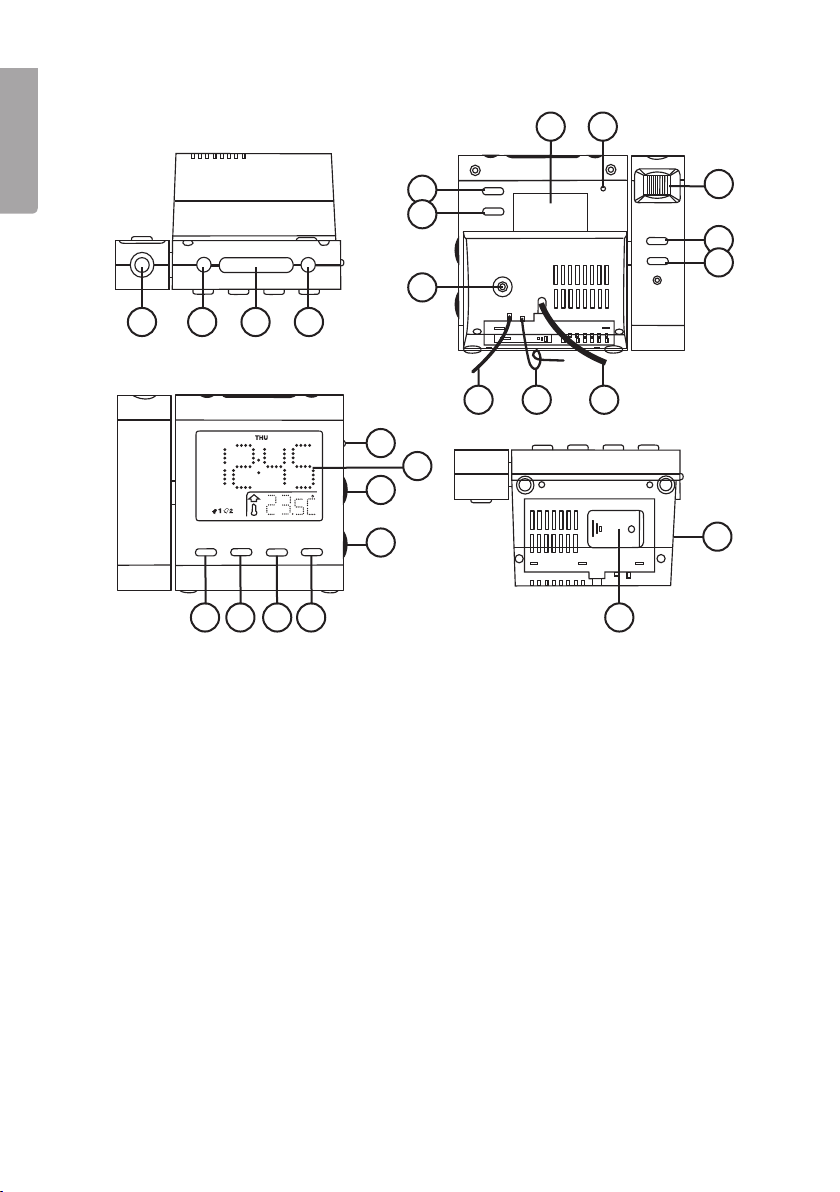
1 2 3 4
5
6
7
8 9
10
11
12
13
16 17 18 19
20
21
22
23
14
25
24
15
4
English
Controlsandfunctions
1. Projector
2. [BAND] Choice of frequency band,
FM or AM
3. [SNOOZE/SLEEP] Snooze, sleep timer
4. [ON/OFF] Radio ON/OFF
5. [AL. 1] Alarm 1 ON/OFF, choice of
alarm signal
6. [AL. 2] Alarm 2 ON/OFF, choice of
alarm signal
7. LINE IN 3.5 mm low-level input
8. Product marking
9. [RESET]
10. [FOCUS] Focus adjustment for
the projected time
11. [180º FLIP] Rotates the projected
time 180º
12. [PROJECTION ON/OFF]
13. Temperature sensor
14. FM aerial
15. Mains lead
16. [AL. SET] Alarm time setting
17. [◄◄] Month/day, ºC/ºF setting
18. [►►] Year, summer/winter time setting
19. [MODE] Toggle between setting modes
20. [DIMMER LOW/HIGH/AUTO OFF]
Display brightness and AUTO OFF
setting
21. LCD display
22. [VOLUME +/-] Volume +/-
23. [TUNING] Radio channel tuning
24. Battery cover
25. Loudspeaker

5
English
Gettingstarted
1. Unscrew the screw that secures the battery cover and open the cover.
2. Install one CR2032 battery (3 V) in the battery holder. Pay attention to the polarity.
The positive side of the battery must be facing upwards.
NOTE! If the power fails:
• The alarm is not activated when the clock is powered from the battery.
• The purpose of the battery is to supply the projector clock during power fai-
lures and to maintain the set date and time. When the power is restored, the
clock is once more powered from the wall socket.
• When the projector clock is powered from the battery, the display and
the radio are both disabled.
3. Connect the projector clock to a wall socket.
Use
Timeanddate
1. Press and hold [MODE] for two seconds. The year starts to flash on the display.
2. Press or hold [◄◄] or [►►] to set the year.
3. Press [MODE] repeatedly to set the following in turn: Month – Day – 12/24-hour
display – Hours – Minutes. Press repeatedly or hold down [◄◄] or [►►] to do
the various settings.
Projector
1. Switch the projector on or off with [PROJECTION ON/OFF].
2. Turn [FOCUS] for a sharp projected image of the set time on the ceiling or wall.
3. To rotate the projected time through 180º, press [180º FLIP].
4. The maximum distance to the wall/ceiling is 3 metres.
Radio
1. Switch the radio on and off with [ON/OFF].
2. Choose FM or AM with [BAND]. An AM aerial is built into the radio.
3. Tune in the radio station you want with [TUNING].
4. Set the volume you want with [VOLUME +/-].
Alarm1and2
1. Press and hold [AL.SET] for two seconds. The setting for hours for alarm 1 flashes
and the indication for alarm 1 lights up on the display
2. Press or hold [◄◄] or [►►] to set the hours.
3. Press [AL. SET] again to set the minutes.
4. Press [AL. SET] again to set the weekday interval. Press [◄◄] or [►►] to choose
from the following intervals: 1–5 (Monday to Friday), 1–7 (the entire week),
6–7 (Saturday-Sunday), 1–1 (one day of the week).

6
English
5. Press [AL. SET] again to start setting alarm 2.
NOTE! If you have chosen 1–1, the display shows 1–1 and SUN (Sunday) flashing
when [AL. SET] is pressed. This is to let you set the day of the week you want
(MON-TUE-WED-THU-FRI-SAT-SUN). Press [◄◄] or [►►] to set the day you want.
The setting for hours for alarm 2 flashes and the indication for alarm 2 lights up on
the display
6. Set alarm 2 in the same way as alarm 1.
7. Press [AL. SET] to check the alarm times for alarms 1 and 2 whenever you want.
8. Press [AL. 1] to activate alarm 1 with a sound signal. Press again to activate it with
the radio as the alarm sound. Press again to deactivate.
9. Press [AL. 2] to activate alarm 2 with a sound signal. Press again to activate it with
the radio as the alarm sound.
10. Press again to deactivate.
If no button is pressed, the alarm signal or the radio operate for 30 minutes when the
alarm is activated. The alarm then switches off automatically and is activated again
after 24 hours.
Snooze
1. Press [SNOOZE/SLEEP] when the alarm is activated. The alarm is silenced and is
activated again after nine minutes.
2. The snooze function is switched off automatically after 30 minutes.
3. The snooze function is switched off if [RADIO ON/OFF] is pressed.
4. If AUTO OFF mode for the display has been chosen, the display lights up when
[SNOOZE/SLEEP/NAP] is pressed and then goes out again.
Display
• Set the brightness of the display with [DIMMER LOW/HIGH/AUTO OFF].
LOW, HIGH or AUTO OFF.
• With AUTO OFF, the display is unlit but lights up when the alarm is activated.
• In AUTO OFF mode, the time can be checked at any time by pressing any button
on the front or top of the projector clock.
• Press [◄◄] to show the set month and day.
• Press [►►] to show the set year.
NOTE: When the [DIMMER LOW/HIGH/AUTO OFF] control is set to AUTO OFF,
the display only goes out after about 10 seconds.
Sleeptimer
1. With the radio switched on, press [SNOOZE/SLEEP]. “90” flashes and
the display shows “SLP” (sleep).
2. Press [SNOOZE/SLEEP] again within five seconds to choose
90, 60, 30 or 15 minutes.
3. The radio switches off automatically when the set time expires.

7
English
DST
Press and hold [►► DST] for two seconds to toggle between summer time and
winter time.
LINE-IN
• Connect a devices such as an MP3 player to the 3.5 mm LINE-IN jack.
• The radio is switched off automatically when LINE-IN is used.
• Adjust the volume of the MP3 player and the projector clock.
Indoortemperaturedisplay
The display shows the current indoor temperature. Hold down [◄◄] to toggle
between ºC and ºF.
Reset
• If the projector clock does not work properly it may help to reset it.
• Use a pointed object (such as a ballpoint pen or paper clip) to carefully press
[RESET].
• This restores the projector clock to its factory settings and returns all settings
(clock, date and alarm times) to zero.

8
Svenska
Projektorklocka
Art.nr 36-4678 Modell AV-225
Läs igenom hela bruksanvisningen före användning och spara den sedan för framtida
bruk. Vireserverar oss för ev. text- och bildfel samt ändringar av tekniska data.
Vid tekniska problem eller andra frågor, kontakta vår kundtjänst (se adressuppgifter
på baksidan).
Säkerhet
• Inga öppna lågor som t.ex. stearinljus får placeras inärheten av eller på produkten.
• Placera inte produkten ien trång hylla på sådant sätt att dess ventilation försämras.
• Se till att vägguttaget där nätsladden ansluts är lättillgängligt eftersom nätsladden
används som frånkopplingsanordning från elnätet.
• Täck inte över produktens ventilationsöppningar.
• Utsätt inte produkten för direkt solljus eller mycket varma, kalla eller dammiga
miljöer. Inteheller för kraftiga vibrationer eller stötar.
• Placera inte produkten så att den utsätts för fukt eller stänkande vatten.
Skötselochunderhåll
Använd enmjuk trasa och ettmilt rengöringsmedel för att rengöra projektorklockan
utvändigt. Användaldrig starka rengöringsmedel eller lösningsmedel.
Avfallshantering
När du ska göra dig av med produkten ska detta ske enligt lokala föreskrifter.
Är du osäker på hur du ska gå tillväga, kontakta din kommun.
Specifikationer
Nätanslutning 230 V AC, 50 Hz, 5 W
Frekvensband FM 87,5–108 MHz
AM 531–1620 kHz
Batteri 1 x CR2032 (3 V)
Produktbeskrivning
• Projektorklocka med FM/AM-radio.
• Insomnings- och väckningsautomatik.
• LINE-IN

12 3 4
5
6
7
8 9
10
11
12
13
16 17 18 19
20
21
22
23
14
25
24
15
9
Svenska
Knapparochfunktioner
1. Projektor
2. [BAND] Val av frekvensband,
FM eller AM
3. [SNOOZE/SLEEP] Snooze,
insomningstimer
4. [ON/OFF] Radio PÅ/AV
5. [AL. 1] Larm 1 PÅ/AV, val av larmsignal
6. [AL. 2] Larm 2 PÅ/AV, val av larmsignal
7. LINE IN 3,5 mm lågnivåingång
8. Produktmärkning
9. [RESET] Återställning
10. [FOCUS] Fokusering av den
projicerade tiden
11. [180º FLIP] Vrider den projicerade
tiden 180º
12. [PROJECTION ON/OFF]
Projektion PÅ/AV
13. Temperatursensor
14. FM-antenn
15. Nätsladd
16. [AL. SET] Inställning av larmtid
17. [◄◄] Inställning av månad/dag, ºC/ºF
18. [►►] Inställning av år, sommar-
och vintertid
19. [MODE] Växla mellan olika
inställningslägen
20. [DIMMER LOW/HIGH/AUTO OFF]
Inställning av displayens ljusstyrka
och AUTO OFF
21. LCD-display
22. [VOLUME +/-] [Volym +/-]
23. [TUNING] Inställning av radiokanal
24. Batterilucka
25. Högtalare

10
Svenska
Attkommaigång
1. Skruva bort skruven som håller batteriluckan och öppna luckan.
2. Sätt i1 x CR2032-batteri (3 V) ibatterihållaren. Varnoga med polariteten, plus på
batteriet ska vara uppåt.
OBS! Vid strömavbrott:
• Larmet aktiveras inte när klockan strömförsörjs från batteriet.
• Batteriet är till för att strömförsörja projektorklockan vid strömavbrott och be-
hålla inställd tid och datum. Närströmmen kommer tillbaka återgår klockan till
att strömförsörjas från vägguttaget.
• När projektorklockan strömförsörjs från batteriet är displayen släckt och radion
fungerar inte.
3. Anslut projektorklockan till ettvägguttag.
Användning
Tidochdatum
1. Tryck och håll in [MODE] i2 sekunder. Inställningenför årtal blinkar idisplayen.
2. Tryck eller håll in [◄◄] eller [►►] för att ställa in årtal.
3. Tryck [MODE] upprepade gånger för att itur och ordning ställa in:
Månad – Dag – 12/24-timmarsvisning – Timmar – Minuter. Tryckupprepade
gånger eller håll in [◄◄ ] eller [►►] för att göra de olika inställningarna.
Projektor
1. Slå på eller av projektorn med [PROJECTION ON/OFF].
2. Vrid [FOCUS] för att tydligt projicera den inställda tiden itaket eller på väggen.
3. Vänd den projicerade tiden 180º genom att trycka [180º FLIP].
4. Maxavstånd till vägg/tak: 3 m.
Radio
1. Slå på och stäng av radion med [ON/OFF].
2. Välj FM eller AM med [BAND]. AM-antennen är inbyggd iradion.
3. Ställ in önskad radiostation med [TUNING].
4. Ställ in önskad volym med [VOLUME +/-].
Larm1och2
1. Tryck och håll in [AL. SET] i2 sekunder. Inställningenför timmar ilarm 1 blinkar och
indikeringen för larm 1 tänds idisplayen.
2. Tryck eller håll in [◄◄] eller [►►] för att ställa in timmarna.
3. Tryck [AL. SET] igen för att ställa in minuterna.
4. Tryck [AL. SET] igen för att ställa in veckodagsintervall. Tryck[◄◄] eller [►►] för
att välja mellan följande intervall: 1–5 (måndag–fredag), 1–7 (hela veckan),
6–7 (lördag-söndag), 1–1 (en dag iveckan).
Este manual sirve para los siguientes modelos
1
Tabla de contenidos
Idiomas:
Otros manuales de Reloj de prologue

Manuales populares de Reloj de otras marcas

Silicon Laboratories
Silicon Laboratories SI5324 Manual de usuario

Heathkit
Heathkit GC-1005 Manual de usuario

Oregon Scientific
Oregon Scientific PRYSMA RMR221P Manual de usuario

Andrew O'Malley
Andrew O'Malley DOTKLOK Manual de usuario

ALGE-Timing
ALGE-Timing ASC3 Manual de usuario

Bodet
Bodet Profil 960 Manual de usuario


