
ProAudio PP107234 Manual de usuario

Brought to market by Pana-Pacific, Inc.
PP107234 and PP107236
CD-RECEIVER
INSTRUCTION MANUAL
AUTORADIO CD
MODE D’EMPLOI
RECEPTOR CD
MANUAL DE INSTRUCCIONES
ProAudio

2ENGLISH
Contents
Before Use................................................................................................. 3
Basics ......................................................................................................... 4
Getting Started ........................................................................................ 5
1 Set the clock and date
2 Set the other optional settings
Radio .......................................................................................................... 6
CD/USB/iPod............................................................................................. 7
Spotify ..................................................................................................... 10
AUX........................................................................................................... 11
Bluetooth® .............................................................................................. 12
Bluetooth – Connection
Bluetooth – Mobile phone
Bluetooth – Audio
Audio Settings ........................................................................................ 18
Display Settings ..................................................................................... 20
Installation/Connection ....................................................................... 21
References .............................................................................................. 23
More information
Change the display information
Troubleshooting.................................................................................... 25
Specifications ......................................................................................... 27
ENGLISH 3
Before Use
IMPORTANT
• To ensure proper use, please read through this manual before using this
product. It is especially important that you read and observe Warnings and
Cautions in this manual.
• Please keep the manual in a safe and accessible place for future reference.
WARNING
• Do not operate any function that takes your attention away from safe
driving.
CAUTION
Volume setting:
• Adjust the volume so that you can hear sounds outside the car to prevent
accidents.
• Lower the volume before playing digital sources to avoid damaging the
speakers by the sudden increase of the output level.
General:
• Avoid using the external device if it might hinder safe driving.
• Make sure all important data has been backed up. We shall bear no
responsibility for any loss of recorded data.
• Never put or leave any metallic objects (such as coins or metal tools) inside
the unit to prevent a short circuit.
• If a disc error occurs due to condensation on the laser lens, eject the disc
and wait for the moisture to evaporate.
This symbol on the product means there are important
operating and maintenance instructions in this manual.
Be sure to carefully read instructions in this manual.
How to read this manual
• The displays shown in this manual are examples used to provide clear
explanations of the operations. For this reason, they may be different
from the actual displays.
• Operations are explained mainly using buttons on the faceplate.
• English indications are used for the purpose of explanation. You can
select the display language from the
[FUNCTION]
menu. (Page6)
•
[XX]
indicates the selected items.
•(PageXX) indicates references are available on the stated page.
4ENGLISH
Basics
To On the faceplate
Turn on the power Press B SRC.
• Press and hold to turn off the power.
Adjust the volume Turn the volume knob.
Select a source • Press B SRC repeatedly.
• Press B SRC, then turn the volume knob within 2 seconds.
Change the display information Press DISP repeatedly. (Page 24)
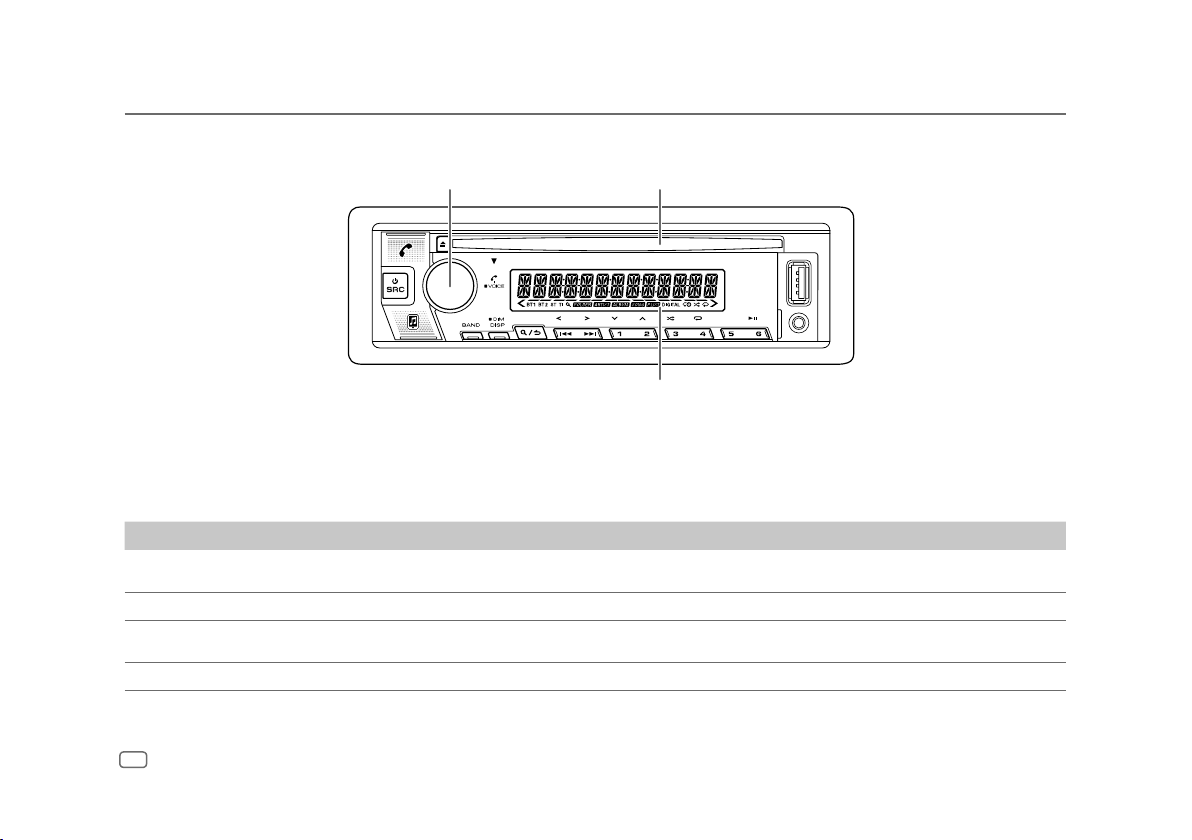
Faceplate
Volume knob Loading slot
Display window*
* Only for illustration purpose.

ENGLISH 5
Getting Started
1 Set the clock and date
1 Press the volume knob to enter
[FUNCTION]
.
2 Turn the volume knob to select
[CLOCK]
, then press the knob.
To adjust the clock
3 Turn the volume knob to select
[CLOCKADJUST]
, then press the knob.
4 Turn the volume knob to make the settings, then press the knob.
Set the time in the order of “Hour” “Minute”.
5 Turn the volume knob to select
[CLOCK FORMAT]
, then press the knob.
6 Turn the volume knob to select
[12H]
or
[24H]
, then press the knob.
To set the date
7 Turn the volume knob to select
[DATEFORMAT]
, then press the knob.
8 Turn the volume knob to select
[DD/MM/YY]
or
[MM/DD/YY]
, then press
the knob.
9 Turn the volume knob to select
[DATESET]
, then press the knob.
10 Turn the volume knob to make the settings, then press the knob.
Set the date in the order of “Day” “Month” “Year” or “Month” “Day”
“Year”.
11 Press and hold to exit.
To return to the previous setting item, press .
2 Set the other optional settings
You can only set the following items while the unit is in STANDBY source.
1 Press BSRC repeatedly to enter STANDBY.
2 Press the volume knob to enter
[FUNCTION]
.
3 Turn the volume knob to select an item (see the following table), then
press the knob.
4 Repeat step 3 until the desired item is selected or activated.
5 Press and hold to exit.
To return to the previous setting item, press .
Default: [XX]
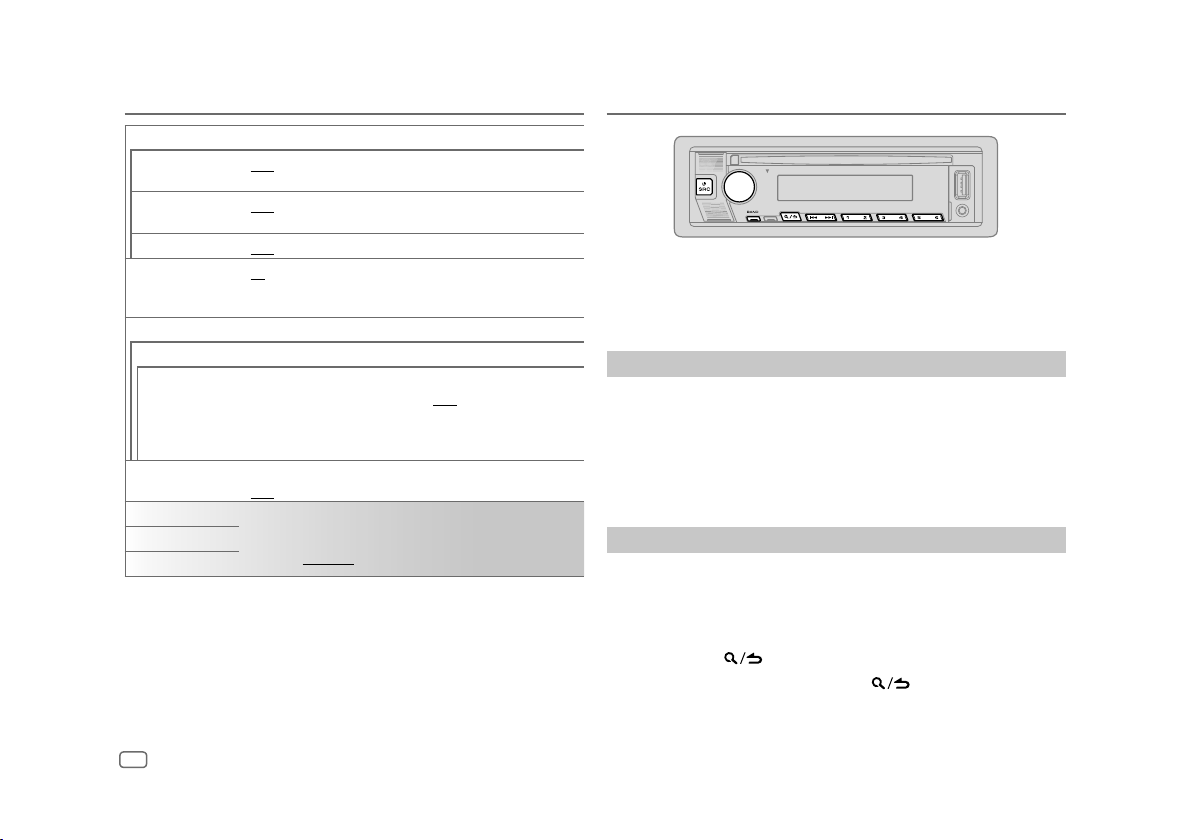
[AUDIO CONTROL]
[SWITCH PREOUT] [REAR]/[SUB-W]: Selects whether rear speakers or a subwoofer are
connected to the line out terminals on the rear (through an external
amplifier). (Page 25)
[TUNER SETTING]
[PRESET TYPE] [NORMAL]: Memorizes one station for each preset button in each band
(FM1/FM2/FM3/AM). ; [MIX]: Memorizes one station for each preset
button, regardless of the selected band.
[SYSTEM]
[KEY BEEP] [ON]: Activates the keypress tone. ; [OFF]: Deactivates.
6ENGLISH
[SOURCE SELECT]
[SPOTIFY SRC] [ON]: Enables SPOTIFY/SPOTIFY BT in source selection. ;
[OFF]: Disables. (Page 10)
[BT AUDIO SRC]
[ON]: Enables BT AUDIO in source selection. ;
[OFF]: Disables. (Page
17
)
[BUILT-IN AUX] [ON]: Enables AUX in source selection. ; [OFF]: Disables. (Page 11)
[CD READ] [1]: Automatically distinguishes between audio file disc and music CD. ;
[2]: Forces to play as a music CD. No sound can be heard if an audio file
disc is played.
[F/W UPDATE]
[UPDATE SYSTEM]
[F/W UP xxxx] (This feature is not available for this model.)
[YES]: Starts upgrading the firmware. ; [NO]: Cancels (upgrading is not
activated).
• Once you have upgraded the firmware, you are unable to downgrade
the firmware.
[FACTORY RESET] [YES]: Resets the settings to default (except the stored station). ;
[NO]: Cancels.
[ENGLISH] Select the display language for [FUNCTION] menu and music
information if applicable.
By default, [ENGLISH] is selected.
[ESPANOL]
[FRANCAIS]
Getting Started Radio
• “ST” indicator lights up when receiving an FM stereo broadcast with
sufficient signal strength.
• The unit switches to FM alarm automatically when receiving an alarm
signal from FM broadcast.
Search for a station
1 Press BSRC repeatedly to select RADIO.
2 Press BAND repeatedly to select FM1/FM2/FM3/AM.
3 Press S/ Tto search for a station.
You can store up to 18 stations for FM and 6 stations for AM.
• To store a station: Press and hold one of the number buttons (1 to 6).
• To select a stored station:
Press one of the number buttons (1 to 6).
Other settings
1 Press the volume knob to enter
[FUNCTION]
.
2 Turn the volume knob to select an item (page 7), then press the
knob.
3 Repeat step 2 until the desired item is selected/activated or follow the
instructions stated on the selected item.
4 Press and hold to exit.
To return to the previous setting item, press .
ENGLISH 7
Default: [XX]
[TUNER SETTING]
[SEEK MODE] Selects the searching method for
S
/
T
buttons when pressed.
[AUTO1]: Automatically search for a station. ; [AUTO2]: Search for a preset
station. ; [MANUAL]: Manually search for a station.
[AUTO MEMORY] [YES]: Automatically starts memorizing 6 stations with good reception. ;
[NO]: Cancels.
• Selectable only if [NORMAL] is selected for [PRESET TYPE]. (Page 5)
[MONO SET] [ON]: Improves the FM reception, but the stereo effect will be lost. ;
[OFF]: Cancels.
[TI] [ON]: Allows the unit to temporarily switch to Traffic Information if
available (“TI” indicator lights up). ; [OFF]: Cancels.
[PTY SEARCH] Select the available Program Type (see the following), then press
S
/
T
to start.
[CLOCK]
[TIME SYNC] [ON]: Synchronizes the unit’s time to the Radio Broadcast Data System
station time. ; [OFF]: Cancels.
•
[MONO SET]
/
[TI]
/
[PTY SEARCH]
is selectable only when the band is FM1/FM2/
FM3.
• If the volume is adjusted during reception of traffic information or news
bulletin, the adjusted volume is memorized automatically. It will be applied
the next time traffic information or news bulletin is turned on.
• Program Type:
[SPEECH]
:
[NEWS]
,
[INFORM]
(information),
[SPORTS]
,
[TALK]
,
[LANGUAGE]
,
[REL TALK]
(religious talk),
[PERSNLTY]
(personality),
[PUBLIC]
,
[COLLEGE]
,
[HABL ESP]
(spanish talk),
[WEATHER]
[MUSIC]
:
[ROCK]
,
[CLS ROCK]
(classic rock),
[ADLT HIT]
(adult hits),
[SOFT RCK]
(softrock),
[TOP 40]
,
[COUNTRY]
,
[OLDIES]
,
[SOFT]
,
[NOSTALGA]
(nostalgia),
[JAZZ]
,
[CLASSICL]
(classical),
[R & B]
(rhythm and blues),
[SOFT R&B]
(soft rhythm and
blues),
[REL MUSC]
(religious music),
[MUSC ESP]
(spanish music),
[HIP HOP]
Radio CD/USB/iPod
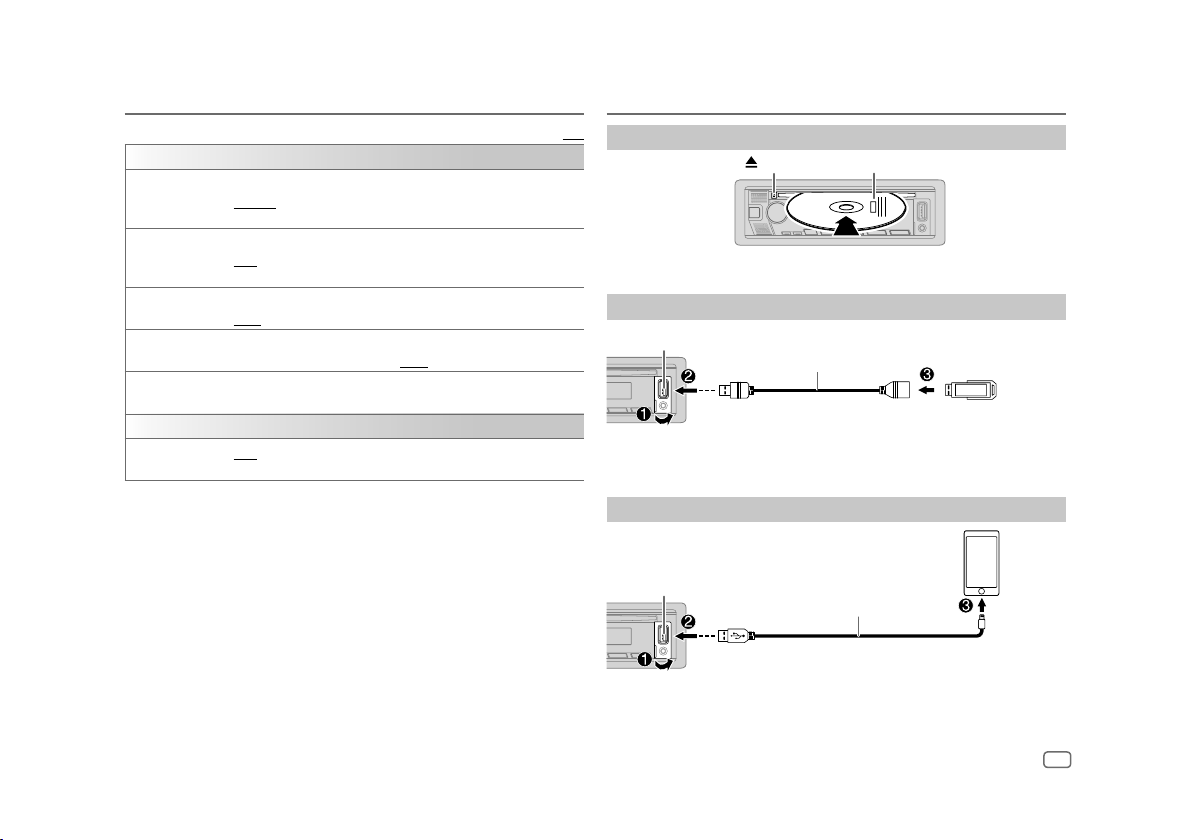
Insert a disc
Eject disc Label side
The source changes to CD automatically and playback starts.
Connect a USB device
USB device
USB input terminal USB cable*
(commercially available)
The source changes to USB automatically and playback starts.
*Do not leave the cable inside the
vehicle
when not in use.
Connect an iPod/iPhone
USB input terminal
Accessory of the iPod/iPhone*
iPod/iPhone
The source changes to iPod USB automatically and playback starts.
•You can also connect iPod/iPhone via Bluetooth. (Page12)
*Do not leave the cable inside the
vehicle
when not in use.

8ENGLISH
CD/USB/iPod
For playable audio file, see “Playable files” on page 23.
To On the faceplate
Play back/pause Press 6 IW.
Reverse/Fast-forward Press and hold S / T.
Select a track/file Press S / T.
Select a folder*1 Press 2 / 1 .
Repeat play*2 Press 4 repeatedly.
[TRACK REPEAT]
/
[ALL REPEAT]
: Audio CD
[FILE REPEAT]
/
[FOLDER REPEAT]
/
[ALL REPEAT]
: MP3/
WMA/AAC/WAV/FLAC file
[REPEAT ONE]
/
[REPEAT ALL]
/
[REPEAT OFF]
: iPod
Random play*2 Press 3 repeatedly.
[DISCRANDOM]
/
[RANDOM OFF]
: Audio CD
[FOLDERRANDOM]
/
[RANDOM OFF]
: MP3/WMA/AAC/
WAV/FLAC file
[SHUFFLE ON]
/
[SHUFFLE OFF]
: iPod
Press and hold 3 to select
[ALL RANDOM]
.*1
*1 For CD: Only for MP3/WMA/AAC files. This does not work for iPod.
*2 For iPod: Applicable only when [MODE OFF] is selected.
Select music drive
While in USB source, press 5 repeatedly.
Stored songs in the following drive will be played back.
• Selected internal or external memory of a smartphone (Mass Storage
Class).
• Selected drive of a multiple drive device. (This unit can support multiple
drive device of up to 4 drives. However, this unit may take some time to
read if three or more cards are connected.)
You can also select the music drive from the
[FUNCTION]
menu.
1 Press the volume knob to enter
[FUNCTION]
.
2 Turn the volume knob to select
[USB]
, then press the knob.
3 Turn the volume knob to select
[MUSIC DRIVE]
, then press the knob.
4 Turn the volume knob to select
[DRIVE CHANGE]
, then press the knob.
The next drive (
[DRIVE 1]
to
[DRIVE 4]
) is selected automatically and
playback starts.
5 Repeat step 1 to step 4 to select the following drives.
6 Press and hold to exit.
To return to the previous setting item, press .
Select control mode
While in iPodUSB source (or iPodBT source), press 5 repeatedly.
[MODE ON]
: Control iPod/iPhone using the iPod/iPhone itself. However, you
can still perform play/pause, file skip, fast-forward or fast-reverse
from this unit.
[MODE OFF]
: Control iPod/iPhone from this unit.

ENGLISH 9
Select a file to play
From a folder or list
• For iPod, applicable only when
[MODE OFF]
is selected. (Page 8)
1 Press .
2 Turn the volume knob to select a folder/list, then press the knob.
3 Turn the volume knob to select a file, then press the knob.
Selected file starts playing.
Quick search
(applicable only for CD source and USB source)
If you have many files, you can search through them quickly.
1 Press .
2 Turn the volume knob to select a folder/list, then press the knob.
3 Turn the volume knob quickly to browse through the list quickly.
4 Turn the volume knob to select a file, then press the knob.
Selected file starts playing.
Skip search
(applicable only for iPod USB source and iPod BT source)
If you have many files in the selected list, you can perform the following to
search for a file by skipping through the list at a rate selected in
[SKIP SEARCH]
.
• For iPod, applicable only when
[MODE OFF]
is selected. (Page 8)
1 Press .
2 Turn the volume knob to select a list, then press the knob.
3 Press S/ Tto search at a preset skip search ratio.
• Pressing and holding S / T searches at a 10% ratio irregardless of
the
[SKIP SEARCH]
settings.
4 Turn the volume knob to select a file, then press the knob.
Selected file starts playing.
[SKIP SEARCH] setting
1 Press the volume knob to enter
[FUNCTION]
.
2 Turn the volume knob to select
[USB]
, then press the knob.
3 Turn the volume knob to select
[SKIP SEARCH]
, then press the knob.
4 Turn the volume knob to select the skip search ratio, then press the
knob.
[0.5%]
(default)/
[1%]
/
[5%]
/
[10%]
The skip search ratio is shown as a percentage of the total files.
5 Press and hold to exit.
Alphabet search
(applicable only for iPod USB source and iPod BT source)
You can search for a file according to the first character.
• For iPod, applicable only when
[MODE OFF]
is selected. (Page 8)
1 Press .
2 Turn the volume knob to select a list, then press the knob.
3 Turn the volume knob quickly to enter character search.
4 Turn the volume knob to select the character.
• Select “ * ” to search for a character other than A to Z, 0 to 9.
5 Press S/ Tto move to the entry position.
• You can enter up to 3 characters.
6 Press the volume knob to start searching.
7 Turn the volume knob to select a file, then press the knob.
Selected file starts playing.
• To return to the root folder/first file/top menu, press 5. (Not applicable for
BT AUDIO source.)
• To return to the previous setting item, press .
• To cancel, press and hold .
CD/USB/iPod

10 ENGLISH
Spotify
You can listen to Spotify on iPhone/iPod touch (via Bluetooth or via USB
input terminal) or Android device (via Bluetooth).
Preparation:
• Install the latest version of the Spotify application on your device (iPhone/
iPod touch or Android device), then create an account and log in to
Spotify.
• Select
[ON]
for
[SPOTIFY SRC]
in
[SOURCE SELECT]
. (Page6)
Start listening
1 Start up the Spotify application on your device.
2 Connect your device to the USB input terminal.
USB input terminal
Accessory of the iPod/iPhone*
iPhone/
iPod touch
You can also connect the iPhone/iPod touch or Android device via
Bluetooth. (Page 12)
• Make sure the USB input terminal is not connected to any device when
you connect via Bluetooth.
3 Press BSRC repeatedly to select SPOTIFY (for iPhone/iPod touch) or
SPOTIFY BT (for Android device).
Broadcast starts automatically.
*Do not leave the cable inside the
vehicle
when not in use.
To On the faceplate
Play back/pause Press 6 IW.
Skip a track Press S*1 / T.
Select thumbs up or thumbs down *2 Press 2 / 1 .
Start radio Press and hold 5.
Repeat play*3 Press 4 repeatedly.
[REPEAT ALL]
,
[REPEAT ONE]
*1,
[REPEATOFF]
Random play*3 Press 3 repeatedly *1.
[SHUFFLE ON]
,
[SHUFFLEOFF]
*1 Available for premium account users only.
*2 This feature is available for tracks in Radio only. If thumbs down is selected, the current track is
skipped.
*3 Available for tracks in Playlists only.
Save favorite song information
While listening to the Radio on Spotify...
Press and hold the volume knob.
“SAVED” appears and the information is stored to “Your Music” or “Your
Library” on your Spotify account.
To unsave, repeat the same procedure.
“REMOVED” appears and the information is removed from “Your Music” or
“Your Library” on your Spotify account.
Otros manuales para PP107234
1
Este manual sirve para los siguientes modelos
1
Tabla de contenidos
Otros manuales de Receptor de coche de ProAudio


