
Pro-Tronik BLAST ! Manual de usuario

1
Manuel de l’utilisateur / User manual : BLAST !
www.a2pro.fr
Caractéristiques :
1. Modèle d’avion d’entrainement et de défoulement pour voltige 3D/Freestyle/F3P.
2. Entièrement fabriqué en EPP découpé avec précision sur machine à commande numérique.
L’EPP est une matière résistante et légère, très résistante au crash.
3. Modèle équipé de 4 servos permettant tous types de mixages aux ailerons pour encore
plus de maniabilité.
4. Design simple et efficace, presque prêt à voler. Montage très simplifié réalisable
rapidement.
5. Que vous soyez un professionnel du vol 3D ou débutant, cet modèle sera le choix que vous
ne regretterez pas.
Features :
1. Training and entertaining model that can be used for 3D aerobatics, freestyle or F3P.
2. CNC made of EPP, durable and light material, almost crash-proof.
3. The model has 4 servos that allow any kind of mix on the ailerons for still more
manoeuvrability.
4. Simple and efficient design, almost ready to fly. Assembly is highly simplified and can be
quickly done.
5. Whether you're a professional 3D flyer or a beginner, this plane will be the choice you will
not regret.
Longueur (Length): 895mm (35in.)
Envergure (Wingspan): 845mm (33in.)
Masse (Flying weight): 190-210g
Moteur (Motor): DM2204-1600
Contrôleur (ESC): Black Fet 10A
Hélice (Propeller): APC SF 8x3.8
Servos: 4x 7450NG-D
Batterie (Battery): 2S liPo 500-800mAh
Fuselage Aile / Wing

2
www.a2pro.fr
Produits recommandés :
A2Pro – Promodel propose une gamme de produits complète qui vous permettra de mener à bien la construction de
votre modèle. Les produits suivants sont parfaitement compatibles avec les matériaux constituants votre
modèle.
Recommended products :
A2Pro - Promodel offers an exhaustive range of products that will allow you to complete the construction of your
model. The following products are fully compatible with your model constituent materials.
Manuel de l’utilisateur / User manual : BLAST !
- La colle cyanoacrylate STYRO réf.1535 de A2Pro convient à tous les
collages de votre modèle, nous vous recommandons de l’associer à
l’usage de l’activateur en bombe réf.1540.
- The CA STYRO glue (ref.1535) by A2Pro can be used for the assembly
of the entire model. We strongly recommend to use it wih the CA
ACTIVATOR (ref. 1540).
- Vous aurez besoin d’un scalpel bien affûté.
- You will need a sharp Xacto knife.
- Vous aurez besoin d’un set de tournevis classique (ref A2Pro : 9957).
- You will need a set of usual screw drivers (A2Pro’s 9957).
- Vous aurez besoin d’un jeu de pinces.
- You will need a set of pliers.

3
www.a2pro.fr
Contenu du kit / Parts included :
Manuel de l’utilisateur / User manual : BLAST !
Notes importantes :
1. La masse finale d’un avion de voltige indoor est directement liée à ses qualités de vol, ne
surchargez pas inutilement votre modèle par l’ajout de renforts supplémentaires (scotch
armé, carbone…) le kit est conçu de façon optimisée et tout est suffisamment solide et
rigide.
2. Dans cette optique de masse la moins élevée possible, nous vous recommandons
sérieusement l’utilisation de batteries Lithium Pro-Tronik qui sont plus légères que les
autres batteries du marché.
3. Faites attention au stockage et au transport de votre modèle, c’est souvent à ces moments
là qu’il y a le plus de casse ou de déformation.
Important remarks :
1. The final weight of an indoor aerobatic model is directly affecting its flight capacities, do
not try to reinforce your model, this will bring useless overload. Everything has been made
on your model to make it strong and rigid.
2. Talking about the weight, we strongly recommend the Pro-Tronik Lithium batteries as they
are lighter than other batteries on the market.
3. Take great care when stocking or carrying your model to the flying area, damages can be
numerous in this conditions.

4
www.a2pro.fr
Manuel de l’utilisateur / User manual : BLAST !

5
www.a2pro.fr
Manuel de l’utilisateur / User manual : BLAST !

6
www.a2pro.fr
- Collez 5 charnières sur chaque aileron et sur l’aile.
ATTENTION à ne pas coller les articulations .
- Glue the 5 hinges in their slots. WARNING do not glue
the rotating point of the hinge.
- Coupez 2 morceaux de plat de carbone de 270mm de
long et collez le au bord d’attaque de l’aile..
- Cut 2pcs of flat carbon strip 270mm long and glue them
on the leading edge of the wing.
- Collez la partie avant. Travaillez sur un chantier bien
plat.
- Glue the nose part, work on a flat surface.
- Coupez un morceau de plat de carbone de 92mm et
collez le dans le nez.
- Cut a 92mm piece of flat carbon strip and glue it in the
nose slot.
5
6
2
3
4
- Collez la partie arrière du fuselage.
- Glue the tail part of the fuselage.
- Chanfreinez les ailerons au niveau de leur charnière.
- Chamfer the ailerons on the hinges side.
1
Manuel de l’utilisateur / User manual : BLAST !

- Insérez le carbone dans les emplacements prévus.
- Insert the carbon rods in the fuselage slots.
- Collez le renfort en place en collant une tige carbone de
1.3mm par 265mm de long de chaque côté.
- Glue the wing strut in place and glue a 1.3mm/265mm
long carbon rod on each side of it.
- Assemblez le renfort d’aile et collez le en place.
- Mount the wing fence and glue it in place.
7
www.a2pro.fr
- Coupez un morceau de plat de carbone de 285mm et
collez le en place.
- Cut a piece of flat carbon strip 285mm long and glue it
in the elevator slot.
- Collez la partie inférieure du fuselage.
- Glue the lower part of the fuselage.
11
12
8
9
107
- Après avoir chanfreiné la partie mobile du stabilisateur,
collez le en place avec 4 charnières.
- After you have chamfered the elevator moving part,
glue it with the 4 hinges.
Manuel de l’utilisateur / User manual : BLAST !
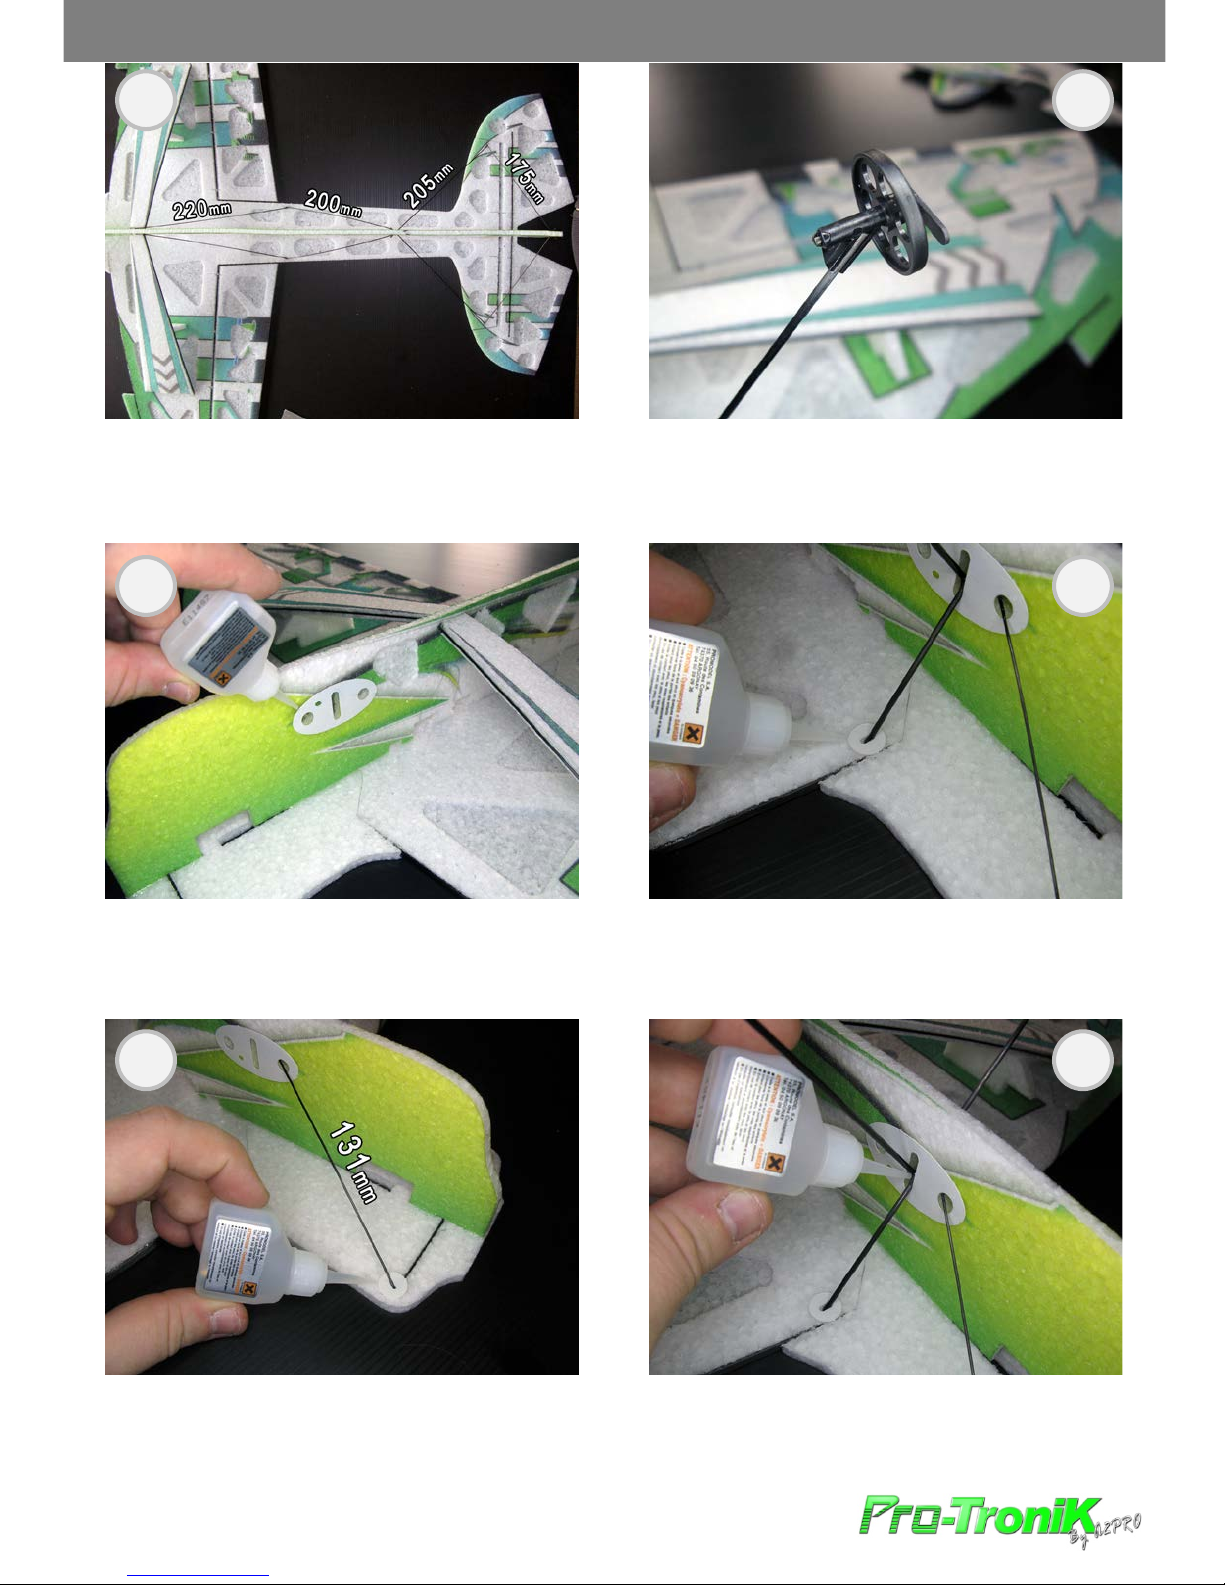
- Même chose pour le renfort principal.
- Same thing for the main reinforcement on the fuselage.
- Calez et collez le train en place dans ses renforts.
- Set and glue the landing gear in the reinforcement slots.
- Assemblez le train d’atterrissage et le pointer à la cyano.
- Mount the landing gear with a bit of CA glue.
8
www.a2pro.fr
- Collez les renforts de train de chaque côté du fuselage.
- Glue the landing gear reinforcements on each sides of
the fuselage.
- Coupez et collez les renforts en carbone de 1mm dans le
nez.
- Cut and glue the 1mm carbon fiber nose
reinforcements.
17
18
14
15
1613
- Coupez et collez les renforts en carbone de 1mm.
- Cut and glue the 1mm carbon fiber reinforcements.
Manuel de l’utilisateur / User manual : BLAST !

- Coupez un morceau de plat de carbone de 45mm et
collez le à l’arrière du fuselage en guise de patin.
- Cut a 45mm flat carbon strip piece and glue it in the rear
slot of the fuselage as a tail skid.
- Coupez et collez les renforts du stabilisateur en carbone
de 1mm.
- Cut and glue the 1mm carbon fiber elevator struts.
- Collez 3 charnières sur la partie arrière du fuselage.
- Glue the 3 hinges on the rear part of the fuselage.
9
www.a2pro.fr
- Collez la partie supérieure du fuselage.
- Glue the top fuselage part.
- Chamfreinez la dérive puis collez les charnières.
- Chamfer the rudder and glue the hinges.
23
24
20
21
2219
- Voici le train collé en place.
- Here’s the landing gear set in place.
Manuel de l’utilisateur / User manual : BLAST !

- Collez les dérives d’aile.
- Glue the wing fences on the wing.
- Collez ces caches à leur place sur le train.
- Glue these wheel covers on the landing gear.
- Assemblez les caches de roues.
- Glue the two whell cover halves together.
10
www.a2pro.fr
- Vissez le moteur en place.
- Screw the motor on it.
- Installez les guignols dans les ailerons (collage facultatif).
- Install the control horns on the ailerons (glue is an
option).
29
30
26
27
2825
- Collez le support moteur.
- Glue the motor mount.
Manuel de l’utilisateur / User manual : BLAST !
Otros manuales de Juguete de Pro-Tronik


