Pro DVX APPC-10SLB Manual de usuario

APPC-10SLB(W)
User Manual

2
Content
Declaration .............................................................................................................2
Product Instruction..................................................................................................3
Power on the Product .............................................................................................5
Without Mounting Bracket..................................................................................5
Use Mounting Bracket .......................................................................................5
Insert SD Card........................................................................................................6
Insert USB Devices ................................................................................................6
Display different content for double ........................................................................8
Home Screen........................................................................................................ 11
System Bar ...........................................................................................................14
Applications .......................................................................................................... 17
Language..............................................................................................................18
Date & Time..........................................................................................................19
Volume..................................................................................................................20
Brightness.............................................................................................................21
Scheduled.............................................................................................................22
Wi-Fi .....................................................................................................................25
Ethernet ................................................................................................................26
Bluetooth .............................................................................................................. 27
Virtual Keyboard ...................................................................................................29
Switch Input Methods ........................................................................................... 30
Surf Online............................................................................................................31
Browse Files ......................................................................................................... 32
Play Media............................................................................................................34
Install & Uninstall Apps .........................................................................................35
Install Apps ......................................................................................................35
Uninstall Apps.................................................................................................. 38
Reset to Factory Default .......................................................................................39
Federal Communications Commission (FCC) Statement…………………………...42

3
Declaration
✓Please read the instructions carefully before equipment installation and
using the device.
✓Do not put the product in high temperature, humid or dusty environment.
✓Do not drop, crash or break down this product.
✓This product is without battery, and after setting up any Settings on the
Settings, it is recommended that the user should not immediately shutdown
and confirm. Please wait for at least 5s before shutting down. For the
system to save Settings data to database.
✓Do not power off the device when it’s formatting or upgrading, otherwise it
will cause operation system error.
✓This product is not waterproof.
✓Use only approved add-on enhancements.
Product Instruction

4
1. Power Key: (1).Short press sleep and wake up
(2).Long press to pop out the power off and reboot dialog box
2. SD Card Slot / Cover: support external SD card
3. Exit Button: return to the previous page
4. Function Keys (Up / Down): select the up/down item
5. Function Keys (Vol+ / Vol-): adjust the system volume

5
6. DC In Jack: powered by 12V/2A DC input
7. LED Indicator:
Green
Power supply is on.
Red
sleep state.
8. Headphone:3.5mm Stereo + MIC
9. HDMI Port: HDMI Type A output (covered, for production test only)
10. Add-on module slot: to put optional add-on module
11. Micro-USB Port: support Micro-USB 2.0
12. USB Port: support USB 2.0 Host type A
13. 10/100/1000Mbps RJ45 Ethernet Port: support Ethernet connection
14. VESA Mount Holes: for installing the bracket
15. Speakers: 8ohm / 2W
16. WIFI:802.11b/g/n/ac 2.4G/5G
17. Temperature:Operation: 0℃~ 40℃( 32F ~104F)
Storage: -10°C ~ 55°C (14°F ~ 131°F)
18: Bluetooth : V4.2 of 1, 2 and 3 Mbps.
Power on the Product
Without Mounting Bracket
Step1 Power on the power adapter that connected to this product.
Step2 When the power is switched on, the LED light (#7) shows green.
Use Mounting Bracket
Step1 Put the mounting bracket to the back of the tablet, and tighten the
installation screws on the screw holes.
Step2 Plug the power adapter into the DC in jack (#8in Product Instruction)
at the bottom of the mounting bracket.

6
Insert SD Card
This product supports external SD card. Please insert your SD card into the
SD Card Slot (#2 in Product Instruction) on the top of this product.
Insert USB Devices
This product supports USB and Micro-USB to deal with your files.
USB
Plug your USB memory into the USB port (#12 in Product Instruction) on the
bottom of this product, and then you can do the file operations via the File
Browser. (See in Browse Files).
Micro-USB
Connect the Micro-USB port (#11 in Product Instruction) on the bottom of
this product and the USB port on your computer with a Micro-USB-to-USB
cable.

7
Click the “USB debugging connected” Entry “Developer options” interface;
Click the “USB for file transfer” access to the USB use options interface.
8
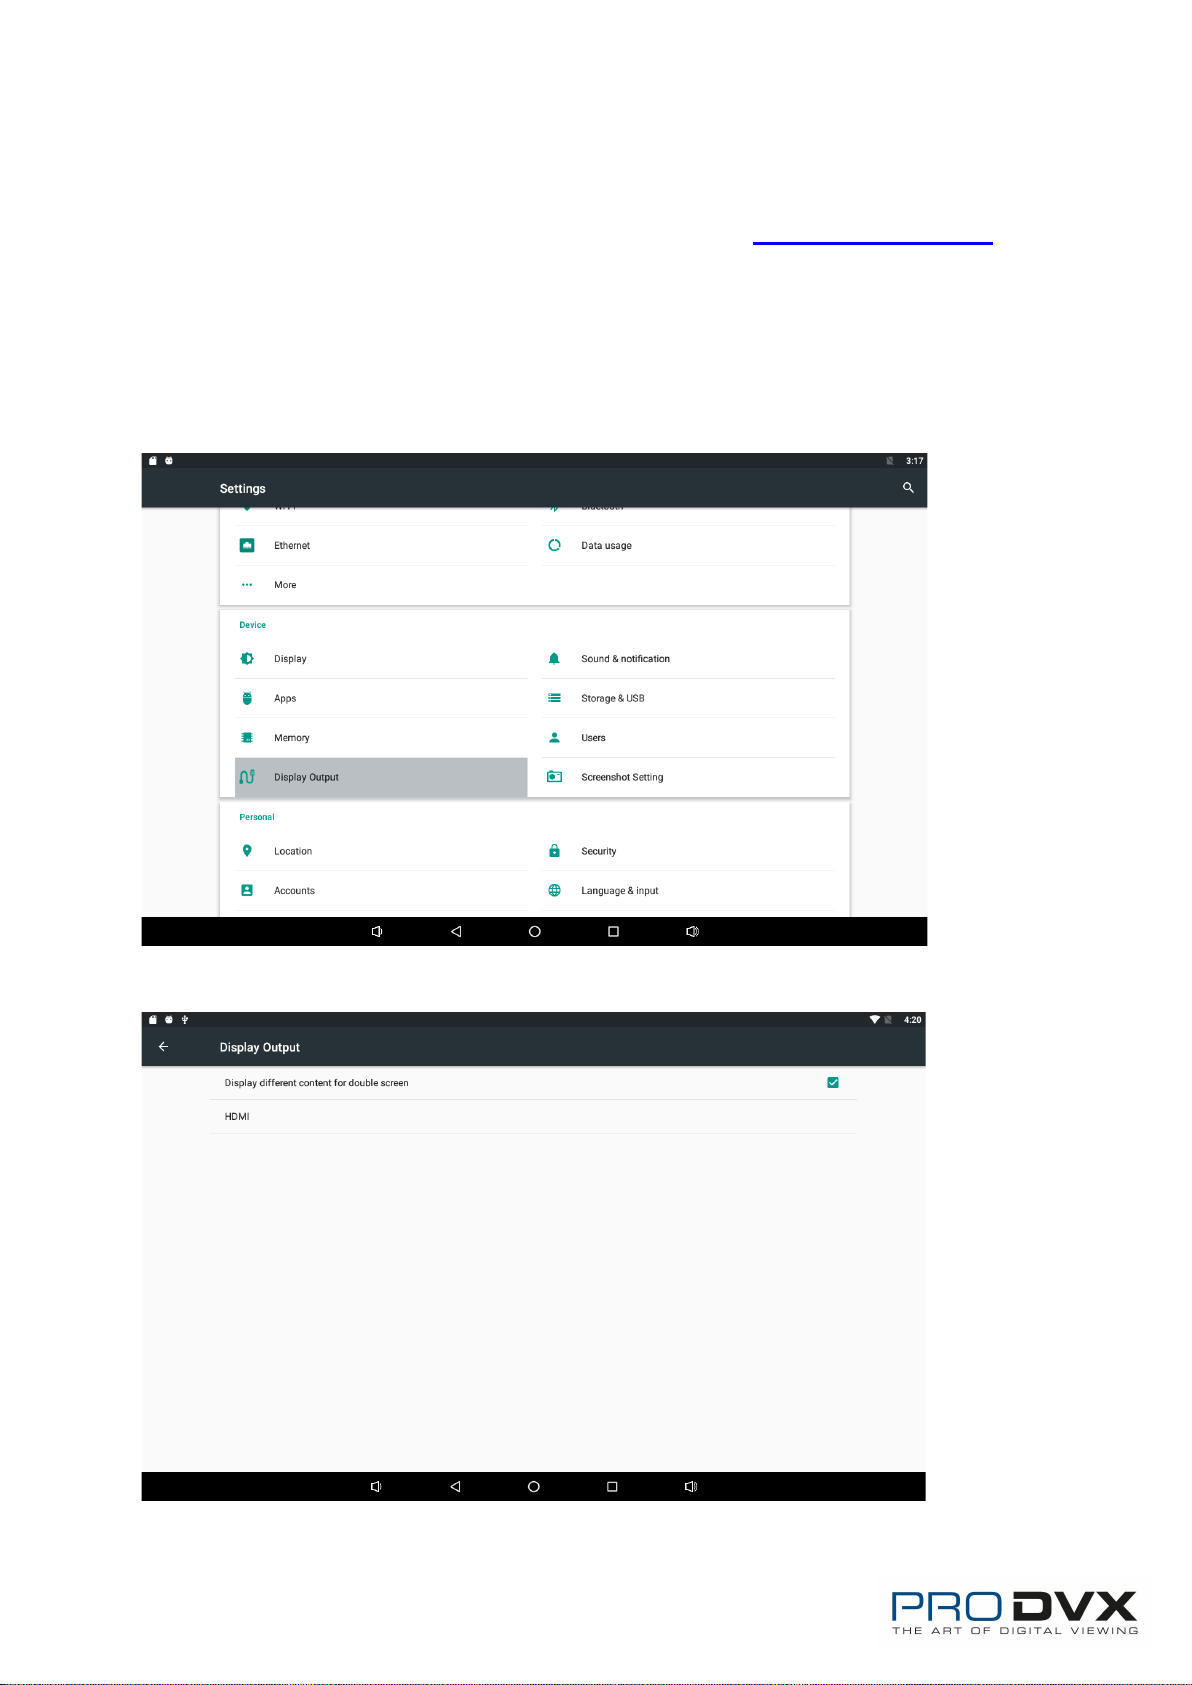
Display different content for double
This product supports display different content for double screen. Please plug
one side of the HDMI cable into the HDMI port (#9 in Product Instruction) on
the bottom of this product, and plug the other side of the HDMI cable into the
HDMI port of the monitor.
Display screen and this product display different interface.
Dual screen show different content Guide:
1. Enter settings to display outputs;
2. Select “Display different content for double screen”;

9
3. Open at least two running programs .For example, video and browser;
4. Slide your finger from the right side to left on the touch panel, then you will
see two buttons;
: This button is different display button.
: This button is same display button

10
5. Click the button, the video display will only stay on HDMI monitor, and
the APPC-10SLB(W) will display previous apk screen;
6. If you want close the different display, please repeat step 4 and then click
button, the APPC-10SLB(W) and HDMI monitor will display same screen.
Otros manuales para APPC-10SLB
1
Este manual sirve para los siguientes modelos
1
Tabla de contenidos


