Pregis packmaster pro 383 Manual de usuario

Easypack®
Model 383
Operating Manual (EN)
38-OM225-1
English

2
www.pregis.com 38-OM225-1
Safety Information
Description and Purpose of Machine
Specification and Installation
Machine Controls
Pre-start Checks
Loading Paper
Instructions for Use
Clearing Paper Jams
Troubleshooting
Declaration of Conformity
3
4
5
6
7
8
10
18
21
22
Contents

3
www.pregis.com 38-OM225-1
Always switch off the machine from the mains supply before
freeing paper jams or lifting the top cover.
THIS MACHINE MUST BE EARTHED
The wires in the mains cable are coloured as such:
GREEN/YELLOW
BLUE
BROWN
EARTH
NEUTRAL
LIVE
It is important that this machine is installed, maintained and used correctly to
avoid the risk of injury.
This machine contains dangerous voltages and rotating mechanical parts.
Safety Information
• Use the machine only for the purposes described in the Operating Manual.
•This machine is to be used only by trained personnel.
•Do not operate without the guards properly in place.
•The machine will not start with the flap in the open position.
•The machine will not run with the top cover or the paper off-cuts door
open.
•The machine is to be serviced or repaired only by Pregis.
•The machine uses a 230V(±10%), 50Hz, single-phase AC supply.
•To protect against electrical shock, do not immerse the plug or mains cable
in water or spray with liquids.
•Unplug from the electrical supply when not in use.
•Do not operate this machine with a damaged mains cable or plug.
•To disconnect from electrical supply, grip the plug - do not pull on the
mains cable.
The machine is fitted with motor driven cut-off blades which operate automatically
at the end of each cycle. Serious operator injury could result if hands are inserted
through the outfeed flap. Care must also be taken to keep hands away from the
paper entry slot to avoid paper cuts or friction burns to the hand.
The machine can be stopped at any time via the rocker switch. This cuts off
the electrical supply to the control panel and motors.

4
www.pregis.com 38-OM225-1
Description and Purpose of Machine
The purpose of the Pregis Packmaster-pro machine is to produce tough, resilient cushions
of recyclable packaging material.
The machine is loaded with either a single ply or a two ply roll of paper. As the material
passes through the machine it is formed and shaped to produce a continuous cushion
which is cut off to the selected length.
The cushion material has excellent bulk properties which make it ideal for void filling
throughout the packaging operation.
The cushion is multi-cellular to resist impact forces and is readily molded to cocoon even
the most awkwardly shaped objects and protect them from damage in transit.
The machine is of rugged design and construction and its stainless steel finish is quickly
wiped over for cleaning purposes. The sub frame is mounted on castors to facilitate move-
ment to a new area.
Control Panel
Outfeed Channel with
Outfeed Flap Inside
Paper Roll Holder
Optional Remote Control Panel
The machine is designed to meet EC safety standards and requires connection only to a
suitable electrical supply. Noise levels not to exceed 70dB(A).
Top Cover
Mains power
rocker switch

5
www.pregis.com 38-OM225-1
Specification
Installation
Specification and Installation
The machine should be positioned in the packing area allowing ample
space for loading the rolls of paper.
Do not allow the mains cable or footswitch cable to become damaged.
Ensure the mains supply cable is routed safely to prevent trip hazards.
Do not attempt to wheel the machine over uneven surfaces or at a speed
greater than a slow walk.
Dimensions (machine) 1170mm (L) x 775 (W) x 545 (H)
Dimensions (frame) 950mm (L) x 840 (W) x 885 (H)
Weight (machine) 124kg
Weight (frame) 24kg
Voltage 230V (±10%), 50Hz
Max Power 400W
Machine Fuse 6.3A
The machine is top heavy when mounted on the frame.
Temperature Min 5°C.
Humidity 10 to 90% RH.
Vibration Do not install the Machine in an area where it is likely to be
subject to constant vibration.
Shock Do not drop the Machine or expose it to sudden shock.
Atmospheric
pollution
Do not install the Machine in an area that is subject to water
hazards, condensation, excessive dust or other atmospheric
contaminants.
Location It is important that the supporting floor is flat and level.
Lifting/Transporting Instructions
The machine must be securely strapped to a pallet for transporting safely.
The machine and frame weigh 148kg.
Connections
The machine must be connected to a 230V, 50Hz, 1-phase electrical supply.
THE MACHINE MUST BE EARTHED.
No other services are required. Maximum power consumption is 400W.
6
www.pregis.com 38-OM225-1
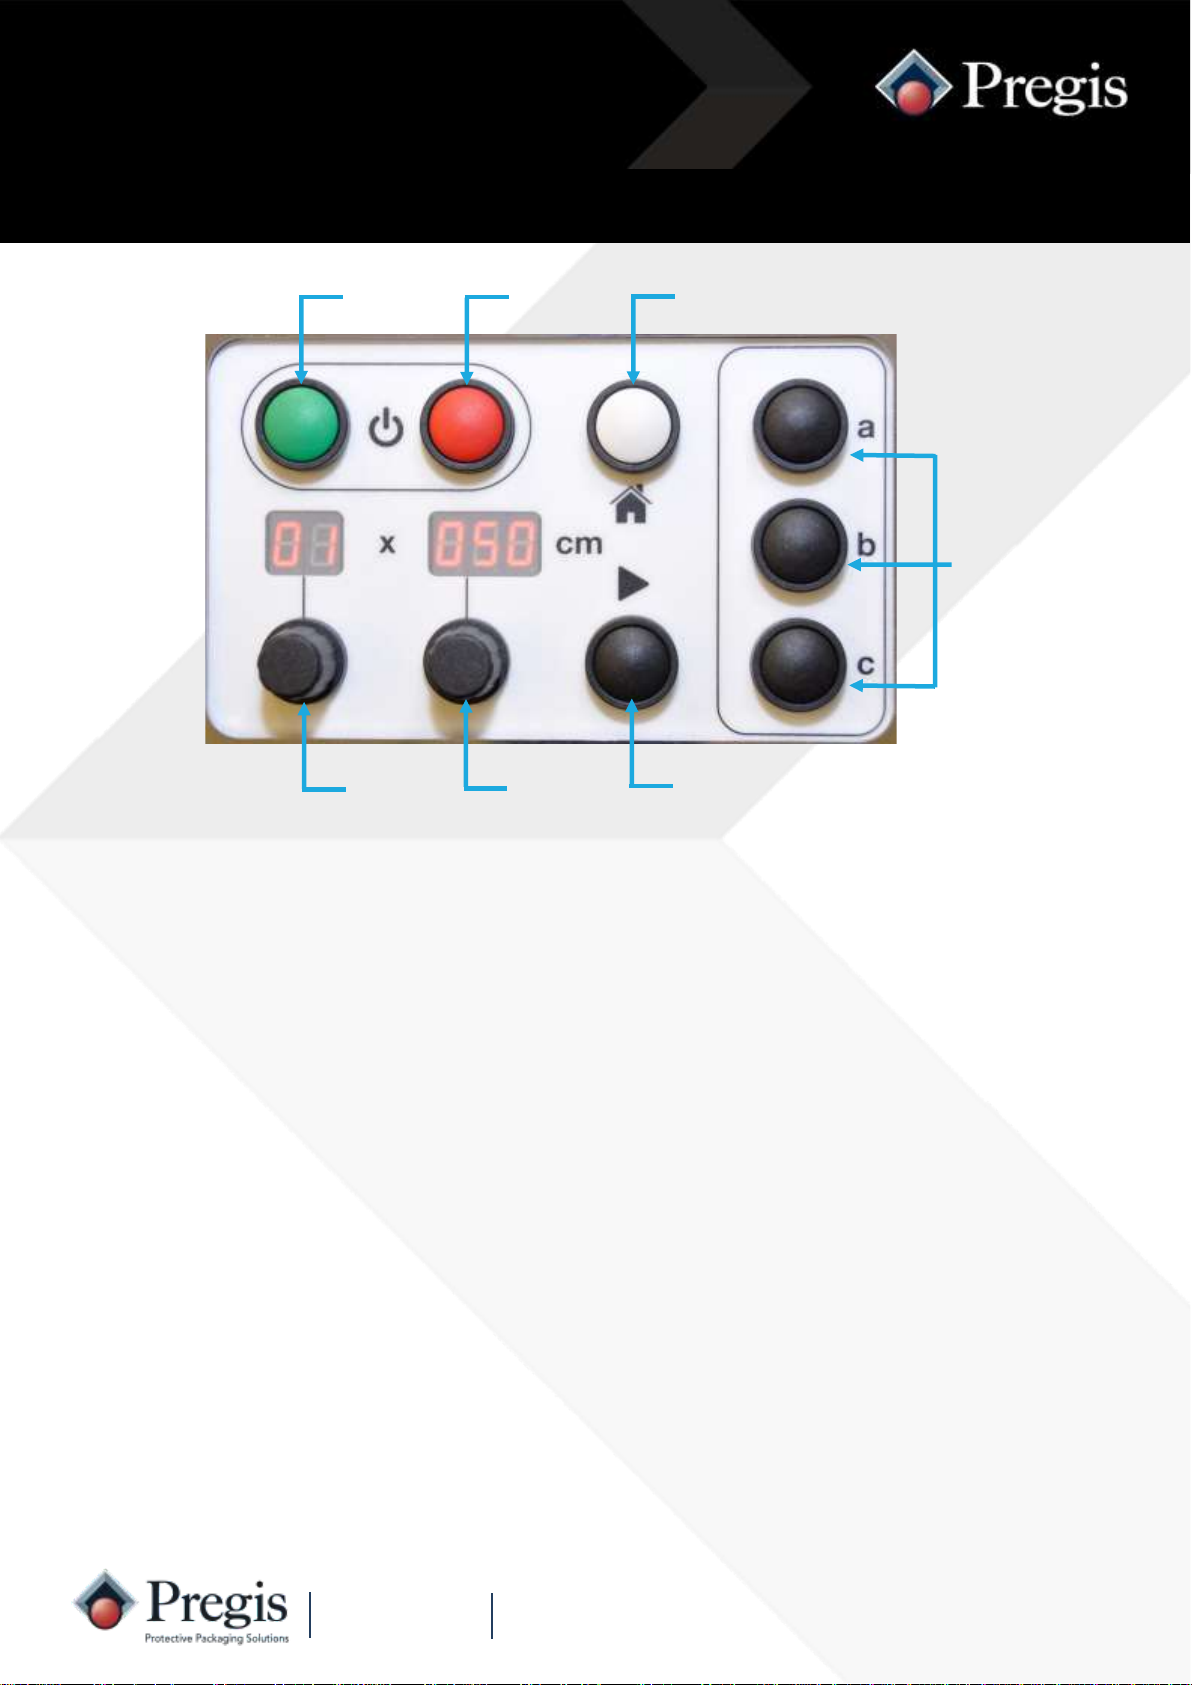
Machine Controls
‘Off’
Button ‘Home’
Button
Quantity
Knob ‘Length’
Knob
‘On’
Button
Preset
Buttons
‘Run’
Button
‘Off’ Button
Preset Buttons
‘Home’ Button
Length Knob
Quantity Knob
*Fault Indication*
‘Run’ Button
‘On’ Button Press the green ‘On’ button to switch the machine on.
The display will illuminate.
Press the red ‘off’ button to stop the machine in a controlled manner and switch
the machine off.
The display will show 5 ‘dots’.
Stops the machine producing packs if running more than one, cancels ‘A1’ or
‘A2’ semi automatic operation, or restores the last set of values for quantity and
length.
The three buttons can be programmed by the operator with commonly used
quantity and length combinations.
This is used to select the quantity of packs required from ‘A1’, ‘A2’ and 01 to 99
or continuous.
The pack length can be adjusted from 25cm to 999cm long on standard ma-
chines.
This button is pressed to initiate the cycle for single pack, semi-automatic and
continuous operation.
If the machine stops unexpectedly and F1, F2, F3 or F4 are displayed,
this indicates a fault (see troubleshooting, page 21).

7
www.pregis.com 38-OM225-1
Pre-start Checks
1. The machine is connected to the
mains supply, switched on and
the neon indicator is illuminated.
2. The footswitch tube is connected
to the machine.
4. Switch the machine on by pressing
the green ‘I’ button. The display will
illuminate. If the display shows
flashing ‘dashes’ the machine needs
to be loaded with a roll of paper.
3. The paper cushion can discharge
from the outfeed channel without
any restriction.

8
www.pregis.com 38-OM225-1
Loading Paper
1. Noting the unwind direction, slide a
new roll of paper onto the paper
arm until the sprung retaining latch
springs up.
Single ply Two ply
4. Press and release the blue feed button
- the paper will load automatically.
The quantity display will flash ‘Ld’ whilst
the paper is loading. Once loading is
complete the display will revert to the
previous settings.
3. Rotate the wheels by hand for about
half a turn to feed-in and grip the pa-
per.
For single ply paper,
feed the sheet be-
tween the roller and
inner guide rods as
shown.
For two ply paper, feed
the inner sheet be-
tween the roller and
guide rods and the
outer sheet between
the inner and outer
guide rods as shown.
2. Pull approximately 70cm of paper from
the roll.
Feed the sheet(s) of paper into the entry
slot.
NOTE: If the machine runs out of paper in auto batch mode, the machine will automatically
continue to produce the remaining quantity of packs as soon as the paper has been loaded.
Paper Rolls

9
www.pregis.com 38-OM225-1
Loading Paper
1. Using a pallet pump truck, lift the
pallet of paper and align with the
frame. 2. Pull approximately 70cm of paper.
NOTE: If the machine runs out of paper in auto batch mode, the machine will automatically
continue to produce the remaining quantity of packs as soon as the paper has been loaded.
Fanfold pallet
3. Feed the sheet between the
guide panel and inner guide rods
as shown.
4. Feed the sheet of paper into the
entry slot.
5. Rotate the wheels by hand for about
half a turn to feed-in and grip the
paper.
6. Press and release the blue feed button
- the paper will load automatically.
The quantity display will flash ‘Ld’
whilst the paper is loading. Once load-
ing is complete the display will revert
to the previous settings.
NOTE: This requires a different frame and some adjustments.

10
www.pregis.com 38-OM225-1
Instructions for Use
2. Depress and hold down the footswitch.
The length display will increment up as
the pack is produced and the quantity
display will change to a cycling symbol.
Release the footswitch when the re-
quired length of cushion is produced.
Remove the cushion from the machine.
1. Remove any material from the
outfeed channel and ensure the
outfeed flap is closed.
Do not insert hands through the
outfeed flap inside the outfeed
channel - risk of serious injury
from motor driven cut-off
blades.
A paper cushion is generated continuously by holding down the foot operated
switch. Releasing the footswitch stops the feed and causes the cushion to be
cut off. When using the footswitch the length setting is overridden.
Footswitch Operation
Tabla de contenidos
Otros manuales de Equipos de embalaje de Pregis

Pregis
Pregis Easypack Coiler Manual de usuario

Pregis
Pregis AirSpeed SMART Manual de instalación y funcionamiento

Pregis
Pregis Quantum Pro 4068969 Manual de usuario

Pregis
Pregis SHARP MAX PRO 18 Manual de usuario

Pregis
Pregis SHARP SX Manual de usuario

Pregis
Pregis EASYPACK QUANTUM Series Manual de usuario

Pregis
Pregis SHARP SX GO Manual de usuario

Pregis
Pregis SHARP MAX 1143 Manual de usuario

Pregis
Pregis Easypack Quantum XT Manual de usuario

Pregis
Pregis Easypack coiler-lite Manual de usuario


