
Precidia Ether232Plus Manual de usuario

Ether232Plus
User Guide
Software Version: 4.04.00
Document No.: 02-CML000057
Revision Date: 15 MAR 04
Document Revision: 2.0
www.precidia.com

Precidia Technologies Inc.
10A Hearst Way
Kanata, Ontario
Canada K2L 2P4
Tel: (613) 592-7557
Fax: (613) 592-0944
Web Site: http://www. precidia.com/
E-mail: [email protected]
The Ether232Plus User Guide also applies to the Ether232.
Both the menu and features in this release may have changed from the previous
obtain a User Guide for an earlier software version, or if you have questions or
comments about using the product or document. For general inquiries, please contact
Disclaimer and Confidentiality Notice
The content of this document is furnished for informational use only, is subject to change without
notice, and should not be construed as a commitment by Precidia Technologies Inc. (Precidia). Precidia
assumes no responsibility or liability for any errors or inaccuracies that may appear in this document.
This document and the information disclosed herein is the confidential property of Precidia. Neither this
document nor the information contained herein shall be used, reproduced or disclosed to others without
Precidia’s written authorization.
Copyright © 2004, Precidia Technologies Inc. All rights reserved.
Published in Canada.
All trademarks and trade names are the properties of their respective owners.

Ether232Plus User Guide Table of Contents
02-CML000057 Precidia Technologies Inc. i
Contents
1 Before You Start................................................................................ 1
1.1 Preview................................................................................................. 1
1.2 Functionality and Features ....................................................................... 2
How It Works........................................................................................... 2
Features................................................................................................. 2
1.3 Ether232Plus Layout ............................................................................... 3
Front Panel ............................................................................................. 3
Back Panel .............................................................................................. 4
1.4 Hardware Requirements .......................................................................... 5
Installation and Configuration ...................................................................... 5
Reconfiguration ........................................................................................ 6
1.5 Software Requirements ........................................................................... 7
1.6 Configuration Requirements..................................................................... 7
Ethernet Settings...................................................................................... 7
Serial Port Settings ................................................................................... 7
Security Settings ...................................................................................... 7
2 Setting up the Ether232Plus.............................................................. 9
2.1 Installing the Hardware ........................................................................... 9
After Configuration.................................................................................... 9
2.2 Setting Up the Terminal..........................................................................10
2.3 Understanding the Configuration Screen ...................................................11
2.4 Timeout During Configuration..................................................................12
2.5 Resetting to Factory (Default) Configuration..............................................13
3 Configuring the Ethernet Settings ................................................... 15
3.1 IP Address............................................................................................16
3.2 Subnet Mask (Static — No DHCP) ............................................................17
3.3 Gateway (Static — No DHCP) ..................................................................17
3.4 Additional Gateway................................................................................18
Network Address .....................................................................................18
Network Mask .........................................................................................18
Gateway................................................................................................18
4 Configuring the Serial Port Settings ................................................ 21
4.1 Protocol................................................................................................22
4.2 Port Setting ..........................................................................................25
4.3 Port Mode.............................................................................................27
4.4 Connection Control ................................................................................28
4.5 Terminal Type (Telnet Protocol Only)........................................................29
4.6 Local Port .............................................................................................30
4.7 Remote IP ............................................................................................30
4.8 Remote Port..........................................................................................31
4.9 Fallback IP............................................................................................31
4.10 Fallback Port.........................................................................................32
4.11 Terminators (Terminated Protocol Only) ...................................................33
4.12 Packet Prefix (Transparent Protocol Only) .................................................35

Table of Contents Ether232Plus User Guide
ii Precidia Technologies Inc. 02-CML000057
4.13 Maximum Inter-Character Delay (Transparent Protocol Only) ......................35
4.14 Preferred Packet Size (Transparent Protocol Only) .....................................36
4.15 Initial String (Transparent Protocol Only)..................................................36
5 Configuring the Security Settings .................................................... 37
5.1 Console Password .................................................................................38
Setting the Console Password.....................................................................38
Viewing the Console Password ....................................................................38
Clearing the Console Password....................................................................38
5.2 Remote Password..................................................................................39
Setting the Remote Password .....................................................................39
Viewing the Remote Password ....................................................................39
Clearing the Remote Password....................................................................39
5.3 Web Server..........................................................................................40
5.4 Access Userid .......................................................................................41
5.5 Access Password...................................................................................41
Setting the Access Password ......................................................................41
Viewing the Access Password......................................................................41
Clearing the Access Password.....................................................................42
5.6 SNMP Server ........................................................................................42
5.7 SNMP Settings......................................................................................42
5.8 IPsec Tunnels #1 and #2 .......................................................................43
Protocol ................................................................................................44
Secure Address.......................................................................................45
SPI......................................................................................................46
Network Address.....................................................................................46
Network Mask ........................................................................................46
Network Gateway....................................................................................46
Encode/Authenticate Keys .........................................................................47
6 System Settings .............................................................................. 49
6.1 Unit ID Value........................................................................................50
6.2 Web Page Download..............................................................................50
6.3 Firmware Download...............................................................................50
6.4 Display System Status...........................................................................51
6.5 Dump System Log.................................................................................51
6.6 Delete System Log ................................................................................52
6.7 Perform Self Test ..................................................................................52
6.8 Reset Unit............................................................................................53
6.9 SNTP Settings.......................................................................................53
6.10 Disable TCP Keep-Alives.........................................................................55
7 Accessing System Information ........................................................ 57
7.1 System Status......................................................................................57
Accessing the System Status Page...............................................................57
Understanding the System Status Page.........................................................59
7.2 System Log..........................................................................................61
Understanding the System Log ...................................................................63
7.3 Static Web Page....................................................................................68
Creating Static Web Pages.........................................................................68
Accessing the Static Web Page....................................................................68

Ether232Plus User Guide Table of Contents
02-CML000057 Precidia Technologies Inc. iii
Appendix A: Glossary of Terms and Acronyms...................................A-1
Appendix B: Troubleshooting and Support.........................................B-1
Appendix C: Specifications and Warranty.......................................... C-1
Appendix D: Connecting with Telnet..................................................D-1
Appendix E: Pinouts and Power Supply ............................................. E-1

Table of Contents Ether232Plus User Guide
iv Precidia Technologies Inc. 02-CML000057

02-CML000057 Precidia Technologies Inc. 1
1Before You Start
1.1 Preview
Each section in this Guide is a step in the process of installing and configuring your
Precidia unit:
1Before You Start
Familiarize yourself with the features and installation requirements of the unit.
2Setting up the Ether232Plus
Set up the hardware and configure the unit via terminal software.
3Configuring the Ethernet Settings
Input the IP address, subnet mask, and gateway address for the unit.
4Configuring the Serial Port Settings
Configure the protocol, speed, connection control, and port information.
5Configuring the Security Settings
Configure the remote, console, and Web passwords, SNMP, and IPSec.
6System Settings
If necessary, have your network administrator configure the advanced settings,
including downloads and system logging options.
7Accessing System Information
Find out how to access the system information locally or remotely.
Appendices at the back of this guide also provide valuable reference information:
A Glossary of Terms and Acronyms
B Troubleshooting and Support
C Specifications and Warranty
D Connecting with Telnet
E Pinouts and Power Supply
1 Before You Start Ether232Plus User Guide
2Precidia Technologies Inc. 02-CML000057
1.2 Functionality and Features
How It Works
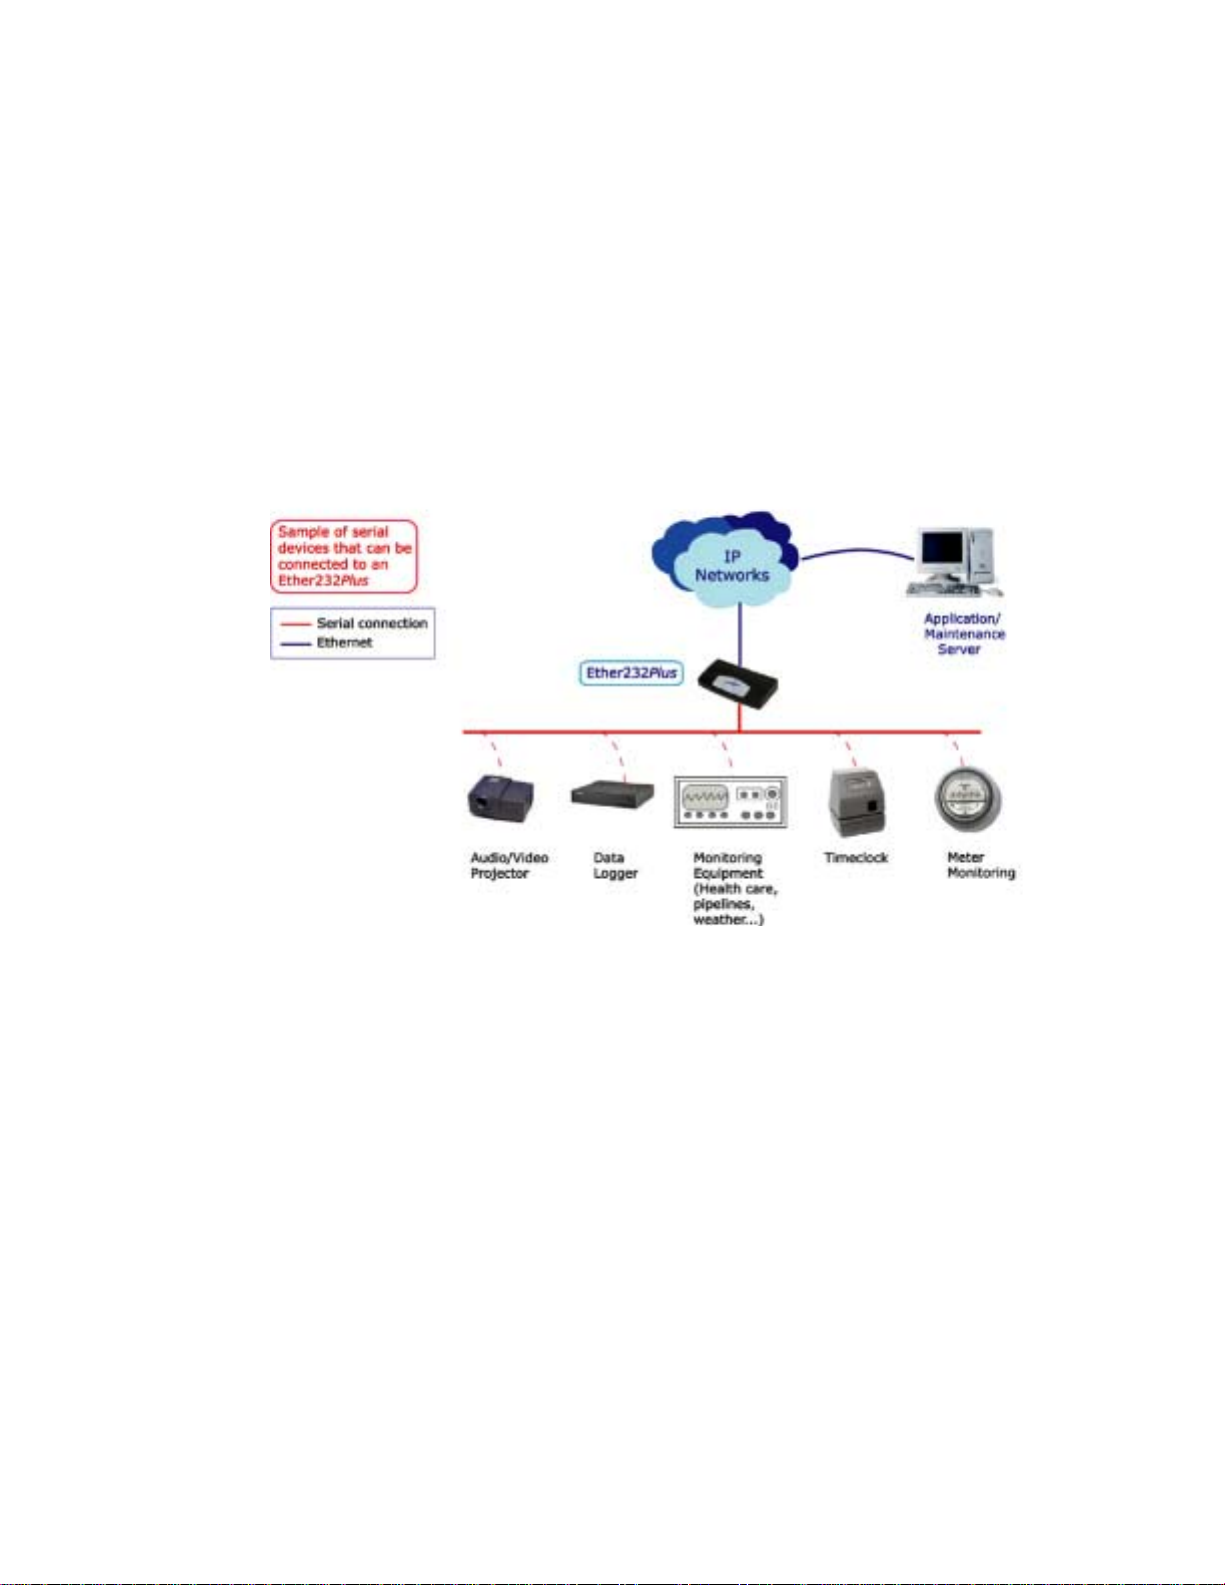
Precidia products connect serial devices and IP networks. A device sends information
to the unit through the serial port. This information is processed according to the
protocol set in the Serial Port Settings, then transferred to the Ethernet side of the unit.
The unit then converts the information to IP compatible format and sends it out the
Ethernet port to the remote server according to the parameters set in the Ethernet
Settings. The process is reversed when information is received from the remote server.
The figure below illustrates an example configuration of the Ether232PPlus in a
network.
Ether232Plus — Network Configuration
Features
The Ether232Plus has many useful features, allowing you to:
• Configure settings locally via the COM port or remotely using telnet
• Display static Web pages using a built-in Web page server
• Display dynamic System Status and System Log pages through the built-in Web
server or the Configuration screen
• Manage information with SNMPv2c (Simple Network Management Protocol)
• Tap remotely into the datastream to monitor data and assist in debugging
• Provide security through passwords and IPsec
• Use a primary and a backup server (automatic switchover on failure)
• Capture statistics and log system information internally
• Upload firmware upgrades using TFTP (Trivial File Transfer Protocol) or via the
local com port

Ether232Plus User Guide 1 Before You Start
02-CML000057 Precidia Technologies Inc. 3
• Control and refine connection settings with options that include:
- Automatic connection in tcp(tunnel) and tcp-client modes to establish a
connection to the server as soon as the first data byte is received on the serial
port
- Connection recovery to ensure the session remains active
- COM Port Redirector Software compatibility using the Com Port Control
protocol option
- Modem Connection Control that allows the Precidia unit to appear as a Hayes-
compatible modem to your serial device
• Connect an RS-422/485 device or an RS-232 device to one of two ports
• Support the following network protocols:
1.3 Ether232Plus Layout
Front Panel
Ether232Plus Front Panel
Table 1.1 describes the function of each indicator lamp.
Telnet ARP DHCP
TCP HTTP SNMPv2c
UDP TFTP (download only) IPsec (manually keyed)
ICMP FTP Ethernet, IEEE 802.3
IP SNTP

1 Before You Start Ether232Plus User Guide
4Precidia Technologies Inc. 02-CML000057
NOTE: See Appendix B, Troubleshooting and Support, for descriptions of how indica-
tor lamps can be used for troubleshooting.
Back Panel
Back Panel of the Ether232Plus
Table 1.1: Front Panel Indicator Lamps
Indicator Lamp Description
ON Illuminates constantly when power is applied to the unit.
— ETHERNET —
LINK Illuminates constantly when the Ethernet port has a valid
connection to a 10BaseT Ethernet network.
COLLISION Illuminates under high traffic loading, when network conges-
tion results in collisions. Collisions are resolved by the Ether-
net protocol and do not necessarily indicate data loss. Lamp
flashes to indicate this activity.
TRANSMIT Illuminates when the unit has control of the line and is send-
ing data on the network. Lamp flashes to indicate this activity.
Does not illuminate when receiving data.
— COM —
TRANSMIT Illuminates when the unit is sending or receiving data out the
COM port. Lamp flashes to indicate this activity.
Illuminates constantly while in configuration mode.
STATUS Off: Unit incorrectly configured or the COM port is disabled.
Slow flash: Correctly configured, in idle mode.
Fast flash: Correctly configured, terminal has communicated.
On (solid): Correctly configured, connected.
Tabla de contenidos
Manuales populares de Equipo de grabación de otras marcas


Strymon
Strymon NIGHTSKY Manual de usuario

Mitsubishi Electric
Mitsubishi Electric 16CH DIGITAL RECORDER DX-TL5000U Manual de usuario

Tews Technologies
Tews Technologies TPMC465 Manual de usuario

Honeywell
Honeywell Excel 50 Manual de usuario

SeaLevel
SeaLevel COMM+8.LPCI Manual de usuario

Arturia
Arturia AUDIOFUSE STUDIO Manual de usuario


