Powis Parker Fastback Hardcover Manual de usuario

Dear Customer,
Thank you for using information provided on our website. You can check the latest
prices and place orders for products contained in this document by visiting our
website at:
http://www.partxpres.com
Information contained in this document was provided by the product manufacturer
or service provider. Although great care has been taken to ensure correctness and
relevance of the information, PARTXPRES does not assume any responsibility or
liability for the information contained herein.
Customer Service
PARTXPRES

FASTBACK HARDCOVER GUIDE USER’S MANUAL, REV.:C 06/09/05 1
INTRODUCTION 2
CREATING A HARDCOVER BOOK 3
CUSTOMIZING OPTIONS 6
ADDING HEADBANDS 7
ABOUT FOILFAST® TITLE SHEETS 8
FOILFAST® TITLE SHEET TIPS 9
SPINE TITLING 10
TROUBLESHOOTING 11
GLOSSARY 12
COPYRIGHT & WARRANTY 14
ÍNDICE 15
TABLE DES MATIÈRES 29
CONTENTS
ÍNDICE
TABLE DES MATIÈRES
This manual was bound
with a Fastback® binder
PN: L5648

FASTBACK HARDCOVER GUIDE USER’S MANUAL, REV.:C 06/09/05 2
FASTBACK HARDCOVER GUIDE USER’S MANUAL, REV.:C 06/09/05 3
INTRODUCTION
The Fastback Hardcover™ Binding System
is a revolutionary new system for creating
professional hard cover books on-demand.
There is no set-up and you can make a book
within a minute. The key to the system is the
Fastback Hardcover Guide. The Guide performs
the following functions:
• It specifies the correct cover spine width.
• It positions and assists the assembly of
your printed pages into the hard cover.
• It positions and assists the application of
Foilfast Title Sheets.
Whether you are looking for a cost-effective
way to produce books for resale, or you want
to create memory books for your children and
friends, the Fastback Hardcover product line is
the perfect solution.
Spacer
Spacer Storage Slot
Rear Paper Stop
Rear Cover Stop
Spacer
Instruction Card
Base
Base Notch
Clamp Lever
Side Paper Stop
Side Cover Stop
Book Thickness Indicator
Slider

FASTBACK HARDCOVER GUIDE USER’S MANUAL, REV.:C 06/09/05 2
FASTBACK HARDCOVER GUIDE USER’S MANUAL, REV.:C 06/09/05 3
CREATING A HARDCOVER BOOK
Fastback Hardcovers™ are currently available in
many popular sizes, from 8” to A4. You may
select from Suede and premium Composition
covers as well as Library and Art cloths, with a
great choice of colors and materials. Check with
your dealer for more information.
Before binding your pages, place folded
Fastback® endleaves at the front and the back of
your printed pages (Fig. 1). The folds should be
at the spine side of your pages.
Insert this book block (with the endleaves folded
end down) into the binding cavity of the Fastback
binder (Fig. 2) Bind the book block using a
Hardcover Linen strip. This strip was specially
designed for binding hard cover books. They are
more flexible than other strips so there is less
stiffness when turning the pages, plus they give an
enhanced look to your book.
For a traditional finishing touch, add headbands to
the top and bottom of the spine after binding the
book block. Refer to page 7.
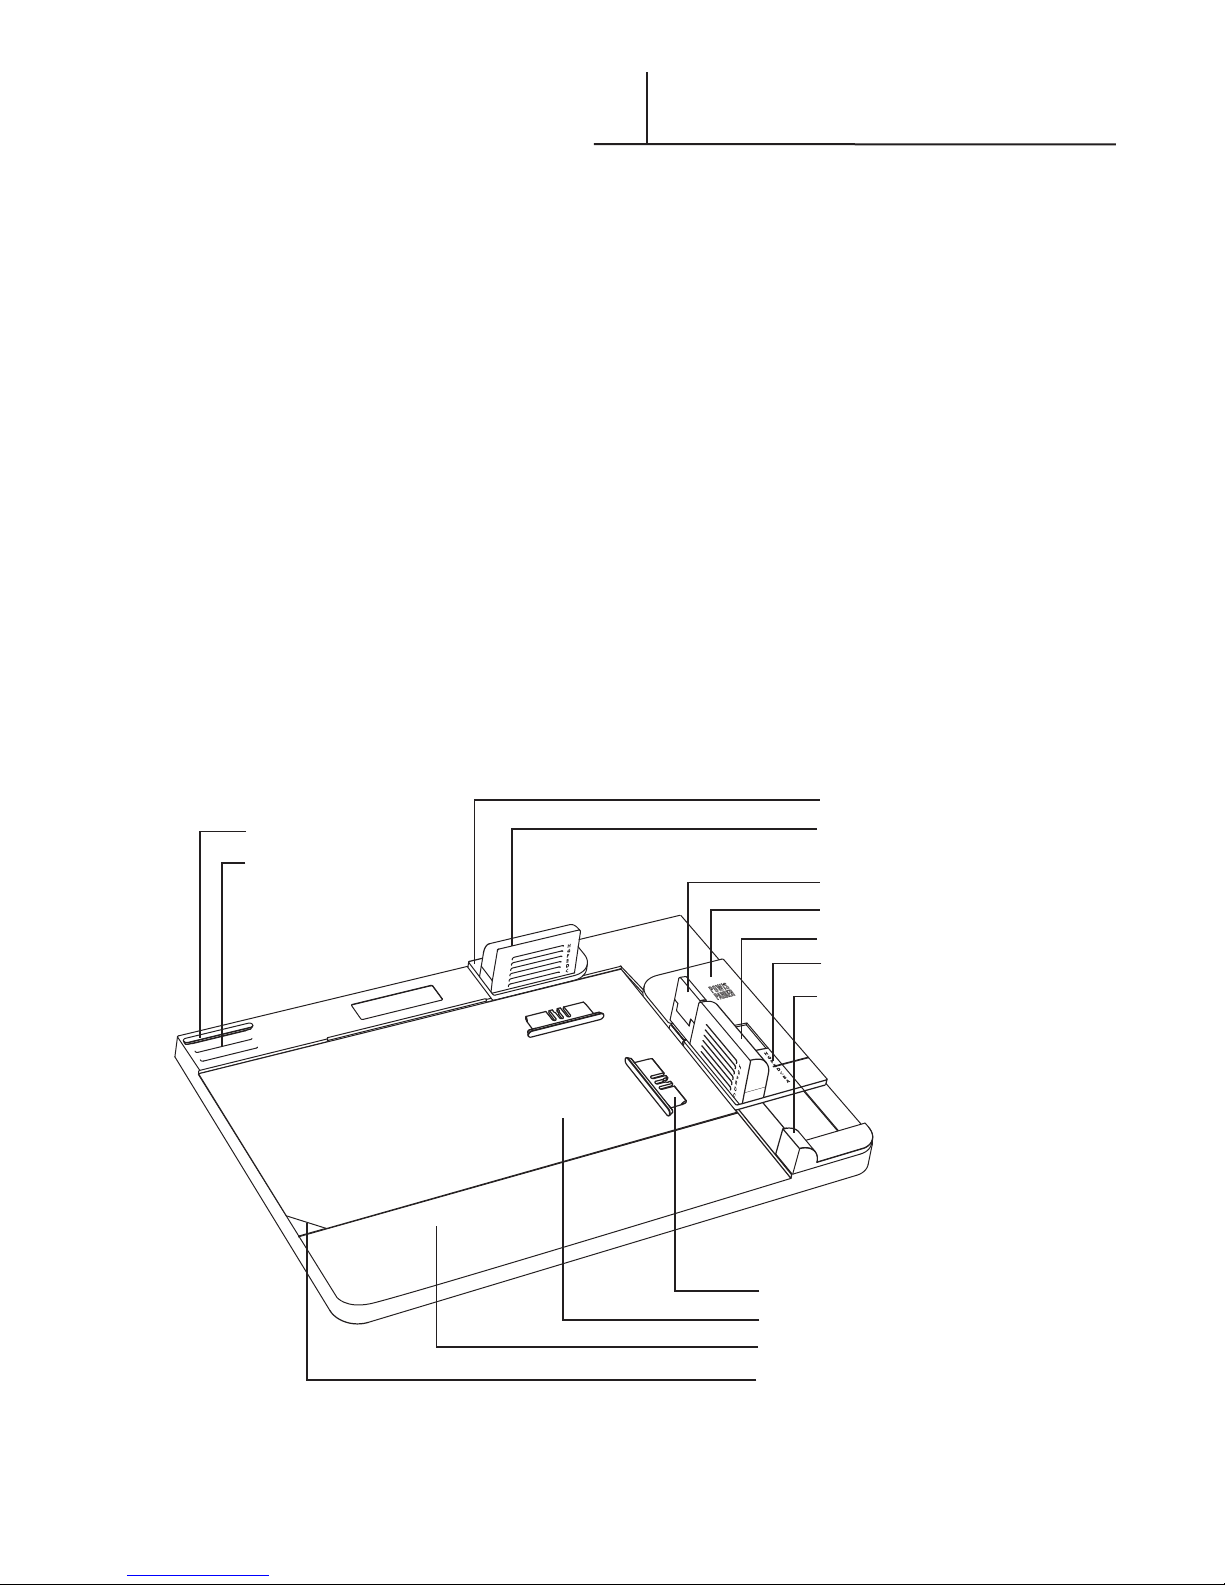
The correct cover spine width is determined by
the thickness of the bound book block. After your
book block has cooled, place it between the right
purple cover stop and the slider handle at the
front right corner of the Guide. Slide the handle
against the book block (Fig. 3). The horizontal line
points to the letter size of which cover width
to use. Covers are available in six sizes, A-F.
When using wider covers (sizes C to F), it is
necessary to use the plastic spacers provided with
the Guide. Without these spacers, the book block
may skew, resulting in an imperfect bind.
The spacers are stored in slots at the rear left
corner of the Guide. We have provided three
spacers, although you only use two at a time.
The third one is an spare. To use the spacers,
push them into the lettered slots on the cover
stops as indicated by corresponding width (Fig. 4).
For example, for an E width book, the spacers
should be inserted in the slots marked ‘E’.
F I G U R E 2
F I G U R E 3
F I G U R E 4
F I G U R E 1
E
H
G
F
E
D
C
u
FOLDED
ENDLEAVES
PRINTED
PAGES

FASTBACK HARDCOVER GUIDE USER’S MANUAL, REV.:C 06/09/05 4
FASTBACK HARDCOVER GUIDE USER’S MANUAL, REV.:C 06/09/05 5
Slide the Instruction Card to the upper right
corner of the base (Fig. 5). The white tab fits
under the clamp and the front left angle fits
behind the base notch. For thicker covers,
this card should be removed.
Place your Fastback Hardcover™ on the Guide
with the release papers facing up, (the back
cover of the book should be to the right).
Slide the cover to the right rear corner of the
base (Fig.6–Step 1). The right and top edges of
the cover should contact the right and rear steps
of the base, with the cover under the paper
stops (step 1 arrows). Flip the lever to the right
to clamp the cover in place (step 2 arrows).
Remove the strip of narrow release paper to the
right of the spine (Fig. 7).
With the front of your book block facing up,
push the page edges against the top and side
green paper stops (and spacers if required —
see page 3, Fig. 4). With the page edges held
against the edges of the paper stops and spacers,
push the spine edge of the book block down
firmly onto the exposed narrow adhesive strip
(Fig. 8).
CREATING A HARDCOVER BOOK
(cont.)
F I G U R E 7
F I G U R E 8
F I G U R E 5
F I G U R E 6

FASTBACK HARDCOVER GUIDE USER’S MANUAL, REV.:C 06/09/05 4
FASTBACK HARDCOVER GUIDE USER’S MANUAL, REV.:C 06/09/05 5
CREATING A HARDCOVER BOOK
(cont.)
With the spine edge attached, carefully rotate
the book block to the left. Remove the wide
release paper on the right side (Fig. 9). Roll the
book block back to the right onto the exposed
adhesive, securing the back endleaf.
Remove both the narrow and wide release
papers on the left hand side of the cover (Fig. 10).
Lift the front cover over the top of the book
block (Fig. 11). The cover edges must contact the
rear and side purple cover stops (Fig. 11 detail
arrow). Then press the cover down onto the
book block.
Flip the lever up to release your book.
Open front and back covers to smooth down the
inside endleaves (Fig. 12).
Your Fastback® Hardcover™ book is done!
F I G U R E 10
F I G U R E 11
F I G U R E 12
F I G U R E 9

FASTBACK HARDCOVER GUIDE USER’S MANUAL, REV.:C 06/09/05 6
FASTBACK HARDCOVER GUIDE USER’S MANUAL, REV.:C 06/09/05 7
CUSTOMIZING OPTIONS
To get the best results, take advantage of the
customizing features that are offered as part of
the Fastback® Hardcover™ product line.
Headbands
Headbands are narrow strips of cloth fastened
between the book block and the spine at the
top and bottom of a book. Although they were
once an integral part of the binding process,
most headbands today are used as attractive
decorative touches. Fastback Headbands
come in a variety of solid and checkered color
combinations (Fig. 13).
Foilfast® Title Sheets
& Spine Titling
Using Powis Parker’s Foilfast® printer, you can
title and decorate your covers with up to seven
colors of foil (Fig 14). Foilfast Title Sheets are
made of the same materials as the Fastback
Hardcovers, so you are ensured of a perfect
match. They may also be used to create spine
titles for you books (Fig. 15).
Traditional Techniques
Fastback Hardcovers are real hard cover cases.
They can be foil stamped, or embossed the
same as any traditional cover. Contact your
dealer for suggestions.
Headbands
Spine Titling
F I G U R E 13
F I G U R E 15
Foilfast®Title Sheets F I G U R E 14

FASTBACK HARDCOVER GUIDE USER’S MANUAL, REV.:C 06/09/05 6
FASTBACK HARDCOVER GUIDE USER’S MANUAL, REV.:C 06/09/05 7
Peel the release paper backward exposing the
adhesive backing (Fig. 16).
Align the edge of the headband with the spine-
edge of the book block (Fig. 17).
Cut the headband strip to the same width as the
book block (Fig. 18).
ADDING HEADBANDS
F I G U R E 16
F I G U R E 17
F I G U R E 18

FASTBACK HARDCOVER GUIDE USER’S MANUAL, REV.:C 06/09/05 8
FASTBACK HARDCOVER GUIDE USER’S MANUAL, REV.:C 06/09/05 9
ABOUT FOILFAST® TITLE SHEETS
Foilfast® Title Sheets (FTS) are adhesive sheets
that match the Suede and Comp covers.
They are designed to work with the Foilfast®
printer to let you add printing to your covers in
seven colors of foil.
Insert the Foilfast® Title Sheet (FTS) into the
Foilfast printer so that the narrow release paper
is on the left side and facing away from you
(Fig 19).
CAUTION: Failure to insert the sheet in
the prescribed manner can result in printing
problems or machine damage.
Compose your design with any software.
When you are finished choose File>Print.
Click on the “Properties” button in the Print
window to open the Properties dialog box.
Choose the “Upside Down” option (Fig. 20).
Put your cover in the Fastback Hardcover Guide
with the exterior of the hard cover face up.
Make sure that the front cover is pushed all
the way into the corners of the Guide recess,
beneath the green stops (Fig. 21—step 1
arrows).
Lock the cover in place by depressing the lever
to the right (Fig 21—step 2 arrow).
Remove the narrow release paper from the FTS.
Align the top and right sides of the FTS against
the edge of the green paper stops (Fig. 22
detail). Then, press the exposed adhesive area
onto the cover.
Gently lift the right end of the FTS and remove
the large release paper (Fig. 23). Lay down the
FTS onto your cover. Smooth down the FTS to
complete your custom printed cover.
*
1
2
F I G U R E 19
F I G U R E 20
F I G U R E 23
F I G U R E 22
F I G U R E 21

FASTBACK HARDCOVER GUIDE USER’S MANUAL, REV.:C 06/09/05 8
FASTBACK HARDCOVER GUIDE USER’S MANUAL, REV.:C 06/09/05 9
Design Considerations
Foilfast®Title Sheets are slightly smaller than their
corresponding covers. For instance, the FTS for
the letter-size Fastback® Hardcover™ is 8-1/8”
rather than 8-1/2” wide. Artwork that you want
to center on the book covers should have its
center 4” from the left edge of the sheet.
Print Quality Considerations
Using the multiple-color ink setting on artwork
that appears in only one color sometimes
produces better results. Using the Clear Cover
setting also produces sharper results with certain
types of artwork.
Some colors, most notably white, will not print
on the suede material unless you use Foil Primer
undercoat.
The Clear Cover setting produces an attractive
and unique effect when gold foil is used on the
suede material.
Image files that print correctly in one format may
appear bitmapped when printed in a different
format, even though nothing other than the file
format is changed. This is also true with certain
programs. A PDF file that prints correctly in
Adobe Illustrator, for instance, may appear
bitmapped when printed with Adobe Acrobat.
TIPS (FOILFAST TITLE SHEET)
Tabla de contenidos
Idiomas:
Otros manuales de Máquina encuadernadora de Powis Parker

Powis Parker
Powis Parker Fastback 20 Manual de usuario

Powis Parker
Powis Parker FastBack Model 11 Manual de usuario

Powis Parker
Powis Parker FASTBACK 15 Manual de usuario

Powis Parker
Powis Parker Fastback 8x Manual de usuario

Powis Parker
Powis Parker FASTBACK 15 Manual de usuario

Powis Parker
Powis Parker Fastback 8x Manual de usuario

Powis Parker
Powis Parker FastBack 11 Manual de usuario


