PORT CONNECT 902003 Manual de usuario

MODEL: 902003
USER GUIDE
MINI 4K CONFERENCE CAM
WITH AUTO FRAMING
MANUEL UTILISATEUR
BENUTZERHANDBUCH
MANUAL DEL USUARIO
GEBRUIKSHANDLEIDING
РУКОВОДСТВО ПОЛЬЗОВАТЕЛЯ
MANUAL DO UTILIZADOR
NAVODILA
ANVÄNDARMANUAL
HASZNÁLATI UTASÍTÁS
PODRECZNIK UŻYTKOWNIKA
NAVODILA ZA UPORABO
UŽIVATELSKÁ PŘÍRUČKA
POUŽÍVATEĽSKÁ PRÍRUČKA
ﻡﺪﺨﺘﺴﻤﻟﺍ ﻝیﻝﺩ
For small rooms
(up to 5 people)

MINI 4K CONFERENCE CAM WITH AUTO FRAMING
2
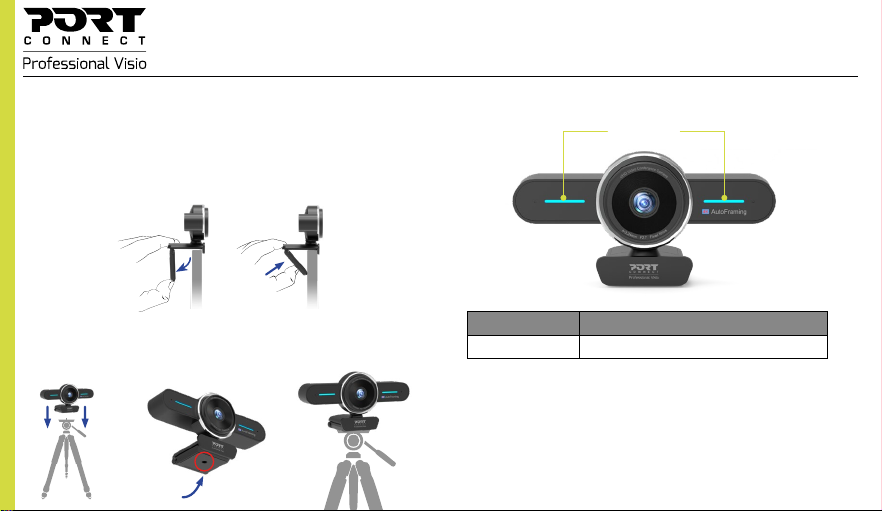
PRODUCT SCHEMA
Product features illustrations:
Stereo: dual microphone
with noise reduction Image auto framing
button
Lens up to 4K
Ultra HD resolution
3840x2160@30Hz
2 fixation modes:
tripod or clamp
USB-C
connectivity to notebook
90°wide
horizontal angle
90°
LED indicators
for video status

MINI 4K CONFERENCE CAM WITH AUTO FRAMING
3
CONGRATULATIONS AND THANK YOU FOR PURCHASING OUR PRODUCT
WARNING!
° KEEP AWAY FROM WATER, LIQUID, FIRE AND OUT OF THE REACH OF CHILDREN.
° AVOID EXPOSING THE DEVICE TO PROLONGED PERIODS OF EXTREME HEAT OR COLD.
° WHEN THE DEVICE IS IN USE, PLACE IT ON A SOLID SURFACE _TABLE, FLOOR, ETC._ WITH ADEQUATE AIRFLOW.
° WHEN DISCONNECTING THE DEVICE FROM THE COMPUTER, ENSURE YOU GRASP THE CONNECTOR AND PULL FIRMLY AWAY FROM THE DEVICE. THIS WILL AVOID DAMAGE TO THE CONNECTOR AND/OR
TO THE CABLE.
° IF THE DEVICE OR ITS ELEMENTS BECOME DAMAGED THEY MUST BE REPLACED BY QUALIFIED PERSONNEL WITH ELEMENTS OF THE SAME TYPE AND RATING. DO NOT DISMANTLE OR ATTEMPT TO
REPAIR THIS PRODUCT YOURSELF.
° IF ANY OF THE FOLLOWING SITUATION ARISES, GET THE EQUIPMENT CHECKED BY A SERVICE TECHNICIAN:
_ THE EQUIPMENT HAS BEEN EXPOSED TO MOISTURE.
_ THE EQUIPMENT HAS BEEN DROPPED AND DAMAGED.
_ THE EQUIPMENT HAS OBVIOUS SIGN OF BREAKAGE.
_ THE EQUIPMENT HAS NOT BEEN WORKING WELL OR CANNOT GET IT TO WORK ACCORDING TO THE USER’S MANUAL
TROUBLESHOOTING
IF THE UNIT APPEARS TO HAVE FAILED IN FUNCTIONING PLEASE CHECK THE FOLLOWING:
° THE DEVICE IS PLUGGED INTO A WORKING OUTLET SOCKET.
° CHECK THAT THE USB PLUG IS CONNECTED TO A WORKING USB PORT ON YOUR COMPUTER.
IF ALL OF THESE SPECIFICATIONS ARE VERIFIED AND THE DEVICE STILL DON’T FUNCTION, PLEASE REFER TO YOUR PURCHASE POINT.
° Image auto framing: supported
Microphone
° Built-in microphones: x2
° Direction: omnidirectional
° Processing technology: automatic noise reduction
° Pick up range: 5 meters (16.4ft)
SPECIFICATIONS
Dimensions: 13,7 x 6.9 x 5,2cm
Net weight: 110 gr
Input: DC 5V/500mA
Video
° Image Sensor: Sony IMX415
° Pixels: 8.29 Megapixels
° Horizontal viewing angle: 90°
° Focal length: 3.24mm
° Max resolution: 3840x2160@30fps (4K)
° Compression format: MJPEG, YUV
CONTENT
1 x Mini 4K conference cam
1 x USB-C to USB-A cable (1,75m)
1 x USB-A to USB-C converter
1 x user manual
MODEL: 902003

MINI 4K CONFERENCE CAM WITH AUTO FRAMING
4
2- LED STATUS INDICATORS
EN - ENGLISH
1- TWO FIXATION MODES
1. Position your conference camera:
a. Clamp fixation
The conference camera clamp allows you to fix and adjust it freely on your monitor.
• Grasp the camera as shown in the below illustration and open the clip with your other hand.
• Mount the camera, making sure the base of the clamp is touching the back of your monitor.
b.Tripod fixation
The conference camera has a screw thread on the bottom of the stand for an additional
tripod (not included).
• Screw it to the tripod as shown in the schema below:
• Place and adjust the camera freely in the conference room.
LED indicators
Camera Status Indicator Status
On Blue light is always on

MINI 4K CONFERENCE CAM WITH AUTO FRAMING
5
3- CONNECTION TO COMPUTER
1. Connect your conference cam to the USB interface of your computer. Wait about 1 minute, the
camera will automatically install itself
2. To enjoy video calling, you and the person(s) you are calling must install a video calling application
such as SkypeTM, Yahoo!®, @Messenger, Windows LiveTM, GmailTM, etc.
In addition to the USB camera and the video calling application, the callers need :
• A computer, a speaker and a microphone (the conference cam is already equipped with built-in
microphones );
• A broadband internet connection (e.g. DSL, T1 or cable);
• Please refer to the terms of use of your video calling application (requirements may vary from
application to application, but in general a minimum download speed of 2 Mbps is required).
NOTE
If your computer has a built-in camera, you will need to change the default camera settings. For
example, change the default camera in the chat software settings or disable the built-in camera in
the computer settings.
EN - ENGLISH

MINI 4K CONFERENCE CAM WITH AUTO FRAMING
6
2- INDICATEURS LED1- DEUX MODES DE FIXATION
1. Positionnez votre caméra de conférence :
a. Fixation avec la pince
La pince de la caméra de conférence vous permet de la fixer et de l’ajuster librement sur votre
écran d’ordinateur.
• Saisissez la caméra comme indiqué sur l’illustration ci-dessous et ouvrez la pince avec votre autre
main.
• Placez la caméra en veillant à ce que la base de la pince touche l’arrière de votre moniteur.
b.Fixation du trépied
La caméra de conférence dispose d’un pas de vice en-dessous du support permettant la
fixation à un trépied (non inclus).
• Vissez-la au trépied comme indiqué dans le schéma ci-dessous.
• Placez et réglez la caméra librement dans la salle de conférence.
Indicateurs LED
Statut de la caméra Indicateurs
On La lumière bleue est toujours allumée
FR - FRANÇAIS

MINI 4K CONFERENCE CAM WITH AUTO FRAMING
7
3- CONNEXION À L’ORDINATEUR
1. Connectez votre caméra à l’interface USB de l’ordinateur via le câble USB-C. Attendez environ 1
minute, la caméra s’installera automatiquement.
2. Démarrer le chat vidéo :
Pour profiter des appels vidéo, vous et votre interlocuteur devez installer une application d’appel
vidéo telle que SkypeTM, Yahoo!®, @Messenger, Windows LiveTM, GmailTM
En plus de la caméra USB et de l’application d’appel vidéo, le destinataire de l’appel a besoin de :
• Un ordinateur, un haut-parleur et un microphone (la caméra de conférence est déjà équipée de
microphones intégrés) ;
• Une connexion Internet à haut débit (par exemple DSL, T1 ou câble) ;
• Veuillez consulter les conditions d’utilisation de votre application d’appel vidéo (les exigences
peuvent varier d’une application à l’autre, mais en général, une vitesse de téléchargement minimale
de 2 Mbps est requise).
NOTE
Si votre ordinateur (portable) est équipé d’une caméra intégrée, vous devez modifier les para-
mètres par défaut de la caméra. Par exemple, changez la caméra par défaut dans les paramètres
du logiciel de chat ou désactiver la caméra intégrée dans les paramètres de l’ordinateur.
FR - FRANÇAIS

MINI 4K CONFERENCE CAM WITH AUTO FRAMING
8
2- LED-STATUSANZEIGEN1- ZWEI FIXIERUNGSMODI
1. Positionieren Sie Ihre Konferenzkamera:
a. Befestigung mit Klemmen
Mit der Konferenzkamera-Klemme können Sie die Kamera an Ihrem Monitor befestigen und beliebig
einstellen.
• Ergreifen Sie die Kamera wie in der folgenden Abbildung gezeigt und öffnen Sie den Clip mit der
anderen Handa.
• Befestigen Sie die Kamera und achten Sie darauf, dass die Basis der Klemme die Rückseite des
Monitors berührt.
b. Stativbefestigung
Die Konferenzkamera hat an der Unterseite des Stativs ein Schraubgewinde für ein zusätzliches
Stativ (nicht im Lieferumfang enthalten).
• Schrauben Sie sie wie nachstehend gezeigt an das Stativ:
• Stellen Sie die Kamera im Konferenzraum auf und richten Sie sie beliebig aus.
LED-Anzeige
Kamera-Status Anzeigestatus
Ein Das blue Licht ist immer an
DE - DEUTSCH

MINI 4K CONFERENCE CAM WITH AUTO FRAMING
9
3- VERBINDUNG MIT DEM COMPUTER
1.Schließen Sie Ihre Kamera über ein USB-C-Kabel an die USB-Schnittstelle des PCs an. Warten Sie
etwa 1 Minute, dann wird die Kamera automatisch installiert.
2. Erste Schritte mit dem Videochat:
Um Videogespräche führen zu können, müssen Sie und Ihr Gesprächspartner eine Videogespräch-
sanwendung installieren, z. B.SkypeTM, Yahoo!®, @Messenger, Windows LiveTM, GmailTM
Zusätzlich zur USB-Kamera und der Videogesprächsanwendung benötigt der Anrufempfänger;
• Einen Computer, einen Lautsprecher und ein Mikrofon (die Konferenzkamera ist bereits mit einge-
bauten Mikrofonen ausgestattet);
• Hochgeschwindigkeits-Internetverbindung (z. B. DSL, T1 oder Kabel);
• Bitte lesen Sie die Nutzungsbedingungen für Ihre Videogesprächsanwendung (die Anforderungen
können von Anwendung zu Anwendung unterschiedlich sein, im Allgemeinen ist jedoch eine Min-
dest-Upload-Geschwindigkeit von 2 Mbit/s erforderlich).
ANMERKUNG
Wenn Ihr Computer (Laptop) mit einer eingebauten Kamera ausgestattet ist, müssen Sie die Stan-
dardeinstellungen der Kamera ändern. Ändern Sie z. B. die Standardkamera in den Einstellungen der
Chatsoftware oder deaktivieren Sie die integrierte Kamera in den Computereinstellungen.
DE - DEUTSCH
MINI 4K CONFERENCE CAM WITH AUTO FRAMING
10
2- INDICADORES LED DE ESTADO1- DOS MODOS DE FIJACIÓN
1. Coloque la cámara de conferencias:
a. Fijación con la pinza
La pinza de la cámara de conferencias sirve para fijarla y ajustarla libremente en su monitor.
• Sujete la cámara como se muestra en la siguiente ilustración y abra el clip con la otra mano.
• Monte la cámara, asegurándose de que la base de la pinza toca la parte trasera de su monitor.
b.Fijación del trípode
La cámara de conferencias tiene una rosca en la parte inferior del soporte para un trípode adicional
(no incluido).
• Enrósquela al trípode como se muestra en el esquema siguiente:
• Coloque y ajuste la cámara según desee en la sala de conferencias.
Indicador LED
Estado de la cámara Estado del indicador
On La luz azul está siempre encendida
ES - ESPAÑOL
Tabla de contenidos
Idiomas:


