PolyVision Walk-and-Talk Manual de usuario

Part number 370-0381-02
©2011 PolyVision Corporation
All rights reserved
Walk-and-Talk™interactive whiteboard
user guide

Information in this document is subject to change without notice.
Reproduction in any manner without written permission of PolyVision
Corporation is forbidden.
PolyVision is a registered trademark of Steelcase, Inc. ēno, Walk-and-
Talk and Lightning are trademarks of PolyVision Corporation. Webster
is a registered trademark of PolyVision Corporation.
This product is covered by one or more of the following patents:
Canada 2,100,624; EPO 600,576; EPO 871,935; Germany
69,321,445; WO 98/14888; US 4,777,329; US 5,248,856; US
5,327,161; US 5,434,370; US 5,583,323; US 5,585,605; US
5,623,129; US 5,665,942; US 5,790,114; US 5,838,309 US
6,353,193; US 6,355,895; US 6,445,384; US 6,667,739; Other
patents pending.
PolyVision Corporation reserves the right to make changes in product
design, or detail, and to discontinue any product or material without
notice.
Flash™ Player, Shockwave®Player, and Authorware®Player are
owned by Adobe Systems.

PolyVision i
Welcome . . . . . . . . . . . . . . . . . . . . . . . . . . . . . . . . . . . . . . . . . . . . . . . . . 1
What are Walk-and-Talk products? . . . . . . . . . . . . . . . . . . . . . . . . . . 1
Register your PolyVision product. . . . . . . . . . . . . . . . . . . . . . . . . . . . 2
Installing your Walk-and-Talk whiteboard . . . . . . . . . . . . . . . . . . . . . . . . . 3
Installation checklist . . . . . . . . . . . . . . . . . . . . . . . . . . . . . . . . . . . . . . 3
Mounting WT interactive whiteboards to a wall. . . . . . . . . . . . . . . . . . 3
What comes in the box . . . . . . . . . . . . . . . . . . . . . . . . . . . . . . . . . 4
Preparing to mount the whiteboard . . . . . . . . . . . . . . . . . . . . . . . . 5
Mounting the whiteboard . . . . . . . . . . . . . . . . . . . . . . . . . . . . . . . . 7
Adding batteries to the WT remote control . . . . . . . . . . . . . . . . . . . . . 8
Adding batteries to the Walk-and-Talk eraser. . . . . . . . . . . . . . . . . . . 8
Install the PolyVision driver . . . . . . . . . . . . . . . . . . . . . . . . . . . . . . . . 10
System requirements . . . . . . . . . . . . . . . . . . . . . . . . . . . . . . . . . . 10
PolyVision driver installation . . . . . . . . . . . . . . . . . . . . . . . . . . . . . 10
Getting started in projection mode . . . . . . . . . . . . . . . . . . . . . . . . . . 13
Using Walk-and-Talk products . . . . . . . . . . . . . . . . . . . . . . . . . . . . . . . 15
Getting started with Walk-and-Talk . . . . . . . . . . . . . . . . . . . . . . . . . 15
Operating Walk-and-Talk products. . . . . . . . . . . . . . . . . . . . . . . . . . 16
Remote control options . . . . . . . . . . . . . . . . . . . . . . . . . . . . . . . . 16
Remote control functions . . . . . . . . . . . . . . . . . . . . . . . . . . . . . . 17
Using Walk-and-Talk products with multiple monitors . . . . . . . . . 20
LED and status messages on the WT interactive whiteboard . . . . 22
Sounds . . . . . . . . . . . . . . . . . . . . . . . . . . . . . . . . . . . . . . . . . . . . 24
Cursor control in projection mode . . . . . . . . . . . . . . . . . . . . . . . . . . 25
Using the on-screen keyboard . . . . . . . . . . . . . . . . . . . . . . . . . . . . . 26
Using dry-erase markers . . . . . . . . . . . . . . . . . . . . . . . . . . . . . . . . . 26
Writing in projection mode . . . . . . . . . . . . . . . . . . . . . . . . . . . . . . . . 27
Changing the pen style. . . . . . . . . . . . . . . . . . . . . . . . . . . . . . . . . 29
Erasing in projection mode. . . . . . . . . . . . . . . . . . . . . . . . . . . . . . . . 29
Writing and erasing with IP models. . . . . . . . . . . . . . . . . . . . . . . . 30
Printing and saving. . . . . . . . . . . . . . . . . . . . . . . . . . . . . . . . . . . . . . 30
Spotlight and reveal options . . . . . . . . . . . . . . . . . . . . . . . . . . . . . . . 31
Spotlighting your work . . . . . . . . . . . . . . . . . . . . . . . . . . . . . . . . . 31
Revealing your work . . . . . . . . . . . . . . . . . . . . . . . . . . . . . . . . . . . 32
Opening a blank window for writing . . . . . . . . . . . . . . . . . . . . . . . . . 33
Table of contents

PolyVision ii
The PolyVision driver . . . . . . . . . . . . . . . . . . . . . . . . . . . . . . . . . . . . . . . 34
Configuring PolyVision driver options . . . . . . . . . . . . . . . . . . . . . . . . 34
General options . . . . . . . . . . . . . . . . . . . . . . . . . . . . . . . . . . . . . . 35
Configuration options . . . . . . . . . . . . . . . . . . . . . . . . . . . . . . . . . . 36
Draw options . . . . . . . . . . . . . . . . . . . . . . . . . . . . . . . . . . . . . . . . 37
Print options. . . . . . . . . . . . . . . . . . . . . . . . . . . . . . . . . . . . . . . . . 38
Save options . . . . . . . . . . . . . . . . . . . . . . . . . . . . . . . . . . . . . . . . 39
Projection options . . . . . . . . . . . . . . . . . . . . . . . . . . . . . . . . . . . . 40
Hardware options. . . . . . . . . . . . . . . . . . . . . . . . . . . . . . . . . . . . . 41
Icon options (for ēno users) . . . . . . . . . . . . . . . . . . . . . . . . . . . . . 42
Status of the PolyVision driver . . . . . . . . . . . . . . . . . . . . . . . . . . . 43
Choosing alignment accuracy . . . . . . . . . . . . . . . . . . . . . . . . . . . . . 43
Using on-screen tools . . . . . . . . . . . . . . . . . . . . . . . . . . . . . . . . . . . 44
Getting help . . . . . . . . . . . . . . . . . . . . . . . . . . . . . . . . . . . . . . . . . . . 45
Checking for updates. . . . . . . . . . . . . . . . . . . . . . . . . . . . . . . . . . . . 45
Exiting the PolyVision driver . . . . . . . . . . . . . . . . . . . . . . . . . . . . . . . 45
To uninstall the PolyVision driver in Windows . . . . . . . . . . . . . . . . . . 46
To uninstall the PolyVision driver on a Macintosh . . . . . . . . . . . . . . . 46
To uninstall the PolyVision driver using Linux . . . . . . . . . . . . . . . . . . 46
Care and maintenance . . . . . . . . . . . . . . . . . . . . . . . . . . . . . . . . . . . . . 47
Walk-and-Talk maintenance. . . . . . . . . . . . . . . . . . . . . . . . . . . . . . . 47
Replacing the Walk-and-Talk eraser pad . . . . . . . . . . . . . . . . . . . 47
Cleaning the Walk-and-Talk whiteboard . . . . . . . . . . . . . . . . . . . . 47
Caring for dry-erase markers and erasers. . . . . . . . . . . . . . . . . . . . . 48
How to obtain replacement parts . . . . . . . . . . . . . . . . . . . . . . . . . . . 48
Summer maintenance . . . . . . . . . . . . . . . . . . . . . . . . . . . . . . . . . . . 48
Technical support . . . . . . . . . . . . . . . . . . . . . . . . . . . . . . . . . . . . . . . . . 50
FCC compliance . . . . . . . . . . . . . . . . . . . . . . . . . . . . . . . . . . . . . . . 51
Warranty . . . . . . . . . . . . . . . . . . . . . . . . . . . . . . . . . . . . . . . . . . . . . . . . 52
Appendix 1: Installing the Walk-and-Talk BT option . . . . . . . . . . . . . . . . 55
Installing the Walk-and-Talk Bluetooth (BT) adapter . . . . . . . . . . . . . 55
Appendix 2: Using the WT BT (Bluetooth) option . . . . . . . . . . . . . . . . . . 60
Registering the whiteboard in Windows . . . . . . . . . . . . . . . . . . . . . . 60
Registering the whiteboard on a Macintosh . . . . . . . . . . . . . . . . . . . 64
Registering the whiteboard using Linux . . . . . . . . . . . . . . . . . . . . . . 68
Confirming Bluetooth registration . . . . . . . . . . . . . . . . . . . . . . . . . . . 71
Appendix 3: Using Walk-and-Talk Wireless (IR) . . . . . . . . . . . . . . . . . . . 72
Index . . . . . . . . . . . . . . . . . . . . . . . . . . . . . . . . . . . . . . . . . . . . . . . . . . . 75

PolyVision 1
Welcome
Welcome
Congratulations on your purchase of a PolyVision®Walk-and-Talk
interactive whiteboard.
What are Walk-and-Talk products?
Walk-and-Talk products include:
•Walk-and-Talk interactive whiteboards (WT)
•Walk-and-Talk Lightning™ interactive whiteboards (WTL)
•Walk-and-Talk Interactive Panels (IP)
Walk-and-Talk products provide cordless interactivity from anywhere in the
room using a remote control. Walk-and-Talk interactive whiteboards enable
you to:
•write with dry-erase markers and print or save your work
•use the whiteboard as a touch-screen for your computer that you
control using your finger
•move freely about the room using the remote control to navigate
documents, presentations, or web pages, and to annotate the
computer screen with writing

PolyVision 2
Welcome
•annotate the projected computer screen on the whiteboard with your
finger, and print or save your work
With the PolyVision driver installed on your computer, you can write with
dry-erase markers then print and save your work. When your computer is
connected to a projector, your Walk-and-Talk product becomes a touch-
screen monitor for your computer. (The IP models always operate this
way.) You can control your computer using your finger (or the stylus for IP
models), or you can roam freely about the room and operate your
computer using the remote control touch pad and buttons.
To minimize cables in your working environment, Walk-and-Talk interactive
whiteboards (WT and WTL) include two wireless options. The Walk-and-
Talk Wireless option provides infrared wireless communication between
your interactive whiteboard and your computer. (Refer to “Appendix 3:
Using Walk-and-Talk Wireless (IR)” on page 72.) The Walk-and-Talk BT
option provides Bluetooth wireless communication between your
interactive whiteboard and your computer. (Refer to “Appendix 1: Installing
the Walk-and-Talk BT option” on page 55.)
Register your PolyVision product
By registering your product, you receive enhanced customer service with
information on software upgrades.
To register your PolyVision product:
•Register on-line at:
http://register.polyvision.com

PolyVision 3
Installing your Walk-and-Talk whiteboard
Each board weighs 77 to 102 pounds (35 to 46 kg). Plan your installation
work accordingly. Two people are needed for portions of this installation.
Installation checklist
1. Mount the WT interactive whiteboard to a wall. (Refer to “Mounting
WT interactive whiteboards to a wall” on page 3.)
2. Install the PolyVision driver on the computer. (Refer to “Install the
PolyVision driver” on page 10.)
3. Install batteries in the WT remote control. (Refer to “Adding batteries
to the WT remote control” on page 8.)
4. Install batteries in the WT eraser. (Refer to “Adding batteries to the
Walk-and-Talk eraser” on page 8.)
5. Install the projector. (Refer to “Getting started in projection mode” on
page 13.)
6. Test the WT interactive whiteboard.(Refer to “Using Walk-and-Talk
products” on page 15.)
Mounting WT interactive whiteboards to a wall
You will need to provide these tools:

PolyVision 4
Installing your Walk-and-Talk whiteboard
What comes in the box
1. remote control
2. remote control batteries (AAA)
3. eraser batteries (AAA)
4. eraser
5. USB cable with PolyKey for driver installation
6. Installation Quick Start
7. two remote control lanyards: one wrist-sized, one neck-sized
8. six (16xx models) or eight (18xx models) screws
9. six (16xx models) or eight (18xx models) sheet rock anchors
10. three (16xx models) or four (18xx models) wall brackets
11. two safety straps and screws
1 8
11
10
9
2
37
4
5
6
Quickstart Installation Guide
3/8"
#2
I
n
s
t
a
n
t
P
l
u
g
a
n
d
P
l
a
y
T
e
chn
o
l
o
g
y
PolyKey
T
M
18XX 16XX 14XX
1
432
56
ab

PolyVision 5
Installing your Walk-and-Talk whiteboard
Preparing to mount the whiteboard
These instructions guide you through installing your interactive whiteboard
on a sheetrock wall. If your wall material is some other substance, such as
concrete or brick, use these instructions as a guideline but install
appropriate anchors to secure the unit to the wall.
Locate and have ready to use:
•tape measure
•Phillips screwdriver
•drill
•level
•safety glasses
•pencil
•stud finder
•step stool
•models WT or WTL 16xx: three wall brackets and six sheetrock anchors
with screws (provided)
•models WT or WTL18xx: four wall brackets and eight sheetrock anchors
with screws (provided)
•safety straps and screws (provided)
note:
NOTE:
Instructions and fasteners are provided to help you install the whiteboard
when walls have metal or wood studs. Be sure to locate wall studs and use
them to drive mounting screws whenever possible.
To position the wall brackets:
1. Choose a location on the wall with convenient access to your
computer, an AC power outlet, and a projector or network
connection, as appropriate.
2. Where possible, locate wall studs and select drill hole locations that
align with wall studs. Sheetrock anchors are provided in case studs
cannot be used.

PolyVision 6
Installing your Walk-and-Talk whiteboard
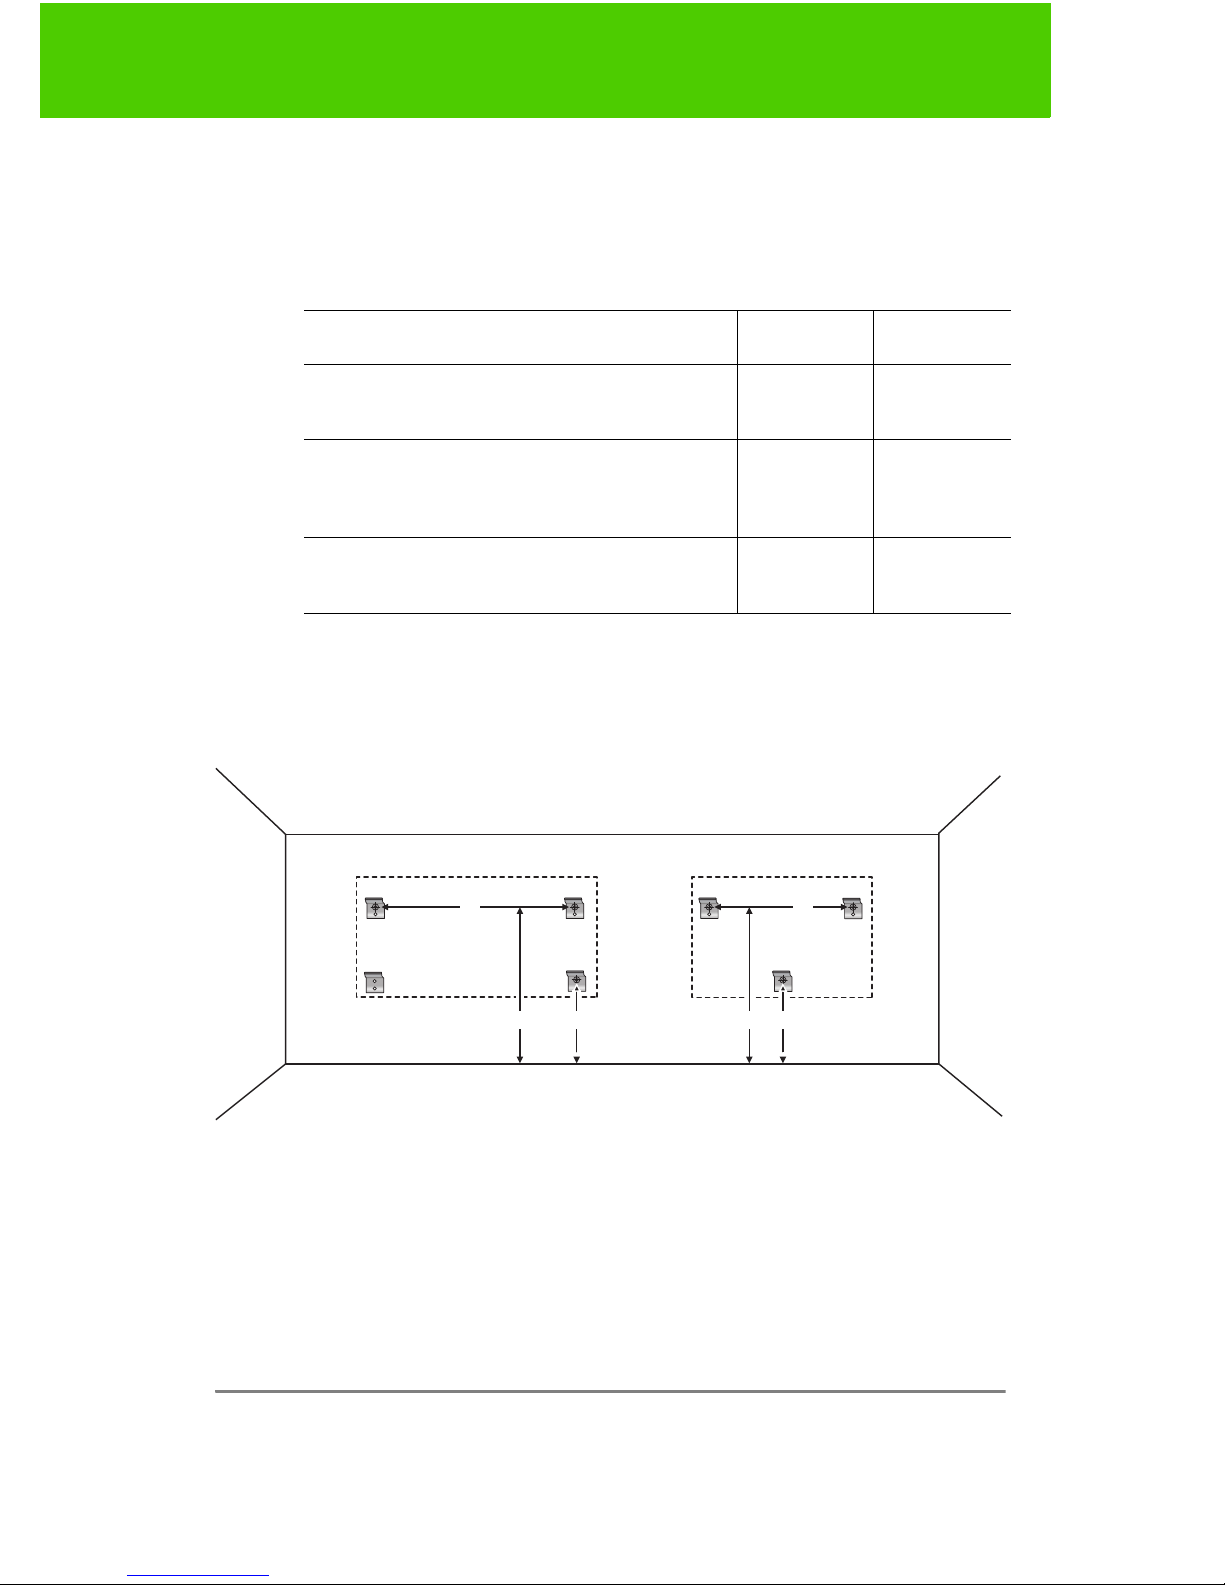
3. Carefully mark three (WT or WTL16xx) or four (WT or WTL 18xx) drill
hole locations as indicated in the table and illustration below, based
on your Walk-and-Talk model. Measurements are for a standard
(adult) height whiteboard*:
*To enable access for young children, reduce vertical measurements by
6 inches (152 mm).
**Choose either 72" or 80" (1823 mm or 2032 mm), whichever distance
enables you to fasten the wall bracket to a wall stud.
4. Using a wall bracket as a template, mark the screw hole locations for
each wall bracket.
5. If installing in sheetrock, install six (WT or WTL 16xx) or eight (WT or
WTL 18xx) sheetrock anchors in the wall at the marked hole
locations. If installing on some other substance such as concrete or
brick, use appropriate anchors.
Model 16xx 18xx
A: Distance from floor to top holes in upper
brackets*
75"
1905 mm
75"
1905 mm
B: Distance between holes 48"
1219 mm
72" or 80"**
1823 mm or
2032 mm
C: Distance from floor to top holes in lower
brackets*
36.25"
920 mm
36.25"
920 mm
B
A A CC
B
18xx 16xx
Otros manuales para Walk-and-Talk
5
Tabla de contenidos
Otros manuales de Pizarra interactiva de PolyVision

PolyVision
PolyVision Walk-and-Talk Manual de usuario

PolyVision
PolyVision Impulse LTX Manual de usuario

PolyVision
PolyVision 370-0255-03 Manual de usuario

PolyVision
PolyVision Walk-and-Talk Instrucciones de funcionamiento

PolyVision
PolyVision eno Instrucciones de funcionamiento

PolyVision
PolyVision TS Series Manual de usuario

PolyVision
PolyVision Walk-and-Talk Manual de usuario

PolyVision
PolyVision CopyCam Instrucciones de funcionamiento

PolyVision
PolyVision eno Manual de usuario