PLX Devices LUXOR 2 Manual de usuario

User Manual
Patents Issued and Patents Pending
© PLX Devices Inc. 2016 All Rights Reserved
TM
PLX

PLX
www.plxdevices.com
2
Contents
1 Introduction
Patents
Warnings
Key features
Package contents
2 Overview
Accessories
3 General Operation
Button function
Light modes
Light modes selection
Intelligent OLED display
Luxor menus
Charging your Luxor
Charging other devices with Luxor- reverse charge
Changing your battery
Additional features
4 Product care and maintenance
Storage
Battery use and safety
Disposal
5 Troubleshooting
Problem turning on your Luxor
Problem charging your Luxor
Resetting your Luxor
Additional Support
6 TechnicalSpecications
3
3
3
3
4
5
6
6
7
8
8
9
9
10
11
11
12
13
13
14
14
3
4
5
11
13
15

PLX
www.plxdevices.com
3
1Introduction
Patents
Warnings
Key features
Package contents
PLX Devices Inc. currently has issued patents and patents pending on the LED digital and
automatic focus, and intelligent battery metering hardware, rmware, and algorithms.
Each Luxor contains a Lithium Polymer (LiPo) battery. LiPo batteries are volatile.
ImproperhandlingofLiPobatteriescanresultinre.ReadALLinstructionsbeforeuse.
Donottamper,disassemble,ormodifythisproduct.Thismaycauseanaccident,re,electric
shock, or product malfunction.
Luxor can become hot when operated at or near maximum output for extended periods of time.
Luxor’s head piece in particular can reach extremely high temperatures during such operation
and can become a burn hazard. Always use caution when Luxor is operated near maximum
output, and never leave Luxor unattended when running at or near maximum output.
Luxor uses high power LEDs that are capable of producing intense light. Never look
directly into the light or shine into another person’s eyes.
Luxor is not a toy. Do not allow children to operate or handle Luxor unsupervised.
Although Luxor is waterpoof, prolonged contact with water is not recommended.
DonotusethisproductanditsaccessoriesinanywayotherthanspeciedbyPLXDevicesInc.PLX
Devices Inc. is not liable for accidents or damage caused by misuse of this
product.
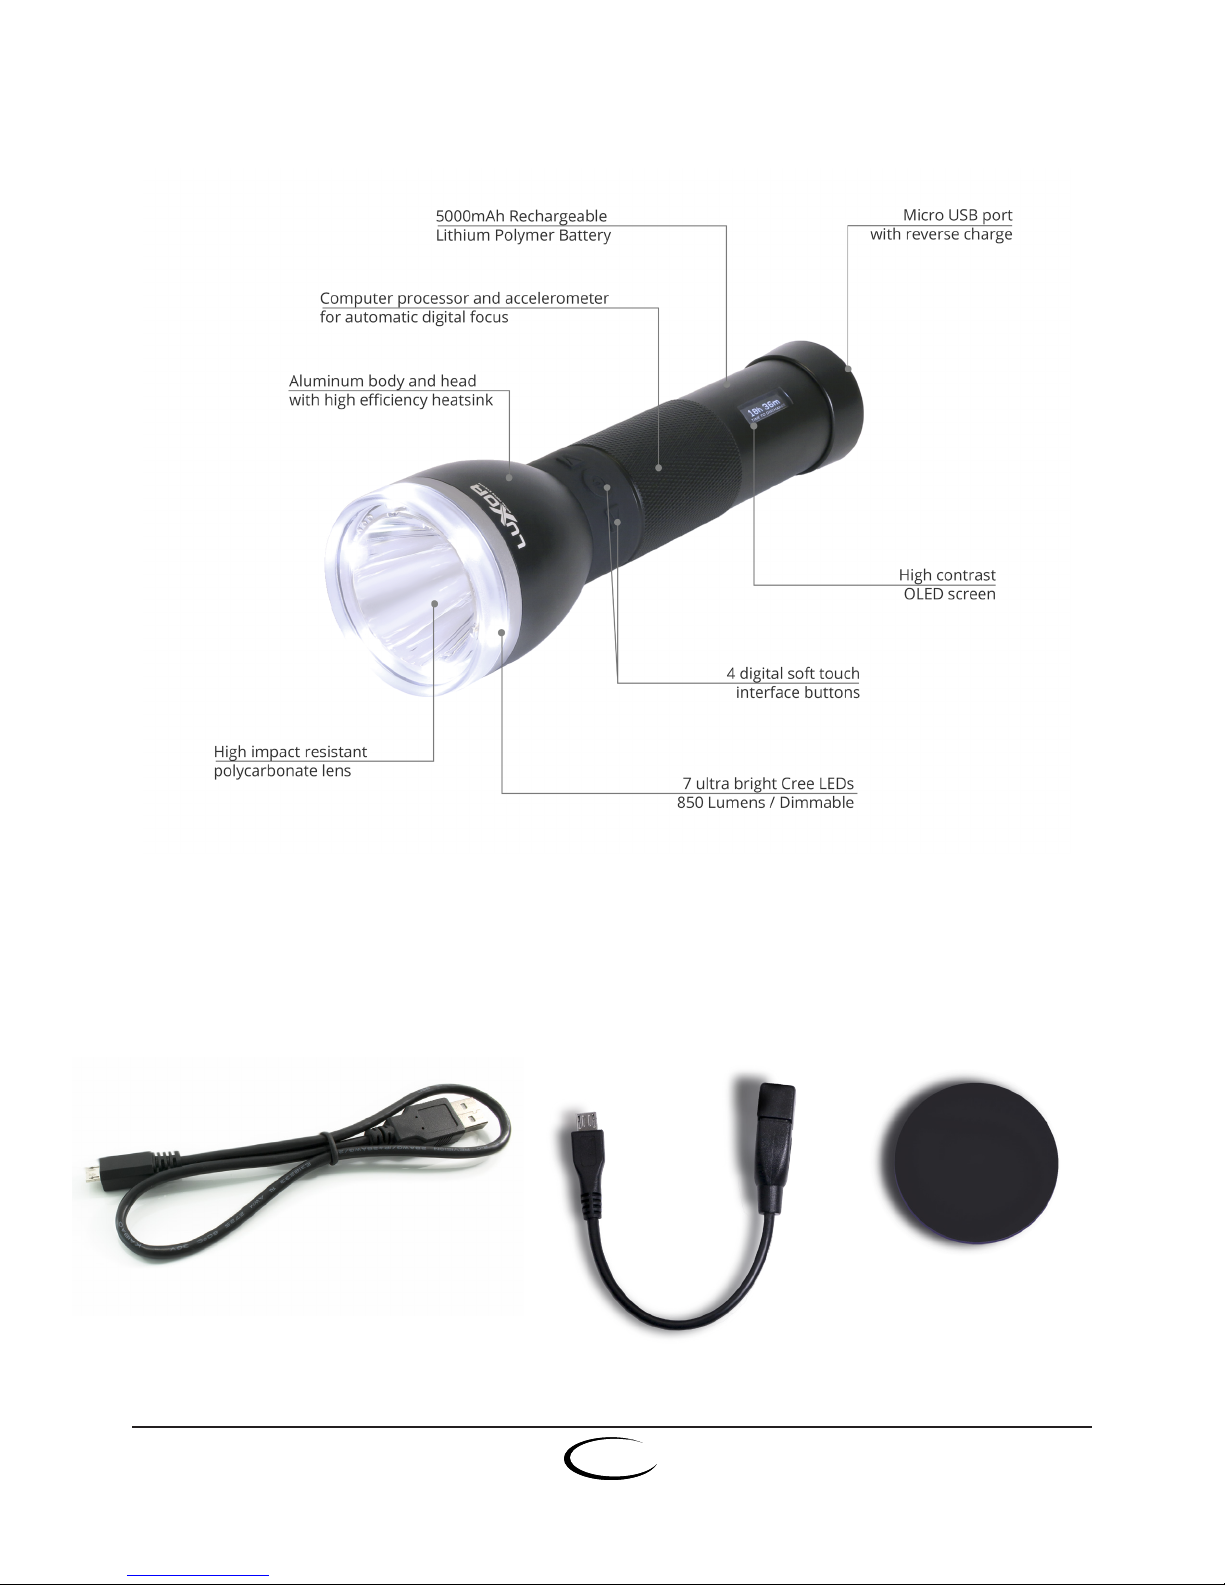
1. Auto Focus and Virtual Focus
2. Beam, Flood, and Lantern Light All in One
3. 7 Cree LEDs delivering up to 850 Lumens
4. 5000 mAh Rechargeable LiPo Battery
5. 10,000:1 Contrast Ratio OLED Display
1. Luxor Intelligent Digital Focusing Flashlight
2. USB Male A to Micro USB Cable
3. Quick Start Guide
4. Micro USB to USB Female A Cable
5. Water Proof Tail Cap
PLX
www.plxdevices.com
4
2Overview
Accessories
Included accessories
Charging Cable Reverse Charge Cable Waterproof Tail Cap

PLX
www.plxdevices.com
5
3General Operation
Button function
Turnon/o:Press & release button
Changelightmode:Press & release button
Decrease/Increaseintensity:Press or button
Adjustfocusforvirtualfocus:Hold & rotate Luxor (or press or button)
Changescreendisplay:Hold & press button
Lock/Unlockbuttons:Press & hold and buttons simultaneously for 5 seconds
Activate/Deactivatelightmodes:Press & hold and buttons simlatneously for
5 seconds
Activate/Deactivatereversecharge:Press & hold button for 3 seconds with Luxor on.
Fullintensityshortcut:Double tap button

PLX
www.plxdevices.com
6
Light modes selection
Luxor oers ve light modes that can be activated/deactivated based on user preference.
With Luxor’s OLED on, press and hold and buttons simultaneously for 5 seconds until the
following display appears:
Once in the light mode selection screen, pressing the or button will scroll through the
dierent light modes that can be activated or deactivated.
Press the button to activated or deactivated the light mode displayed on the screen.
Press the button once you are satised with your selection to exit the light mode selection
screen.
Light modes
Luxor has ve light modes: auto focus, virtual focus, strobe, beam+ood, and
beam+ood+lantern.
Autofocus:In auto focus mode, Luxor detects where it is being pointed and automatically
adjusts the focus of the light to deliver the best lighting for that application.
Virtualfocus:Virtual focus mode allows you to manually control the beam pattern of your
Luxor. While in virtual focus mode, hold the button down and rotate clockwise to narrow the
beam pattern or rotate counterclockwise to widen the beam pattern.
You can also adjust the beam by holding down the button down and pressing the button
to narrow the beam pattern or pressing the button to widen the beam pattern. Once the
desired beam pattern has been selected, the intensity can be adjusted by pressing the or
button.
Strobe:In strobe mode, four forward facing LEDs turn on and o at your desired frequency.
Adjust the frequency by pressing the or button.
*note: Strobe mode not activated out of the box
Beam+ood:With all four front facing LEDs on, beam+ood mode is the most ecient way to
light up what lies ahead. Adjust intensity by pressing the or button.
*Beam+ood mode note activated out of the box
Beam+ood+lantern:In beam+ood+lantern mode, all seven LEDs are on, allowing you to get a
maximum light output of 850 lumens. Adjust intensity by pressing the or button.

PLX
www.plxdevices.com
7
Intelligent OLED display
Shows the percent charge remaining and the actual capacity
remaining in mAh.
Shows the amount of time (days:hours:minutes) remaining until
Luxor becomes empty.
Shows the amount of time (days:hours:minutes) remaining until
Luxor becomes fully charged.
Shows the amount of light emitted in lumens and graphically
shows what percentage of maximum light output is being
emitted from each set of LEDs (beam, ood, lantern).
Shows the beam projecting performance in meters.
Shows the battery’s voltage, the amount of current in Amps be-
ing charged into or being consumed by Luxor, and the amount
of power in Watts Luxor is currently using.
Shows the health of your battery and charge mode. Luxor keeps
track of your battery’s wear and tear and its charging condition.
Shows the angle of the light being emitted in DFS mode and
graphically shows what percentage of maximum light output is
being emitted from each set of LEDs’ (beam, ood, lantern).

PLX
www.plxdevices.com
8
Luxor menus
Six dierent menus may be selected by the user on Luxor’s organic LED display. These menus
include battery percentage, time remaining, electrical, health & charge mode, throw, and
lumens.
Battery percentage: The battery percentage menu will display the remaining battery capacity
as a percentage of Luxor’s maximum battery capacity numerically and graphically. The remain-
ing battery capacity will also be displayed in mAh.
Timeremaining:In the time remaining menu, Time to Discharge, Time to Charge, or Fully
Charged will be displayed. During normal operation, the Time to Discharge will be displayed,
showing the amount of time left before Luxor needs to be charged. If Luxor is being charged,
the Time to Charge will be displayed, showing the amount of time Luxor needs to be charged to
reach full capacity. If Luxor has reached full capacity, Fully Charged will be displayed.
Electrical:The electrical menu contains the voltage, current, and power readings of Luxor’s bat-
tery. NOTE: If your screen is on but the LEDs are o, you should expect to see a low current of
0.05A or less.
Health&chargemode:The health & charge mode menu displays the condition (new, good, ok,
poor, bad, or replace) of Luxor’s battery, as well as which charge mode is activated.
NOTE: Please note that LiPo batteries operate better at lower temperatures.
Throw:The throw menu contains the distance in meters that the beam light is emitting.
Lumens:The lumens menu shows the total amount of light emitted in lumens. Additionally, the
Lumens menu graphically shows what percentage of maximum light output is being emitted
from each set of LEDs (beam, ood, lantern).
Charging your Luxor
1. Insert the USB male A end of your
charging cable into a USB power source.
2. If the waterproof tail cap is on, unscrew
the tail cap seal and remove the tail cap.
3. Connect the micro USB end of your
charging cable into Luxor’s micro USB
port.
NOTE: Luxor will still charge if it is o or
locked.

PLX
www.plxdevices.com
9
Changing your battery
1. Before changing your Luxor battery, always make sure that there is no moisture present
on or around your Luxor unit.
2. Unscrew the tail cap seal ring and remove the tail cap.
3. Disconnect the battery connector and
remove the battery.
4. Slide your new Luxor battery into the
battery compartment and connect the
battery.
NOTE: Be sure that your battery
connector is inserted with the correct
orientation.
5. Place the tail cap back into position,
making sure that it is correctly oriented
by aligning the micro USB opening with
the micro USB port.
6. While applying pressure on the tail cap,
screw the tail cap seal ring back on. Be
sure that the tail cap seal is completely
screwed onto the body of your Luxor.
NOTE: If your Luxor will not charge after
replacing the battery, conrm that the tail
cap is aligned properly and the tail cap
seal ring is completely screwed onto the body of your Luxor. If the tail cap is misaligned or
the tail cap seal ring is not screwed on completely, your micro USB cable might be unable
to be inserted completely, preventing your Luxor from registering a charge.
Charging other devices with Luxor - reverse charge
1. Make sure reverse charge mode is activated. Pressing &
holding the button for 3 seconds with Luxor on activates/
deactivates Reverse Charge.
2. Insert the micro USB end of your reverse charge cable into
Luxor’s micro USB port.
3. Insert the USB male A end of the charging cable into the USB
female A end of the reverse charge cable.
4. Connect the Micro USB end of the charging cable into your
other device.
Important Notes: Reverse charge will be deactivated if battery level is too low. When reverse charge
is on, maximum brightness levels of strobe, beam+ood, and beam+ood+lantern mode will be
reduced 75%, 75%, and 50% respectively to protect Luxor.
WARNING: DO NOT CHARGE LUXOR WHEN REVERSE CHARGE IS ACTIVATED.
LEDs on while using reverse charge can cause damage to Luxor and is not recommended.

PLX
www.plxdevices.com
10
Additional features
Lowbatteryindicator: Luxor has a low battery indicator that activates when your battery
is critically low. When you battery is low, all active lights will blink twice (every 30 seconds)
and a warning screen will display (every 6 seconds). All low battery indicators will be turned
automatically o once your battery reaches a safe charge level. Luxor’s LiPo battery can be
damaged if drained to a very low level.
Emergencylocator: Luxor automatically turns on during a power outage to let you know its
location.
1. Plug Luxor into a USB power source with your charging cable.
2. As soon as a power outage occurs, Luxor’s built-in processor detects the power outage
and turns on in a matter of seconds.
3. PIck up Luxor or press the button to exit emergency locator mode.
4. Emergency locator will turn o if left alone for 10 minutes to conserve power.
Tabla de contenidos


