Perfect Choice PC-171669 Manual de usuario

Welcome to the PERFECT CHOICE Design’s world
Before start using this product it is important to read the manual.

A4 Portable Scanner
PC-171669
V.PCD 1.2

Content
• Portable scanner 1 piece
• USB cable 1 piece
• Travel bag 1 piece
• Batteries 4 pieces
• Installation disk 1 piece
• Calibration card 1 piece
• User´s manual 1 piece
Features
• Letter/A4 maximum scanning size.
• Color or gray scale.
• 600 and 300 DPI resolution.
• Stores JPG les directly into the microSD memory.
• Compatible with up to 32GB microSD cards.
• No driver required for Windows XP / Vista / 7 (storing mode).
Scanner

Status Icons
Part Function
1 USB port Downloads image to PC via the USB cable. It can also be used to provide power to the
scanner.
2 Battery compartment Holds 4 AA batteries.
3 Turn ON button Press once to turn it on. Press again to turn it off.
4 Card slot
To insert microSD card.
5 Effect / Up Selects between color or gray scale scanner modes. Display will show the color or
monochromatic icon depending on selection.
6 Format button Formats the microSD memory.
7 Enter Press this button to confirm the entries or changes.
8 DPI / Down Selects high resolution (600 DPI) or low resolution (300 DPI). High/Low icon will be shown
in the display depending on selection.
9 LCD Screen Displays scanner status.
10 Time adjust Press this button to enter the DATE AND TIME mode.
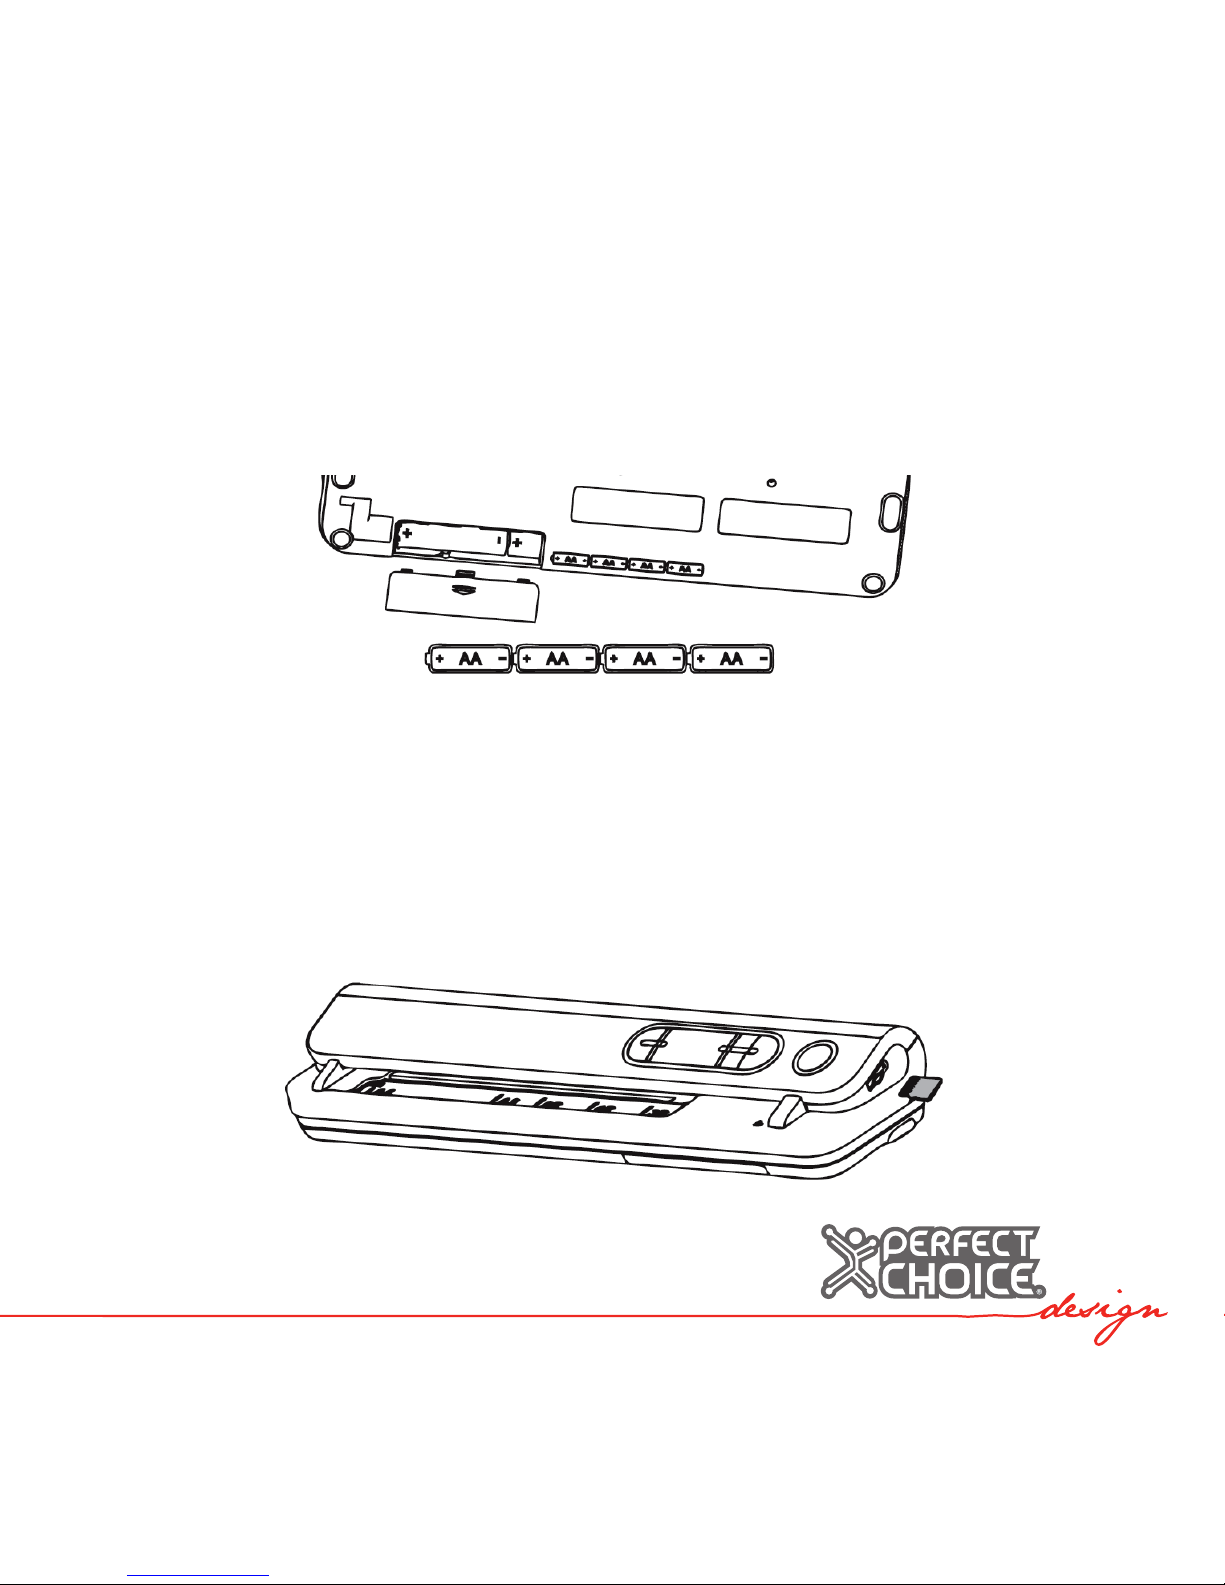
Installing the Batteries
1. Open the battery compartment lid.
2. Place 4 AA batteries inside the compartment verifying the correct polarity.
3. Close the lid.
4. Turn on the scanner by pressing the Turn ON button.
Inserting the MicroSD Memory Card
You must have a microSD card (not included) installed to store images.
To insert the microSD memory card:
1. Turn off the scanner.
2. Insert the memory card in the slot by gently pressing the card until it holds itself.

Note: Do not force the card into the slot; otherwise you can damage both, the slot
and the card. Align the card as shown in the drawing and try again in case you have
problems inserting it.
Date and Time Adjustment
1. Press the “Time Set” button.
2. Display will show 1 XX, then press the Effect and DPI button to select the desired
numbers.
3. Press “Enter” to conrm selection.
4. Display will show the following settings, in sequence: 1 XX year, 2 XX month,
3 XX day, 4 XX hour, 5 XX minutes.
5. After entering the desired information, press the “Time Set” button again to exit the
date and time mode adjusting.
Formatting the MicroSD memory
1. Insert a new microSD card in the slot and turn on the scanner.
2. Press the “Format” button. “F” will be shown in the display.
3. Press the “Enter” button to start formatting the memory.
4. Card indicator will blink until formatting is completed.
Selecting the Resolution
Press the “DPI” button to select between high/low resolution. Selected resolution will
be shown in the screen.

Adjusting the Scanning Mode
Press the “Effect” button to select between color or mono. Selection will be shown in
the display.
Scanning
1. Press the Turn ON button.
2. Scanner will be set to standby mode. Select the color and resolution.
3. Adjust the width selector to match your document.
4. Place the document with the information facing down.
5. Once the scanner detects the document, scanning process will start and the Turn
ON button light will turn green.
6.Scanner will pull the document and store the image automatically. When the
counter increases the number by one, the scanner will be ready to scan a new
document.

Compatibility
System requirements:
• Windows®XP SP2/Vista and Mac OS 10.4 or greater
• Pentium III or greater
• 256 MB RAM
• Free USB slot
Connecting to Computer
1.You can also connect the scanner to your computer to download or visualize the
scanned images.
2.Connect the scanner using the USB cable, turn on the scanner and press “Enter”
to enable the storing mode.
3. Press the ON button again to turn off the scanner and exit the storing mode.
4. Turn ON the scanner to enable the standby mode and scan other documents.

Calibration
• To start the scanner calibration you must take out the MicroSD card from the scanner.
• Turn ON the scanner by pressing the power button.
• Insert the white balance calibration card as arrow direction.
• And the scanner will start scanning the card for auto white balance calibration.
• Turn off the scanner after scanning finished.
Note: Calibration must be done only when the whites balance needs adjustment.
Troubleshooting
Scanner does not turn on.
• Batteries might be worn out or not properly placed.
• Verify the batteries polarity. Replace them for new batteries in case they are worn
out.
Image is not stored when scanning.
• It is necessary to have a microSD memory installed to store information.
• If memory is full, it will be necessary to free up space by downloading images to a
computer or deleting them.
• It might be necessary to format the memory from the scanner in order to have it
working properly.

Computer does not recognize the scanner when it is on.
• Verify the cable is securely connected. Restart your computer.
Turn ON button LED is on in red.
• Scanner needs to be re calibrated.
Safety and Care Information
• Turn OFF the equipment and store it properly protected against heavy objects and
shocks.
• Do not store at high temperatures (higher than 110ºC), such as in a car under the
direct sun light.
• Do not spill or expose it to liquids.
• To clean, do it with a slightly damp cloth.
• Do not throw away or smash it.
• Keep it away and protected of dust.
Technical Specications
Power supply:...............................................................................6 V (4 AA batteries)
Resolution:.........................................................Low 300 x 300 DPI High 600 x 600 DPI
Scanning speed of a A4 document:................................................................6 seconds
Maximum width of scanning document:....................................................21 cm (8.27’’)
Maximum length of scanning document:................................at 300 DPI: 127 cm (50’’),
at 600 DPI: 63.5 cm (25’’)
File format:..............................................................................................................JPEG
Automatic power off:................................................................................after 3 minutes
Tabla de contenidos
Idiomas:


