Pello Ripple Manual de usuario

1
bikes
Owner’s Manual
All content © 2023 Pello Bikes
Printed on climate pledge friendly paper

2 3
Smile.
Ride.
Repeat...
Congratulations, you are the owner of a brand new Pello
Bike! Untold adventures await, but before you head out to
conquer the paths and trails, please take time to read this
owner’s manual.
You will find everything you need to properly set up your
bike and some tips to our new cyclists for being safe whilst
having fun.
Beyond that, you will even find some tips for maintaining
your bike and keeping it in its best working order in the fu-
ture. If you have any questions or issues with your Pello bike
now or in the future, please drop us a note at
info@pellobikes.com
Enjoy your time out there; cycling is a family affair and a
great way to spend time together. bikes
All content © 2023 Pello Bikes
pellobikes.com
Content
Get to know your Pello
What do I need to put it together?
What’s in the small parts box?
Assembling your bike
Bike fit
Checklist, Review and First Ride
Maintaining your bike
Safety & Riding Tips
Returns/Warranty/Contact
GrowPello
Maintenance Tracker
Journal
Color the Bike
Lets Ride!
PAGE
4-9
10
11
12-23
24-26
27
28-30
31
32
33
34-35
36-37
38-39
40

4 5
Get to know your Pello balance bike
(Ripple)
1Frame
2 Fork
3 Bell
4 Handlebar
5 Brake Lever
6 V-Brake
7Stem
8 Headset
9 Tire
10 Spokes
11 Valve Stem
(Schrader)
12 Rim
13 Saddle
14 Seatpost
15 Seatpost Clamp
16 Reflector
1
2
10
11
8
5
3
6
20
4
12
14
15
7
9
13
18

6 7
Get to know your single speed Pello
(Romper, Revo & Reddi)
1Frame
2 Fork
3 Bell
4 Handlebar
5 Brake Lever
6 Brake
7Stem
8 Headset
9 Tire
10 Spokes
11 Valve Stem
(Presta)
12 Rim
13 Crank Arm
14 Chain ring
15 Bottom Bracket
16 Pedal
17 Saddle
18 Seatpost
19 Seatpost Clamp
20 Chain guard
21 Chain
22 Reflector
12
4
10
11
12
13
14
15
8
18
5
3
16
20
6
7
9
17
19
21
22

8 9
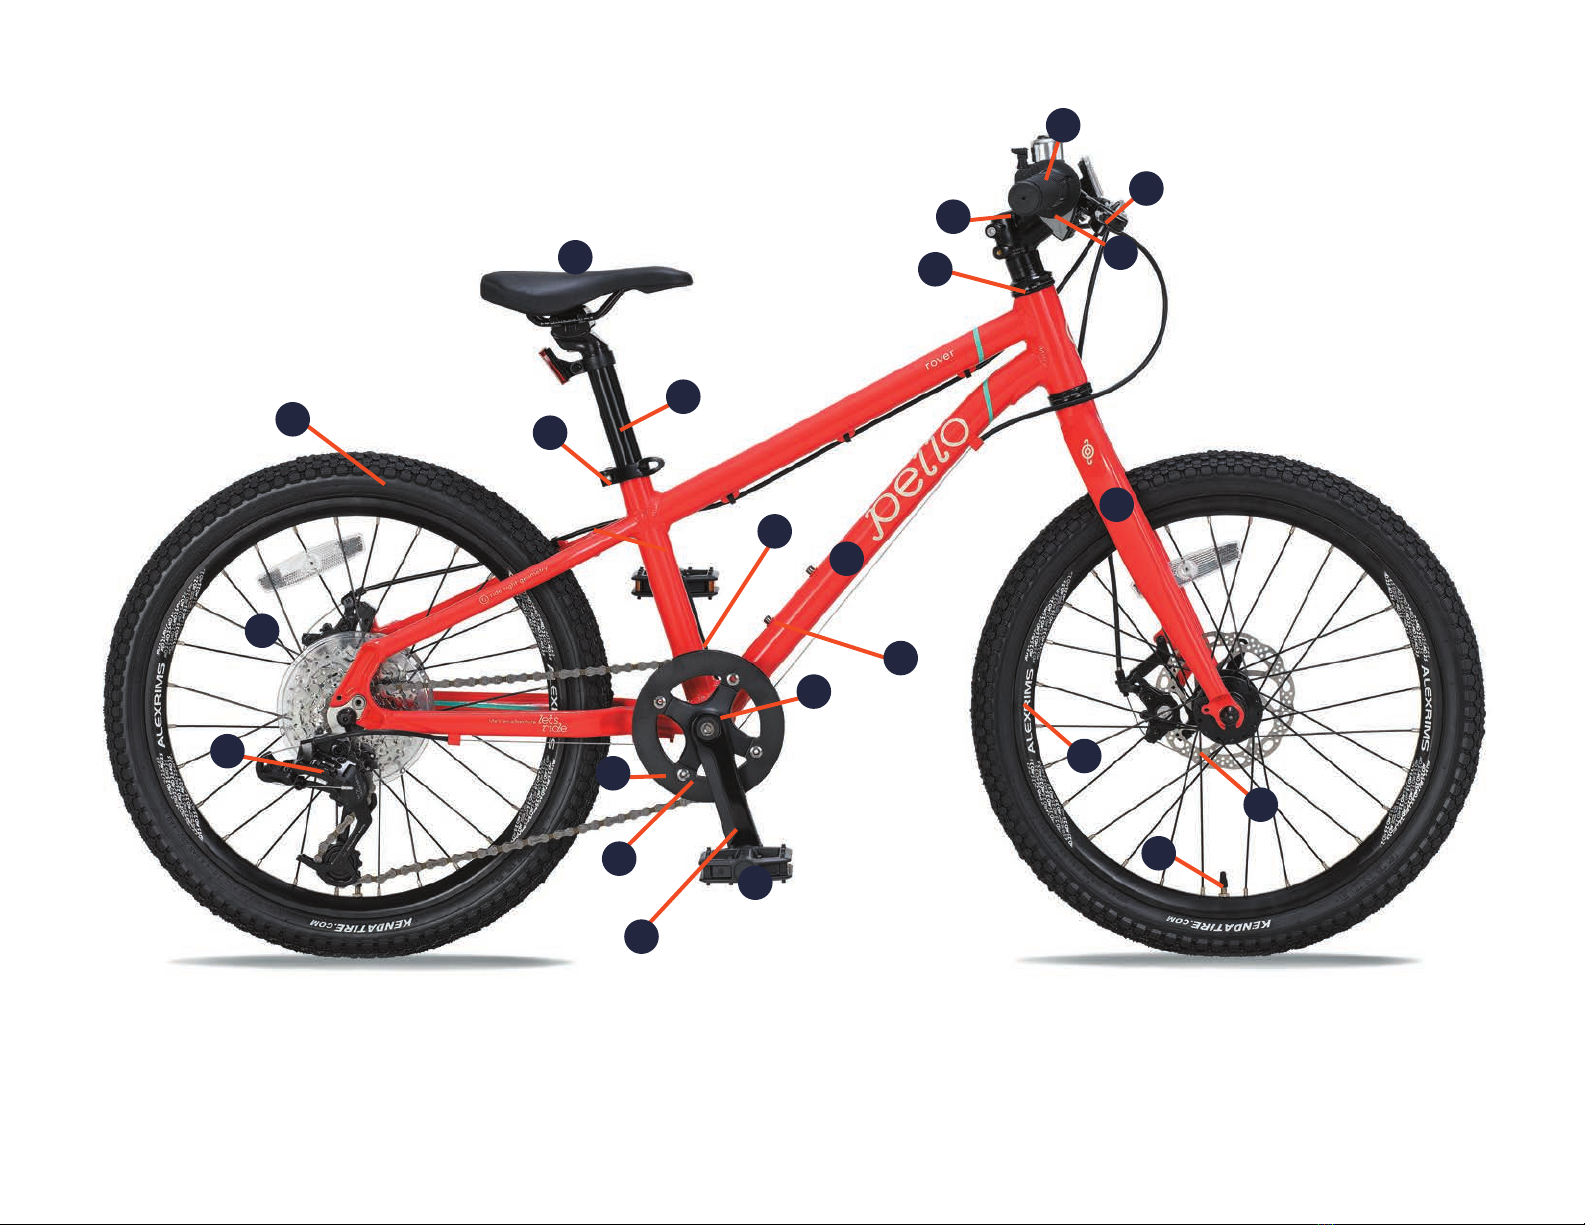
Get to know your geared Pello
(Rover, Reyes & Roovi)
1Frame
2 Fork
3 Handlebar
4 Brake Lever
5 Shifter
6Stem
7Headset
8 Tire
9Spokes
10 Valve Stem (Presta)
11 Rim
12 Crank Arm
13 Chain ring
14 Bottom Bracket
15 Pedal
16 Saddle
17 Seatpost
18 Seatpost Clamp
19 Chain guard
20 Dérailleur
21 Disc Brake
22 Water Bottle Cage
Mounting Bolts
23 Seatpost Dropper
Port (Reyes &
Roovi)
1
2
3
4
5
6
7
9
10
11
12
13
14
15
16
19
20
818
21
22
23
17

10 11
Now that your bike has been delivered, there are a few steps you need to
take to get it ready to ride.
Before your bike left our hands we went through a quality pre-ship
checklist that is included in your paperwork. When you opened the box,
you will see a Pello that is 95% assembled. Please see below for a few
things that are needed to make it 100% complete.
Tools needed:
• 5mm and 6mm Allen wrenches (provided in your small parts box)
• 15mm open wrench (or adjustable crescent wrench)
• Phillips screwdriver
• Presta valve tire pump. If you don’t have a presta valve pump, there
is a presta valve adapter in your small parts box.
You will need to perform the following:
• Unpack your new Pello
• Install and secure the front wheel
• Install and align the handlebars
• Install the pedals
• Install reflectors and bell
Please read all instructions first before assembly.
There was a lot of care given in packing your Pello to ensure it made it to
you without damage. Please use care when unpacking your new Pello and
please recycle responsibly.
After assembly and prior to riding your Pello, it is recommended that you
have your local bike shop or Qualified Bicycle Mechanic review your bike
assembly.
What do I need to put it together?
Presta Valve
Adapter
What’s in the Small Parts Box?
1
1
1
1
22
22
33
3
3
44
4
4
5
5
5
5
6
66
7
7
7
8
8
9
10
11
1 Spare Inner Tube
2 5mm & 6mm Hex Tools
3 Bell
4 Front Reflector
5 Rear Reflector
6 Pedals
7 Presta Valve Adapter
8 Quick Release Skewer
9 Dropper Port Cable Holder
(Reyes & Roovi)
10 Spare Cable Zipties
11 Spare Derailleur Hanger
12 Short Seatpost (Revo)
12
Packed with your bike will find a small
parts box that contains some cool stuff
for your Pello. Please see below for
what’s in the box.
Ripple Romper & Revo
Reddi
Rover, Reyes & Roovi

12 13
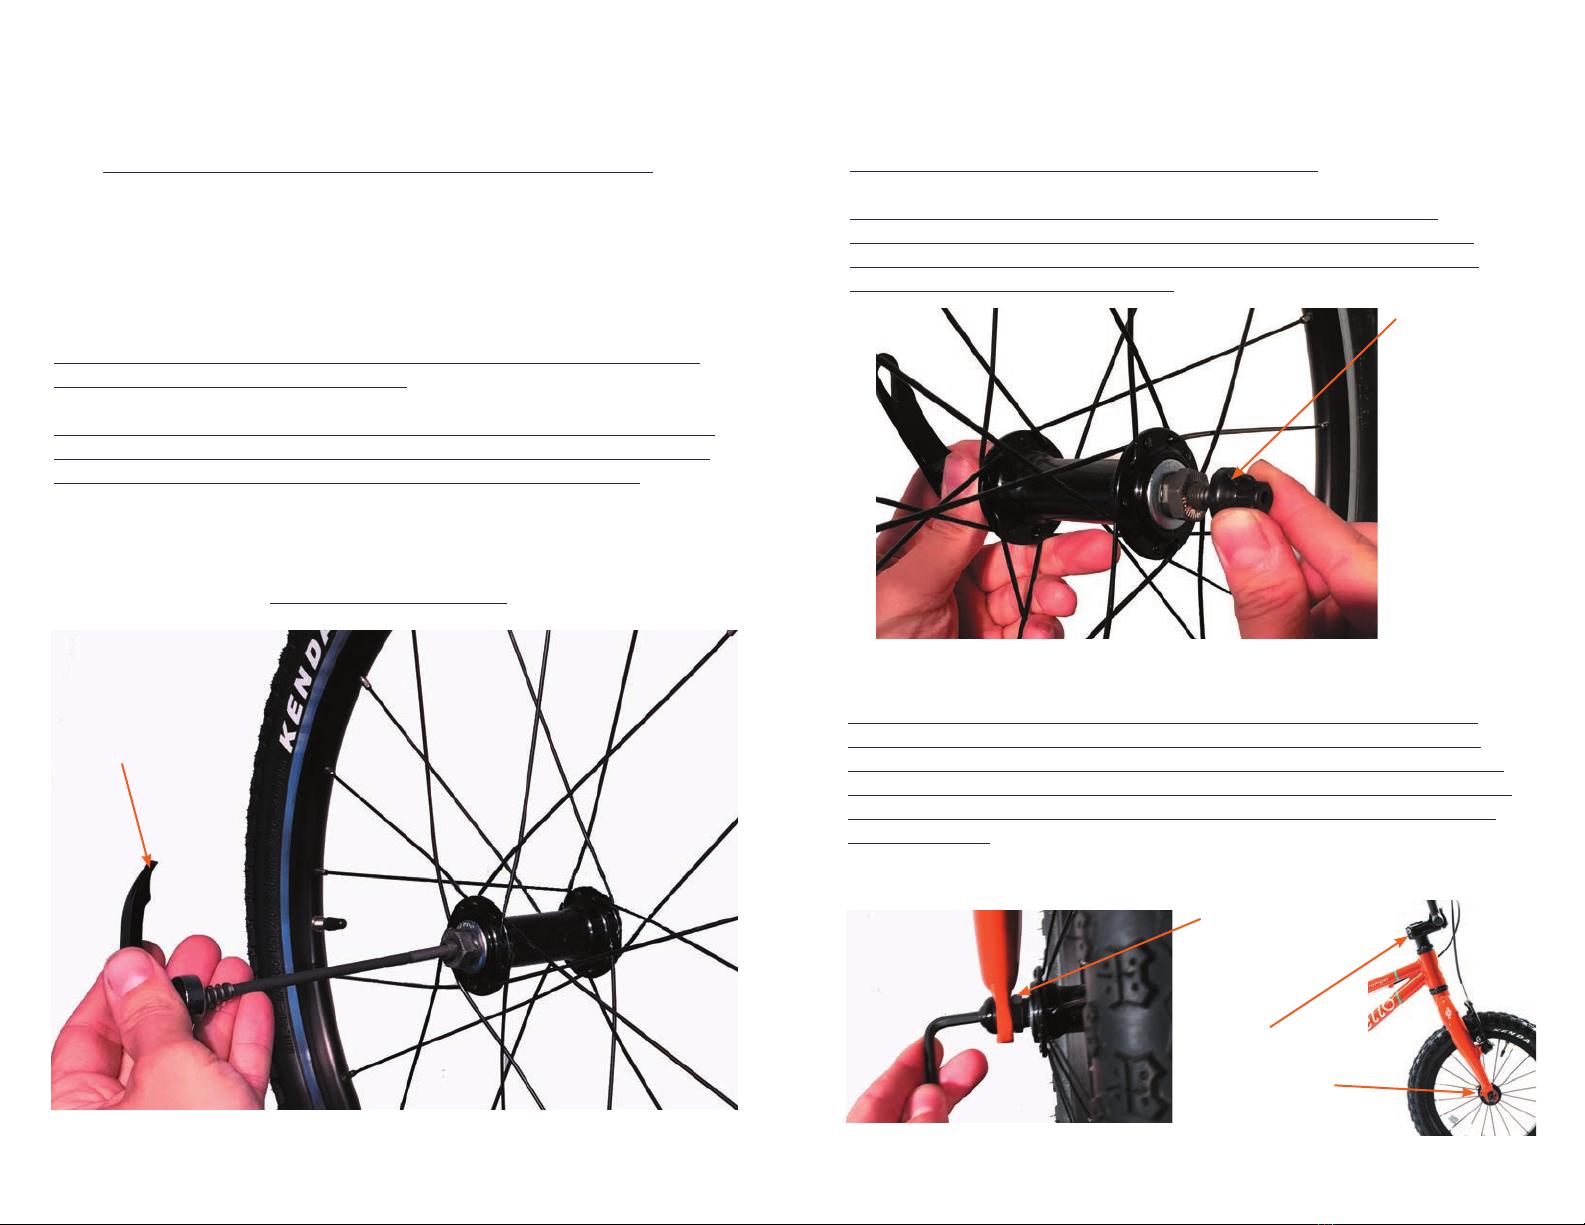
Step 2/3
Ripple, Romper & Revo = Skip to next step
Reddi, Rover, Reyes & Roovi = Now that the skewer is
inserted into the hub you will now hand tighten the screw
nut partially onto skewer with narrow side of spring going
first (please see image below)
Ripple, Romper & Revo = Align stem and fork so they are both
faceing forward. The fork is properly oriented when the fender
eyelet is facing the rear of the bike. Attach wheel to fork, ensure
axle is properly seated at top of fork dropouts. Tighten both sides
clockwise with provided 5mm Allen key until secure. (Please see
images below)
Step 3/3
Axle is
securely
seated in
dropout
Assembling your bike cont...
Stem
facing forward
Fender eyelet
alignment
Install and secure the front wheel
*Note: Please DO NOT squeeze front brake lever on bikes equipped
with disc brakes until wheel is installed. We know this is very tempting
but doing so may result in a miss-alignment of the disc pads and rotor.
Ripple, Romper & Revo = Loosen 5mm Allen bolts on each
side of wheel but do not remove.
Assembling your bike
Step 1/3
Reddi, Rover, Reyes & Roovi = Remove screw nut from quick
release skewer and insert into the front hub as shown below
(you will find the quick release in the small parts box).
*(If your tires are directional please look on side of tire for the directional
arrow.)
Reddi, Rover & Reyes
Quick
Release
Skewer
Screw Nut

14 15
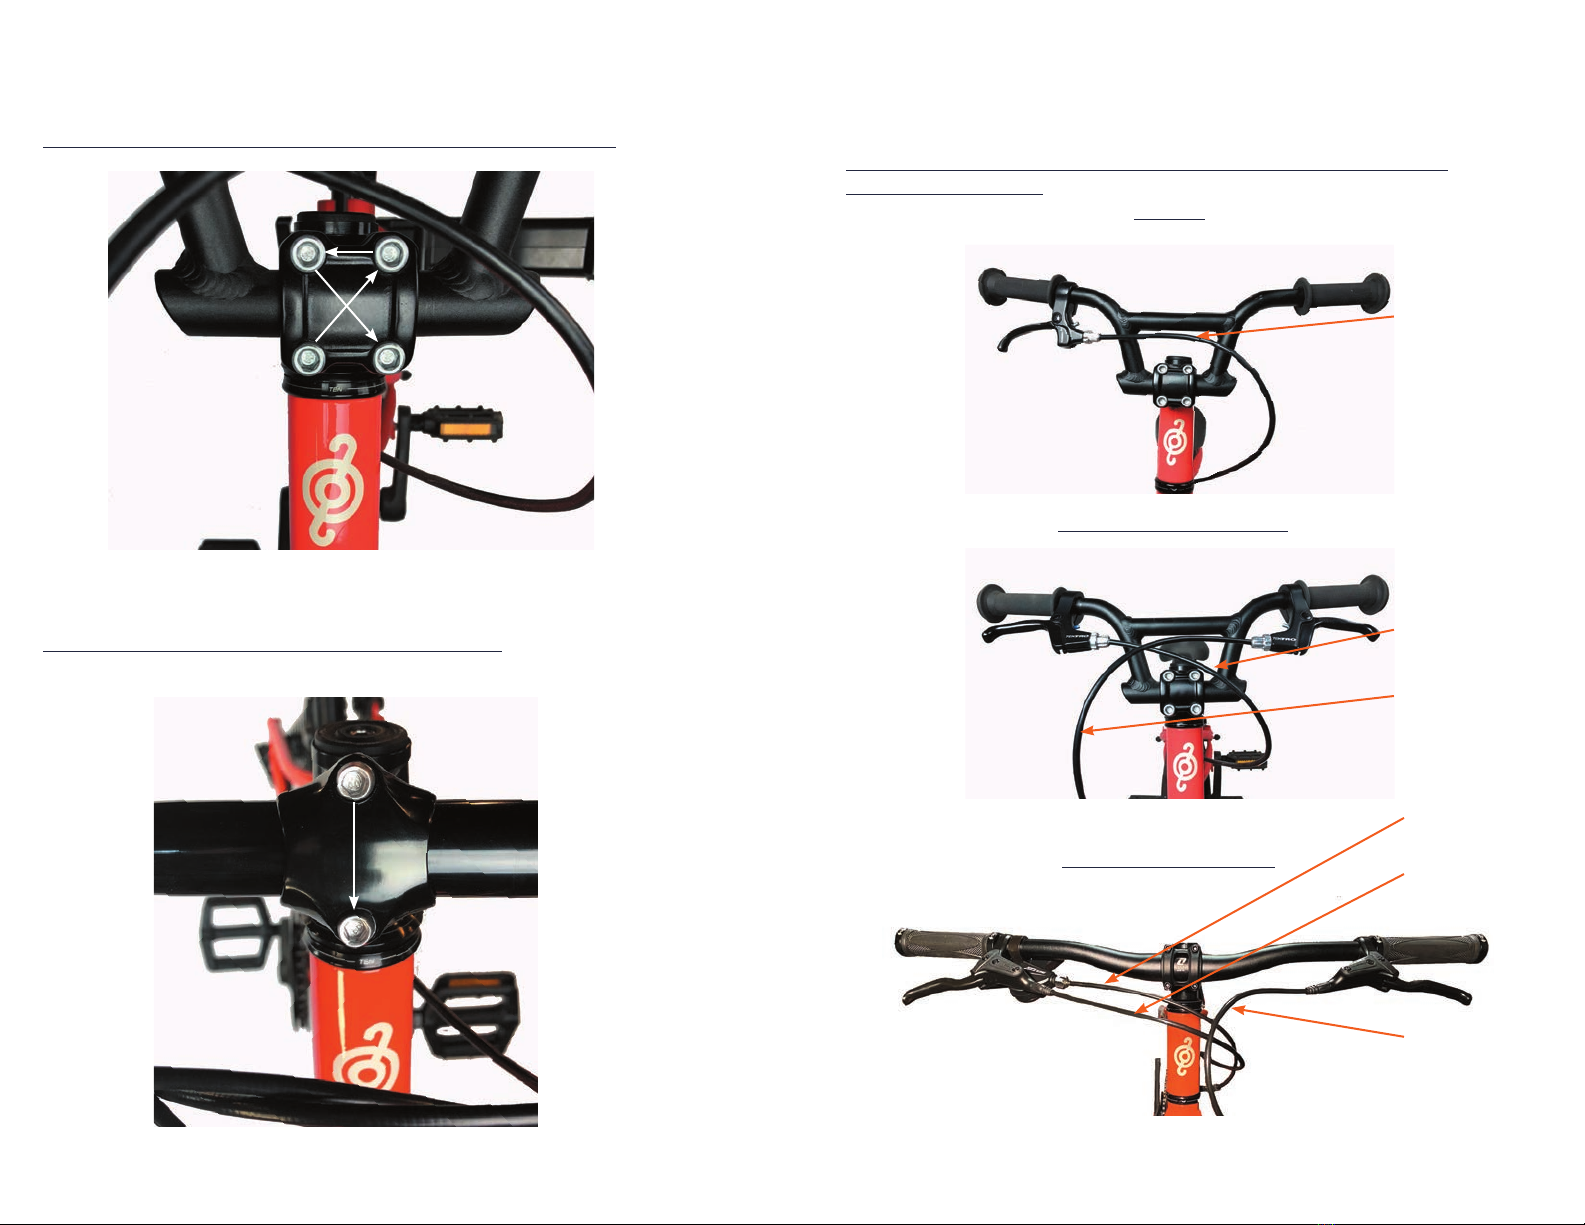
Step 1/2
Unscrew stem fixing bolts securing faceplate to stem body. Insert
handlebar between stem body and faceplate and then thread bolts
back into the stem loosely. Adjust the handlebar to the desired position
to best fit your child (refer to bike fit section for tips) then tighten
the bolts 1/4 turn at a time in an X-pattern (Ripple, Romper, Revo &
Roovi) and Top-Bottom (Reddi, Rover & Reyes). The faceplate should
be tightened evenly on the handlebar so the faceplate gap is even top
and bottom and the handlebar is secure. Align stem and fork so they
look straight when looking down onto handlebar (align stem with front
wheel) then tighten stem body fixing bolts. Please see page 17 for
reference images of proper cable routing. (Please see images below &
on next page)
Assembling your bike cont...
Fixing Bolt
Maintain
equal gap on
top & bottom
of faceplate
Stem body
fixing bolts
Ripple, Romper & Revo
Reddi, Rover, Reyes Fixing Bolt
Faceplate
Maintain
equal gap on
top & bottom
of faceplate
Stem body
fixing bolts
Faceplate
Installing Handlebar to StemReddi = Align stem and fork so they are both faceing forward. The
fork is properly oriented when the fender eyelet is facing rear of bike.
Attach wheel to fork and ensure axel is seated fully into the fork
dropouts. (Because of the cushy tires you may need to wiggle the tire
a little past the brakes) Tighten screw nut until the quick release lever
is tight and in closed position. Look for the word “closed” on the
quick release lever when it is in it’s the closed position. (Please see
images below).
Rover, Reyes & Roovi = Align stem and fork so they are both facing
forward. The fork is properly oriented when the disc caliper is facing
rear of bike and on the same side as rear caliper. (Note: Stem is still
loose and will be tightened when installing the handlebar). Attach
wheel to fork. When attaching wheel to fork make sure to align the
disc rotor with the caliper. Once the axel is seated fully in the front
dropouts tighten screw nut until the quick release lever is tight and in
the closed position. Look for the word “closed” on the quick release
lever when it is in it’s the closed position. (Please see images below)
Step 3/3 Continued
Align rotor and caliper so rotor
slides between caliper brake pads
Axle is securely
seated in dropout
Stem
facing forward
Fender eyelet facing
rear of bike
Quick release lever
closed
Stem
facing forward
Disc caliper facing
rear of bike
Quick release lever
closed
Roovi

16 17
Step 2/2
Please reference the images below for proper Cable Routing after
handlebar instalation.
Rear brake
cable
Ripple
Romper, Revo, Reddi
Rear brake
cable
Front brake
cable
Rear brake
cable
Front brake
cable
Rear derailleur
cable
Rover, Reyes, Roovi
Assembling your bike cont...
Tighten in X-Pattern (Ripple, Romper, Revo & Roovi)
1
2
4
3
Tighten Top-Bottom (Reddi, Rover, Reyes)
1
2
Step 1/2 Continued

18 19
Squeeze the brake arms together until the pads
press up against the rim while pulling the brake
noodle across to the noodle holder.
Step 2/3
Assembling your bike cont...
Noodle Holder
Brake Noodle
Brake Arm
Squeeze brake arms and pull noodle to noodle
holder
Make sure the brake cable is seated in the brake lever.
Step 1/3
Brake lever is NOT seated properly
Brake lever IS seated properly
Connect the Front Brake (Romper,
Revo & Reddi)
*Please note that the Romper comes equipped with a rear coaster
and rear hand brake. The rear hand brake is already connected and
adjusted.
Brakes are essential safety devices so care should be taken to make
sure they work correctly.
Otros manuales para Ripple
1
Este manual sirve para los siguientes modelos
6
Tabla de contenidos
Otros manuales de Bicicleta de Pello