peerless-AV PSTA-1200 Guía

Models: PSTA-600, PSTA-1200, PSTA-1600
Installation and Assembly:
Universal Short Throw Projector Wall Arm
R
Max UL Load Capacity:
25 lb (11.3 kg)
ISSUED: 05-02-11 SHEET #: 056-9036-3 08-25-11
2300 White Oak Circle • Aurora, Il 60502 • (800) 865-2112 • Fax: (800) 359-6500 • www.peerlessmounts.com

ISSUED: 05-02-11 SHEET #: 056-9036-3 08-25-11
2 of 21
Note: Read entire instruction sheet before you start installation and assembly.
Table of Contents
Parts List.................................................................................................................................................................................3
Installation to Solid Concrete/Cinder Block ...........................................................................................................................4
Installing Projector Mount Assembly.......................................................................................................................................5
Cable Management ................................................................................................................................................................6
Tools Needed for Assembly
• level
• drill
• 13/32" (10mm) drill bit for solid concrete or cinder block
• phillips screwdriver
• Do not begin to install your Peerless product until you have read and understood the instructions and warnings
contained in this Installation Sheet. If you have any questions regarding any of the instructions or warnings, for US
customers please call Peerless customer care at 1-800-865-2112, for all international customers, please contact
your local distributor.
• This product should only be installed by someone of good mechanical aptitude, has experience with basic building
construction, and fully understands these instructions.
• Make sure that the supporting surface will safely support the combined load of the equipment and all attached
hardware and components.
• Never exceed the Maximum UL Load Capacity. See page one.
• Always use an assistant or mechanical lifting equipment to safely lift and position equipment.
• Tighten screws firmly, but do not overtighten. Overtightening can damage the items, greatly reducing their holding
power.
• This product is intended for indoor use only. Use of this product outdoors could lead to product failure and personal
injury.
• This product was designed to be installed on the following wall construction only;
WALL CONSTRUCTION HARDWARE REQUIRED
•Solid Concrete Included
•Cinder Block Included
•Brick Contact Qualified Professional (not evaluated by UL)
•Other or unsure? Contact Qualified Professional
WARNING

ISSUED: 05-02-11 SHEET #: 056-9036-3 08-25-11
3 of 21
Before you begin, make sure all parts shown are included with your product.
Parts may appear slightly different than illustrated.
AA
AA
CC DD
DD
EE
BB
Description Qty. Part #
A
A
wall arm assembly 1 054-0180 (PSTA-600)
054-0181 (PSTA-1200)
054-0182 (PSTA-1600)
BB 5/16" x 3" wood screw 4 520-1243
CC 10mm concrete anchor 4 590-0321
DD plastic cap 1 590-1349
EE 4mm allen wrench 1 560-0782
Parts List
Install plastic cap (DD) onto wall arm assembly (AA).
1

ISSUED: 05-02-11 SHEET #: 056-9036-3 08-25-11
4 of 21
Installation to Solid Concrete or Cinder Block
Pull wall plate cover away from wall plate.
Make sure that wall plate is level, use it as a
template to mark four mounting holes. Drill four
13/32" (10mm) dia. holes to a minimum depth of 3"
(76mm). Insert anchors (CC) in holes flush with wall
as shown right. Place wall plate over anchors and
secure with 5/16" x 3" screws (BB). Level wall plate,
then tighten all fasteners.
2
CUTAWAY VIEW
INCORRECT CORRECT
wall
plate
wall
plate
plaster/
drywall
plaster/
drywall
concrete concrete
AA
BB
CC
WALL PLATE
COVER
WALL PLATE
• When installing Peerless wall mounts on cinder block, verify that you have a minimum of 1-3/8" (35 mm) of actual
concrete thickness in the hole to be used for the concrete anchors. Do not drill into mortar joints! Be sure to mount
in a solid part of the block, generally 1" (25 mm) minimum from the side of the block. Cinder block must meet ASTM
C-90 specifications. It is suggested that a standard electric drill on slow setting is used to drill the hole instead of a
hammer drill to avoid breaking out the back of the hole when entering a void or cavity.
• Concrete must be 2000 psi density minimum. Lighter density concrete may not hold concrete anchor.
• Make sure that the wall will safely support four times the combined load of the equipment and all attached hardware
and components.
WARNING
• Tighten screws so that wall plate is firmly attached,
but do not overtighten. Overtightening can damage
screws, greatly reducing their holding power.
• Never tighten in excess of 80 in. • lb (9 N.M.).
• Always attach concrete expansion anchors directly
to load-bearing concrete.
• Never attach concrete expansion anchors to
concrete covered with plaster, drywall, or other
finishing material. If mounting to concrete surfaces
covered with a finishing surface is unavoidable (not
evaluated by UL), the finishing surface must be
counterbored as shown below. Be sure concrete
anchors do not pull away from concrete when
tightening screws. If plaster/drywall is thicker than
5/8" (16 mm), custom fasteners must be supplied by
installer (not evaluated by UL).
WARNING
SOLID CONCRETE
CINDER
BLOCK
wall plate
BB CC
CC
1
3
Drill holes and insert anchors (CC).
Place plate (AA) over anchors (CC) and secure with screws (BB).
Tighten all fasteners.
2
concrete
surface
ISSUED: 05-02-11 SHEET #: 056-9036-3 08-25-11
5 of 21
Follow steps detailed in instruction manual included with PRS-UNV for installation of projector mount assembly to
projector.
3
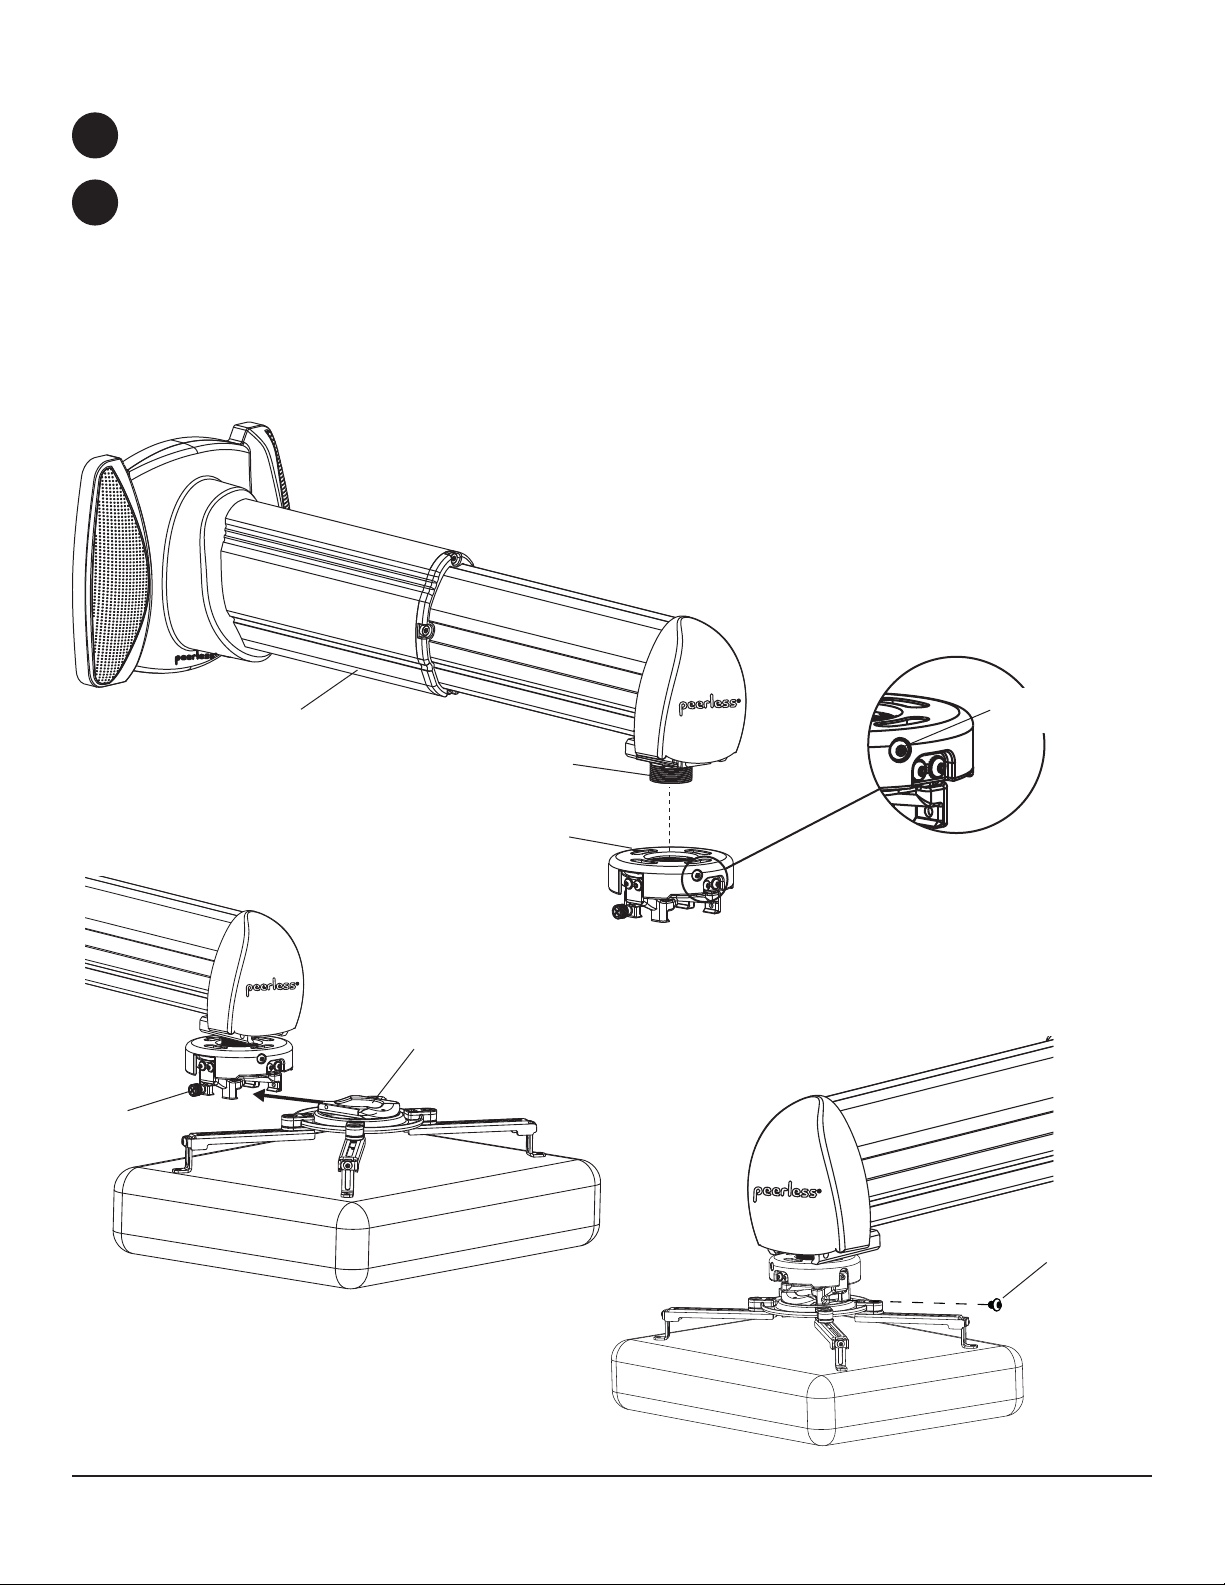
Installing Projector Mount Assembly
DETAIL 1
Install projector mount assembly onto threaded tube with at least three turns as shown in figure 4.1. Tighten
swivel stop screw as shown in detail 1 using 4mm security allen wrench (supplied with PRS-UNV). NOTE: Do not
overtighten screw. Overtightening screw will damage threads making it difficult to separate products.
Slide connection block with projector into projector mount assembly as shown in figure 4.2. Push in and fully tighten
captive screw to secure projector to projector mount assembly. Adjust wall arm assembly (AA) to desired projector
throw distance.
For security installations, insert one #10-32 x 1/4" socket pin screw (supplied with PRS-UNV) through projector
mount assembly and into connection block as shown in figure 4.3. Tighten screw with 4mm security allen wrench.
4
THREADED TUBE
Fig. 4.1
AA SWIVEL STOP
SCREW
CONNECTION BLOCK
CAPTIVE
SCREW
Fig. 4.2
Fig. 4.3
#10-32 X 1/4"
SOCKET PIN SCREW
ARROW INDICATES
FRONT OF MOUNT

ISSUED: 05-02-11 SHEET #: 056-9036-3 08-25-11
6 of 21
Route projector cables through front cable window and out rear cable window as shown in figure 5.1.
Slide wall plate cover back against wall and snap into place as shown in figure 5.2.
5
Cable Management
FRONT CABLE
WINDOW
REAR CABLE WINDOW
Fig. 5.1
Fig. 5.2

ISSUED: 05-02-11 SHEET #: 056-9036-3 08-25-11
7 of 21
Loosen security screw on bottom of wall arm assembly (AA) using allen wrench (EE). Adjust extension of arm to
desired position and retighten security screw.
Follow steps detailed in instruction manual included with PRS-UNV for adjusting the projector pitch, roll and swivel.
6
7
Projector Adjustment
© 2011, Peerless Industries, Inc. All rights reserved.
All other brand and product names are trademarks or registered trademarks of their respective owners.
SECURITY SCREW
AA

Modelos: PSTA-600, PSTA-1200, PSTA-1600
Instalación y Ensamblaje:
Brazo de Pared Universal para Proyectores de Distancia Corta
R
Máxima capacidad de UL carga:
25 lb (11.3 kg)
PUBLICADO: 05-02-11 HOJA #: 056-9036-3 08-25-11
2300 White Oak Circle • Aurora, Il 60502 • (800) 865-2112 • Fax: (800) 359-6500 • www.peerlessmounts.com

PUBLICADO: 05-02-11 HOJA #: 056-9036-3 08-25-11
9 de 21
Español
NOTA: Lea toda la hoja de instrucciones antes de iniciar la instalación y el montaje.
Tabla de Contenido
Lista de Piezas .................................................................................................................................................................... 10
Instalación en una Pared de Concreto o de Bloques de Hormigón de Escorias..................................................................11
Instalar la Unidad del Soporte Para Proyectores ................................................................................................................ 12
Manejo de los Cables.......................................................................................................................................................... 13
Herramientas necesarias para el ensamblaje
• nivel
• taladro
•broca de 13/32" (10mm) para paredes de concreto y de bloque de hormigón de escorias
• destornillador phillips
• No comience a instalar su producto de Peerless hasta haber leído y entendido las instrucciones y las advertencias
contenidas en la Hoja de Instalación. Si tiene alguna pregunta acerca de cualquiera de las instrucciones o las
advertencias, por favor, llame a Servicio al Cliente de Peerless al 1-800-865-2112 si está en EE. UU. Si es un
cliente internacional, por favor, comuníquese con su distribuidor local.
• Este producto sólo debe ser instalado por una persona que tenga una buena aptitud mecánica, que tenga
experiencia en construcción básica de edifi cios y que entienda estas instrucciones en su totalidad.
• Asegúrese de que la superfi cie de apoyo sostendrá, con seguridad, la carga combinada del equipo y todos los fi
jadores y componentes.
• Nunca sobrepase la capacidad máxima de soportar carga de UL. Vea la página 8.
• Siempre cuente con la ayuda de un asistente o utilice un equipo mecánico de izar para levantar y colocar el equipo
con más seguridad.
• Apriete los tornillos con fi rmeza, pero no en exceso. Apretarlos en exceso puede dañar los artículos y puede
disminuir signifi cativamente su fuerza de fi jación.
• Este producto está diseñado para uso en interiores solamente. Utilizar este producto en exteriores podría causar
fallas del producto y lesiones a individuos.
• Este producto fue diseñado para ser instalado en paredes con la siguiente construcción solamente:
CONSTRUCCIÓN DE LA PARED SUJETADORES NECESARIOS
• Concreto macizo Incluido
• Bloque de hormigón de escorias Incluido
• Ladrillo Comuníquese con un profesional califi cado (no evaluados por UL)
• Otra superfi cie o no está seguro? Comuníquese con un profesional califi cado
ADVERTENCIA

PUBLICADO: 05-02-11 HOJA #: 056-9036-3 08-25-11
10 de 21
Español
Antes de comenzar, coteje la lista de piezas para asegurarse de que se han incluido todas las piezas.
AA
AA
CC DD
DD
BB
Instale la tapa de plástico (DD) en conjunto de brazo de pared (AA).
1
Descripción Cant. Nº de pieza
A
A
brazo de pared 1 054-0180 (PSTA-600)
054-0181 (PSTA-1200)
054-0182 (PSTA-1600)
BB tornillos para madera de 5/16" x 3" 4520-1243
CC concreto anclajes 10mm 4 590-0321
DD
tapa de plástico
1
590 1349
Lista de piezas
DD
t
apa
d
e p
lá
s
ti
c
o
1
590
-
1349
EE llave allen 4mm 1 560-0782
Las piezas pueden verse un poco distintas a la ilustración.
EE
Este manual sirve para los siguientes modelos
2
Tabla de contenidos
Idiomas:
Otros manuales de Proyector de peerless-AV


