Panasonic TH-42LFE7W Manual de usuario

h
TH-42LFE7W
TH-50LFE7W
TH-65LFE7W
Operating Instructions
FULL HD LCD Display (for business use)
Model No.
English TQB0AC0102-1
Please read these instructions before operating your set
and retain them for future reference.

2
Dear Panasonic Customer
Welcome to the Panasonic family of customers. We hope that you will have many years of
enjoyment from your new LCD Display.
To obtain maximum benefit from your set, please read these Instructions before making
any adjustments, and retain them for future reference.
Retain your purchase receipt also, and note down the model number and serial number of
your set in the space provided on the rear cover of these instructions.
Visit our Panasonic Web Site http://panasonic.net
Table of Contents
Important Safety Notice ........................................... 3
Safety Precautions ................................................... 4
Accessories .............................................................. 7
Accessories Supply ................................................. 7
Remote Control Batteries ........................................ 7
Connections.............................................................. 8
AC cord connection ................................................. 8
Video equipment connection ................................... 8
AUDIO OUT connection .......................................... 9
HDMI connection..................................................... 9
DVI-D IN connection.............................................. 10
PC Input Terminals connection...............................11
SERIAL Terminals connection ............................... 12
IR IN/OUT (infrared signal) connection ................. 13
CHARGE Terminals connection ............................ 13
Power On / Off......................................................... 14
Selecting the input signal...................................... 16
Basic Controls ........................................................ 17
ASPECT Controls ................................................... 19
Digital Zoom............................................................ 20
On-Screen Menu Displays ..................................... 21
Adjusting Pos./Size ................................................ 22
Picture Adjustments............................................... 24
Advanced settings ................................................. 25
Sound Adjustment.................................................. 26
PRESENT TIME Setup / Set up TIMER.................. 27
PRESENT TIME Setup.......................................... 27
Set up TIMER........................................................ 28
Screensaver (For preventing image retention).... 29
Setup of Screensaver Time ................................... 30
Wobbling ................................................................. 30
No activity power off .............................................. 31
ECO Mode settings................................................. 32
Customizing the Input labels................................. 33
Selecting the On-Screen Menu Language............ 34
Customizing the On-Screen Menu Display .......... 34
Setup for MULTI DISPLAY...................................... 35
How to Setup MULTI DISPLAY ............................. 35
ID Remote Control Function.................................. 36
Setup for Input Signals .......................................... 37
YUV / RGB-IN select ............................................. 37
Signal menu .......................................................... 38
Cinema reality ....................................................... 38
XGA Mode ............................................................. 39
Sync ...................................................................... 39
HDMI Range.......................................................... 40
Input signal display................................................ 40
Network Setup ........................................................ 41
Options Adjustments ............................................. 43
Input Search .......................................................... 45
RS-232C/LAN Information Timing ......................... 46
Using Network Function ........................................ 47
Network Connection .............................................. 47
Command Control ................................................. 48
PJLink™ Protocol.................................................. 48
Using Web Browser Control.................................. 49
Before Using Web Browser Control....................... 49
Access from Web Browser .................................... 49
Display Control (BASIC CONTROL/OPTION
CONTROL Screen) ............................................... 50
NETWORK SETTING (NETWORK SETTING Screen)
... 51
Password Setting (CHANGE PASSWORD Screen)....51
Crestron Connected™ page.................................. 52
Troubleshooting ..................................................... 54
Applicable input signals ........................................ 55
Shipping condition................................................. 56
Speci¿cations ......................................................... 57
Before use
Illustrations and screens in this Operating Instructions are images for illustration purposes, and may•
be different from the actual ones.
Descriptive illustrations in this Operating Instructions are created mainly based on the 65 inch model.
•

3
Important Safety Notice
WARNING
1) To prevent damage which may result in ¿re or shock hazard, do not expose this appliance to dripping
or splashing.
Do not place containers with water (Àower vase, cups, cosmetics, etc.) above the set. (including on
shelves above, etc.)
No naked Àame sources, such as lighted candles, should be placed on / above the set.
2) To prevent electric shock, do not remove cover. No user serviceable parts inside. Refer servicing to quali¿ed
service personnel.
CAUTION
This appliance is intended for use in environments which are relatively free of electromagnetic ¿elds.
Using this appliance near sources of strong electromagnetic ¿elds or where electrical noise may overlap with the
input signals could cause the picture and sound to wobble or cause interference such as noise to appear.
To avoid the possibility of harm to this appliance, keep it away from sources of strong electromagnetic ¿elds.
IMPORTANT INFORMATION
If a display is not positioned in a suf¿ciently stable location, it can be potentially hazardous due to falling. Many
injuries, particularly to children, can be avoided by taking simple precautions such as:
• Using cabinets or stands recommended by the manufacturer of the display.
• Only using furniture that can safely support the display.
• Ensuring the display is not overhanging the edge of the supporting furniture.
• Not placing the display on tall furniture (for example, cupboards or bookcases) without anchoring both the furniture
and the display to a suitable support.
• Not standing the displays on cloth or other materials placed between the display and supporting furniture.
• Educating children about the dangers of climbing on furniture to reach the display or its controls.
Note:
Image retention may occur. If you display a still picture for an extended period, the image might remain on the
screen. However, it will disappear after a while.
Trademark Credits
• VGA is a trademark of International Business Machines Corporation.
• Microsoft®, Windows®, Windows Vista®, and Internet Explorer®are the registered trademarks or trademarks
of Microsoft Corporation in the United States and/or other countries.
• Macintosh, Mac, Mac OS, OS X and Safari are the trademarks of Apple Inc. registered in the United States
and other countries.
• PJLink is a pending trademark in Japan, the United States and other countries and regions.
• SVGA, XGA, SXGA and UXGA are registered trademarks of the Video Electronics Standard Association.
Even if no special notation has been made of company or product trademarks, these trademarks have been
fully respected.
• HDMI, the HDMI Logo, and High-De¿nition Multimedia Interface are trademarks or registered trademarks of
HDMI Licensing LLC in the United States and other countries.
• RoomView, Crestron RoomView and Fusion RV are registered trademarks of Crestron Electronics, Inc, and
Crestron Connected is the trademark of Crestron Electronics, Inc.

4
Safety Precautions
Always be sure to ask a quali¿ed technician to carry out set-up.
Small parts can present choking hazard if accidentally swallowed. Keep small parts away from young children. Discard
unneeded small parts and other objects, including packaging materials and plastic bags/sheets to prevent them from
being played with by young children, creating the potential risk of suffocation.
Do not place the Display on sloped or unstable surfaces, and ensure that the Display does not hang over the
edge of the base.
• The Display may fall off or tip over.
Do not place any objects on top of the Display.
• If water is spills onto the Display or foreign objects get inside it, a short-circuit may occur which could result in ¿re
or electric shock. If any foreign objects get inside the Display, please consult your local Panasonic dealer.
Transport only in upright position!
• Transporting the unit with its display panel facing upright or downward may cause damage to the internal
circuitry.
Ventilation should not be impeded by covering the ventilation openings with items such as newspapers, table
cloths and curtains.
For suf¿cient ventilation;
Leave a space of 10 cm or more at the top, left and right, and 5 cm or more at the rear, and also keep the space
between the bottom of the display and the Àoor surface.
Cautions for Wall Installation
• Wall installation should be performed by an installation professional. Installing the Display incorrectly may lead to
an accident that results in death or serious injury. Furthermore, when installing on a wall, a wall hanging bracket
that conforms to VESA standards (TH-42LFE7W: VESA 200×200, TH-50LFE7W: VESA 400×200, TH-65LFE7W:
VESA 400×400) must be used.
• If you terminate the use of the Display on the wall, ask a professional to remove the Display as soon as possible.
• When mounting the Display on the wall, prevent the mounting screws and power cable from contacting metal objects
inside the wall. An electric shock may occur if they contact metal objects inside the wall.
When installing the Display vertically, be sure to install the power indicator onto the top of the Display.
Do not install the product to a place where the product is exposed to direct sunlight.
• If the screen is exposed to direct sunlight, the liquid crystal panel may have adverse effect.
During installation, impacts and the like may damage the Display. Please handle with care.
WARNING
Setup
This LCD Display is for use only with the following optional accessories. Use with any other type of optional
accessories may cause instability which could result in the possibility of injury.
(All of the following accessories are manufactured by Panasonic Corporation.)
• Pedestal ....................................................... TY-ST42PE7 (for TH-42LFE7W, TH-50LFE7W)
TY-ST65PE7 (for TH-65LFE7W)
We are not responsible for any product damage, etc. caused by use of the pedestal or wall-hanging bracket made
by other companies, or by failures in the installation environment for the pedestal or wall-hanging bracket even
during the warranty period.

5
Safety Precautions
When using the LCD Display
The Display is designed to operate on 220 - 240 V AC, 50/60 Hz.
Do not cover the ventilation holes.
• Doing so may cause the Display to overheat, which can cause ¿re or damage to the Display.
Do not stick any foreign objects into the Display.
• Do not insert any metal or Àammable objects into the ventilations holes or drop them onto the Display, as doing so
can cause ¿re or electric shock.
Do not remove the cover or modify it in any way.
• High voltages which can cause severe electric shocks are present inside the Display. For any inspection, adjustment
and repair work, please contact your local Panasonic dealer.
Ensure that the mains plug is easily accessible.
Do not use any power supply cord other than that provided with this unit.
• Doing so may cause ¿re or electric shocks.
Securely insert the power supply plug as far as it will go.
• If the plug is not fully inserted, heat may be generated which could cause ¿re. If the plug is damaged or the wall
socket is loose, they shall not be used.
Do not handle the power supply plug with wet hands.
• Doing so may cause electric shocks.
Do not do anything that may damage the power cable. When disconnecting the power cable, pull on the plug
body, not the cable.
• Do not damage the cable, make any modi¿cations to it, place heavy objects on top of it, heat it, place it near any
hot objects, twist it, bend it excessively or pull it. To do so may cause ¿re and electric shock. If the power cable is
damaged, have it repaired at your local Panasonic dealer.
Do not remove covers and NEVER modify the Display yourself
• Do not remove the rear cover as live parts are accessible when it is removed. There are no user serviceable parts
inside. (High-voltage components may cause serious electrical shock.)
• Have the Display checked, adjusted, or repaired at your local Panasonic dealer.
If the Display is not going to be used for any prolonged length of time, unplug the power supply plug from
the wall outlet.
If problems occur during use
If a problem occurs (such as no picture or no sound), or if smoke or an abnormal odour starts to come out
from the Display, immediately unplug the power supply plug from the wall outlet.
• If you continue to use the Display in this condition, ¿re or electric shock could result. After checking that the smoke
has stopped, contact your local Panasonic dealer so that the necessary repairs can be made. Repairing the Display
yourself is extremely dangerous, and shall never be done.
If water or foreign objects get inside the Display, if the Display is dropped, or if the cabinet becomes damages,
disconnect the power supply plug immediately.
• A short circuit may occur, which could cause ¿re. Contact your local Panasonic dealer for any repairs that need to
be made.

6
Safety Precautions
CAUTION
When using the LCD Display
Do not bring your hands, face or objects close to the ventilation holes of the Display.
• Heated air comes out from the ventilation holes at the top of Display will be hot. Do not bring your hands or face,
or objects which cannot withstand heat, close to this port, otherwise burns or deformation could result.
Be sure to disconnect all cables before moving the Display.
• If the Display is moved while some of the cables are still connected, the cables may become damaged, and ¿re or
electric shock could result.
Disconnect the power supply plug from the wall socket as a safety precaution before carrying out any
cleaning.
• Electric shocks can result if this is not done.
Clean the power cable regularly to prevent it becoming dusty.
• If dust built up on the power cord plug, the resultant humidity can damage the insulation, which could result in ¿re.
Pull the power cord plug out from the wall outlet and wipe the mains lead with a dry cloth.
Do not burn or breakup batteries.
• Batteries must not be exposed to excessive heat such as sunshine, ¿re or the like.
Cleaning and maintenance
The front of the display panel has been specially treated. Wipe the panel surface gently using only a cleaning
cloth or a soft, lint-free cloth.
• If the surface is particularly dirty, wipe with a soft, lint-free cloth which has been soaked in pure water or water in
which neutral detergent has been diluted 100 times, and then wipe it evenly with a dry cloth of the same type until
the surface is dry.
• Do not scratch or hit the surface of the panel with ¿ngernails or other hard objects, otherwise the surface may
become damaged. Furthermore, avoid contact with volatile substances such as insect sprays, solvents and thinner,
otherwise the quality of the surface may be adversely affected.
If the cabinet becomes dirty, wipe it with a soft, dry cloth.
• If the cabinet is particularly dirty, soak the cloth in water to which a small amount of neutral detergent has been
added and then wring the cloth dry. Use this cloth to wipe the cabinet, and then wipe it dry with a dry cloth.
• Do not allow any detergent to come into direct contact with the surface of the Display. If water droplets get inside
the unit, operating problems may result.
• Avoid contact with volatile substances such as insect sprays, solvents and thinner, otherwise the quality of the
cabinet surface may be adversely affected or the coating may peel off. Furthermore, do not leave it for long periods
in contact with articles made from rubber or PVC.
Usage of a chemical cloth
• Do not use a chemical cloth for the panel surface.
• Follow the instructions for the chemical cloth to use it for the cabinet.
Notes before use
The usage environment of the liquid crystal panel may have an effect on the screen display. In addition,
depending on the viewing angle, changes in hue or irregularities in brightness may occur.
• Please note that this is a characteristic of the liquid crystal panel and not a malfunction.

+
-
+
-
Accessories Supply
Accessories
Power supply cord
Batteries for the Remote
Control Transmitter
(R6 (UM3) Size × 2)
Remote Control
Transmitter
N2QAYB000691
Operating Instruction book
Check that you have the accessories and items shown
Remote Control Batteries
Requires two R6 batteries.
1. Pull and hold the hook, then open
the battery cover.
2. Insert batteries - note correct
polarity (+ and -).
3. Replace the cover.
Helpful Hint:
For frequent remote control users, replace old batteries with Alkaline
batteries for longer life.
Precaution on battery use
Incorrect installation can cause battery leakage and corrosion that will damage the remote control transmitter.
Disposal of batteries should be in an environment-friendly manner.
Observe the following precaution:
1. Batteries shall always be replaced as a pair. Always use new batteries when replacing the old set.
2. Do not combine a used battery with a new one.
3. Do not mix battery types (example: “Zinc Carbon” with “Alkaline”).
4. Do not attempt to charge, short-circuit, disassemble, heat or burn used batteries.
5.
Battery replacement is necessary when remote control acts sporadically or stops operating the Display set.
6. Do not burn or breakup batteries.
Batteries must not be exposed to excessive heat such as sunshine, ¿re or the like.
“R6 (UM3)” size
7
Attention
Store small parts in an appropriate manner, and keep them away from young children.
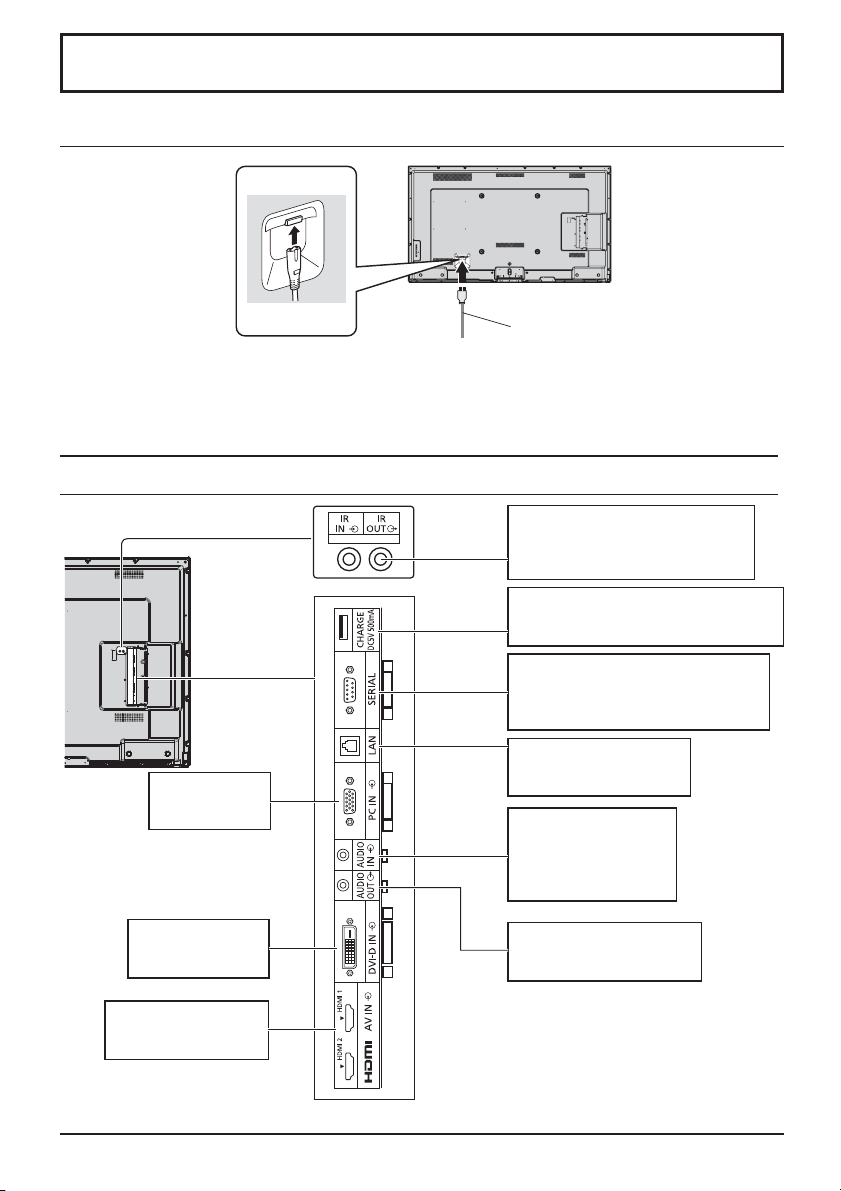
LAN: Connect to a network
to control the unit.
(see page 41, 47)
SERIAL
SERIAL Input Terminal
Control the Display by connecting to PC.
(see page 12)
IR IN/OUT
IR IN/OUT (infrared signal) Terminal
Enable connection of multiple displays.
(see page 13)
AUDIO IN (DVI-D / PC IN)
Connect the audio output
of a device connected to
DVI-D IN, PC IN.
(see page 10, 11)
AUDIO OUT
Connect to sound equipment
(see page 9)
CHARGE OUT
Connect to separately sold devices such as
stick PCs to supply power. (see page 13)
Connections
Video equipment connection
AC cord
(accessory)
Notes:
• Insert the AC cord ¿rmly into place.
• When disconnecting the AC cord, be absolutely sure to disconnect the AC cord plug at the socket outlet ¿rst.
• The included AC cord is for use with this unit only.
PC IN
PC Input Terminal
(see page 11)
DVI-D IN
DVI-D Input Terminal
(see page 10)
AV IN (HDMI 1, HDMI 2)
HDMI Input Terminal
(see page 9)
8
AC cord connection

9
HDMI
AV OUT
HDMI
AV OUT
Connections
AUDIO OUT connection
Notes:
• Additional equipment and cables shown are not supplied with this set.
• To output sound from the AUDIO OUT terminal of the Display, be sure to set “Output Select” to “AUDIO OUT” in the
“Sound Adjustment” menu. (see page 26)
HDMI connection
[Pin assignments and signal names]
19
3 1
42
18
Note:
Additional equipment and HDMI cable shown are not supplied with this set.
Pin No.
Signal name
Pin No.
Signal name
1T.M.D.S Data2+
11
T.M.D.S Clock
Shield
2T.M.D.S Data2
Shield
12
T.M.D.S Clock-
3T.M.D.S Data2-
13
CEC
4T.M.D.S Data1+
14
Reserved
(N.C. on device)
5T.M.D.S Data1
Shield
6T.M.D.S Data1-
15
SCL
7T.M.D.S Data0+
16
SDA
8T.M.D.S Data0
Shield
17
DDC/CEC
Ground
9T.M.D.S Data0-
18
+5V Power
10
T.M.D.S Clock+
19
Hot Plug Detect
Stereophonic sound code
audio equipment
line-in
Stereo mini plug (M3)
DVD player
HDMI cable

10
DVI-D IN connection
Pin No.
Signal Name
Pin No.
Signal Name
1T.M.D.S. data 2-
13
2T.M.D.S. data 2+
14
+5 V DC
3T.M.D.S. data 2 shield
15
Ground
4
16
Hot plug detect
5
17
T.M.D.S. data 0-
6DDC clock
18
T.M.D.S. data 0+
7DDC data
19
T.M.D.S. data 0 shield
8
20
9T.M.D.S. data 1-
21
10
T.M.D.S. data 1+
22
T.M.D.S. clock shield
11
T.M.D.S. data 1 shield
23
T.M.D.S. clock+
12 24
T.M.D.S. clock-
Notes:
• Additional equipment and cables shown are not supplied with this set.
• Image deterioration may occur depending on the length or the quality of the cable.
DVI-D Input Connector
Pin Layouts
Connection port view
9
8
1
17
24
16
Connections
Stereo mini plug (M3)
Shared
with PC
IN.
PC with DVI-D
video out
DVI-video cable (Within 5 m)
Otros manuales para TH-42LFE7W
1
Este manual sirve para los siguientes modelos
2
Tabla de contenidos


