OXBOARD PRO2 Manual de usuario

E-SCOOTER PRO2
INSTRUCTIONS / HANDLEIDING
BENUTZERHANDBUCH / MODE D’EMPLOI

For full warranty and product liability,
please consult our website.
Voor de volledige garantievoorwaarden en product aansprakelijkheid,
gelieve onze website te raadplegen.
Für volle Gewährleistung und Produkthaftung,
konsultieren Sie bitte unsere Website.
Pour toutes informations sur la garantie et conditions du produits,
consulter notre site internet.

INtroduction 3
E-SCOOTER PRO 2 PUTS THE WORLD AT YOUR
FEET
Congratulations! You are the new owner of the E-Scooter PRO 2. A practical and fun way of transport that you will enjoy.
From now on you are part of the Oxboard community.
It is not for nothing that we say: It’s fun, easy and electric.
Warning
Of course we assume that you will handle your E-Scooter PRO 2 in a safe and responsible way. Its use is not entirely without
risk.
The use of the E-Scooter PRO 2 is entirely at your own risk. Therefore, read this manual carefully so that you can use it
safely. Oxboard B.V. is not liable for any personal injury and injuries to yourself and others. Therefore, protect yourself
well with a helmet and knee and elbow protection. If you fall, the protect a large part of your fall. This manual was originally
written in Dutch.

CONTENT
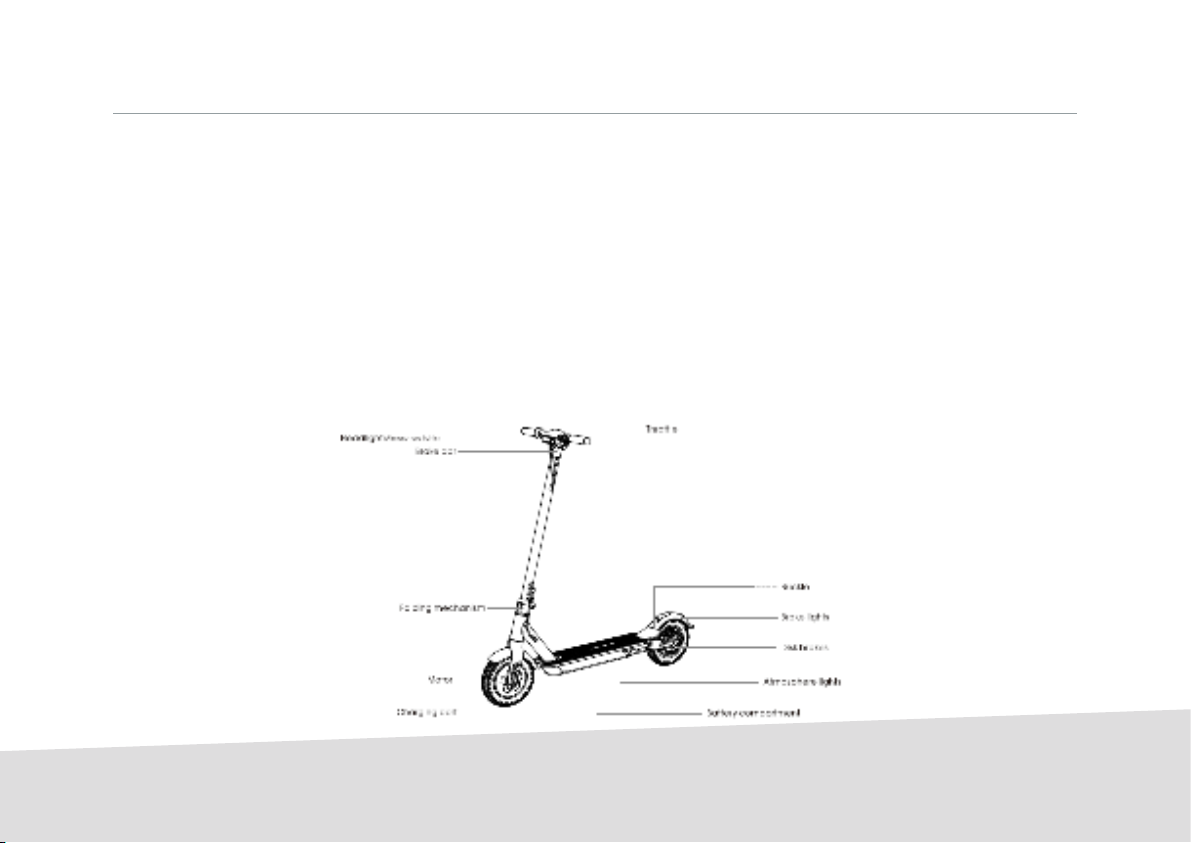
1. E-SCOOTER PRO 2 DESCRIPTION 5
1.1 E-Scooter PRO descriptions 5
1.2 E-Scooter PRO components 5
2. HOW DOES YOUR E-SCOOTER PRO 2WORK? 6
2.1 Getting started with your E-scooter PRO 2 6
2.2 Installation guide 6
2.3 Controle panel 8
2.4 How to ride the E-Scooter PRO 2? 8
2.5 Folding and transportation 10
2.6 Charging Instructions 11
3. E-SCOOTER PRO 2 PRECAUTIONS MEASURES
ADVICE 12
4. WEIGHT AND SPEED LIMITS 13
4.1 Maximum weights 13
4.2 Maximum speed in kilometers per hour 13
5. POSSIBLE HINDRANCE TO USE AND 14
ENVIRONMENTAL LIMITATION
6. BATTERY INFORMATION AND SPECIFICATIONS 15
6.1 Battery indication 15
6.2 Special situations 15
7. HOW TO MAINTAIN AND STORE YOUR E-SCOOTER
PRO 2 16
7.1 Maintenance tasks 16
7.2 Storage tips 16
8. E-SCOOTER PRO 2 SPECIFICATIONS AND A LIST 17
OF PRODUCTS DELIVERED
8.1 E-Scooter PRO 2 specifications 17
8.2 Products delivered 17
9.
WARRANTY AND REGISTRATION 18
9.1 Warranty conditions 18
9.2 Warranty and repairs 18
10. CONTACT AND CUSTOMER SERVICES 19
11. CE-CONFORMITY 19
4
INSTRUCTIONS 5
1. E-SCOOTER PRO 2 PRODUCT DESCRIPTION
1.1 E-Scooter PRO 2 description
The E-Scooter Pro 2 is a personal transporter. The E-scooter is an electric scooter with a built-in motor that is powered by a
battery pack. The compact design makes it suitable to take it with you everywhere. The E-Scooter Pro is rain-resistant and
easily foldable.
The E-Scooter Pro 2 achieves a speed of max. 25 km per hour and has a range of 22 to 25 kilometers (depending on: sur-
face, user weight and ambient temperature). This makes it ideal for short distances from, for example, the station to school
or to work. The scooter can be used both electrically and normally (with the steppes of your feet). The top has a non-slip
layer. This provides extra control and grip. You give gas by means of a regulator on the handle.

2. HOW DOES YOUR E-SCOOTER PRO 2
WORK?
2.1 Getting started with your E-Scooter PRO 2
Take the scooter out of the box and place it on a flat
surface.
2.2 Installation guide
1. Instal the brakes to the correct position with the Hex
Wrench (m5 in the tool bag).
2. Instal the handlebars, pay attention to the installation
direction
3. Hold the E-Scooter PRO 2 up right to ensure that the lock
will not be affected, please keep the folding- spanner (the
blue part of the image at the bottom. Pull the folding-span-
ner to the top, the scooter is completely locked.
INSTRUCTIONS
6

INSTRUCTIONS 7
4. Fasten the E-scooter standpipe and fold out the kick-
stand.
6. Use the hex wrench in the mounting box to lock the
screws on both sidses.
5. Install the handlebars to the standpipe.
7. After the installation is completed, swich, on and off to
detect the scooter.

2. HOW DOES YOUR E-SCOOTER PRO 2 WORK?
2.3 Control panel
Use the controle panel to controle the scooter. The specific
features are as follows.
1. Long press the power button to turn on the the scooter
and front ligth, lower atmosphere light, tall ligth and
brake light will all go on. The controle panel also shows
the power and the speed.
2. After turning on the, the control panel display shows
“1”, indicating that the speed is in 1st gear. Press the
button to display 2nd gear; the highest display is 3rd
gear.
3. Press the button twice and the front light goes on,
press again twice and the front light will go off.
4. Press the button the times to display the total mileage,
then press the button three times to display the speed.
5. When the brakes are applied in emergeny, the bright-
ness of the brake increases after the brake handles are
gripped.
6. Power display: five lights means fully loaded, four lights
means 50%, three lights means 30%, two lights means
10% and one ligt means less than 10%.
INSTRUCTIONS
8

INSTRUCTIONS 9
2.4 How to ride the E-Scooter PRO 2.
1. Turn on the power and check the indicator.
3. When the E-Scooter PRO 2 is driving, the other foot steps
on the deck. After this you slightly press the throttle (speed
above 5 km/h will start the throttle)
2. One foot steps on the deck, the other foot kicks
backward.
4. Release the throttle to slow down the speed. Also the
automatic energy recovery system can help to slow down.
For an emergent brake the handlebar brake on the left side
needs to be used.

INSTRUCTIONS
10
Pull the safety lock up, meanwhile holding the standpipe, then open up the folding spanner (blue part in the image)
aim it at the bell and the fender hook, then buckle the bell with the back- fender.
After you folded the E-Scooter PRO 2 you can transport him easily.
2.5 Folding and transporting instructions
Tabla de contenidos
Idiomas:
Otros manuales de Scooter de OXBOARD


