Oster 3168 Manual de usuario

Instruction Manual
JUICE EXTRACTOR
READ ALL INSTRUCTIONS BEFORE USING THIS APPLIANCE
funsZ’k eSuqvy
Twkl ,DLVªsDVj
bl midj.k dk mi;ksx djus ls igys lHkh funsZ’kksa dks i<+ ysaA
3168
MODEL / ekWMy:

1
IMPORTANT SAFEGUARDS
When using electrical appliances, basic safety precautions should always be followed
including the following:
1. Read all instructions before using your juice extractor.
2. To protect against risk of electrical shock, DO NOT put power cord or motor base in
water or any other liquid.
3. Turn Off ( O) juicer and unplug from outlet when not in use, before putting on or taking off
parts, and before cleaning.
4. Avoid contact moving parts. DO NOT touch the small cutting blades located at the base
of the stainless steel lter.
5. DO NOT operate any appliance with a damaged cord or plug or after the appliance
malfunctions, or is dropped or damaged in any manner. Return appliance to the nearest
authorized service center for examination, repair or electrical or mechanical adjustment.
6. The use of attachments not recommended or sold by the manufacturer may cause re,
electric shock or injury.
7. DO NOT use outdoors.
8. DO NOT let cord hang over edge of table or counter. Do not use extention cord.
9. DO NOT let cord touch hot surfaces, including the stove.
10. DO NOT operate this appliance continuously for more than 5 minutes.
11. Always make sure juicer lid/cover is clamped securely in place before motor is turned on.
DO NOT unfasten clamps while juicer is in operation.
12. Be sure to turn switch to off position “O” after each use of your juicer. Make sure the
motor stops completely before disassembling.
13. DO NOT PUT YOUR FINGERS OR OTHER OBJECTS INTO THE JUICER OPENING
WHILE IT IS IN OPERATION. IF FOOD BECOMES LODGED IN THE OPENING,
USE FOOD PUSHER OR ANOTHER PIECE OF FRUIT OR VEGETABLE TO PUSH
IT DOWN. WHEN THIS METHOD IS NOT POSSIBLE, TURN THE JUICER ON/OFF
SWITCH TO OFF “O”, UNPLUG CORD AND DISASSEMBLE JUICER TO REMOVE
THE REMAINING FOOD.
14. DO NOT use the appliance if the rotating sieve/lter is damaged.
15. DO NOT push produce into the feed chute with your nger. Always use the food pusher
provided. Do not bypass the safety switch to operate juicer.
16. DO NOT touch the small cutting blades in the base of the stainless steel lter basket.
17. Always make sure the juice extractor is properly and completely assembled before
operating. The unit will not turn on unless properly assembled.
18. Always use the juice extractor on a dry, level surface.
19. Always turn the juice extractor off rst before unplugging it from the outlet.
20. DO NOT place this appliance on or near a hot gas or electric burner, or where it could
touch a heated oven.

2
21. This appliance is not intended for use by persons (including children) with reduced
physical, sensory or mental capabilities, or lack of experience and knowledge,
unless they have been given supervision or instruction concerning use of the
appliance by a person responsible for their safety. Children should be supervised to
ensure that they do not play with the appliance.
22. Close supervision is necessary when any appliance is used by or near children, or
incapacitated individuals.
THIS UNIT IS FOR HOUSEHOLD USE ONLY.
SAVE THESE INSTRUCTIONS

3
1. Powerful 600-watt Motor
2. One Movement Safety Locking Arm
3. Extra Wide/Removable Food Chute
4. All Stainless Steel Filter
5. Filter Basket
6. 1-liter Jar with Slide-In Froth Separator
7. Large Pulp Collector Container
8. ON/OFF Switch (I/O)
9. Food Pusher
10. Juice Extractor Lid/Cover
11. Motor Base Housing
12. Safety Switch
13. Cleaning Brush
DESCRIPTION OF THE APPLIANCE
4
2
8
11
7
1
6
9
10
5
3
13
12
4
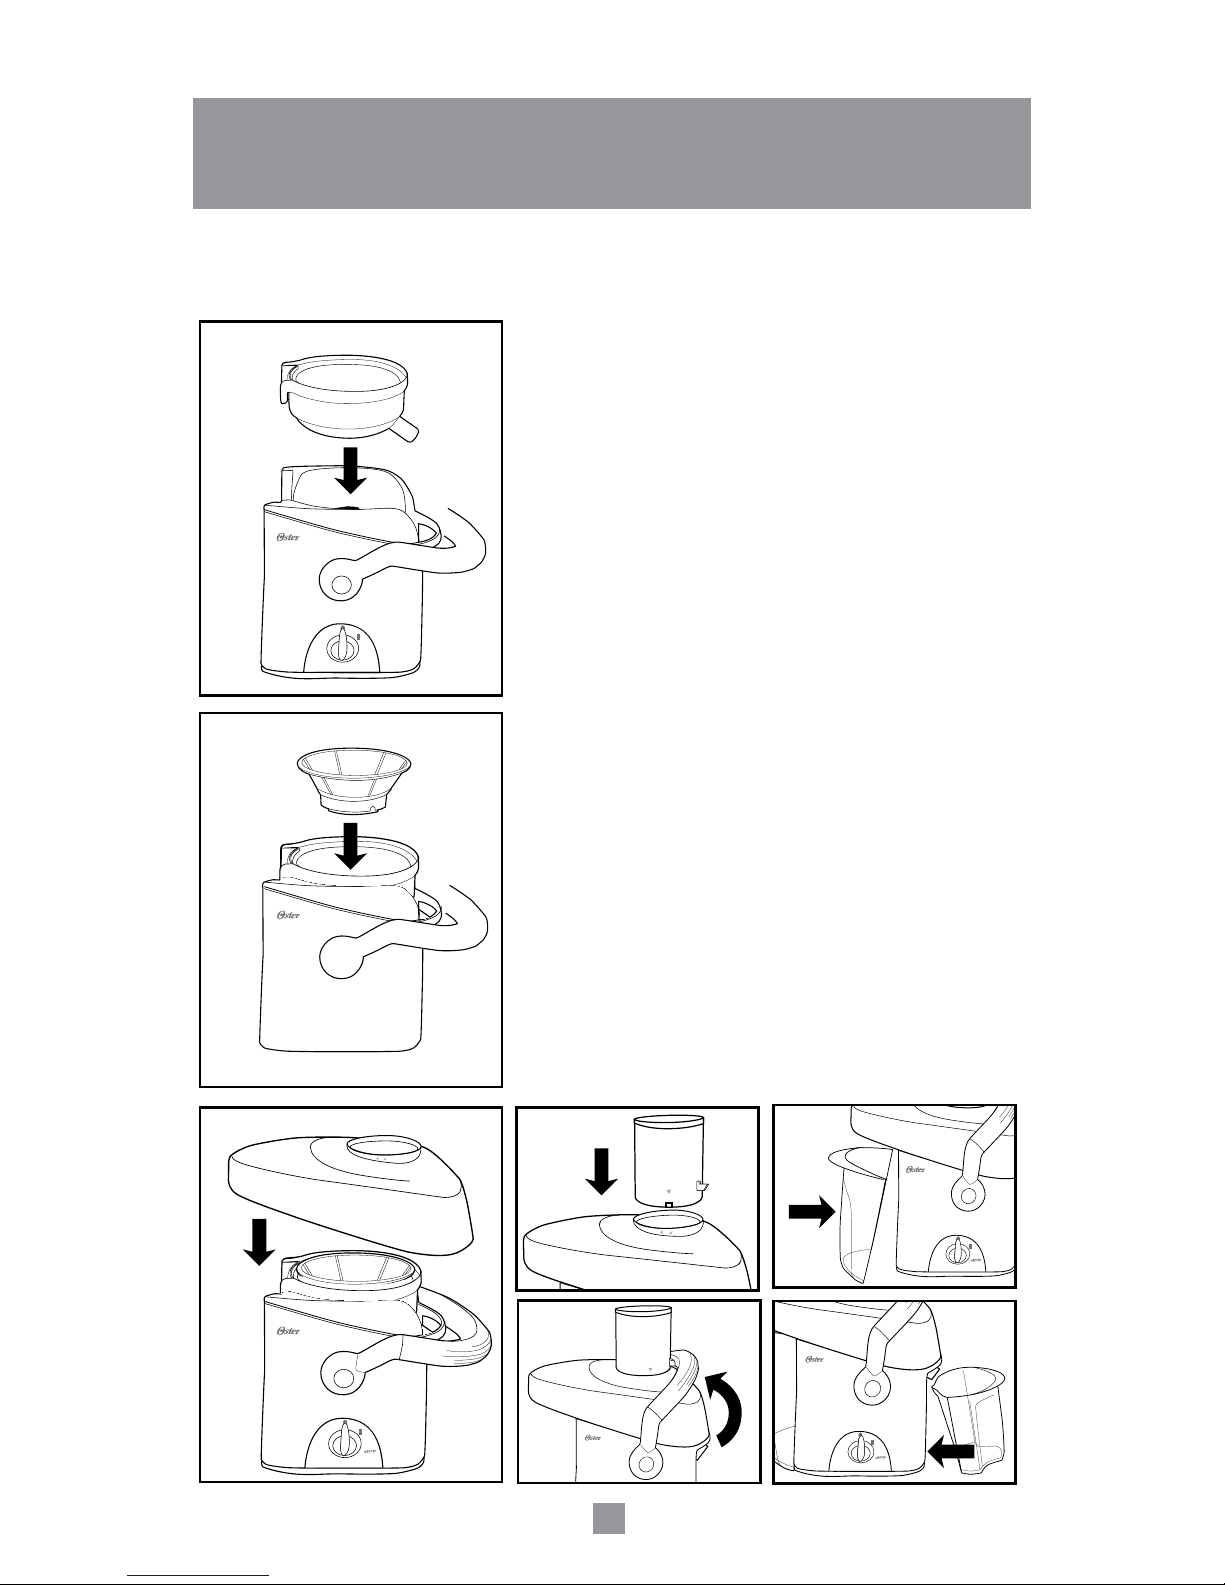
Follow the assembling instructions listed below before using your Oster® Juice Extractor:
• Before you start assembling your juice extractor, make
sure it is unplugged and it is placed on a dry and
leveled surface.
• Place lter basket on top of the motor base (Figure 1).
• Place the stainless steel lter on top of the lter basket
turning it until it ts into the grooves of the motor shaft
(Figure 2).
• Place juicer cover/lid on top of the lter basket (Figure 3)
• Place removable food chute on top of the lid and turn it
until tabs t into tab grooves or by aligning the arrows
on the chute with the arrows on the lid. Once the tabs
are inside the grooves, turn the chute clockwise until it
locks into position (Figure 4).
• Raise the one movement safety locking arm and place
it on the grooves on the sides of the lid. The food
chute in will t into the safety switch located in the center
of the locking arm. This is a safety feature that will
ensure the unit will not operate unless the lid is properly
locked. The safety locking arm should now be up and
locked into place on top of the juicer lid (Figure 5).
• Place the pulp container into position by tilting it slightly
(Figure 6).
• Place the 1-liter jar under the spout located on the right
hand side of the juicer by tilting it slightly. Other jars or
glasses can be used as well (Figure 7).
Figure 1
Figure 2
Figure 3 Figure 4 Figure 6
Figure 7
Figure 5
BEFORE USING YOUR JUICE EXTRACTOR

5
BEFORE USING YOUR JUICE EXTRACTOR
1. Prepare your fruits and vegetables by washing them thoroughly and peeling off those that need
the skin removed.
2. Your juicer features an extra wide chute and thus most fruits and vegetables such as
apples, carrots, beats, celery and others will not need to be cut into smaller pieces
since they t in the chute.
3. Make sure your juice extractor is properly assembled. Please follow the instructions from the
section “Before Using Your Juice Extractor.”
4. Ensure the juice extractor and its accessories are clean by following the cleaning and
maintenance section of this manual.
5. Place the jar or any other container/glass you may wish to use to collect the juice under the
spout and make sure the pulp collector is in place prior to begin juicing. Do not allow the pulp
collector container to overll as this may cause the unit to stall.
6. Plug the power cord into an electrical outlet and turn the power on “I.”
7. Once the juicer is on, place the fruits and vegetables on the food chute and use the food pusher
slowly to drive them down. In order to extract the maximum amount of juice, it is important to
push the food pusher slowly.
8. The juice extractor will separate the juice and the pulp in the jar and pulp collector while you are
juicing.
NOTE: Both the pulp container as well as the jar can be emptied during juicing by turning the
juice extractor off “O.” Make sure to place both containers back in place before you resume
juicing.
NEVER USE HAND OR FINGERS TO PUSH FOOD DOWN THE FOOD CHUTE OR TO CLEAR
THE FOOD CHUTE. ALWAYS USE THE FOOD PUSHER PROVIDED.

6
Before cleaning and storing your juice extractor, follow the instructions below to
disassemble the unit:
• Turn juice extractor off “O” and unplug it
from the electrical outlet (Figure 1).
• Remove the jar and the pulp collector
container by tilting it slightly (Figure 2).
• Unlock the safety locking arm and move it to
the right and down to release the cover/lid
(Figure 3).
• Turn the food chute slightly counter
clockwise to unlock the tabs from their
locked position and then move it up to
remove it from the lid (Figure 4).
• Lift the lid up and remove it from the juice
extractor (Figure 5).
• In order to remove the lter basket and the
lter, hold the lter basket with two hands
and then lift it straight up (Figure 6).
WARNING: THE STAINLESS STEEL FILTER
BASKET CONTAINS SMALL SHARP BLADES TO
CUT AND PROCESS FRUITS AND VEGETABLES.
DO NOT TOUCH BLADES WHEN HANDLING THE
FILTER BASKET.
Figure 1
Figure 2
Figure 3
Figure 4
Figure 5
Figure 6
AFTER USING YOUR JUICE EXTRACTOR

7
• After disassembling all removable parts of the juice extractor, wash them by hand
with warm soapy water or in the dishwasher (top shelf only). If the pulp dries out in
the pulp collector container, the lter or the lter basket, let it soak in water for
approximately 10 minutes before washing it.
• Wipe the motor base with a damp cloth.
• It is very important to keep the lter very clean, free of residues blocking the holes in
order to ensure optimal performance. Use a nylon brush to clean it thoroughly, if
necessary. If the holes in the mesh remain blocked, soak the lter in hot water with a
water solution with 10% lemon juice.
NOTE: DO NOT IMMERSE THE MOTOR BASE IN WATER OR ANY OTHER LIQUID.
• Some plastic parts might stain when in contact with some fruits and vegetables for
too long. In order to avoid this from happening, all parts should be washed
immediately after each use.
AFTER USING YOUR JUICE EXTRACTOR
MAINTENANCE

8
PROBLEMS AND SOLUTIONS
PROBLEM
Juice Extractor will not work
after switching on “I”.
Motor makes loud noise and
unit starts vibrating.
Motor appears to stall when
juicing.
Too much pulp build up on
stainless steel lter.
Pulp too wet and reduced juice
extraction.
Juice leaks between the rim of
the Juicer and Cover
the Filter.
SOLUTION
• Safety locking arm may not be locked properly in
its position.
• Turn off and unplug unit and ensure all parts are
assembled properly.
• Turn off and unplug unit and check if there are any
residues blocking the unit.
• Turn off and unplug unit and ensure all parts are
assembled properly.
• Juicing overripe fruits may produce too much pulp
and clog the lter. Turn off and unplug unit and
clean the lter thoroughly.
• If pulp starts building up under the lid, slow down
the juicing process. Turn off and unplug unit and
clean the lter basket, the stainless steel lter and
the lid.
• Follow the instructions to disassemble the unit
included in the “After Using Your Juice Extractor”
section. Clean up pulp from the lter.
• Try a slower juicing action. Remove stainless steel
mesh lter and thoroughly clean mesh with a
nylon brush. Rinse the lter basket with hot
water. If the ne mesh holes are blocked, soak
the basket in a solution of hot water with 10%
lemon juice to unblock the holes or wash in the
dishwasher. This will remove excess ber build up
(from fruit or vegetables), which could be reducing
the ow of juice.
• Try a slower juicing action by pushing the Food
Pusher down slower.

9
TIPS AND SUGGESTIONS
• Do not place any fruits or vegetables until you turn the unit on. Allow unit to run for at
least 10 seconds before you start juicing.
• Do not allow the pulp container to overll as this may prevent correct operation or
damage the unit.
• Ensure to remove large pits from fruits such as peach, mango, etc as they can
damage the unit.
• You can use a plastic bag inside the pulp collector container to avoid having to
clean it.
• Do not use bananas or avocados as they do not contain juice and will clog the unit.
You can use a blender to add them to the juice.
• You can use the pulp of the juices you prepare in a variety of ways. The pulp from
fruits and vegetables contains high amounts of ber and cellulose, which are
essential for a healthy and well balanced diet. You can use the pulp to thicken soups,
bulk up rissoles and thicken casseroles or to enhance your desserts. Make sure to
use the pulp the same day you juice to avoid loss vitamins.
Tabla de contenidos
Otros manuales de Exprimidor de Oster

Oster
Oster 3186 Manual de usuario

Oster
Oster FPSTJU407W-049 Manual de usuario

Oster
Oster FPSTJU4176 Manual de usuario

Oster
Oster FPSTJU4175 Manual de usuario

Oster
Oster FPSTJE3157 SERIES Manual de usuario

Oster
Oster FPSTJU407W Manual de usuario

Oster
Oster FPSTJU3190W Manual de usuario

Oster
Oster FPSTJU407W-049 Manual de usuario

Oster
Oster FPSTJE4000R Manual de usuario

Oster
Oster 3167 Manual de usuario


