
Open Country Tumble Drumm TD-6065-13 Especificaciones técnicas

Automatic Fish Scaler
Model: TD-6065-13 and TD-6065-13L
Care/Use Guide
Guide d’entretien/d’utilisation
Écailleur à poissons automatique
Modèle: TD-6065-13 et TD-6065-13L
Guía del usuario/mantenimiento
Escalador automático de pescado
Modelo: TD-6065-13 y TD-6065-13L
TD-6065-13
(18 in. long drum)
(45,7cm long tambour)
TD-6065-13L
(26 in. long drum)
(66,0 cm long tambour)
A
U
T
O
M
A
T
I
C
F
I
S
H
S
C
A
L
E
R

Table of Contents
Important Safeguards ......................................................................... 1
Grounding Instructions ........................................................................ 2
Parts and Accessories ........................................................................ 3
Operating Instructions ...................................................................... 3-4
Care and Cleaning .............................................................................. 4
One Year Limited Warranty ................................................................ 5
Model #: TD-6065-13 (18 in. long drum) Electric Fish Scaler
Model #: TD-6065-13L (26 in. long drum) Electric Fish Scaler
Tumble Drumm™ is a registered trademark of:
The Metal Ware Corporation
1700 Monroe St., P.O. Box 237
Two Rivers, WI 54241-0237, USA
Phone: (800) 288-4545
Table des matières
Mesures de Sécurité Importantes ....................................................... 6
Mise à la Terre .................................................................................... 7
Pièces et Accessoires ......................................................................... 8
Mode d’Emploi ................................................................................. 8-9
Entretien et Nettoyage ........................................................................ 9
Garantie Limitée de un an................................................................. 10
Índice
Precauciones Importante .................................................................11
Instrucciones de Puesta a Tierra .....................................................12
Piezas y Accesorios .........................................................................13
Manual de Instrucciones .............................................................13-14
Cuidado y Limpieza ......................................................................... 14
Garantía Limitada de 1 año ............................................................. 15
Part No.: 65844 rev 03/30/11
A
U
T
O
M
A
T
I
C
F
I
S
H
S
C
A
L
E
R

1
English
IMPORTANT SAFEGUARDS
- THIS APPLIANCE IS INTENDED FOR HOUSEHOLD USE ONLY -
When using electrical appliances, basic safety precautions should always be
followed, including the following:
1. READ ALL INSTRUCTIONS BEFORE USING APPLIANCE.
2. To protect against electrical hazard, do not immerse cord, plug or motor drive
unit in water or other liquid.
3. Close supervision is necessary when an appliance is used by or near children.
4. Always turn power switch ‘OFF’ before plugging and unplugging appliance cord
into wall outlet.
5. Connect to a polarized, grounded-type receptacle or use an acceptable
adaptor. See page 2 “Grounding Instructions” for details.
6. Unplug appliance from power outlet when not in use, before putting on or
taking off parts, and before cleaning.
7. Do not operate an appliance with a damaged cord or plug or after the
appliance malfunctions or has been dropped or damaged in any manner.
8. If an extension cord is used, follow the instructions given by the cord
manufacturer. See Instructions on Page 2 for recommended cord type.
9. The use of accessories and attachments not recommended by the
manufacturer may cause re, electrical shock or injury.
10. Do not let cord hang over the edge of the table or counter, or touch hot surfaces.
11. Do not place on or near a hot gas or electric burner, or in a heated oven.
12. Keep hands, hair and clothing away from drum during operation to reduce the
risk of injury to persons, and/or damage to the appliance.
13. Do not use appliance for other than intended use as described in this manual.
14. Do not use this appliance in rain or wet conditions.
15. Do not pour water over or direct a stream of water directly at the motor drive.
16. To avoid ELECTROCUTION HAZARD! Never place the appliance in standing
water while it is plugged into a wall outlet.
17. Do not plug into outlet if hands are damp or wet. Dry hands rst.
SAVE THESE INSTRUCTIONS
Polarized Plug: This appliance has a polarized plug (one blade is wider than the
other). To reduce risk of electric shock, plug is intended to t into polarized outlet
only one way. If the plug does not t fully into the outlet, reverse the plug. If it still
does not t, contact a qualied electrician. Do not try to modify the plug in any way.
Short Cord Instructions: A short power supply cord is provided to reduce the risk
resulting from becoming entangled in or tripping over a longer cord. Extension
cords may be used if care is exercised in their use. If an extension cord is used,
the marked electrical rating of the cord should be at least as great as the electrical
rating of the appliance. The longer cord should be arranged so that it will not
drape over the tabletop where it can be pulled on by children or tripped over
unintentionally.

2
English
Grounding Instructions
Extension Cords
This appliance is equipped with a 3-conductor cord and 3-pin plug (NEMA
5-15P) to t into standard 15A grounded receptacle (NEMA 5-15R). The
appliance must be grounded while in use to protect the operator from an
electrical hazard or shock.
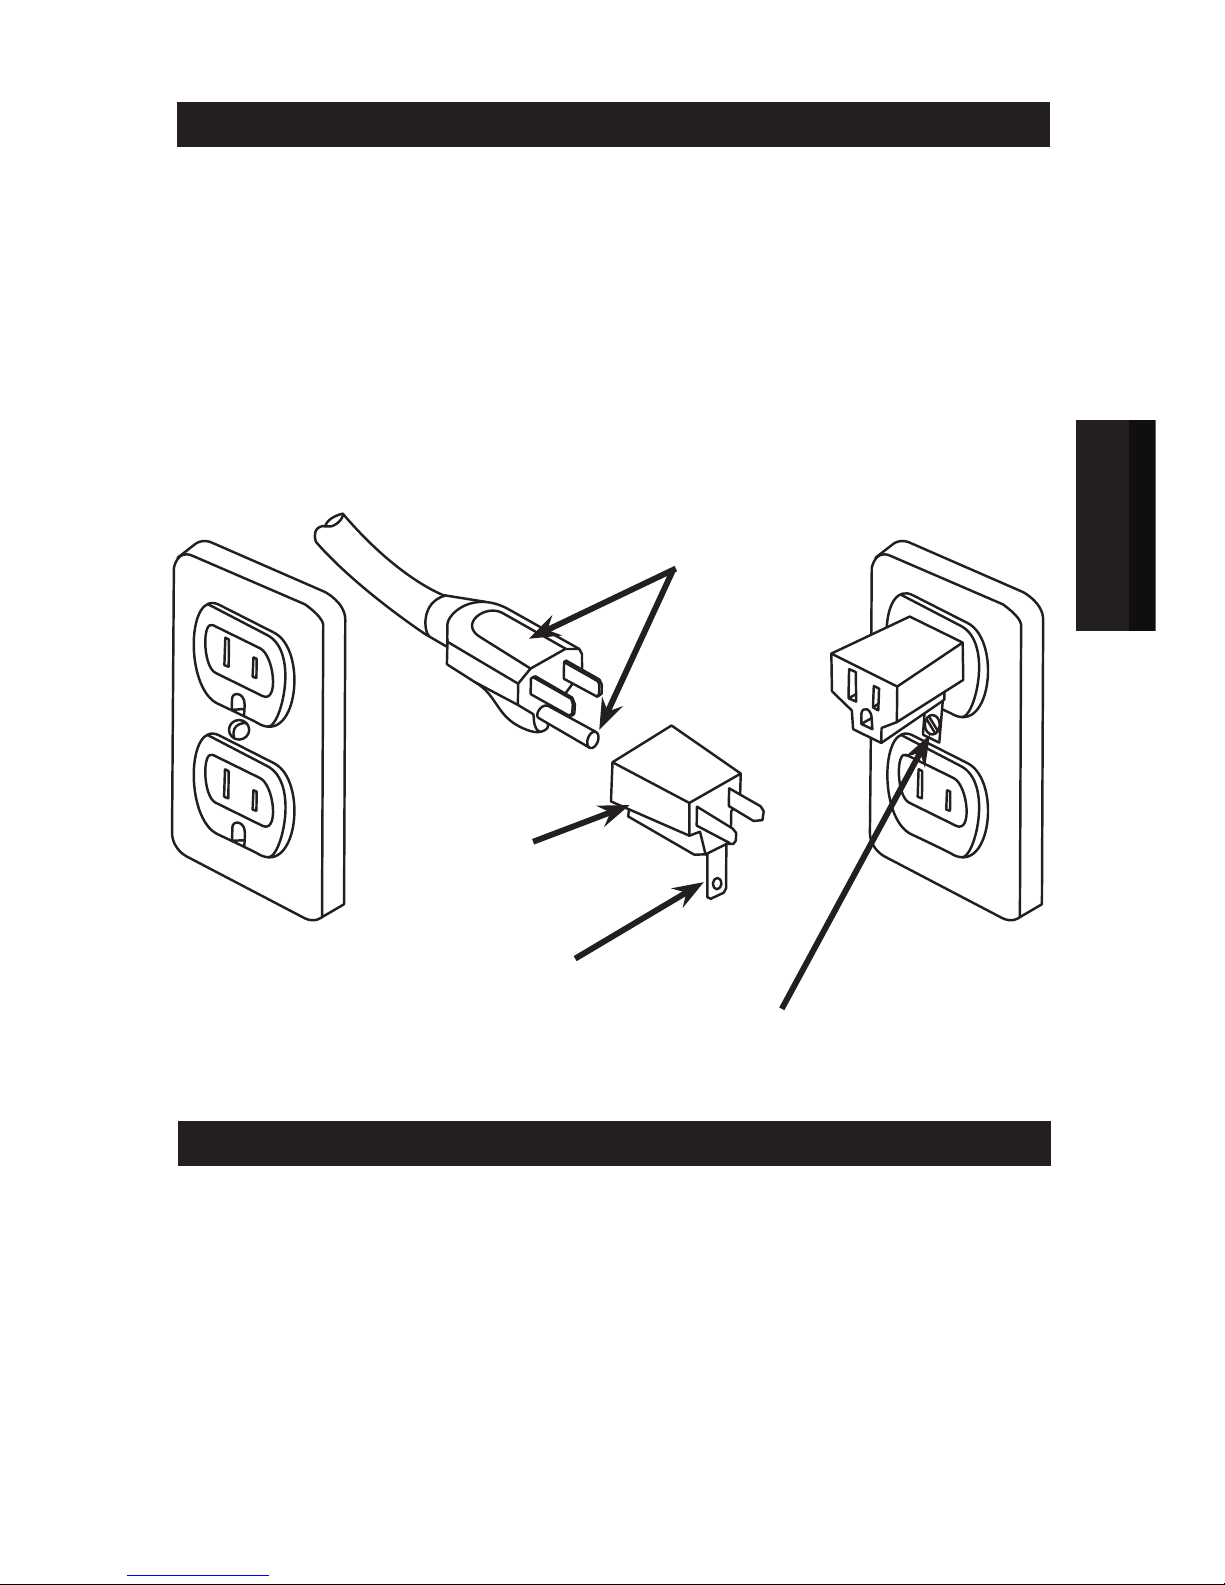
Grounding Adapter may be used if you are using a 2-conductor receptacle.
The grounding means, which extends from the adapter body, must be
connected to the screw in a properly grounded outlet box. See diagram for
reference.
Grounding
Adapter
3-conductor
Grounded
Outlet
(NEMA 5-15R)
Grounding Plug
with Grounding Pin
(NEMA 5-15P)
Grounding
Means 2-conductor
Outlet.
(NEMA 1-15R)
Center screw
grounded
Grounding
Screw
Use only polarized grounded-type extension cord that is rated 15A
(minimum). We recommend using an extension cord that is intended for
outdoor use. Do not use damaged extension cords. Extension cords are
only to be used for temporary purposes. They do not replace the need for
installation of outlets and proper wiring where necessary. Do not pull on
cord to disconnect. Keep away from heat and sharp objects.

3
English
Operating Instructions
1. Remove all packaging materials before using the rst time.
2. Wash parts with soapy water and rinse. Reduce splashing and dump
dirty water by lifting Tub from Motor Drive to keep water from entering
Motor Drive area. CAUTION: ALWAYS WEAR SAFETY GLOVES
WHEN REACHING INSIDE OF DRUM!
3. Rotate Drive Coupling until slot is horizontal. Using Tub handles, lift
Drum and insert Drive Shaft into Drive Coupling. Lower the opposite
end shaft of Drum into groove on Bearing Block.
4. Place unit on level surface and add water to the “Maximum Fill Line”.
Water level inside of Drum should be 1/4” to 1/2” above the bottom.
CAUTION: DO NOT POUR WATER OVER MOTOR DRIVE!
5. Release Latch by lifting and open door, place sh into Drum. For best
results load scaler by similar size and types of sh.
6. Note: TD-6065-13 (18” long drum) will scale up to 50 small pansh
and TD-6065-13L (26” long drum) is designed to scale large s up to
22” in length.
Parts and Accessories
Locking
Latch
Water
Tub
Drum
On/Off
switch
Handle
Motor
Drive
Hinged
Door
Drive
Coupling
Bearing
Block
Maximum
Fill Line
Drive Shaft

4
English
7. Close door and lock the Latch by pressing rmly.
8. Check that Switch is in OFF position and hands are dried. Plug cord
into standard grounded 120 V.a.c. outlet. If grounded outlet is not
available use adapter as shown on page 2.
9. Flip Switch to ON position and allow “Tumble Drumm™” to operate
about 10 to 25 minutes. Times will vary due to size / type / number of
sh per load.
10. Turn switch to OFF position and allow Drum to stop rotating. Release
latch, open door and inspect sh. Drum has sharp edges that can
cause cuts and abrasions. CAUTION: ALWAYS WEAR SAFETY
GLOVES WHEN REACHING INSIDE OF DRUM!
11. If more time is needed to remove scales, close door and lock latch.
Operate a few minutes longer, check frequently to avoid damaged
sh.
12. When sh are completely scaled, turn Switch to OFF position and
unplug cord from outlet.
13. Remove Drum from Tub by lifting opposite end of Motor Drive, then
slide Drum away from Motor Drive while lifting to remove.
14. Release Latch and open door. Dump sh into suitable container.
15. Rinse Drum with hose. Repeat steps as needed.
Care and Cleaning
1. Be sure cord is disconnected from outlet and switch in OFF position.
2. Remove Drum from Tub and rinse with clean water. Drum has sharp
edges that can cause cuts and abrasions. CAUTION: ALWAYS
WEAR SAFETY GLOVES WHEN REACHING INSIDE OF DRUM!
3. Dump the dirty water by tilting Tub with Motor Drive upwards. Rinse
with clean water. NOTE: If scales are dried, try soaking parts by lling
Tub with warm soapy water to the Maximum Fill Line, add Drum and
cycle without sh for several minutes.
4. Rinse all parts separately and allow to dry thoroughly. The Tub and
Motor Drive can be wiped with dry cloth.
5. When all parts have dried, assemble Drum or store Drum in bottom of
Tub.
6. Store indoors in a dry place. Do not expose to rain.

5
English
ONE YEAR LIMITED WARRANTY
This appliance is warranted for one year from date of original purchase against
defects in material and workmanship. This warranty does not cover transportation
damage, misuse, accident or similar incident. This warranty gives you specic
legal rights and you may have other rights, which vary from state to state. This
product is intended for household use only, not for commercial use. Warranty
does not cover commercial use.
Your new appliance comes equipped with numerous safety features. Any attempt
to interfere with the operation of these safety features makes this warranty null
and void. In the event we receive an appliance for service that has been tampered
with, we reserve the right to restore it to its original state and charge for the repair.
For service in warranty - Defective products may be returned, postage prepaid,
with a description of the defect to: The Metal Ware Corporation, 1700 Monroe
Street, Two Rivers, Wisconsin 54241, for no-charge repair or replacement at our
option. Must include proof of purchase or copy of original bill of sale when
returning product for warranty service.
Please call Customer Satisfaction at 1-800-288-4545 to obtain a Return
Authorization before shipping.
• For service in warranty, follow instructions set forth in warranty. When ordering
new parts, make sure that you always mention the model number of the
product.
• Call us on our toll free number, 1-800-288-4545 and tell us about your problem.
• If we instruct you to send all or part of your appliance to us for repair or
replacement, our Customer Satisfaction representative will provide a Return
Authorization number (this number noties our receiving department to
expedite your repair). Pack your unit carefully in a sturdy carton with sufcient
padding to prevent damage because any damage caused in shipping is not
covered by the warranty.
• Print your name, address and Return Authorization number on the carton.
• Write a letter explaining the problem. Include the following: your name, address
and telephone number and a copy of the original bill of sale.
• Attach the sealed envelope containing the letter inside the carton. Insure the
package for the value of the appliance and ship prepaid to:
Attn: Factory Service Dept.
The Metal Ware Corporation
1700 Monroe Street
Two Rivers, WI 54241

6
Français
MESURES DE SÉCURITÉ IMPORTANTES
- Ce produit est destiné à un usage domestique seulement -
L’utilisation d’appareils électriques nécessite certaines précautions élémentaires, y compris les suivantes:
1. LIRE TOUTES LES INSTRUCTIONS AVANT D’UTILISER CET APPAREIL.
2. Pour protéger contre les risques électriques, ne plongez pas le cordon, la che
ou unité de commande de moteur dans l’eau ou autre liquide.
3. Une surveillance étroite est nécessaire lorsqu’un appareil est utilisé par ou près
des enfants.
4. Toujours mettre ‘OFF ‘ alimentation avant de brancher ou de débrancher le
cordon appareil dans une prise murale.
5. Connectez-vous à une prise polarisée, prise de masse de type ou utiliser un
adaptateur acceptable. Voir page 2 mise à la terre” pour plus de détails.
6. Débrancher l ‘appareil de la prise électrique lorsqu’il n’est pas utilisé, avant de
mettre ou enlever des pièces, et avant le nettoyage.
7. Ne pas faire fonctionner un appareil avec un cordon ou une che endommagé
ou lorsque l ‘appareil ou s’il est tombé ou endommagé de quelque façon.
8. f une rallonge est utilisé, suivre les instructions données par le fabricant cordon.
Voir les instructions sur la page 2 pour le type de cordon recommandé.
9. L’utilisation d’accessoires non recommandés par le fabricant peut causer un
incendie, de choc électrique ou de blessure.
10. Ne pas laisser le cordon pendre sur le bord de la table ou un comptoir, ni
toucher des surfaces chaudes.
11. Ne pas placer près ou sur un brûleur à gaz ou électrique, ou dans un four chauffé.
12. Garder les mains, cheveux et vêtements à l’écart du tambour pendant le
fonctionnement an de réduire les risques de blessures aux personnes et / ou
endommager l’appareil.
13. Ne pas utiliser cet appareil pour un usage autre que prévu, comme décrit dans ce manuel.
14. Ne pas utiliser cet appareil dans des conditions de pluie ou humide.
15. Ne pas verser de l’eau ou de diriger un jet d’eau directement sur la commande du moteur.
16. Pour éviter toute électrocution DANGER! Ne jamais placer l’appareil dans l’eau
stagnante pendant qu’il est branché dans une prise murale.
17. Ne pas brancher dans une prise si les mains sont humides ou mouillés. Se
sécher les mains en premier.
GARDEZ CES INSTRUCTIONS
Fiche polarisée : Cet appareil est pourvu d’une che polarisée (une lame est plus large que
l’autre). An de minimiser le risque de choc électrique, cette che peut être insérée dans une
prise de courant polarisée dans un sens seulement. Si elle n’entre pas complètement dans
la prise de courant, inversez la che. Si elle refuse toujours d’entrer, consultez un technicien
qualié. Ne modiez la prise d’aucune façon.
Au sujet du cordon : Un cordon d’alimentation court est fourni pour minimiser le risque
d’enchevêtrement ou de trébuchement. Vous pouvez utiliser des rallonges avec prudence. Si
vous vous servez d’une rallonge, la tension nominale de la rallonge doit être au moins égale
à celle de l’appareil. Le cordon plus long doit être posé de façon qu’il ne dépasse pas de la
table, qu’il ne puisse pas être tiré par des enfants ou qu’on ne puisse pas tomber dessus par
accident.
7
Français
Mise à la Terre
Les Cordons de Rallonge
Utilisez uniquement une rallonge polarisée à la terre-type qui est de
15A (minimum). Nous vous recommandons d’utiliser une rallonge qui
est destiné à une utilisation en extérieur. Ne pas utiliser de rallonges
endommagées. Les rallonges ne doivent être utilisés à des ns
temporaires. Ils ne remplacent pas la nécessité pour l’installation de points
de vente et le câblage le cas échéant. Ne pas tirer sur le cordon pour le
débrancher. Tenir loin de la chaleur et des objets tranchants.
Mise à la terre
Adaptateur
3-conducteur
Mise à la terre
Outlet
(NEMA 5-15R)
Prise de terre avec mise
à la terre Pin
(NEMA 5-15P)
Moyens à la
terre 2-conducteur
Outlet.
(NEMA 1-15R)
Centre de vis à la
terre
Mise à la
terre à vis
Cet appareil est équipé d’un cordon à 3 conducteurs et 3-broches (NEMA
5-15P) pour s’adapter à 15A standard mis à la masse (NEMA 5-15R).
L’appareil doit être mis à la terre lors de leur utilisation pour protéger
l’opérateur d’un risque de choc électrique ou un choc.
Mise à la terre adaptateur peut être utilisé si vous utilisez un récipient à
2 conducteurs. Les moyens de mise à la terre, qui s’étend de la corps de
l’adaptateur, doit être relié à la vis dans une boîte de prise de terre. Voir le
schéma de référence.

8
Français
Pièces et Accessoires
De verrouillage
Loquet
Eau de
la cuve
Tambour
On/Off
Interrupteur
Poignée
Moteur
Drive
Charnières
Porte
Drive
Couplage
Roulement
de bloc
Maximum La ligne
de remplissage
Arbre de
Transmission
Mode d’Emploi
1. Retirez tous les matériaux d’emballage avant d’utiliser la première fois.
2. Tambour de lavage et bain à l’eau savonneuse et rincer pour enlever
tout résidu du procédé de fabrication. Réduire les éclaboussures et
de vidage de l’eau sale en soulevant bain de moteur d’entraînement
à empêcher l’eau de Motor Drive zone. ATTENTION: TOUJOURS
porter des gants en atteignant intérieur du tambour!
3. Tournez jusqu’à ce que Drive Couplage fente est horizontale.
Utilisation de bain poignées, soulevez Tambour et insérez dans le
lecteur Drive Shaft Couplage. Bas à l’opposé de Tambour dans la
rainure de Roulement de bloc.
4. Place “Tumble Drumm™” sur la surface de niveau et ajouter de l’eau
à la «ligne de remplissage maximum». Le niveau d’eau à l’intérieur
du tambour doit être 6 mm à 12 mm au-dessus du fond. ATTENTION:
NE PAS verser de l’eau MOTEUR!
Este manual sirve para los siguientes modelos
1
Tabla de contenidos
Idiomas:
Otros manuales de Electrodoméstico de cocina de Open Country

Open Country
Open Country FS-250SK Manual de usuario

Open Country
Open Country Electric Roaster Oven Especificaciones técnicas

Open Country
Open Country FS-140RSK Especificaciones técnicas

Open Country
Open Country FS-150SK Especificaciones técnicas

Open Country
Open Country FG-10SK Especificaciones técnicas

Open Country
Open Country VS-01SK Especificaciones técnicas

Open Country
Open Country FS-130SK Especificaciones técnicas


