Oliso TG-800 Manual de usuario

User Manual for /
Manuel d’utilisation
Oliso®Steam Iron with Auto-Lift System™ /
Fer à vapeur Oliso®avec système Auto-liftMC
Models / Modèles
TG-800 with Non-Stick Soleplate /
TG-800 Semelle Antiadhésive
TG-1000 with Stainless Steel Soleplate /
TG-1000 Semelle en Acier Inoxydable
TG-1200 with Stainless Steel Soleplate /
TG-1200 Semelle en Acier Inoxydable

2
1 ) Use iron only for its intended use.
2 ) To protect against a risk of electric shock, do not immerse the iron in water or other liquids.
3 ) The iron should always be turned to “Off” before plugging or unplugging from the outlet. Never yank
cord to disconnect from the outlet; instead, grasp plug and pull to disconnect.
4 ) Do not allow cord to touch hot surfaces. Let iron cool completely before putting away. Loop cord
loosely around iron when storing.
5 ) Always disconnect iron from electrical outlet when filling with water or emptying and when not in use.
6 ) Do not operate iron with a damaged cord or if the iron has been dropped or damaged. To avoid the
risk of electric shock, do not disassemble the iron. Take it to a qualified serviceman for examination and
repair. Incorrect reassembly can cause a risk of electric shock when the iron is used.
7 ) Do not allow children to use iron. Close supervision is necessary for any appliance being used near
children. Do not leave iron unattended while connected or on an ironing board.
8 ) Burns can occur from touching hot metal parts, hot water, or steam. Use caution when you turn a
steam iron upside down – there may be hot water in the reservoir.
9 ) If the LED flashes orange (not red or green), the iron is not operating normally. Disconnect from the
power supply and have the iron serviced by qualified service personnel.
IMPORTANT SAFETY INSTRUCTIONS
When using your iron, basic safety precautions should always be followed, including the following:
Read all instructions before using this product.
SPECIAL INSTRUCTIONS
1 ) The iron must be used on a stable surface. When placing the iron on a stand or resting surface, make
sure the stand or surface is stable.
2 ) TG800 and TG1000 are 1440 watt appliances. TG1200 is a 1600 watt appliance. To avoid a circuit
overload, do not operate another high wattage appliance on the same circuit.
3 ) If an extension cord is absolutely necessary, a 12 A cord (TG800/1000) or a 14 A minimum cord
(TG1200) should be used. Cords rated for less amperage may overheat. Care should be taken to arrange
the cord so that it cannot be pulled or tripped over.
SAVE THESE INSTRUCTIONS

1
Welcome
Thank you for purchasing the Oliso®Iron, the only iron with the patented AUTO-LIFT
SYSTEM™. You’re just a few steps away from a new safer, easier way of ironing. Follow
the instructions in this manual to learn about your new iron’s features and care. We
hope you enjoy your Oliso®Iron.
Smart. Simple. Delightful.
EN

2
3 simple steps to start
FILL
Open the Flip Funnel™ and add
water to the tank with the fill cup
or directly from a faucet.
Plug in, then choose a fabric
setting.
When the green light stops blinking and is
constantly lit, the iron is ready for use. Touch
the handle and begin.
Enjoy your Oliso®iron
If you would like to learn more about your
iron’s unique features, please read on.
1
SET UP
2
iRON
3

3
getting to know your Oliso®iron
Status Light
Steam Button
Spray Button
Steam Selector
Electronic Fabric Selector
Spray Nozzle
Detailer
Lifters
Touch-activated handle
Auto-Lift™
on/off switch
Flip Funnel™
Water Tank
Soleplate
EN
4
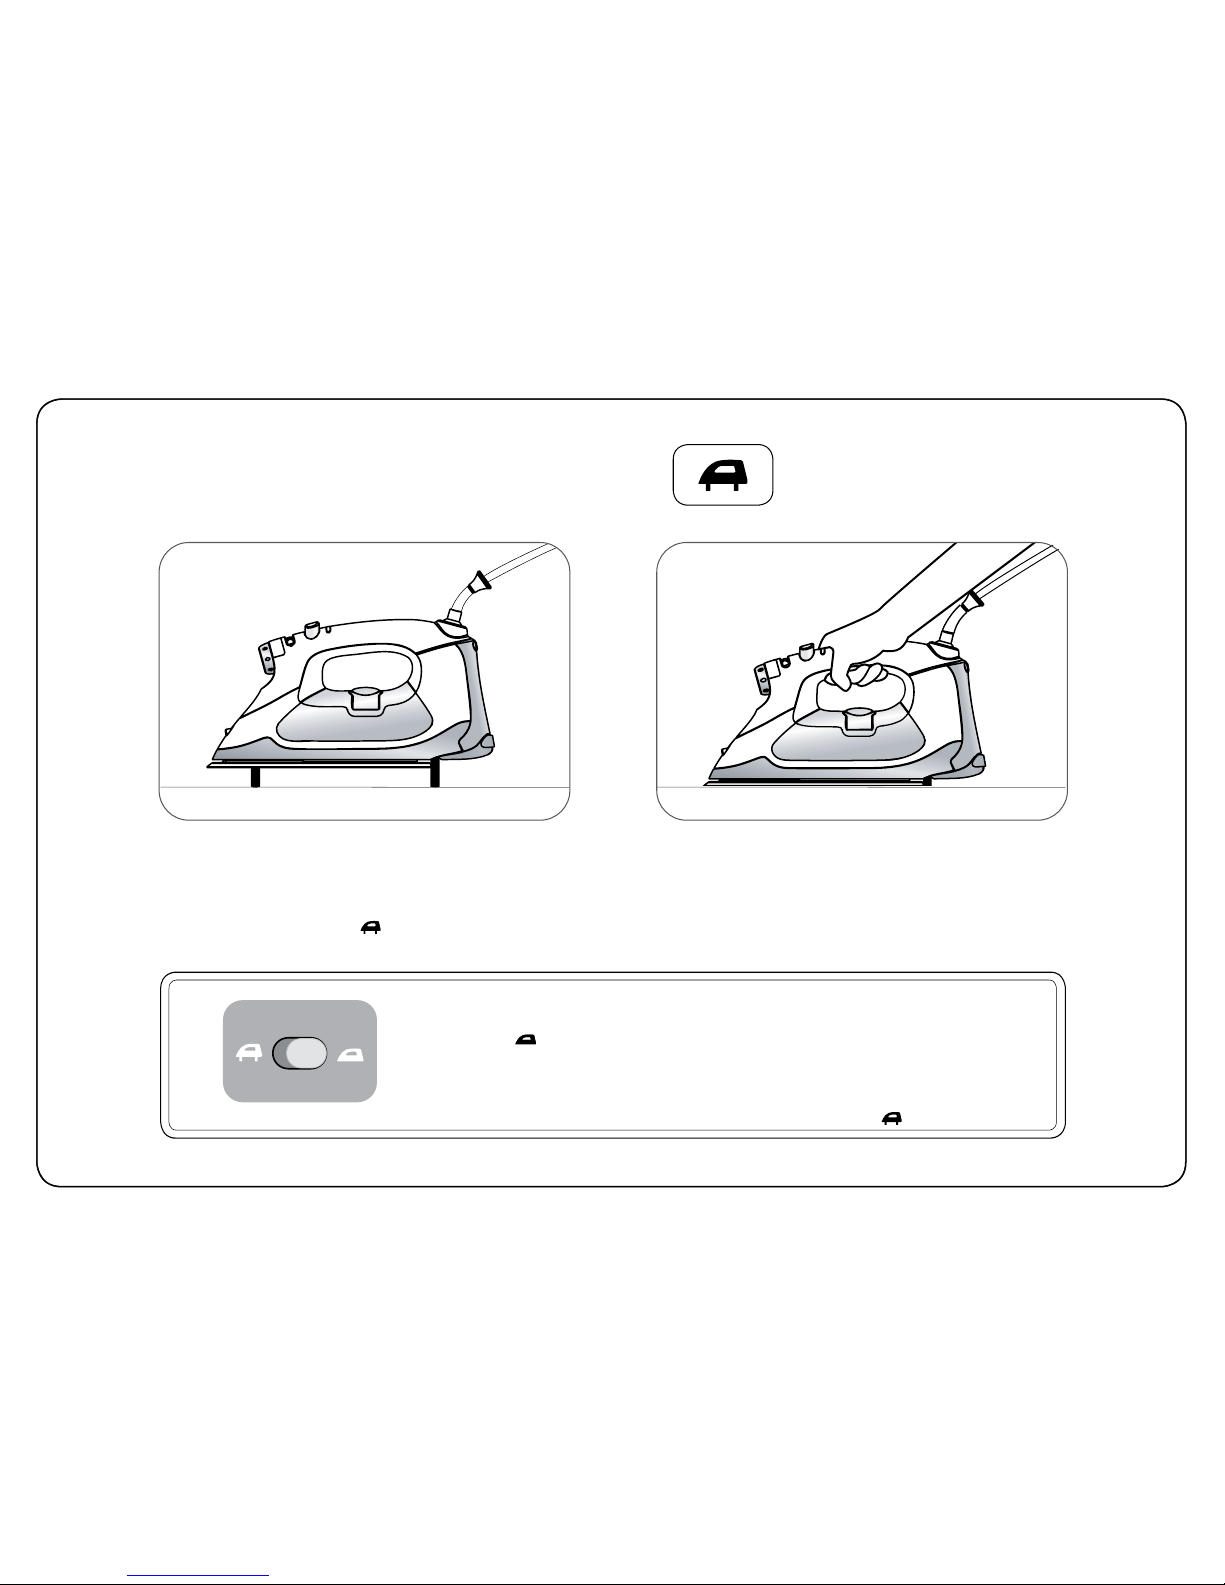
Auto-Lift System™
To operate, place the iron right side
up on a flat surface. Plug the iron into
an outlet and make sure the Auto-Lift
switch is in the on ( ) position.
Touch the iron handle and the iron will
sense your hand and lower. Let go and
the iron’s Lifters will automatically raise
the iron above fabric.
OVERRIDING THE AUTO-LIFT SYSTEM™
If you wish to turn off the Auto-Lift system, move the switch on the back of the
iron to the off ( ) position. Your iron will now operate like a standard iron. If the
iron is left in the horizontal position without being touched for more than 30
seconds, the Auto-Lift system will automatically raise the iron. This will prevent
the iron from scorching or burning. Touch the iron handle, and the iron will lower.
You can restore Auto-Lift by returning the switch to the on ( ) position.

5
water tank
Open the Flip
Funnel™.
Leave the iron in a
horizontal position
and fill using the
included fill cup. Two
fill cups equal the
maximum capacity
of the water tank.
Alternatively, fill directly
from a faucet holding
the iron horizontally. Do
not fill the tank past the
MAX fill line on the
side of the iron. Close
the port when done.
If you need to add water during ironing, unplug
the iron and repeat the above steps. After filling,
make sure the iron is fully reheated before ironing.
This iron is designed to be used with regular tap
water. If your water is over 12 grams of hardness we
recommend using either inexpensive bottled spring
water or mixing half tap water with half distilled water.
Never use 100% distilled water as this can cause the
iron to spit and leak.
water recommendations
Before filling, slide
the steam selector
to off ( ). Make
sure the iron is
unplugged.
EN

6
fabric selector
fabric selector
status light
temperature is too low for steam steam ok
red flashing green green flashing red
off optimizing
temperature at set temp auto off
Turn the fabric selector to select a fabric setting. To use constant steam
or steam burst, the temperature must be set to the wool, cotton, or linen
range.
The Oliso iron uses a status light to display the iron’s status. To ensure correct
temperature, wait until the light displays steady green before ironing.

7
steam/spray system
Steam Selector: Slide the steam selector to set the amount of constant steam. The iron
can only produce steam when the fabric selector knob is set to the wool ( •• ), cotton, or
linen range (•••). Allow the iron to heat up (steady green status light) before activating
the steam control. Steam will be produced as soon as the iron is lowered.
Dry Ironing: To turn off the steam, slide the steam selector off ( ).
Auto Anti-Drip: Your Oliso®iron has an anti-drip feature which shuts off steam
production any time the iron’s Lifters are extended. This prevents unwanted
steam while the iron is standing. To prevent dripping entirely, keep the steam selector in
the off ( ) position.
Spray
• press the spray button for a strong mist spray
• the spray will help remove wrinkles
Burst of Steam
• firmly press the steam button for a strong burst of steam from the soleplate.
• the steam button can only be used when the iron is heated to the wool (••),
cotton, or linen range (•••).
• wait at least 3 seconds between each press of steam button.
Vertical Steam
• to steam vertically press the steam button while holding the iron upright.
• this is useful for getting creases and wrinkles out of hanging clothes or curtains.
• wait at least 3 seconds between each press of the steam button.
EN

8
If the Oliso®iron is not being used while it is plugged in, the status light will flash red and the iron will
turn itself off. The auto shut-off timing depends on whether the Auto-Lift System™ is turned on or off.
Touch the handle of the iron to restart it.
auto shut-off system
Auto-Lift on Auto-Lift off
iron position iron positionauto shut-off timing auto shut-off timing
8 minutes unused
8 minutes vertical
30 seconds knocked over 30 seconds knocked over
8 minutes vertical
30 seconds left untouched,
lifters will raise iron,
and iron will cool
Este manual sirve para los siguientes modelos
2
Tabla de contenidos
Idiomas:
Otros manuales de Hierro de Oliso

Oliso
Oliso Smart Iron TG1250 Manual de usuario

Oliso
Oliso smartiron TG1600Pro+ Manual de usuario

Oliso
Oliso smart iron TG1600Pro+ Manual de usuario

Oliso
Oliso Mini Project Iron M2Pro Manual de usuario

Oliso
Oliso Touch & Glide Manual de usuario

Oliso
Oliso project iron M3PRO Manual de usuario

Oliso
Oliso project iron M3PRO Manual de usuario

Oliso
Oliso smartiron TG1050 Manual de usuario

Oliso
Oliso Smartiron Manual de usuario


