NEWYES SyncPen Manual de usuario

User Guide
NEWYES SyncPen Smartpen

CONTENTS
Getting started 1
Hardware 1
Know about your SyncPen 1
·Ink Cartridge 1
·MAC Number 2
·Know About the LED Light 2
·How to Turn On/Off the SyncPen? 2
·Download the NEWYES NOTE App 3
·Pairing for the First Time 3
·Reconnecting Your SyncPen to Your Device 4
·Manage Your SyncPens and Devices 4
·Connecting to a Different SyncPen 4
·Checking Your SyncPen Battery Level 4
Working with Notebooks 5
Create Notebook 5
Edit Notebook 5
View 5
Notebook Settings 5
Working With Pages 6
View 6
Sort 6
Know More About the Page 6
·Pen/Marker/Eraser 7
·Insert an Image 7
·Playback a Note 8
·Playing the Recording 8
Search for Notes 9
Offline Mode 10
About Me 10
Work with Paper 11
Work with LCD Pad 11
Packages 12
Warranty 12
Manage Multiple Pages 6
·Record 7
·Change Page Background 7
·Recognize the Handwritting 8
·Share a Note 8
More About the Page Icons 9

Getting Started
Thanks for purchasing your new SyncPen3 smartpen. In a few moments, you’ll be able to
start writing in your new NEWYES notebook and watch your notes appear instantly in the
NEWYES NOTE app!
Hardware
Know About Your SyncPen
①Ink CartridgeLid USB Port
Camera ②MAC Number ③LED Light
① Ink Cartridge
Please insert the ink cartridge when using the
SyncPen3 for the first time.
Connectivity Bluetooth 5.0
Battery Rechargeable lithium (non-removable)
Camera High-speed infrared camera
Processor ASIC
Pressure level 1024
Adaptor DC5.0V / 500mA
Charging Type C USB cable
Charging Time 1.5 hours
Full Charged Time Continuously writing 8 hours
Audio Recording and playback of audio is handled by your
companion device.
Writing Angle 360° full angles capturing
Ink Cartridge 67mm length X 2.35 mm diameter
Size & Weight Length: 168.0 mm (6.61 in.)
Width: 10 mm (0.39 in.)
Weight: 20 grams (0.35 oz.)
1

* The SyncPen 3 will not save notes in this state.
Pairing mode ‒ Waiting for initial Bluetooth connec-
tion with a device.
Blinking Blue Fastly
Writing
Blinking Blue Slowly
Powered on / Bluetooth connected to the mobile
device.
Solid Blue
Battery level lower than 20%
Blinking Red Fastly
Charging
Solid Red
Fully charged
Solid Purple
SyncPen is off. The SyncPen automatically powers off
after 30 mins of inactivity.
LED Off *
COMMUNICATES
LIGHT
Note:
Your SyncPen 3 captures your notes even when you are not connected to your device.
The next time your SyncPen and device are connected, your SyncPen can transfer your
notes to your device. Please check page 10 to refer to the Offline Mode.
Note:
We recommend compatible NEWYES branded replacement ink cartridges (67 mm x
2.35 mm diameter). You can check the NEWYES website www.newyes.com for
alternative ink cartridges.
Ink cartridges that meet the same size specifications, contain carbon-free ink, and
have a leak protection system may also be used. However, NEWYES does not
guarantee the performance of non-NEWYES branded replacement ink cartridges.
• How to Turn On/Off the SyncPen?
Turn On
Method 1: Open the pen cap, then the SyncPen 3 will automatically turn on.
Method 2: Write directly, the SyncPen 3 will automatically turn on.
Turn Off
Method 1: Close the pen cap.
Method 2: After the SyncPen standby for over 30 minutes, it will turn off.
② MAC Number
MAC number is a unique serial number assigned to each smartpen. You need to use this
MAC number to connect your SyncPen with the App.
③ LED Light
The LED Light communicates important information about your SyncPen.
2

Note:
Since the Android system involves various mobile brands and models, if our applica-
tion doesn’t work with your phone, please get in touch with [email protected]om, we
will do our best to make things back to the right way.
• Download the NEWYES NOTE App
The NEWYES NOTE app is available for free on iOS and Android. Get started by download-
ing the app from the App Store and Google Play. Or you can scan the QR code to download
it directly.
Minimum Requirements
iOS 9.0 Android 5.0
• Home Page
1. SyncPen:
This is for the SyncPen smartpen.
2. Photo Scanning:
This is for our other product - Smart
Reusable Notebook.
3. Mini Printer:
For our another series of products,
and this is still under construction.
2. Tap the symbol of the "SyncPen" section.
3. Go ahead to register an account.
4. Open the cap to turn on the SyncPen, and the LED blinks blue to indicate it's in pairing
mode.
5. Select the correct SyncPen from the list according to the MAC number, then click
"connect."
6. After connecting, you can start to use your SyncPen.
The first time you use your SyncPen, you must pair it with your device.
1. On your mobile, make sure Bluetooth is on.
• Pairing For The First Time
Note:
For Android users, our App needs location permissions to work with Bluetooth.
3

If you paired more than one SyncPen with your device, your device connects with the first
paired SyncPen that your device detects. Your device can connect to only one SyncPen at a
time.
To connect to a different SyncPen:
1. Turn off the SyncPen to which your device is currently connected.
2. Turn on the paired SyncPen to which you want to connect.
With your SyncPen connected to NEWYES NOTE, do as follows to give each SyncPen a
new name.
• Connecting To A Different SyncPen
You can pair up to multiple compatible devices with your SyncPen, making it easy to switch
between your smartpen and your selected devices. Keep in mind that you can have only
one active device connection at a time.
• Manage Your SyncPens and devices
Note:
To keep track of multiple SyncPens, give each SyncPen a unique name.
• Tap
• Tap settings
• Tap Default writing format
• Tap Name and enter a new name
When your SyncPen is connected to your device, the smartpen icon in the App Bar changes
color to indicate the smartpen’s current battery level:
• Checking Your SyncPen Battery Level
• Battery level is 21% or more.
Note:
You can also view the current battery level as a percentage by tapping the smartpe
icon to open the SyncPen Info panel.
• Battery level is 20% or less; please recharge immediately.
• Tap to connect to SyncPen.
Once you pair your SyncPen to a device, they connect automatically in most situations. If
your SyncPen doesn’t reconnect automatically, do one of the following:
• Make sure that you've turned on the Bluetooth of your mobile.
• Keep the SyncPen and mobile device within 1 meter / 3.28 ft.
• Restart the Pen. Close then reopen the cap, you will see the LED light flashes blue, then
connect again.
• Use the pen to tap on the paper, then the pen will be activated so it can connect with the
App.
• Reconnecting Your SyncPen To Your Device
Note:
If you use your SyncPen with an additional Android or iOS device, repeat the pairing
process the first time you use each new device.
4

View
• Tap
• Tap image or list to change image view or list view.
Notebook Settings
Method 2: Use the SyncPen 3 to write on our paper directly, a page will be created
automatically, click on the top left, and you will be back to the Notebook interface and
see the notebook just created.
Edit Notebook
The bottom right corner has a number that indicates
the pages of the notebook you're using. Currently,
we have 64, 128, and 160 pages.
When you long-press the Notebook , you can see the below settings.
• Rename - You can rename the notebook here.
• Delete - Delete the whole notebook.
• Save into PDF - It will save the whole notebook into a PDF file.
• Lock the notes - The pages can not be edited after the notebook is locked. And you can
see a lock icon on the bottom right of the notebook. It's a way to protect your data
won't be accidentally edited.
• If you need to unlock the notebook and edit it again, long-press the notebook icon
again, and you will see the option of Unlock the notes.
Note
64
Note:
By default, the newly created notes will be saved on the first notebook on the interface.
If you need to keep the note in another notebook, you need to open that notebook
first, then use the SyncPen to write on NEWYES paper. Or you can lock other notebooks
and leave only one notebook, and then all the new notes will be saved on the unlocked
notebook.
• Tap Name, you can change the SyncPen's name here.
• Writing formats is a place to set your default pen writing thickness, colors, paper
background, etc.
Default writing format
My tag
My tag You can add or edit a tag here, such as rename or delete.
Help
It's some quick instructions.
Working with Notebooks
Method 1: Tap Create Notebook, give the notebook a name, then tap Finish on the top
right corner.
Create Notebook
5
• You can find the MAC number list here, choose yours and click bind.
• You can also unbind the SyncPen and connect it to another account.
You can set the handwriting transcribed language here. For more handwritten language
recognition settings, you can check page 8 Recognize.
My sync pen
Transcribe language
If you want to bind your SyncPen with one account, then other users won't be able to
connect your SyncPen accidentally. It's a good way to protect your data safety.
It will show all your used SyncPens, and you can bind or unbind SyncPen here.
Note:
One SyncPen can only be bonded to one account. If you want to change the associated
account, please unbind it firstly the repair.
Working With Pages
You can preview the created content on the thumbnail images. You can change the views
and sorts as follows.
View
• Tap
• Tap image or list to change image view or list view.
Manage Multiple Pages
Long-press any page, you can see the options of managing multiple pages, you can select
several pages and add tags for them or delete them.
Tap , you can find two options,
1. Tap page sharing, you can share the page on Facebook or Twitter.
2. Tap bind to share, you can bind the pages to PDF or JPG, then share.
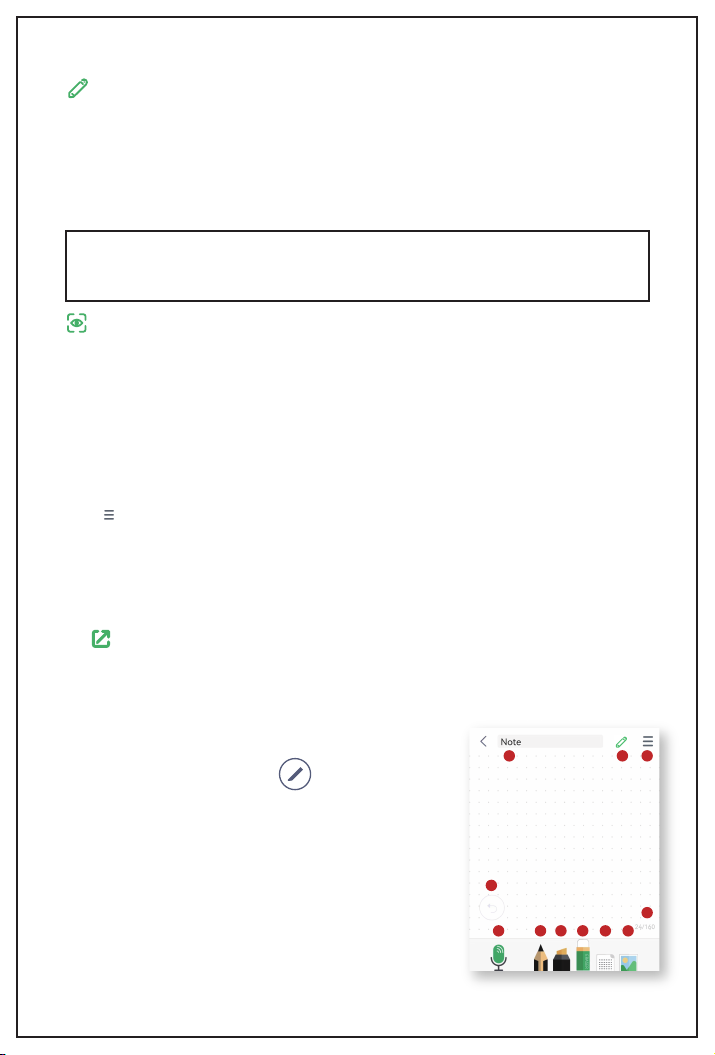
Know More About The Page
On the specific page, when click , you will see more
writing settings.
6
1 2 3 4 5 6
8
7
11109

It's the page number and the total page quantity. 14/64 means
that now is the 14th page, and this notebook has 64 pages.
Page Number
24/160
Each time, after clicking the Undo button, it can only reverse
one step, then it will turn grey .
Undo
After tapping the Notebook Title, you will be redirected to a
new page. It's a place to do tags. Tap Enter tags, you can add
a new tag, after typing a tag, it's in blue , if you need to
apply this tag to this note, you will need to tap the tag, then it
will change to green , the hit save on the bottom right.
Now, this note has been tagged.
Notebook Title
Tap this record icon, the phone will record your voice and save
it to the current note. Tap this to stop recording. After the
voice is saved, you will see there's a change of the icon ,
there's "1" on it, which means this note has 1 recording. You
can record multiple times and multiple voices to one note, the
number will show the voice quantity that has been saved.
Record
Tap this icon, you can change the pen colors and thickness.
There're 4 kinds of thickness to choose.
For the colors, there're 6 standard shortcut colors. If you want
other colors, you can tap , shift your finger and choose one
color, and it will show a preview of the color you chose on the
left. If it's not the color you want, slide your finger again. Once
you decide on the color. Tap to apply this color.
Pen
Tap it, you will be able to use the SyncPen as the marker, you
can also use your finger to write directly on the screen. Tap it
again, you will see the color options like the pen section,
choose the color as mentioned above.
Marker
Tap it, and you will be able to use your finger as the eraser.
Slide your finger on the screen, it will erase the content you
slide over. Tap the eraser icon again, you will be able to choose
the eraser size or empty the whole page directly.
Eraser
Tap it, you will see 3 options for the background, dot, line, and
blank. Choose one, then click Finish, the page background
will change accordingly.
Background
Tap this icon, you will be able to insert an image to the note,
choose an image from the album or take a new photo. After
selecting a picture, you can edit it. For example, you can use
two fingers to zoom in or out; change the place; tap to rotate
the image.
Image
Note:
You can only insert 1 image to one page. If you insert a
second image, the new one will replace the old one.
1
Note
7
1
2
3
4
5
6
8
7
9

Hit this icon. You can see the pen's information.
Pen info panel
Note:
1. We use Myscript to recognize handwritten languages. If
you can not use this feature, it might be because we have
run out the limits. Please get in touch with us when you
encounter such a problem.
2. To ensure the recognition accuracy, please write neatly as
possible.
Here, you can see more page settings.
It's a place to transcribe your handwriting to digital text.
The default language is set as English (USA). If you need to
change to another language, you need to tap English (USA) on
the top right and then click More languages, then you will see
the language list.
There're 66 supported recognition languages.
Find your language, then click to download the language,
after downloading, turn it on by tapping to be .
You can also delete the language you don't need by tapping
Delete on the top right corner.
Please note that if you download several languages, the primary
recognized language will be the one you used the last time. If it's
not the language you wrote, please choose it manually on the
menu.
Copy Copy the text and paste it to other places.
Share You can save your notes to TXT or DOC file and share it
to other platforms. Or click More to send the text to other places.
Capture area to transcribe Tap it, and you can capture a
specific area instead of transcribing the whole page.
Settings
Recording
It will display your writing process as a video, click the on the
bottom right, it will change the play speed. It has 2 times and 4
times speed.
Share You can share this video to the listed social media
channel or click More to share it to other apps on your phone.
You can hit to save the whole playback process as a video to
your album or hit to save it as a 10 seconds video.
Recognize
Playback
8
11
10
Tabla de contenidos


