Newport Azure Manual de usuario

Newport Controls, LLC
2201 Alton Parkway
Irvine, CA 92606
©2009 Newport Controls, LLC. All Rights Reserved. Rev: 10-14-09

Table Of Contents
Quick Start Guide . . . . . . . . . . . . . . . . . . . . . . . . . . . . . . . . . . . . . . . . . . . .Page 2
Shortcut Mode System Control . . . . . . . . . . . . . . . . . . . . . . . . . . . Page 2
Navigation Mode System Control . . . . . . . . . . . . . . . . . . . . . . . . . .Page 3
Setting Up Your Spa Control System . . . . . . . . . . . . . . . . . . . . . . . . . . . . Page 4
Invert The Screen . . . . . . . . . . . . . . . . . . . . . . . . . . . . . . . . . . . . . . Page 4
Set The Heating Mode . . . . . . . . . . . . . . . . . . . . . . . . . . . . . . . . . . .Page 5
Set The Filter Cycles . . . . . . . . . . . . . . . . . . . . . . . . . . . . . . . . . . . . Page 6
Set The Screensaver . . . . . . . . . . . . . . . . . . . . . . . . . . . . . . . . . . . . Page 8
Set Fahrenheit Or Celsius . . . . . . . . . . . . . . . . . . . . . . . . . . . . . . . Page 9
Set Reminder Messages . . . . . . . . . . . . . . . . . . . . . . . . . . . . . . . . . Page 9
Set Day/Night Mode . . . . . . . . . . . . . . . . . . . . . . . . . . . . . . . . . . . . .Page 10
Set The Language . . . . . . . . . . . . . . . . . . . . . . . . . . . . . . . . . . . . . . Page 11
Lock The Control Panel . . . . . . . . . . . . . . . . . . . . . . . . . . . . . . . . . Page 12
Lock The Water Temperature . . . . . . . . . . . . . . . . . . . . . . . . . . . . . Page 12
Set Over Temperature . . . . . . . . . . . . . . . . . . . . . . . . . . . . . . . . . . . Page 13
Set Time And Date . . . . . . . . . . . . . . . . . . . . . . . . . . . . . . . . . . . . . .Page 14
Set Water Temperature . . . . . . . . . . . . . . . . . . . . . . . . . . . . . . . . . . Page 16
Help With Messages And Maintenance . . . . . . . . . . . . . . . . . . . . . Page 18
Set Your Moods (Azure i600 Panel Only) . . . . . . . . . . . . . . . . . . . Page 20
Set Your Timers (Azure i600 Panel Only) . . . . . . . . . . . . . . . . . . . Page 22
Your Entertainment, Games and Photos . . . . . . . . . . . . . . . . . . . . . . . . . Page 27
Play Your Music (Azure i400 & i600 Panels Only) . . . . . . . . . . . . Page 27
Watch Your TV (Azure i400 & i600 Panels Only) . . . . . . . . . . . . . Page 28
Play Your Games (Azure i600 Panel Only) . . . . . . . . . . . . . . . . . . Page 31
View Your Photos (Azure i600 Panel Only) . . . . . . . . . . . . . . . . . Page 32
Page 1

Welcome To A New Dimension In Spa Control Systems.
You can use your Smart Control two ways: (1) Single
Button Touch in the Shortcut Mode to turn a function On or Off, like a Pump, a Blower,
or a Light, without any navigation or additional steps. (2) Navigation Mode where you
utilize the full opportunities on the Full Color Screen. In the Navigation Mode, you can
immediately return to the Shortcut Mode by Touching the Back Button, or
automatically return to Shortcut Mode if you don’t touch a button for 15 seconds.
This Section of the Control Panel User’s Manual is intended to be a Quick Start
Guide to get you started in Navigating the Newport Controls Control Panel Menu Sys-
tem. Although this Guide illustrates the Azure i400 Control Panel, the principles are the
same for the Azure i600 and Azure i200 Control Panels.
Shortcut Mode System Control
The Key to
the Button
Functions is
on screen.
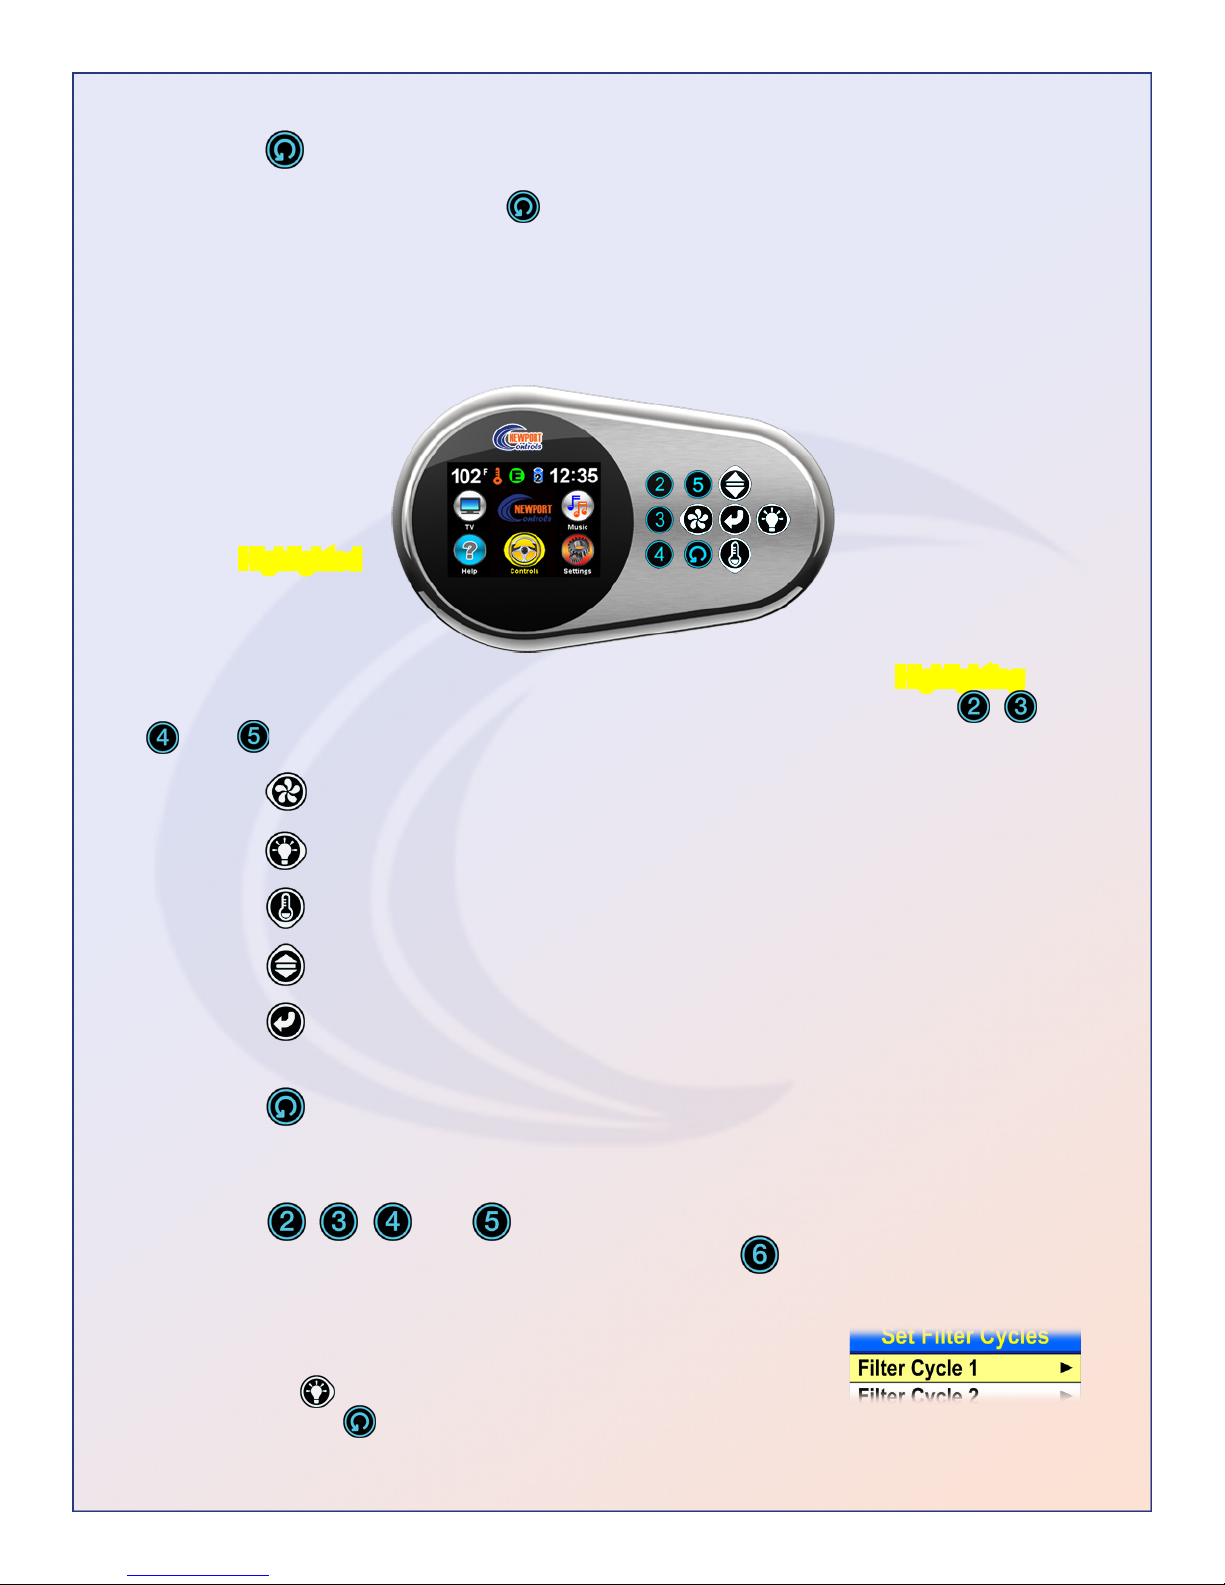
When the Shortcut Button Icons with the Button Functions are displayed on screen, the
System is in Shortcut Mode, and All of the buttons Except the Select Button and
the Back Button can be used to Directly Control the System equipment and other
functions. A Yellow Icon on the Screen indicates that the Function is turned On.
The Button is the Jets or Jets 1 Control Button.
The Button is the Spa Light Control Button.
The Button is the Water Temperature Control Button.
The Button is the Invert Screen and Navigation Button.
The , , , and Buttons are the Option 2, 3, 4, and 5 Control Buttons
asdenedontheScreen,whichmaybetheAir Blower, Jets 2, Jets 3, another
Light or other option. The Azure i600 Control Panel also has an Option
Button Button for additional Control Options.
The Button is the Select Button, and it is only used to Change from the
Shortcut Mode to the Navigation Mode.
Page 2

When Navigating the Menus, if the Yellow Highlighted Menu
Bar you are on has an Arrow at the Right End of the Menu Bar,
use the Right Button to Navigate to the Next Menu,
and use the Back Button to Return to the Previous Menu.
The Button is the Back Button, and it is not used in the Shortcut Mode.
In the Navigation Mode, the Back Button can be used to immediately return to the
Shortcut Mode. If you’re not at the Home Screen, use the Back Button to navigate back
to it, and then Touch Back again to return to the Shortcut Mode.
Navigation Mode System Control
The Controls
Icon on the
Home Screen
is Highlighted.
When the Navigation Icons and the Company Logo are on screen with Highlighting, the
System is in the Navigation Mode, and All of the Buttons Except the Option , ,
, and Buttons can be used to Navigate and Select from the Menu System.
The Button is the Move Left Navigation Button.
The Button is the Move Right Navigation Button.
The Button is the Scroll Down or Move Down Navigation Button.
The Button is the Scroll Up or Move Up Navigation Button.
The Button is the Select Button, and it is used to Select a Menu Item, or turn
a Menu Item On or Off.
The Button is the Back Button, and it is used to go back one level in the
Menu System. From the Navigation Home Screen, the Back Button is also used
to immediately Change to Shortcut Mode.
The , , , and Buttons are not used for anything in the Navigation
Mode. The Azure i600 Control Panel also has a Button which is never used
in the Navigation Mode.
Page 3

Invert the Screen - To Invert the Screen in Navigation Mode, Touch Select
when the Invert Screen Menu Bar is Highlighted. When the Screen is Inverted, the
Navigation Buttons are also Inverted, so that the Up and Down Buttons are switched
with each other and the Left and Right Buttons are switched with each other. The
Back Button does not change position. The Screen and Navigation Buttons are
Uninverted the same way as they are Inverted.
Use the Up Button to Scroll Up to the next Menu Bar Above, or use the Down
Button to Scroll Down to the next Menu Bar Below.
If the Blue Area at the Bottom of the Menu says More and
has Arrows pointing Down and/or Up, as indicated, use the
Down Button to Scroll from the Bottom Menu Bar to the
Next Menu, or the Up Button to Scroll from the Top Menu Bar to the Previous Menu.
Setting Up Your Spa Control System
This Section of the Control Panel User’s Manual provides more Detailed Instructions
forproperlySettingUpandConguringyourSpaControlSystem.AlthoughthisGuide
illustrates the Azure i400 Control Panel, the principles are the same for the Azure i600
and Azure i200 Control Panels.
All of the initial Spa Control System Options and Settings, like Time and Date, Filter
Cycles, Heating Mode, and Language, are located in the Settings Menu.
The Settings
Icon on the
Home Screen
is Highlighted.
From the Highlighted Controls Icon, Move Right to Highlight the Settings Icon.
Then Touch Select to enter the Settings Menu.
The Invert
Screen
Menu Bar
is Highlighted.
Page 4

To change to this Heating Mode, Touch Select , or to Exit back, Touch Back .
Invert (Continued)
The Screen
and Buttons
are Inverted.
From the Heating Mode Menu Bar, Move Right to the Heating Mode Menu.
The Economy
Menu Bar
is Highlighted.
Set the Heating Mode - The Heating Mode determines when the Heater will heat
and how the Water Temperature will be maintained. The Details are on the Set Menu.
The
Heating Mode
Menu Bar
is Highlighted.
The Default Heating Mode is the Standard Mode. To change Heating Modes, from the
Heating Mode Menu Bar, Move Right to the Heating Mode Set Menu.
The Economy
Heating Mode
is turned On.
Page 5

To turn On (Enable) or turn Off (Disable) a Filter Cycle, with Filter Cycle 1 Highlighted,
Touch Select . If the Filter Cycle is Set to Off, the System ignores the Days and
Times Set, and the Filter Cycle is Disabled.
Set the Filter Cycles - The Filter Cycles determine when the Filter Pump will turn
On to Filter the Water. The Default is two 2 hour Filter Cycles every day of the week, 12
hours apart. You can Set up to four Filter Cycles on any days of the week, and with any
Start Time and End Time you want.
The Filter Cycle Days and Time also determine when the Heating will take place in the
Economy and Vacation Heating Modes. In these Modes, the Heater will only operate
during the Filter Cycle Filtration times, and will not operate between Filter Cycles.
The
Filter Cycles
Menu Bar
is Highlighted.
By Default, Filter Cycle 1 is On and Preset. To Change the Days and Time for Filter
Cycle 1 or to Set or Modify other Filter Cycles, scroll to Highlight the Filter Cycle, then
Move Right to the Filter Cycles Set Menu.
The
Filter Cycle 1
Menu Bar
is Highlighted.
From the Filter Cycles Menu Bar, Move Right to the Set Filter Cycles Menu.
The
Filter Cycle 1
Menu Bar
is Highlighted.
Page 6

To change the Filter Timer Start Time, Move Left or Right to Hours or Minutes,
and then Touch Up or Down to change the Time. Touch Back to Exit back to
the previous Menu.
To Set the Days for the Filter Timer to Operate, from the Timer Days Menu Bar, Move
Right to the Timer Days Menu.
The S For
Sunday is
Highlighted.
To Set the Filter Timer Start Time, from the Start Time Menu Bar, Move Right to the
Start Time Menu.
The Hour
is Highlighted.
Filter Cycles (Continued)
The
Timer Days
Menu Bar
is Highlighted.
By Default, all days of the week are turned On. To turn a day Off or On, Move Left
or Right to that day and Touch Select . Touch Back to Exit back to the
previous Menu.
The
Start Time
Menu Bar
is Highlighted.
Page 7

To turn the Screensaver On or Off, or to Change to a different Screensaver, from the
Screensaver Menu Bar, Move Right to the Screensaver Menu.
To change the Filter Timer End Time, Move Left or Right to Hours or Minutes,
and then Touch Up or Down to change the Time. To Exit back, Touch Back .
Set The Screensaver - The Screensaver can be Set to display Company
Information, Company Logo, or the Time and Temperature. If any of the three
Screensavers are turned On, after a period of time, the Screensaver that is turned On
will replace the Home Screen until a Button is Touched or until the Display turns Off.
The
Screensaver
Menu Bar
is Highlighted.
To Set the Filter Timer End Time, from the End Menu Bar, Move Right to the End
Time Menu.
The Hour
is Highlighted.
Filter Cycles (Continued)
The
End Time
Menu Bar
is Highlighted.
Page 8

From the Reminders Menu Bar, Move Right to the Set Reminders Menu.
Scroll to the Screensaver that you want to turn On or Off, then Touch Select . If a
Screensaver is already turned On, and you turn on a different Screensaver, the previous
one will go Off. If any one of the three is turned On, the Screensaver is activated.
Set Fahrenheit or Celsius - Your Water Temperature can be Set to display in
either Degrees Fahrenheit or Degrees Celsius. The Default is Degrees Fahrenheit.
The ºF/ºC
Menu Bar
is Highlighted.
Page 9
Screensaver (Continued)
The
Company Info
Menu Bar
is Highlighted.
To toggle back and forth between ºF and ºC Temperature display, from the ºF/ºC Menu
Bar, Touch Select . Fahrenheit will be displayed in one degree increments, and
Celsius will be displayed in one half degree increments.
Set Reminder Messages - The Reminder Messages Pop-Up periodically to Re-
mind you to perform the Normal Maintenance required for your Spa. They are all set to
Pop-Up at various intervals from 7 Days to 1 Year, but you can change any of them.
The Reminders
Menu Bar
is Highlighted.
Otros manuales para Azure
1
Tabla de contenidos
Otros manuales de Panel de control de Newport


