NEILPRYDE FLY 1.4 Manual de usuario

User Manual

WARNING
3
DO NOT USE THIS PRODUCT UNLESS YOU HAVE READ AND
UNDERSTAND THESE WARNINGS AND INSTRUCTIONS WHICH
ARE FORYOUR SAFETY AND PROTECTION.THIS INFORMATION
MAY BE SUBJECT TO CHANGE AT ANY TIME.
PLEASE VISIT OUR WEBSITE AT: WWW.NEILPRYDE.COM FOR
CURRENT UPDATES.
IF YOU ARE BELOW THE AGE OF 18, YOU SHOULD HAVE
YOUR PARENT OR GUARDIAN READ THESE WARNINGS AND
INSTRUCTIONS AND SHOULD NOT USETHIS PRODUCT UNLESS
YOU ARE UNDER THE PROPER GUIDANCE AND SUPERVISION
OF SUCH A PERSON.
The use of this product exposes the user to many unavoidable
and unexpected risks, dangers and hazards. The suppliers of this
product are not responsible for any damage to property or any
personal injury caused by any active negligence of the suppliers
or by any use, misuse, abuse or irresponsible use of this product
by the user.
4
Make sure to attach the
twist pump adapter (in
blue) to correctly inflate
the wing
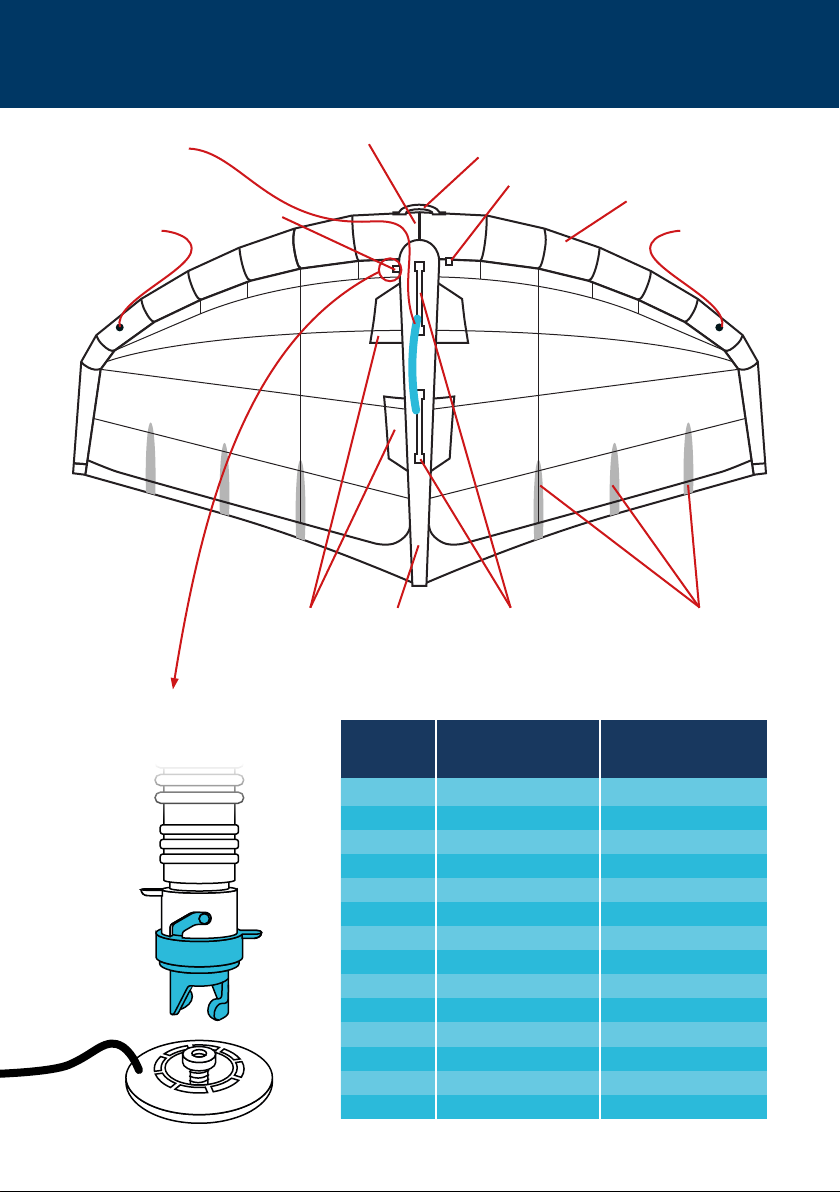
Overview
Recommended Inflation pressure
LE inflation Strut inflation
Model pressure (PSI) pressure (PSI)
FLY 1.4
10.0 10.0
FLY 1.8
10.0 10.0
FLY 2.1
9.5 9.5
FLY 2.5
9.5 9.5
FLY 2.9
9.0 9.0
FLY 3.3
9.0 9.0
FLY 3.6
9.0 9.0
FLY 4.0
8.5 8.5
FLY 4.3
8.5 8.5
FLY 4.7
8.5 8.5
FLY 5.0
8.0 8.5
FLY 5.4
8.0 8.5
FLY 5.7
7. 5 8.0
FLY 6.0
7. 5 8.0
Windows Strut Mini
Battens
Control
Handles
LE Valve
Leading Edge Handle
Leading Edge
Leash
Attachement
Strut valve
Harness Line
Attachement
(optional)
Bladder
Anti-Twist
System
Bladder
Anti-Twist
System
5
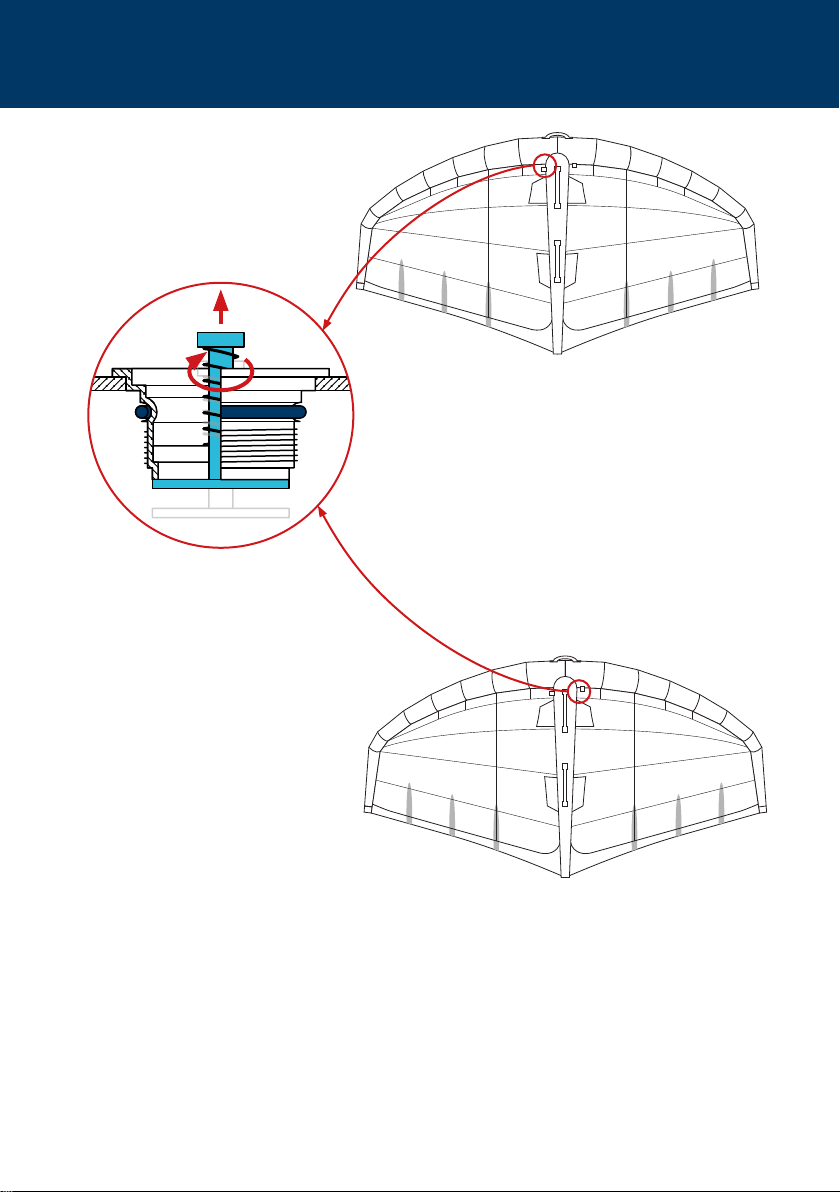
Instructions to inflate your wing
1- Make sure that the valve is correctly
positioned, by twisting it and pulling it
up. Connect the pump to the valve to
open it
3- Make sure that the valve is correctly positioned, by twisting it and
pulling it up. Connect the pump to the valve to open it
Strut valve
Leading
edge valve
2- Pump the strut accordingly the
pressure values specified for each model
(see page 4)
Always pump the Strut
first, before than the
Leading Edge valve.
4- Pump the leading edge accordingly the pressure values specified for
each model (see page 4)
Any use of an air compressor may result in poor performance or damage to the wing, and
automatically avoids all warranties. If you leave your wing exposed to the hot sun, check the
pressure and deflate it slightly. Otherwise the wing may become over inflated and stretch the
material. The ambient temperature affects the tube’s internal pressure: a variation of 1° C/ 1.8° F
causes a variation of the pressure in the tube of +/- 0.06psi (4 mBar).

6
RECOMMENDED WING FOIL PRACTICE
• Wing foiling is a HAZARDOUS activity and the use of this equipment involves
the risk of serious personal injury to any part of the user’s body or death.
• Injuries are an INHERENT RISK of wing foiling and the participation in this
sport implies the user’s express assumption of those risks.
• Do NOT use the wing out of the wind ranges that they were specified for.
Always check the weather forecast to ensure that the wind range is apropriate.
• Do NOT exceed the recommended pressure indicated for each part of the
wing and do NOT leave the wing in the sun when not in use.
• Injuries are an INHERENT RISK of foiling and the participation in foiling implies
the user’s acceptance of those risks.
• Wear a helmet when appropriate.
• Children should always be under adult supervision.
• It is strongly recommended that beginners take lessons from a licensed or
certified instructor.
• Always inspect your equipment for signs of wear and tear each time before
riding.
• IF any products are found to show signs of wear and tear these should be
repaired or replaced immediately and before further use. If in doubt about
any signs of wear and tear, please contact your local NeilPryde ONE-DESIGN
vendor. Contact details are available from www.neilpryde.com.
• Make sure that your wing is connected with a leash to your body (wrist or
waist) when in use.
• NEVER place yourself in a situation where breakage of any one of the various
components would pose a risk to yourself or others, or make it impossible to
return to the shore safely and unassisted.
• Take time to study the conditions including sea state, tides, currents and
weather forecasts before you decide to go sailing. Beware of sailing in offshore
winds.
• Familiarize yourself with any new location before venturing onto the water.
Ask the locals to tell you about any hazards.
• Watch out for other beach users, especially swimmers, divers and small
children. Make sure you keep your board and wing under control at all times and
that they don’t get blown about on the beach or in the water.
•
Always use appropriate safety and floatation devices. Wear the correct
protective clothing for the conditions such as a wetsuit or a UV top. Cold water
and cold weather can result in hypothermia. Always carry identification.
• Make sure someone knows where you’ve gone & when you are expected
back – never sail alone.
• Be aware of the conditions as they change. Always return to the beach if
there is a significant change in the conditions, i.e. wind dropping or wind and
waves increasing.
Tips for a safe use
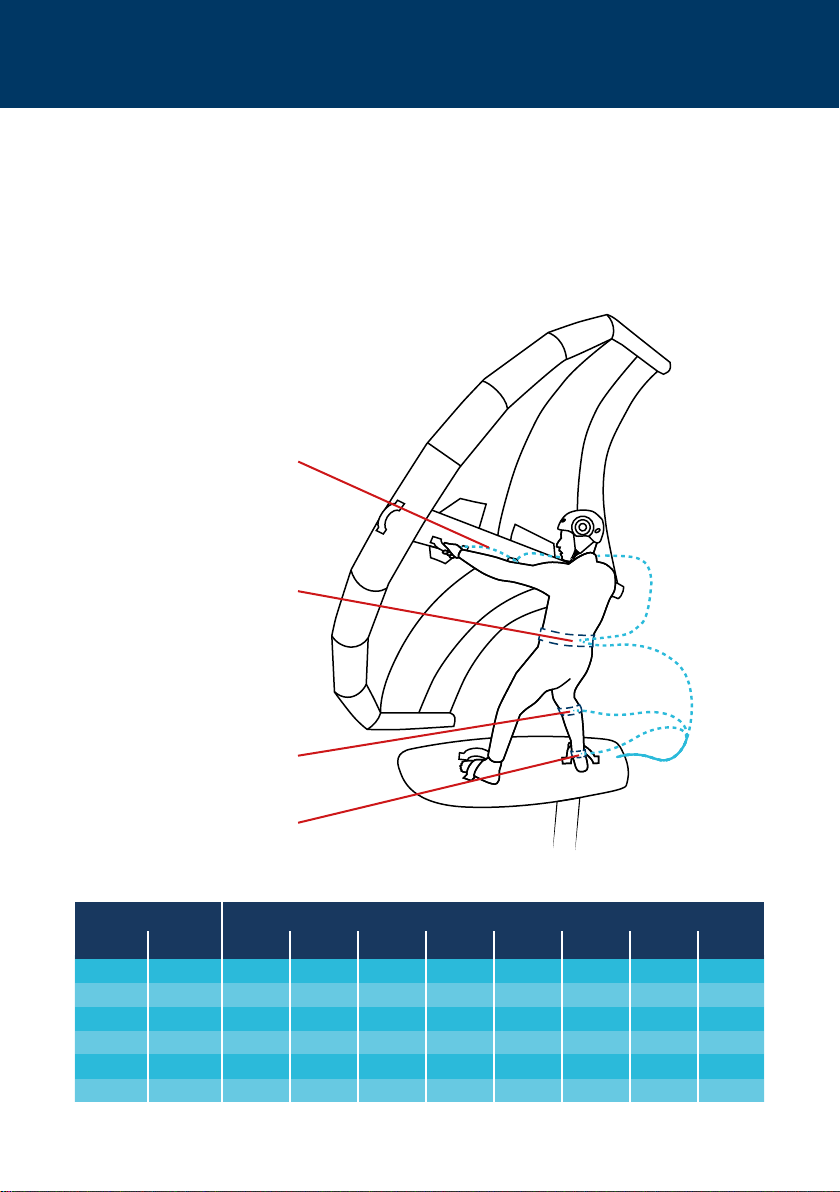
7
Min Max < 40
40-50 50-60 60-70 70-78 78-85 85-95
> 95
30 40+ 1.4 1.4 1.4 1.8 1.8 2.2 2.5 2.9
25 35 1.4 1.8 1.8 1.8 2.2 2.5 2.9 3.6
20 30 1.8 1.8 2.2 2.5 2.9 3.3 3.6 4.3
16 25 2.2 2.5 3.9 3.3 3.6 4.0 4.3 5.0
12 20 2.9 3.3 3.6 4.0 4.3 4.7 5.0 6.0
8 15 3.6 4.0 4.3
4.7/5.0
5.0/5.4
5.4/5.7
6.0 6.0*
Wind (kn) Rider’s Weight (kg)
Wing-size-weight recommendation
Leash positioning options
*Min 10-12 knots
Waist Leash
(Board or Wing)
Wrist Leash
(Wing)
Knee Leash
(Board)
Ankle Leash
(Board)
•
As you learn the sport, work within your own limitations and do not exceed them.
• Make sure to stay hydrated. This is a physically demanding sport and
dehydration can also occur in cold temperatures.
• Do not alter, modify or change this product.
•
This product is designed and manufactured exclusively for wing foiling on water.
• Do not operate the wing under the influence of drugs or alcohol.
• Keep these instructions for future reference.

8
How to attach the leash
INSTRUCTIONS
The leash has one side with a short loop plus the
swivel (on the left), and the other side with a bigger
loop (on the left). The short loop needs to be attached
either to the wrist cuff or the waist belt, depending
how you like to use your leash.
1- Push the shorter loop through the
attachment point of the wrist cuff or
waiste belt
2- Push the bigger loop through the
short loop until the leash is tight
3- Make sure to pull it as tight as
possible, making a node
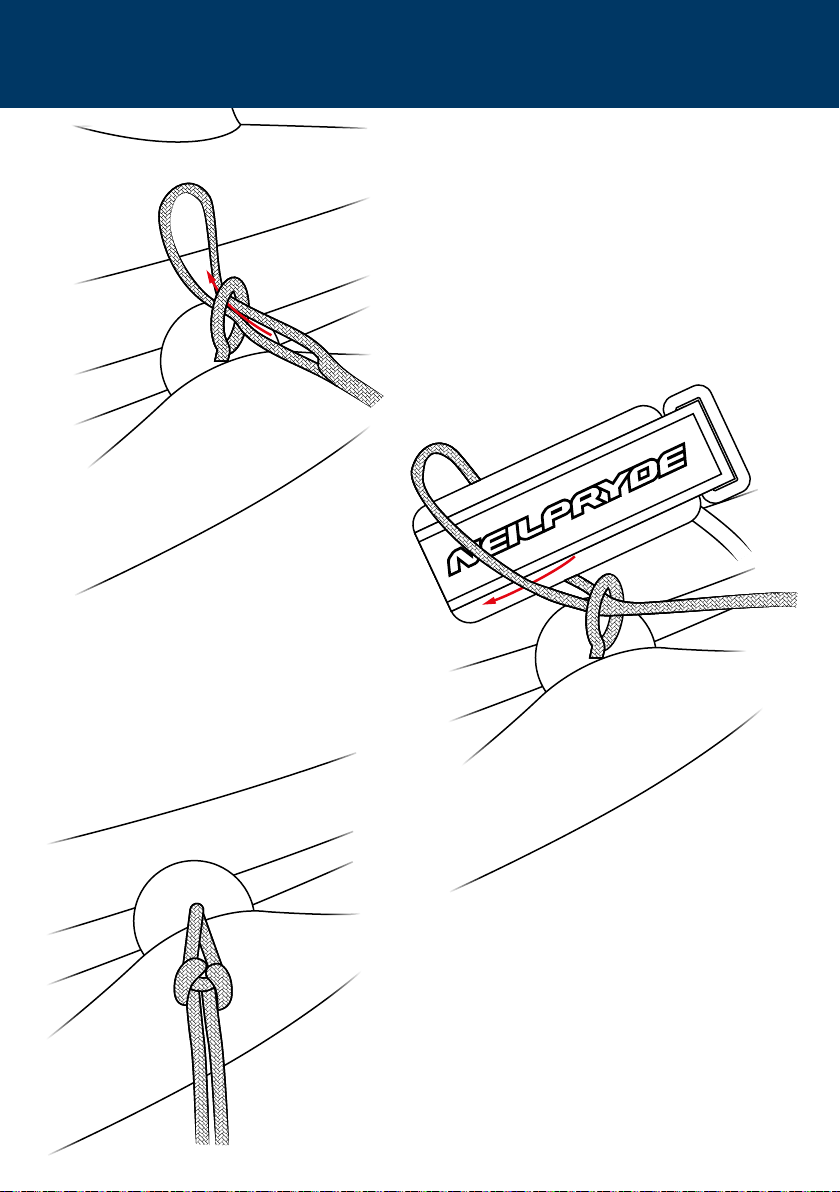
9
4- On the other side, push the bigger
loop through the attachment point of
the wing
5- Push the wrist band or waist
belt through the loop
6- Make sure to pull it as tight as
possible, making a node

10
Instructions to deflate your wing
2- Find the LE valve, push its pin
down and twist it.The air will start
flow to the outside
3- Find the strut valve, push its
pin down and twist it, the same
way it was done for the LE valve
1- After using the wing, whenever possible, rinse it with fresh water
11
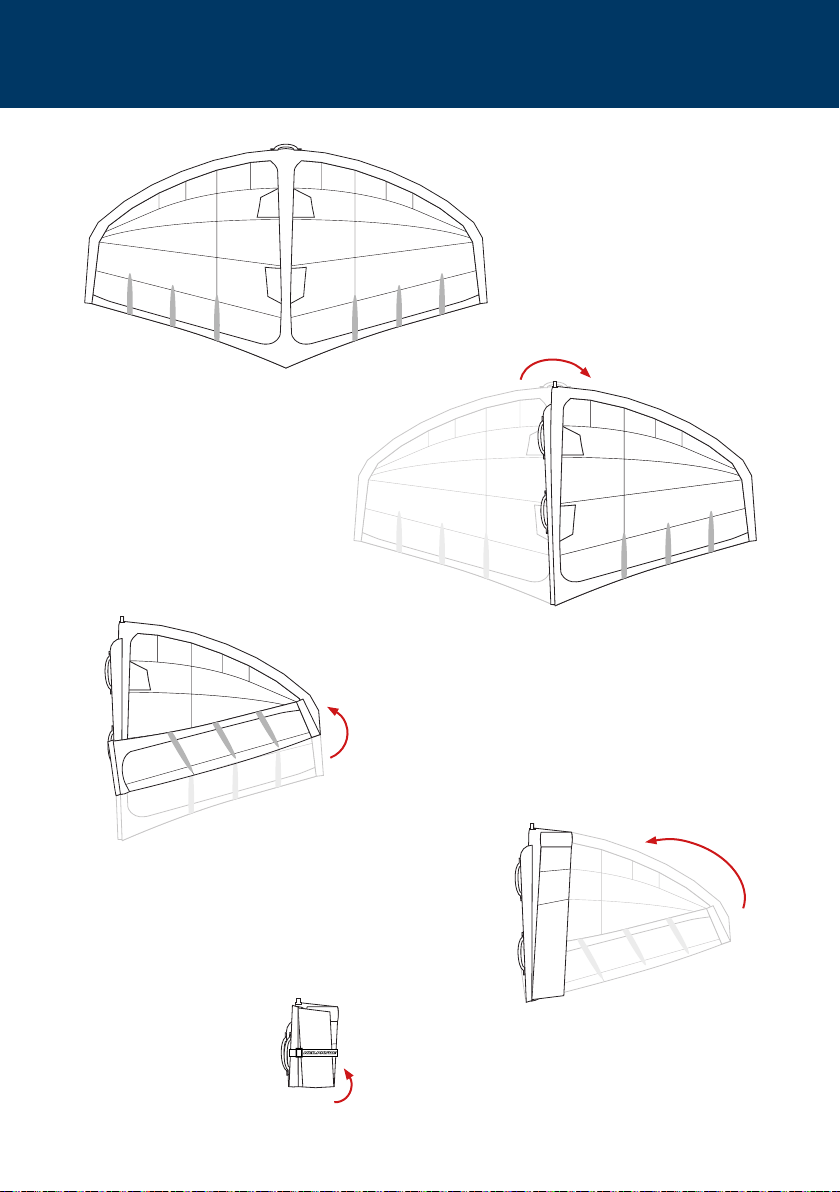
1- Flip the wing over, so
the handles are down
3- Fold both trailing edges forward
- position the crease line just after the
mini battens end
5- Fold it in half between the handles to
make it compact. Use the waist leash belt
or wrist leash to secure it
4- Roll from wingtips to center strut
2- Fold the wing in half at the strut, so
the handles are sticking out
Instructions to fold your wing
Este manual sirve para los siguientes modelos
13
Tabla de contenidos
Otros manuales de Equipo de windsurf de NEILPRYDE


