nanov NGLT104WP Manual de usuario

USER’S Manual
NGLT104WP
NGLT150WP
LCD TV / Monitor
(IP67 Grade)
This Manual is revisable without further notice

Contents
Contents ------------------------------------------------------------------- 1
Safety Precautions ---------------------------------------------------------- 2
Operating Safety ------------------------------------------------------------ 3
Packing ----------------------------------------------------------------------- 4
Wall mounting --------------------------------------------------------------- 5
Wiring ------------------------------------------------------------------------ 6
Remote Controller ---------------------------------------------------------- 7
Basic Operations ------------------------------------------------------- 8
1. POWER ON / OFF --------------------------------------------------- 8
2. MENU ACCESS ----------------------------------------------------- 8
3. VIDEO SOURCE SELECTION --------------------------------------- 9
4. AUDIO VOLUME CONTROL ---------------------------------------- 9
Menu Operations ------------------------------------------------------ 10
1. MENU --------------------------------------------------------------- 10
2. AV PICTURE MENU ------------------------------------------------- 11
3. AV SCREEN MENU -------------------------------------------------- 11
4. PC PICTURE MENU ------------------------------------------------- 12
5. PC SCREEN MENU -------------------------------------------------- 12
6. SOUND MENU ------------------------------------------------------ 13
7. OSD MENU ---------------------------------------------------------- 13
8. MISCELLANEOUS MENU ------------------------------------------- 14
System Specification ------------------------------------------------------- 15
1

RISK OF ELECTRIC SHOCK
DO NOT OPEN
CAUTION
TO PREVENT FIRE OR ELECTRIC SHOCK, DO NOT REMOVE
COVER OR BACK COVER.
Safety Precautions
CAUTION : TO REDUCE THE RISK OF ELECTRIC SHOCK,
DO NOT REMOVE COVER (OR BACK).
NO USER-SERVICEABLE PARTS INSIDE.
REFER SERVICING TO QUALIFIED SERVICE
PERSONAL
This symbol is intended to alert the user to the presence of
important operating and maintenance (servicing)
instructions in the literature accompanying the appliance.
The symbol is intended alert the user to the presence of un-
insulated “dangerous voltage” within the product’s
enclosure that may be of sufficient magnitude to constitute
a risk of electric shock to persons.
2

Operating Safety
zUse only factory supplied power adapter and connector Assemblies to operate
the TV monitor.
zWhen a user install the TV Monitor himself, read the “INSTALL GUIDE” before
installation.
zDo not install power outlet in a hot or humid place, or where there is excessive
dust or vibration.
zDo not install the TV Monitor in a hot place or where is excessive vibration.
zIf a chemical liquid like acid or a volatile solvent fall on the front bezel or
back cover, have it checked by a qualified technician before operating again.
zDo not open the back cover if a user opens the back cover, the TV Monitor is
to be leak.
zDo not clean a front bezel with a strong volatile solvent.
zDo not spray on a front bezel of TV Monitor with water or any liquid over 80℃.
zDo not use under condition of 5 feet (about 1.5 m) below a depth.
zDo not thrust a steel chop stick or a sharp solid object into the speaker grill
on a front bezel.
zDo not spray on the TV Monitor with any liquid before installation completely.
zDo not try to repair the unit by yourself. Opening cover will lead to serious
electric-shock or other danger.
Operating Safety
3

1pc
1pc
1pc
1pc
1pc
Monitor
Remote Controller
Power Adapter
User’s manual
zMonitor
zRemote controller
zPower adapter
zUser’s manual
zPower cord
Power Cord
Packing
4

Installing VESA compliant mounting devices
Wall mounting
1. Align the mounting interface pad (75mm ×75mm hole spacing) with the holes
in the holes in the monitors rear cover mounting pad.
2. Secure bracket with the four screws ( 4mm : M4) that came with the VESA mounting
device.
Note : The length of screws should be within A+5mm.
75mm
75mm
4mm (M4)
5mm
A
bracket rear cover
5
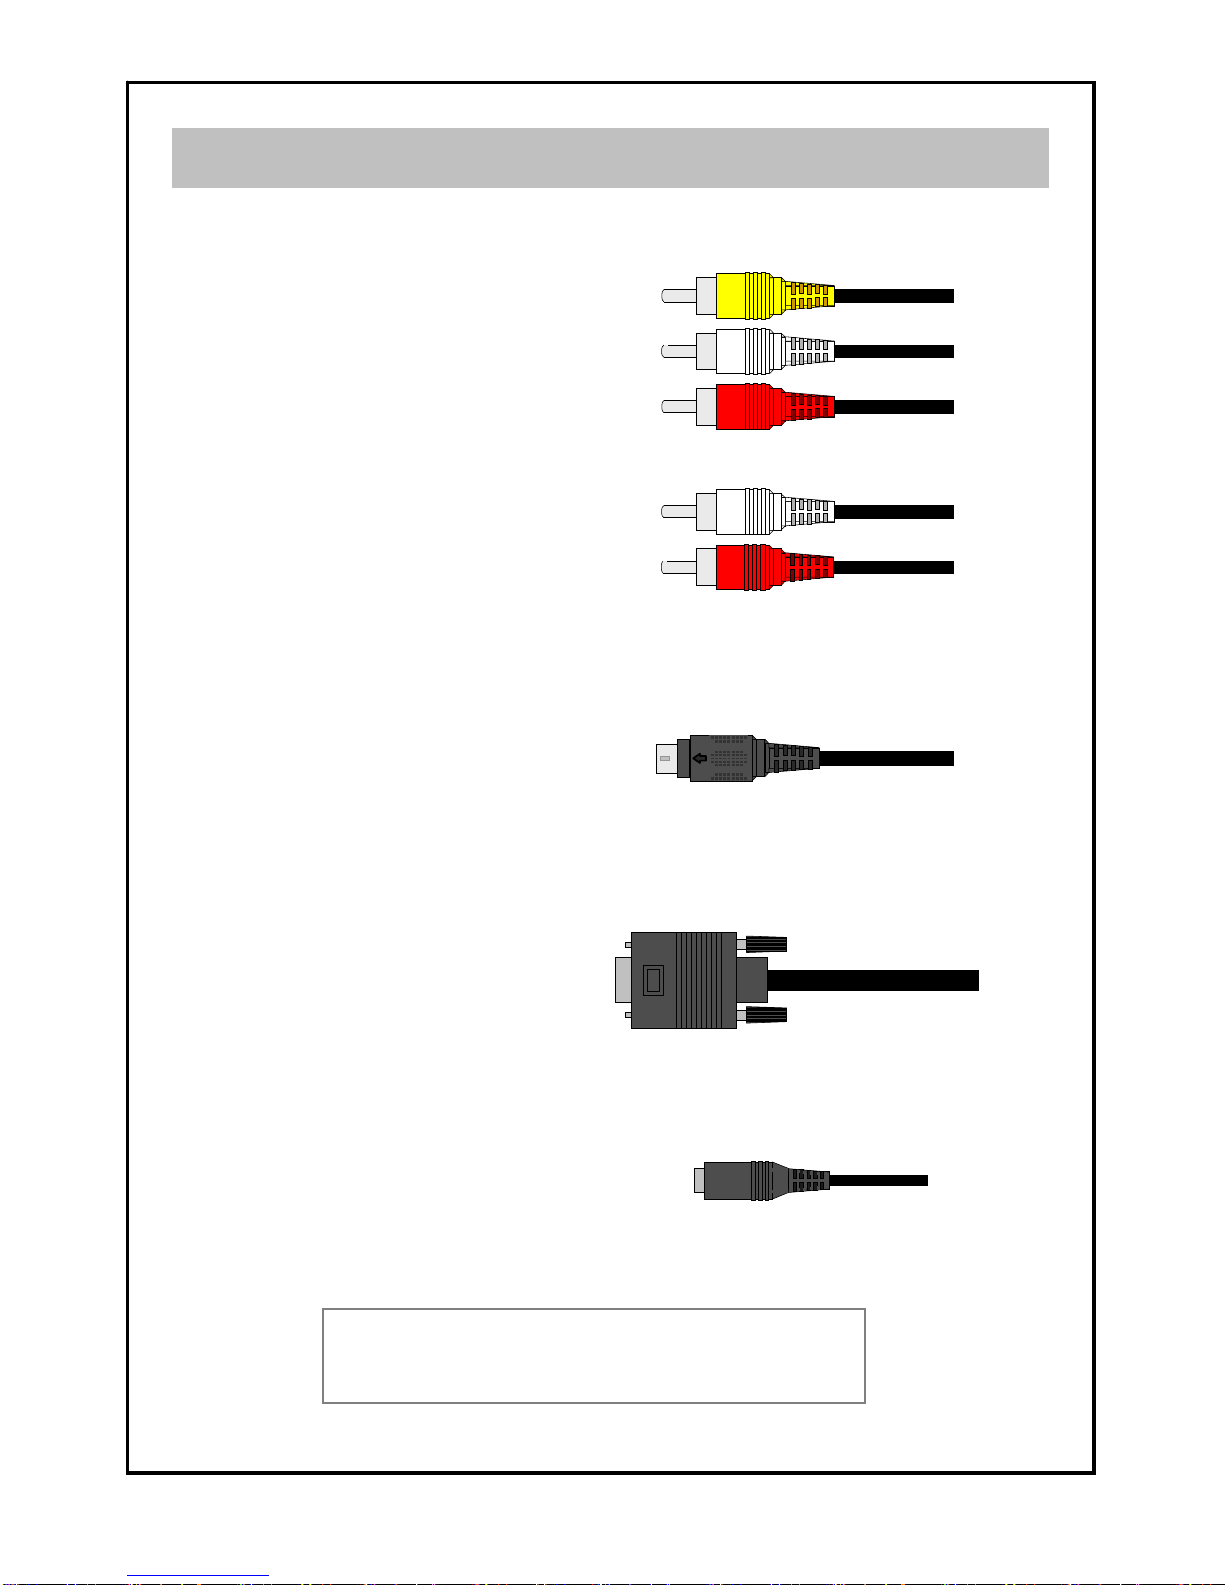
Make sure check the audio and video source
wiring before WIRING CONNECTION
Audio In Right (Red)
Audio In Left (White)
Video In CVBS (Yellow)
1. AV Connecter
3. D-SUB(PC) Connecter
4. DC 12V Power Jack
2. S-Video Connecter
Speaker Out Right (Red)
Speaker Out Left (White)
Wiring
6

Remote Controller
Power On/Off
Basic Operations : Source Select
Menu Operation : Item Select
Audio Mute On/Off
Basic Operations : Volume Down
Menu Operation : Value Down
Column Down
Menu Operation : Column Up
Basic Operations : Menu Enter
Menu Operation : Menu Exit
Basic Operations : Volume Up
Menu Operation : Value Up
Column Up
Menu Operation : Column Down
Basic PC Operations : Auto Adjust
Menu Operation : Item Select
1
2
3
4
5
6
7
8
9
1
2
3
4
5
6
7
8
9
7

A/V Basic Operations
To turn power on, put your finger on the “POEWR” button. A
power-indicate green lamp turn on and you can see a signal
on the screen.
When you want to turn off, put your finger on the “POWER”
button again.
Remote IR
SENSOR
Note
The buttons on the front bezel are designed with infrared technology;
you can control by touching each button only not pressing.
1. POWER ON / OFF
SOURCE MENU ◁VOL▷
To adjust the screen quality or another functions, put your finger
on the “MENU” button. The OSD will appear on center of the
screen.
When you desire to access sub-menu, put your finger on the
“SOURCE” button and sub-menu will be available.
When you desire select your Sub-menu, put your finger on the
button “◀”or“▶”
When you put your finger on the “MENU” button again, the OSD
disappear or escape from the SUB-MENU.
2. MENU ACCESS
MENU
8

A/V Basic Operations
3. VIDEO SOURCE SELECTION
To select PC, Video and S-Video, put your finger on the “SOURCE”
button. OSD, “PC” or other functions appear on the left upper
side of the screen in turn whenever touch “SOURCE” button.
SOURCE
When you desire control the audio volume, put your
finger on the “VOLUME” button “◀”or“▶”
4. AUDIO VOLUME CONTROL
◁VOL▷
Minimum Volume Indicate - Button “◀”
Maximum Volume Indicate – Button “▶”
Audio Mute OSD
9
Este manual sirve para los siguientes modelos
1
Tabla de contenidos


