
Munch Machine CB1 Manual de usuario

Cluster Bucker
Model: CB1
Operator’s Manual
Please read the operator’s manual and all included warnings carefully and make sure you fully
understand the instructions before using the machine

2
Table of Contents
Warnings & Precautions 3
Introduction 4
Machine overview 5
Operator Safety 7
Uncrating 7
Machine Transport 9
Machine Setup 9
Machine Guarding 10
Machine Power 11
Machine Controls 12
Machine Operation 14
Direct Contact Surfaces 15
Shielding 18
Suspension System 21
Coupling System 22
Cassettes 23
Belts 28
Cleaning the Cluster Bucker 31
Daily Clean 31
Deep Clean 34
Maintenance 37
Reinstallation of Components 37
Reassembly Checklist 38
Storage 39
Compliance 39
Limited Warranty 40
Customer Service 40
Technical Specifications 41

3
● WARNING – This product is a piece of power equipment that if used in ways other than
described by this instruction manual can result in operator injury or even death
● WARNING – All users need to fully read this instruction manual and familiarize
themselves with the machine before operation
● WARNING – Keep all shields, guards and safety devices installed and in proper working
order at all times
● WARNING – Keep all hands, feet and clothing away from power driven parts.
● WARNING – This machine is capable of pulling body parts, hair, clothing, gloves, etc.
into the feed holes of the installed Die Plate. Use extreme caution to prevent unintended
items from entering the feed holes of installed Die Plates.
● WARNING – Unexpected energization or startup of the equipment is controlled by
unplugging the equipment from the energy source; The plug is under the exclusive
control of the employee performing the servicing or maintenance.
WARNING
The operation, servicing and cleaning of the Cluster Bucker by MUNCH Machine is
hazardous and could cause severe injuries or worse. These machines are solely intended to
be used for the harvesting and processing of cannabis, hemp and hops. Do not operate, service
or clean these machines without proper training, reading the instructions and fully
understanding all aspects of the activities on these machines and fully knowing the risks
involved. Your failure to abide these warnings is negligence on your part. As warned,
you assume all risks associated with the lack of proper use, in any manner, of the Cluster
Bucker by Munch Machine.

4
Introduction
Thank you for your purchase of the Cluster Bucker built by MUNCH Machine. Welcome to
the best bucking team around! Our products are designed around years of real-world use for
maximum reliability and durability. Every product we bring to market is designed, tested
and manufactured 100% in the USA.
The Mother Bucker introduced mechanized bucking to the cannabis industry and now the
Cluster Bucker has claimed the title of most powerful, both being the most reliable harvesters
on the market. We strive to take a different approach when building equipment for the
cannabis industry. Our goals are to put the customer first when it comes to both sales and
service. We maintain a close relationship with farmers to be sure we are offering the best
products to improve efficiency and lower production costs.
Our parent company Dauenhauer Manufacturing has roots that go back 75+ years as pioneers
of the first mechanical hops harvesting equipment. Dauenhauer continues to sell to and
service some of the top producers in the hops industry. We are proud of this heritage and
committed to carrying this tradition forward with MUNCH Machine.
All persons operating this machine need to fully read this instruction manual and familiarize
themselves with the machine before operation.
5
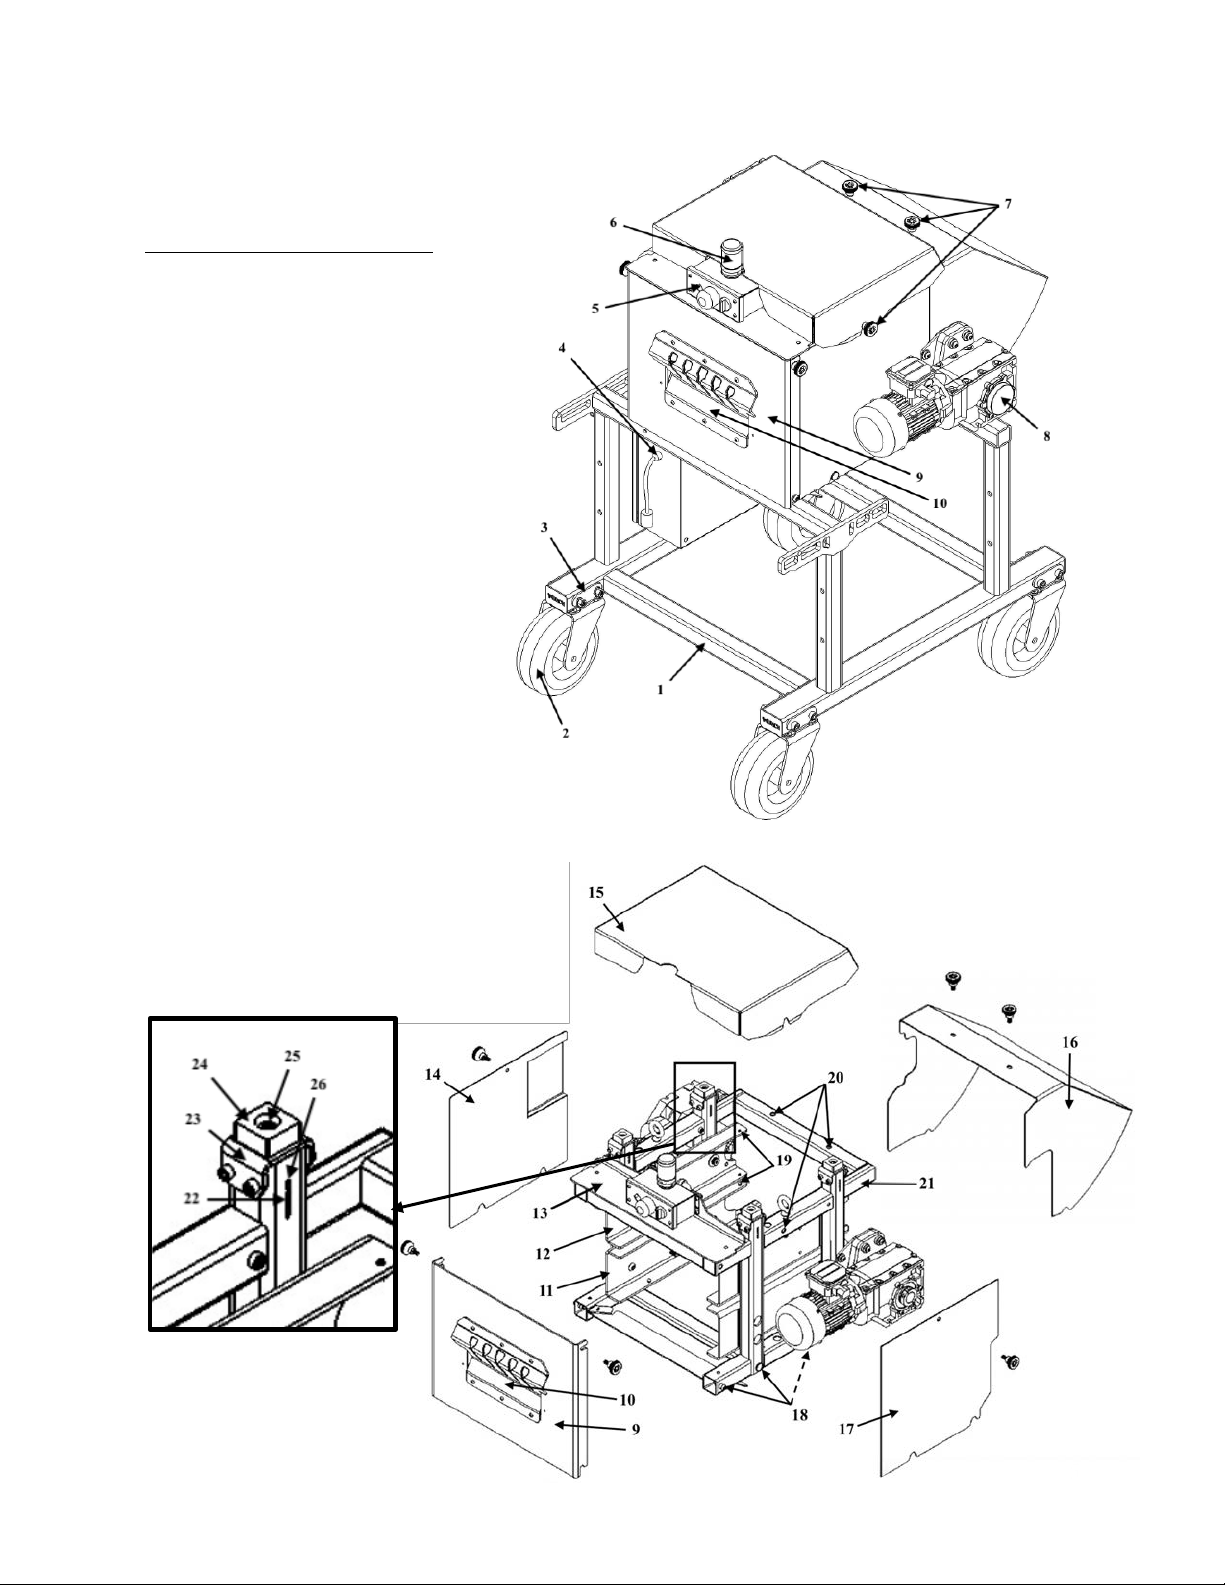
Machine Overview
Part Name (Qty Per Machine)
1. Frame Base
2. Casters (4)
3. Caster Bracket (4)
4. Electrical Panel /Accessory Outlet
5. Button Array
6. Indicator Light
7. Thumb Screws (6)
8. Motor Cover
9. Face plate
10. Die Plate
11. Lower Cassette Track (2)
12. Upper Cassette Track (2)
13. Button Mount Bracket
14. Left Side Shield
15. Top Shield
16. Rear Shield
17. Right Side Shield
18. Mount Peg (8)
19. Cassette Pins (16)
20. Threaded Inserts (6)
21. Upper Frame
22. Force Plate (4)
23. Force Cap (4)
24. Force Cap Bumper (4)
25. Pressure Adjustment
Bolt (4)
26. Suspension Rule (8)

6
27. Cassette (2)
28. Cassette Pin Holes (16)
29. Belt (2)
30. Bearing (8)
31. Bearing Collar (8)
32. Keyway (4)
33. Drive Pulley (2)
34. Cassette Locking Tabs (4)
35. Follow Pulley (2)
36. Cassette Fixed End (4)
37. Tensioning Bolts (8)
38. Tension Brackets (4)
39. Tension Lock Bolts (16)
40. Belt Tension Rule (8)
41. Cassette Sliding End (4)
42. Lower Motor
43. Lower Motor Mount
44. Coupler Assembly (2)
45. Drive Key (4)
46. Coupler Cog (4)
47. Coupler Flex Element (2)
48. Coupler Nylon Cover (2)
49. Upper Motor Mount
50. Upper Motor

7
Operator Safety
Training
Operators must be properly trained in the correct use of this machine before taking part in any
operation. It is up to the facility to determine guidelines based on these instructions for use. It is
up to the organization’s management structure to implement training programs, written
procedures, and supervision that are compliant with local regulations.
Operation
All persons operating this machine need to fully read this instruction manual and familiarize
themselves with the machine before operation. The machine is built to have 1-2 operators
standing at the front of the machine feeding material through the die plate.
▪ WARNING – This product is a piece of power equipment that if used in ways other than
described by this instruction manual can result in operator injury or even death.
▪ WARNING – Keep all shields, guards and safety devices installed and in proper working
order at all times.
▪ WARNING – Keep all hands, feet and clothing away from power driven parts.
▪ WARNING –This machine is capable of pulling body parts, hair, clothing, gloves, etc.
into the feed holes of the installed Die Plate. Use extreme caution to prevent unintended
items from entering the feed holes of installed Die Plates.
Uncrating
Upon receipt of the Cluster Bucker, freight must be inspected upon arrival. If you suspect
damage, it is essential to document by taking photos of the packaging issues/damage and
notating DAMAGE on the proof of delivery (POD) prior to signing. Do not sign for the shipment
until you have thoroughly inspected the packaging and contents.
The Cluster Bucker crate will have one side panel that is held closed with wood screws. While
supporting the panel, remove all screws from the outer perimeter of the crate. Once screws are
removed, set the panel aside.
The Cluster Bucker will be held in place with nylon strapping. Prior to strap cutting, ensure all
individuals nearby are wearing the proper personal protective equipment to guard against
possible flying debris. Also, check that the machine is stable and supported prior to cutting to
prevent injury. Cut the strapping with a sharp knife or scissors in a way that prevents damage to
the machine finish.
▪ WARNING – Proper personal protective equipment is essential for all persons working
around the uncrating and setup of the machine.
▪ CAUTION – Injury could result if proper precautions are not taken to ensure the
equipment is stable during the uncrating process.

8
▪ ATTENTION – It is possible that the machine has shifted during shipment, ensure the
equipment is supported when strapping is removed, continue to do so until the machine is
out of the crate on a flat level surface with the casters locked.
Using a forklift insert the forks under the lower frame with the forks as wide as they can be set
while still passing between all four casters. The forks must pass beyond the far side of the lower
frame to ensure the machine is completely supported (see image below). Ensure no equipment
will be damaged when lifted. Slightly lift the cluster bucker watching the top hood to prevent
damage to the top of the machine. Back the equipment out of the crate and lower onto a flat level
surface.
▪ CAUTION – Injury could result if proper precautions are not taken to ensure the
equipment is stable during the uncrating process.
▪ CAUTION – Attempting to roll the machine out of the crate could cause the machine to
tip, possibly causing injury.

9
Machine Transport
Handles
The Cluster Bucker has Handles built into the Frame
located on both the right and left sides of the
machine. Only these two Handles and the lower
frame are to be used for moving the machine.
▪ WARNING – When moving equipment on
an inclined surface it is strongly
recommended to use multiple people to
prevent loss of control leading to injury or
death.
▪ ATTENTION - Do not move the machine by
pulling on the Motor or Bucker Head
Casters
The Cluster Bucker has Casters installed that work
for both Indoor and Outdoor use. These tires allow
for 360° rotation and have both a rotational lock and
rolling lock.
To activate the rolling lock press down the “ON” lever arm with your foot until it clicks. The
brake should be clamped firmly on the wheel. To disengage the brake, press “OFF” with your
foot until the brake is free of the wheel
To activate the swivel lock, locate the four notches on the swivel bearing directly above the
wheel. Line up one of the four notches with the lock pin by swiveling the wheel. Grab the key
ring attached to the lock pin, pull it away from the caster and turn it 90°. Release the key ring
and lock pin. The lock pin should now be engaged firmly in the notch. The wheel should not be
able to swivel. To disengage repeat the above procedure. The lock pin should not be contacting
the swivel bearing and the wheel should swivel freely.
Machine Setup
The Cluster Bucker requires very little setup; the Indicator Light is the only item that comes
uninstalled for protection during shipment.
Indicator Light Installation
Holding the Upper Indicator Light Assembly locate the green arrow located at the base of the
lens. Align the arrow point with the black line on the Indicator Light Mount. Press down lightly
to engage the light into the base, then rotate the upper light assembly 1/8 turn clockwise.
When the machine is energized ensure the indicator light is functioning properly, lit when the
machine is powered “ON”, and off when the machine is powered “OFF”.
10
▪ CAUTION – the Indicator Light is a safety device that needs to be installed and properly
working on the machine, failure to do so could result in injury or death.
Machine Guarding
All Shields must be in place before any operation of the machine. The Face Plate and Die Plate
must be installed properly, the Control Panel must be closed and locked.
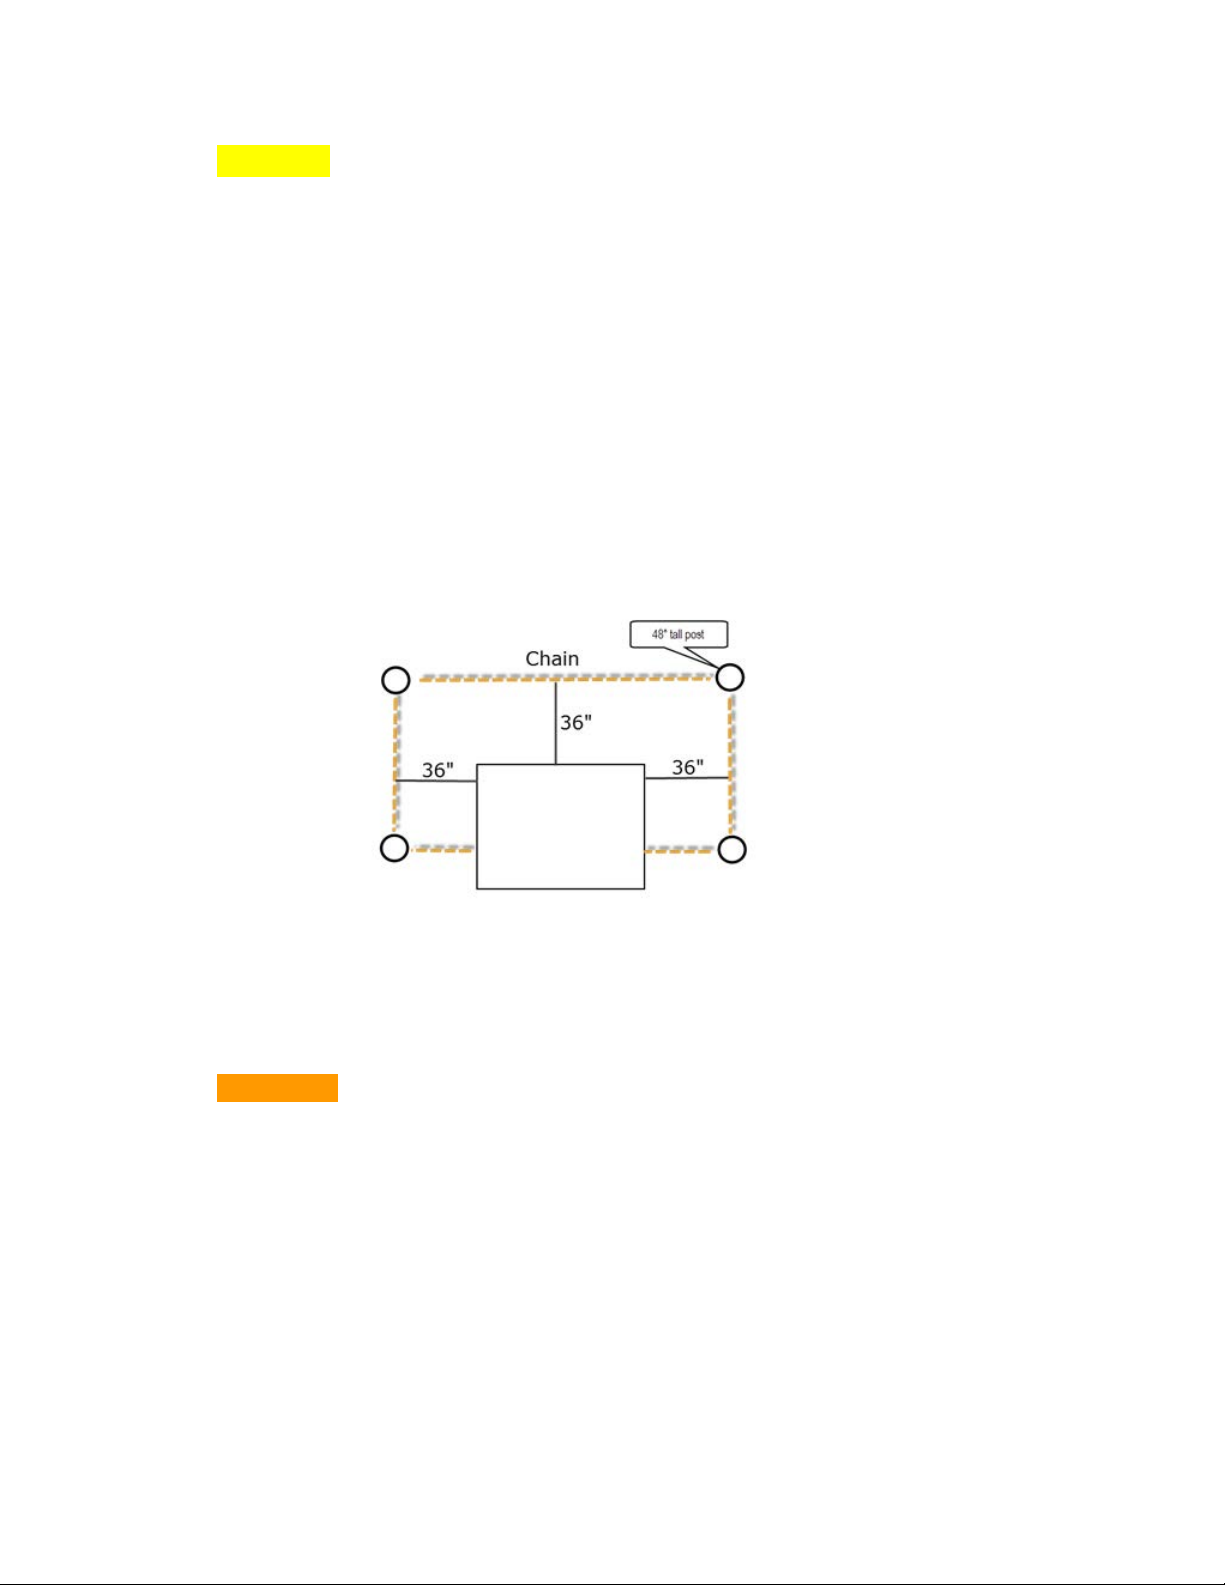
To prevent processed stalk material from jamming in the outfeed side of the machine it is not
possible to closely guard the outfeed area. To ensure personnel cannot reach into the rollers
during operation, a barrier guard on the sides and back of the machine must be in place. Four
posts (48” tall) and a metal or plastic chain set 36” away from the machine and connected to the
sides of the machine must be in place during operation. Signs advising personnel to stay out
when the machine is running must be on the chain or posts.
Solid panels or rigid mesh panels may also be used and can be placed closer to the machine
depending on the mesh opening size (US companies should refer to OSHA regulations). Consult
with your local workplace safety officials to ensure you meet your relevant regulation
▪ WARNING – Operation of equipment without the proper guarding installed could result
in serious injury and possibly death
Contact MUNCH Machine Customer Service if you need further assistance.
Tabla de contenidos
Otros manuales de Equipos industriales de Munch Machine


