Moulinex AMD1 Manual de usuario

AMD 1, 2 & 3 24/07/02 9:12 Page 1

DE
BA
C
F
G
L
1
3
2
I
H
K
J
AMD 1, 2 & 3 24/07/02 9:12 Page 2

3
English p. 5
Français p. 11
Deutsch S. 17
Nederlands p. 20
Español p. 23
Português p. 26
Italiano p. 29
Danmark s. 32
Norge s. 35
Svenska s. 38
Suomi s. 41
AMD1/AMD2/AMD3
AMD 1, 2 & 3 24/07/02 9:12 Page 3

4
AMD 1, 2 & 3 24/07/02 9:12 Page 4

5
IMPORTANT SAFEGUARDS
When using electrical appliances, basic safety precautions should
always be followed :
• Read all instructions.
• Do not touch hot surfaces. Use handles or knobs.
• To protect against electric shock, do not immerse cord, plug, or
appliance in water or other liquids.
• Close supervision is necessary when any appliance is used by or near
children.
• Unplug from mains when not in use and before cleaning. Allow to cool
before putting on or taking off parts.
• Do not operate any appliance with a damaged cord or plug or after the
appliance malfunctions, or has been damaged in any manner. Return
appliance to an authorized Moulinex Service Centre for examination,
repair or adjustment (see enclosed list).
• The use of accessory attachments not recommended or sold by
Moulinex may cause injuries.
• Do not use outdoors.
• Do not let the cord hang over the edge of the table or work surface, or
touch hot surfaces.
• Do not place on or near an external heat source, such as a hot gas or
electric hob or in a heated oven.
• Extreme caution must be used when moving an appliance containing
hot oil or other hot liquids.
• To disconnect remove plug from mains socket.
• Do not use the appliance for any use other than that which it is
intended.
AMD 1, 2 & 3 24/07/02 9:12 Page 5

6
• Do not use metallic fasteners to hold the waffles in place. Sharp
utensils should not be used.
• Always check that the voltage indicated on the identification panel
matches that of your electrical installation.
• This product has been designed for domestic use only.
Any commercial use, inappropriate use or failure to comply with the
instructions, Moulinex accepts no responsability and the guarantee
will not apply.
• Position the appliance on a flat, stable heat resistant surface.
• Do not leave or use the appliance in a damp area.
• Do not touch the non-stick plates when in use.
SAVE THESE INSTRUCTIONS
CAUTION
This appliance is for household use. Any servicing other than cleaning
and user maintenance should be performed by an authorized Moulinex
Service Centre (see enclosed list).
• Do not immerse appliance in water.
• To reduce the risk of fire or electric shock, do not dismantle the
appliance. Repairs should be carried out by an authorized Moulinex
Service Centre only.
SPECIAL CORD INSTRUCTIONS
A. A short power-supply cord is provided to reduce the risk of becoming
entangled in or tripping over a longer cord.
B. Extension cords may be used if care is exercised in their use.
C. If an extension cord is used, (1) the marked electrical rating of the
AMD 1, 2 & 3 24/07/02 9:12 Page 6

7
extension cord should be at least as great as the electrical rating of
the appliance, (2) the cord should be arranged so that it will not
drape over the counter top or table top where it can be pulled on by
children or tripped over unintentionally.
D. This appliance has a polarized plug (one blade is wider than the
other). To reduce the risk of electric shock, this plug is intended to fit
into a polarized socket only one way. If the plug does not fit fully into
the socket, reverse the plug. If it still does not fit, contact a qualified
electrician. Do not attempt to modify the plug in any way.
AMD 1, 2 & 3 24/07/02 9:12 Page 7

8
Thank you for choosing an appliance from the
Moulinex range.
Description
AInsulated handles
BLocking catch
CTimer (according to model)
DPilot Light (red)
EControl light (green)
FNon-stick hotplates (removable or fixed
according to model)
GButtons to unlock the plates
HDeep filled sandwich plates (according
to model)
IToasted sandwich hotplates (according
to model)
JWaffle hotplates (according to model)
KGrill plates (according to model)
Safety Recommendations
-Keep appliance out of reach of children.
-This product has been designed for do-
mestic use only. Any commercial use, inap-
propriate use or failure to comply with the
instructions, the manufacturer accepts no
responsibility and the guarantee will not
apply.
- Always check that the voltage indicated on
the identification panel matches that of your
electrical installation.
Any error in connecting the appliance inva-
lidates the guarantee.
- It is essential that your appliance is connect-
ed using an earthed plug complying with
British standards. If an extension lead is re-
quired, it must be earthed and at least 10
amps rating.
APPLIANCES WITH FITTED PLUG
Important: For your convenience this applian-
ce is supplied complete with a plug incorpora-
ting a 13 amp fuse.
In the event of replacing a fuse in the plug sup-
plied, a 13 amp fuse approved by ASTA to
BS1362 must be used.
If the socket outlets are not of the 13A BS
1363 type, and therefore do not accept the
plug connected to this appliance, cut off the
plug.
When cut off, this plug is a shock hazard if
inserted into a socket outlet and must there-
fore be disposed of safely.
If the fuse cover is detachable, never use the
plug with the cover omitted. Replacement co-
vers can be obtained from your service agent.
Fit the appropriate plug according to the ins-
tructions in paragraph “Fitting a plug”. With al-
ternative plugs a 15 amp fuse must be fitted
either in the plug or adaptor or at the main fuse
box.
APPLIANCES WITHOUT FITTED PLUG
FITTING A PLUG – IMPORTANT
The wires in the mains lead are coloured in
accordance with the following code:
GREEN & YELLOW : EARTH
BLUE : NEUTRAL
BROWN : LIVE
As the colours in the mains lead of this ap-
pliance may not correspond with the coloured
markings identifying the terminals in your plug,
proceed as follows:
- The wire which is coloured GREEN & YEL-
LOW must be connected to the terminal in
the plug which is marked with the letter ‘E’ or
by the earth symbol or coloured green or
green and yellow.
- The wire which is coloured BLUE must be
connected to the terminal which is marked
with the letter ‘N’ or coloured black.
- The wire which is coloured BROWN must be
connected to the terminal which is marked
with the letter ‘L’ or coloured red.
This appliance complies with current safety
regulations and requirements as well as direc-
tives:
- 89/336/CEE modified by 93/68/CEE
- 73/23/CEE modified by 93/68/CEE
1
AMD 1, 2 & 3 24/07/02 9:12 Page 8

9
-With the deep filled sandwich plates (H) or
the toasted sandwich plates (I), butter the
outer surface of the slices of bread.
Once the appliance reaches the right tempe-
rature, the green light (E) comes on. Then
place the slices of bread on the lower plate.
With a spoon, lightly push down on each
slice to form a slight recess into which you
can add the sandwich filling.
Cover the filling with the second slice of
bread, then close the appliance slightly, until
you can close the lock.
-With waffle plates (J), lightly oil the hotpla-
tes.
Once the green light (E) comes on, pour the
waffle batter slowly making sure to cover the
lower plate but without spilling over.
Bring the top part down. The back hinge will
have a little extra give, to provide extra space
for the waffle batter to rise.
Use of the timer (C)
(according to model)
- The timer enables you to monitor the cooking
time.
To set the timer:
- Press the button situated on the right side of
the screen (either several short presses or
hold down the button) to set the time.
Note: in case of an error, continue pressing
the button. The timer comes automatically
back to 0 after the figure 9.
- Release the button. After 5 seconds, a black
dot flashes at the right of the set figure and
the time deduction starts.
To delete the setting of the timer:
- To stop the timer during the time deduction,
hold the button situated on the right side of
the screen down for 2 seconds: the timer is
automatically reset to zero and the light goes
out after about 1 minute.
To stop the warning signal:
- When the cooking time is finished, the timer
gives a warning signal and stops automati-
cally after 20 rings.
- To stop the warning signal manually, press on
the button situated on the right side of the
screen. The timer light goes out after about 1
minute.
- Warning: the timer indicates the end of cook-
ing but does not turn the appliance off.
- Never let the mains lead touch the hot surfa-
ces of the appliance, or any heating source.
Before each use, check the lead is not
damaged, and never let it hang within reach
of children.
Important: If the mains lead or the plug are
damaged, do not use your appliance. In order
to avoid any accident, they must be replaced
by an approved Moulinex Centre (see list in the
leaflet “Moulinex Service”).
- Position the appliance on a flat, heat resist-
ant surface.
- Do not leave or use the appliance in a damp
area.
- Always disconnect after each use and wait
for the appliance to cool down before handl-
ing. Never immerse the appliance in water.
- Do not touch the non-stick hotplates when in
use.
- Only Moulinex non-stick hot-plates should
be used.
- If the appliance is damaged, or it will not
work, consult a Moulinex approved service
centre. (See list in Moulinex Service booklet).
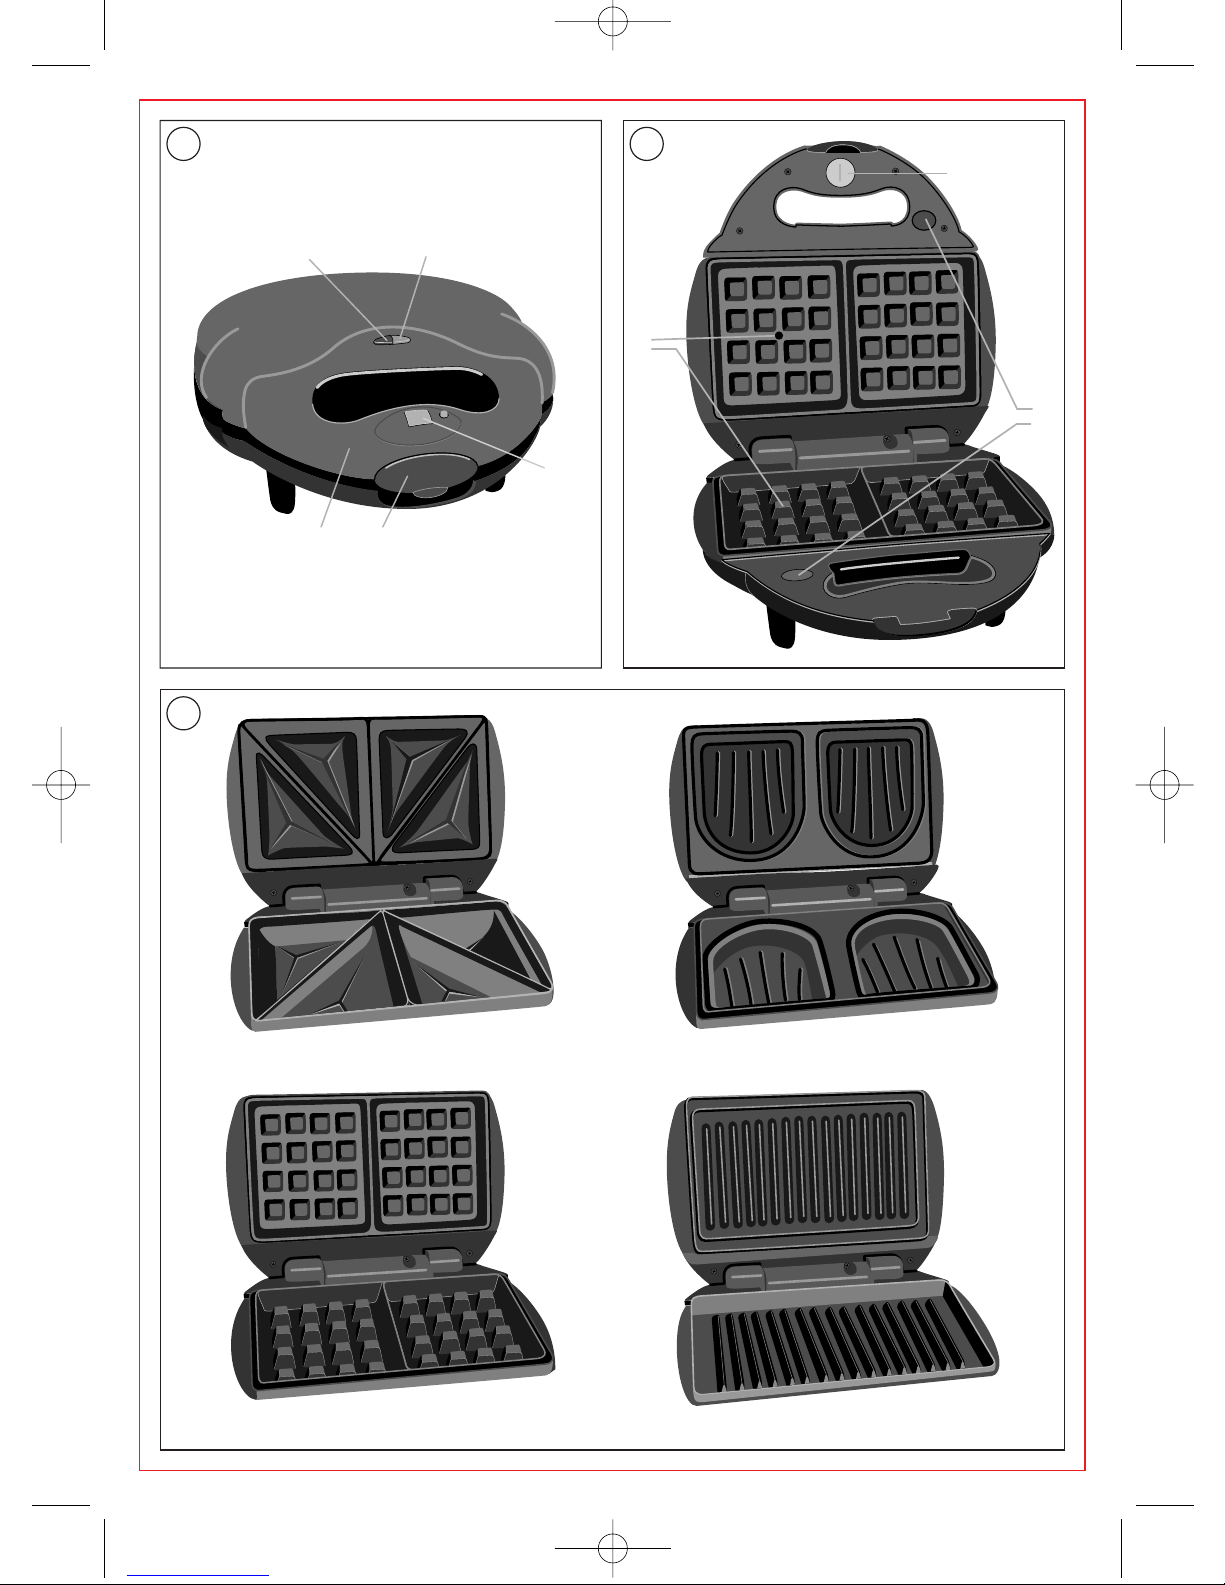
Changing of the plates
- Unplug the appliance.
- Check the appliance is cool.
- Open the appliance.
- To remove the plates: press the button (G) to
unlock the cooking plate and remove the
plate lifting it at an angle.
- To put the plates back in position: put the
plate at an angle on the appliance, into the
two notches situated opposite the button
(G), then press on the plate until it is locked.
Before using your appliance
for the first time
- After lightly oiling the hot-plates, close the
appliance and plug it in. The red light (D)
comes on.
- Leave for a few minutes to allow the “new
smell” to disappear.
- Once the appliance reaches the right tempe-
rature, the green light (E) comes on.
Using the appliance
- Plug the appliance in. The red light (D)
comes on.
1
1
3
1
1
3
AMD 1, 2 & 3 24/07/02 9:12 Page 9

10
To change the battery:
- Note: if there is a partial or total loss of the
display, the battery must be changed.
- To remove the battery from the timer, un-
screw the round part situated under the timer
(L).
-
To respect the environment dispose of the
battery at your nearest waste disposal centre.
Practical Hints
With toast or toasted sandwiches, the cook-
ing time is around 4 to 6 minutes, and varies
according to the moisture content of the bread
or the type of filling involved.
With waffles, the cooking time is around 4 to
8 minutes and varies depending on the batter
mixture.
In all cases it is recommended to adapt cook-
ing according to your own taste. Quantities
and cooking times given are indications only.
- When cooking is complete, remove the sand-
wich or waffle using a wooden spatula.
- Avoid the use of metallic or sharp utensils, as
they will damage the non-stick coating of the
hotplates.
• Waffle batter recipe
500 g flour,
2 to 3 pinches of salt,
6 eggs,
150 g butter,
3/4 litre milk (or less according to taste),
50 g granulated sugar.
- Whip the egg-whites until white and fluffy.
Mix the flour, butter, egg-yolks, milk and
sugar. Add the salt and egg-whites. Your bat-
ter is ready.
Cleaning
- Always disconnect the appliance before
cleaning, and leave to cool for around 30 mi-
nutes.
- Do not place the appliance in water or under
running water.
- To clean the external surfaces, use a damp
cloth and dry carefully.
- To clean the fixed hotplates (according to
model), use a damp cloth, maybe with some
washing-up liquid, then rinse with a wet
sponge and dry carefully.
- To clean removable hotplates (according to
model), unclip them and wash in hot water
and washing-up liquid. Leave to dry and wipe
carefully before replacing.
- Never use scouring pads or scouring powder.
Storage
The appliance can be stored vertically to save
space.
What to do if your appliance
does not work
- Check firstly that the appliance is plugged in
correctly.
What to do if your appliance still does not
work
Consult a Moulinex approved service centre
(see list in Moulinex service booklet).
Or call our Helpline:
0845 330 4554 – UK
(01) 47 51947 – Ireland
2
3
2
3
AMD 1, 2 & 3 24/07/02 9:12 Page 10
Este manual sirve para los siguientes modelos
2
Tabla de contenidos
Otros manuales de Máquina para hacer wafles de Moulinex


