miRider One Manual de usuario

Instruction Manual
Electric Folding Bike

About us
Here at MiRiDER, we’re passionate people with a keen interest in
outdoor leisure. Our dream is to get people to fall back in love
with cycling, making it fun and accessible for everyone; it’s at
the heart of everything we do. We want to make it easier for
people of all ages to enjoy more exercise, have more fun and
create more memories.
We’re a family-run business, located in the heart of
Lancashire, where there’s a plethora of hills to ride up and
down! We’re a diverse bunch, always looking for the next
challenge. We’ve used knowledge garnered from a variety
of trades and industries to create a fun, stylish and
aordable electric bike brand that we hope you’ll love as
much as we do.
Being keen cyclists ourselves, we took a look at the
eBike and scooter market, and saw the opportunity to
provide aordable products, without compromising
on high quality and style. Thus, the MiRiDER One was
born! Designed with a focus on providing reassuring
performance ride after ride, using a combination
of advanced technology, superior style, and
unbeatable quality, the MiRiDER One was carefully
crafted to be the ultimate electric folding bike.
www.mirider.co.uk
+44 (0)1257 228242
Disklok House
Preston Road
Chorley
Lancashire
PR7 5HH

Bike structure and functions
Packing list
Instructions for use
LCD display instructions
Other operations
Maintenance and storage
Charging the battery
Battery charging precautions
Safety advice
Warnings and precautions
Specications
Troubleshooting
Warranty
Please read this manual carefully before using the MiRiDER one eBike. This manual
will help you understand the bike’s:
1. Basic operational process
2. Safety principals
3. Product structure, its care & use
Contents
Page 6
Page 7
Page 8 - 12
Page 13
Page 16
Page 17
Page 18
Page 19
Page 20
Page 21
Page 22 - 23
Page 24
Page 25

67
Bike structure and functions
Items included:
1. 1 x MiRiDER one eBike
2. 1 x Seat saddle
3. Instruction manual
4. 1 x Charger
5. 1 x Battery
6. 2 x Mudguards
7. 2 x Battery locking keys
Before use
It is recommended that you wear protective clothing and approptiate accessories when riding
the MiRiDER one eBike.
Packing list

89
Secure the hinge by pressing the black
lever into the stem rmly until you hear it
snap shut.
Lift the handle bar stem upwards until
it sits at on the headset in the upright
position.
1. Folding the eBike frame 2. To secure the eBike frame
On the hinge lever, hold the red lever down
then open the lever outwards.
Connect the frame together and push the
frame folder back in to lock. Check that the
frame is rmly locked before use.
Instructions for use
3. Securing the stem

10 11
4. Adjusting handlebar height
Open the clamp to raise and lower the
handle bar height. Make sure the clamp is
closed fully before riding. Do not extend
higher than the grooved lines
5. How to insert the seat
6. Adjust saddle height
Open the seat clamp, as shown in the
image above.
Push the seat into the frame to the
minimum inserion mark on the seat post
then secure the seat post by closing the
seat post clamp.
Adjust the Seat post height by lifting the
lever on the post and adjusting the height
to the required level. Then close the lever
securing the seat post at this height.
12 13
7. Folding the pedals
8. Power On
To unfold simply pull down the pedal until
it clicks into place.
To fold, push the pedal inwards, then lift
upwards.
Press & hold the power button, on the LCD
screen, for 3 seconds to turn the power on.
Connect the charger into the port if the
LCD screen does not activate.
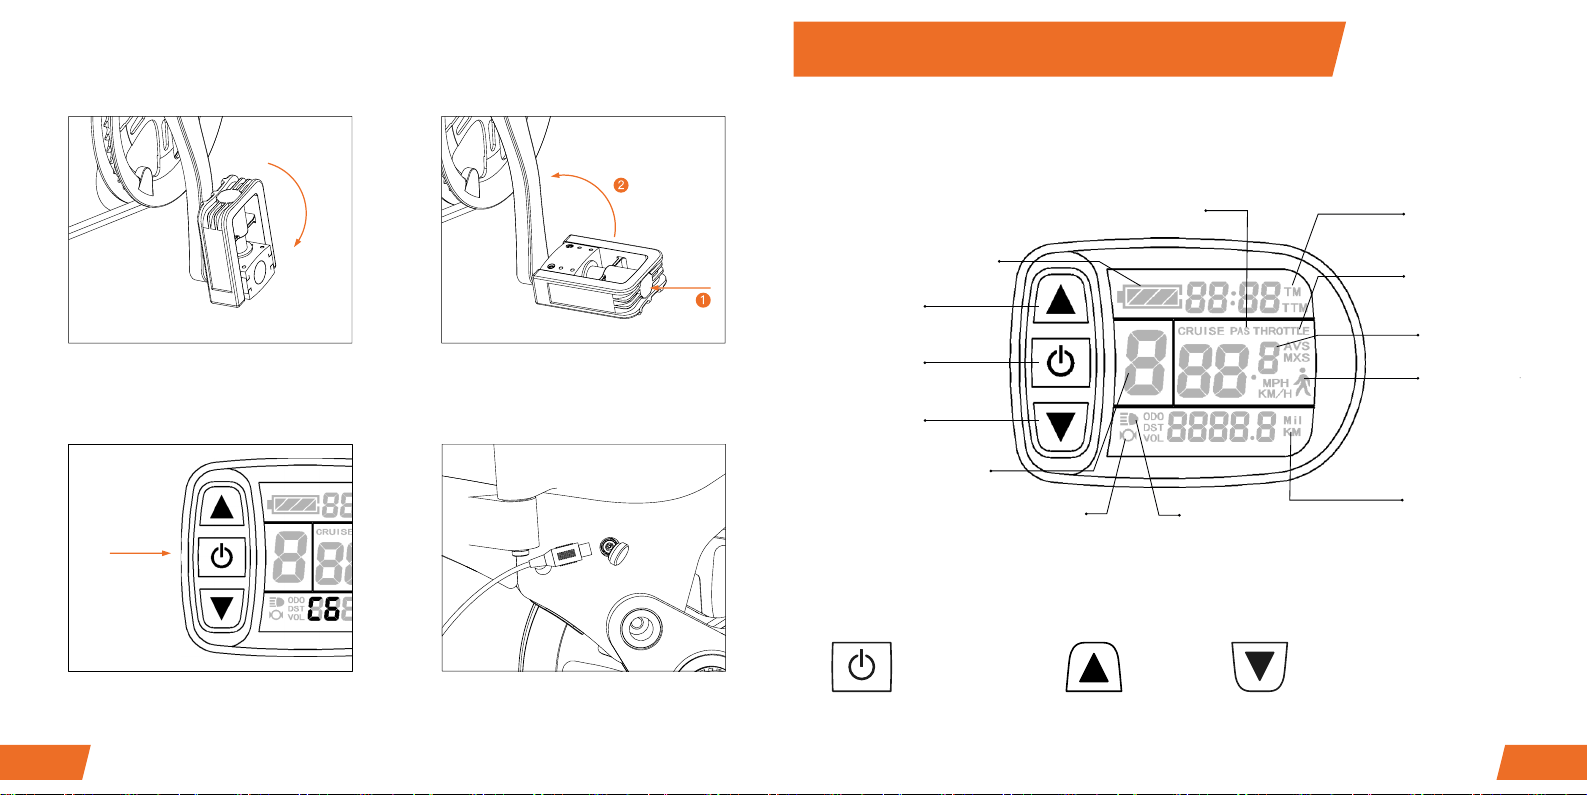
LCD display instructions
UP button
SW button
DOWN button
Brake status mark Backlights and
headlights status mark
Trip distance or real-time
battery voltage display
Walk assist
mode indicator
Vehicle speed display
Running counter
Throttle turned on mark
Power-assist
startup mark
Power assist level indicator
Battery capacity indicator
The display content is shown as follow.
There are 3 keys on the LCD display, the icons for these keys are:
SW or POWER button UP button DOWN button

14 15
Push and hold the power ON/OFF button to activate
the display. The same button is to be pushed and
held to switch the display o. Note: The display will
power itself o after 5 minutes of inactivity.
Holding the up arrow on the display turns on
the display backlight and the bikes headlight.
Push and hold the same button again to switch
this lighting o.
Use the up and down arrows in the display to
increase or decrease the power assist level.
When pushing the bike if you push and hold the
down arrow button on the display and walk assist
mode will be engaged providing 6km/h (4mph)
power assist to aid pushing the bike. As soon as you
release the down arrow this assistance will stop.
The thumb throttle can provide a boost from a
standing start upto 6km/h (4mph) When continually
pedalling the thumb throttle can be used top
provide a power boost taking the bike upto the
maximum speed limit of 25km/h (15.5MPH). If the
rider stops pedalling the throttle Boost drops o
to 6km/h (4MPH) only. To retain throttle boost the
rider must continuously pedal the bike at the same
time as applying the thumb throttle.
ON/OFF Headlights & Backlights
Gear Switch Thumb Throttle Assist

16 17
Uninstalling/Installing the battery
Turn the power o. Fold the eBike frame. Fold the eBike frame and unlock the
battery lock using the battery locking key.
Pull out the battery from inside the frame,
using the handle, as shown in the image
above.
To re-insert the battery, push the battery
into position and lock it in place using the
locking key.
Other operations Maintenance and storage
Parts Maintenance checks
Brakes Ensure all the brakes are fully functioning before use
Tyres Ensure the tyre pressure is correct before use
Tyre rims Check the conditions of the tyre rims
Shock absorber Check the shock absorber condition
Throttle Throttle function should provide 6 km/h speed
Wires Ensure there is no exposed wiring
Screws Ensure the screws are all tight and connected
Battery Ensure the eBike battery life is lasting suciently
Charger Ensure the charging connections are fully functional
Hubs & Sprocket Apply regular lubrication
eBike Regularly clean the eBike with a clean, damp cloth
1. Ensure the bike is stored in a cool and dry place when not in use
2. Regularly check the screws and small parts on the bike. Tighten when required
3. Do not use any chemical solvents to clean the bike, as this may corrode the surface of the
product
Suggested regular maintenance checks:

18 19
Option 1: Open the seal, as shown in the
image above, and insert the jack into the
charging port.
Option 2: Fold the eBike, remove the
battery, and plug the charger into the port,
as shown in the image above.
How to manoeuvre the portable eBike
Charging the battery
1. Ensure the battery is charged in temperatures between 10-45°C
2. Always store the battery in a cool and dry place, at normal room temperature
3. Keep the battery away from all chemicals, water, re and heat
4. Do not disconnect the positive and negative power supply. Do not damage or
disassemble the battery
5. Always charge the battery with the supplied charger
6. Charging time must not exceed six hours, and charging current must not exceed
2A
7. Ensure the user has read the instruction manual before charging the battery
8. Always charge in a dry and cool place. Do not charge in a closed and high
temperature environment
9. Unplug the charger from the battery once the charge percentage is complete. Do
not plug the charger into mains power when not charging
10. Plug the jack into the battery rst, then connect the plug into the socket
11. After charging is complete, switch o the power socket, remove the plug and then
remove the charging jack from the battery port
12. If the charger indicator stops working, or the charger overheats and causes a
strange smell, unplug the charger immediately and do not use
13. Ensure the charger does not come into contact with water
14. Ensure the charger is stored in a dry, cool place
15. Do not allow battery level to be completely exhausted
16. Do not attempt to disassemble or replace any parts of the charger
17. Do not put the battery in places where it may fall to the ground. This may cause
battery leakage, overheating and may lead to re or explosion
18. Only dispose of batteries according to the local laws and regulations of your
region
19. Do not touch leaking batteries directly; wear protective clothing to remove them,
and dispose of them properly and immediately
Battery charging precautions
Otros manuales para One
2
Tabla de contenidos


