Mega System Tech NET101 Manual de usuario

NET101
RS232 / RS422 / RS485 to Ethernet Converter
User’s Manual
Version 1.2
Copyright Information
Copyright © 2004-2005, Mega System Technologies, Inc.
All rights reserved.
Reproduction without permission is prohibited.
Technical Support and Contact Information
Mega System Technologies, Inc.
Tel: +886-2-87922060
Fax: +886-2-87922066
Web: www.megatec.com.tw

i
CONTENTS
Chapter 1: Introduction ________________________________________ 1
Section 1. Features___________________________________________ 1
Section 2. Networking with NET101______________________________ 2
Section 3. Package Contents ___________________________________ 3
Section 4. NET101 Description__________________________________ 3
Section 5. NET101 DB-9 Pin Assignment__________________________ 4
Section 6. NET101 Indicators___________________________________ 5
Chapter 2: Installation Procedure________________________________ 6
Chapter 3: Hardware Installation ________________________________ 7
Section 1. Installation Procedure ________________________________ 7
Chapter 4: Using Netility to Setup IP & Update Firmware________________ 9
Section 1. Installing Netility_____________________________________ 9
Section 2. Using Netility _______________________________________ 9
2.1 Network Selection_________________________________________ 9
2.2 Configure ______________________________________________ 10
2.2.1 IPAddress____________________________________________ 10
2.2.2 Advanced ____________________________________________ 11
2.3 Upgrade Firmware _______________________________________ 11
2.4 About__________________________________________________ 12
2.5 Refresh ________________________________________________ 12
Chapter 5: Configure NET101 by WEB Browser ___________________ 13
Section 1. Introduction _______________________________________ 13
Section 2. NET101 Web Manager Interface_______________________ 13
2.1 Information _____________________________________________ 14
2.1.1 System Information_____________________________________ 14
2.1.2 Network Status ________________________________________ 14
2.2 Configuration____________________________________________ 14
2.2.1 Network______________________________________________ 15
2.2.2 WEB / Telnet__________________________________________ 18
2.2.3 System Time__________________________________________ 19
2.2.4 Connection ___________________________________________ 20
2.3 Help___________________________________________________ 21
2.3.1 About ________________________________________________ 21
Appendix A: Update NET101 Firmware __________________________ 23
Appendix B: NET101 Virtual COM Port __________________________ 26

NET101 User’s Manual -1-
Chapter 1: Introduction
Chapter 1: Introduction
Section 1. Features
NET101 is one of the smallest RS232/RS422/RS485 Ethernet Converter in the
market. This device provides the means to transfer serial data over the Internet
without having to make changes to your existing hardware/software. That is done by
connecting two NET101 in Master mode and Slave mode. Alternatively, a virtual
driver can be installed to control the facility over Internet.
The NET101 also could be used as a MODBUS gateway. It could convert transaction
between the MODBUS on Serial Bus and MODBUS on TCP/IP. Please refer to the
specification of MODBUS for detailed specification on MODBUS.
Some of the main features of this device are;
Firmware:
•Built-in Web Server
•Support RS232 / 422 /485 (Half/Full Duplex) physical bus
•Auto-detection of Ethernet bus type
•Support Virtual COM port drivers from Microsoft Windows platform
•Support One-on-One communication mode
•Support Virtual COM port mode
•Gateway between MODBUS Serial and MODBUS on Ethernet
•Configuration via telnet, Web or Netility (freeware)
•PPPoE and DDNS protocol for xDSL broadband connection
•Serial data transfer rate up to 115kbps (19.2kbps for continuous
transmit/receive).
•Connects serial device to 10/100Mbps Fast Ethernet Network Access
•Support any Web Browser for configuration
•Network Protocol: HTTP server, TCP/IP, UDP, SMTP, PPPoE, Dynamic DNS,
DNS Client, SNTP, BOOTP, DHCP, FTP Server, SNMP
Hardware:
•32-Bit 50MHz RISC ARM7 TDMI CPU
•System clock: 25MHz or 50MHz
•Flash Memory: 512KB / 1MB / 2MB / 4MB / 8MB
•Dynamic Memory: 2MB / 8MB / 16MB
•LCD display shows the IP address, Subnet Mask and Gateway
•Power supply: 4.8V to 7.0V, 250mA maximum.
•Operating Voltage: 3.3 volts
•Operating Temperature: 0°C ~ 60°C
•Operating Humidity: 5% ~ 90%
•Dimensions: 48mm x 63mm x 21m
•Weight: 75g
•For Indoor Use. Protective housing required for outdoor use

NET101 User’s Manual -2-
Chapter 1: Introduction
Section 2. Networking with NET101
NET101 gives the user two options when it comes to Network connection. The user
may choose to manage and control the various serial devices over Internet using
windows Virtual COM port function (refer to Fig 1). In this configuration, a NET101 is
connected to a serial device. The user can then manage and control each of these
serial devices over LAN.
Fig.1 NET101 using a Virtual COM Port in Windows mode
To extend this further, the user may opt to have a One-on-One configuration (refer to
Fig. 2). One of these 2 NET101 needs to be configured in Master mode, and the other
is configured in Slave mode.
Fig.2 NET101 a One-on-One Communication Diagram

NET101 User’s Manual -3-
Chapter 1: Introduction
Section 3. Package Contents
A standard package should contain these items;
One NET101 module
One Utility CD which contains;
1. Netility: to configure IP address and update the firmware.
2. Time Server: Time adjustment utility.
3. Adobe Acrobat 5.0 Reader.
4. User Manual
One Power Adaptor (European / USA)
Section 4. NET101 Description
Fig.3 NET101 Front View

NET101 User’s Manual -4-
Chapter 1: Introduction
Section 5. NET101 DB-9 Pin Assignment
Fig.4 DB-9 Male
NET101 DB-9 PIN Assignment
DB-9 Pin No. RS-232 RS-422 RS-485
Full Duplex RS-485
Half-Duplex
1 DCD RxD- RxD-
2 RxD RxD+ RxD+
3 TxD TxD+ TxD+ TxD+ / RxD+
4 DTR TxD- TxD- TxD- / RxD-
5 GND GND GND GND
6 DSR
7 RTS
8 CTS
9 RI
Fig.5 NET101 DB-9 PIN assignment

NET101 User’s Manual -5-
Chapter 1: Introduction
Section 6. NET101 Indicators
NET101 LED Status Indicators
Color Signal Definition Condition / Description
Green Power state On: Normal power
Red Error Condition On: Error condition occurred
Orange Logon state On: When there is Master or Driver
logon and receive the image.
Yellow Data activity Flash when there is data
transmission / receive by DB-9.
Fig.6 NET101 Status LED Indicator
NET101 LAN Port LED Light indicators
Color Condition / Description
Green On: Internet correspond speed is 100M
Flash: Data transmitting / receiving
Yellow On: Internet correspond speed is 10M
Flash: Data transmitting / receiving
Fig.7 NET101 LAN LED Indicator

NET101 User’s Manual -6-
Chapter 2: Installation Procedure
Connect the designated serial device, power
adaptor and Ethernet cable to NET101
(Chapter 3)
Install Netility supplied in the Utility CD.
Use Netility to setup the IP (for Static IP)
(Chapter 4)
Open a standard web browser, key in the IP
and go thru the configuration in
“NET101 Web Manager”
(
Chapter 5
)
Set-up completed
Chapter 2: Installation Procedure
Before you start using NET101, you will need to set-up both the hardware and
software. The following is a flow chart on the installation procedure:
Fig.8 NET101 installation flowchart

NET101 User’s Manual -7-
Chapter 3: NET101
Chapter 3: Hardware Installation
The following details the installation procedure for NET101.
Section 1. Installation Procedure
Step 1:
Connect the DB-9 to
either a RS232 / 422 or
485 serial port of the
device.
Step 2:
Connect one end of the
Ethernet cable to a hub /
router.
NET101 User’s Manual -8-
Chapter 3: NET101
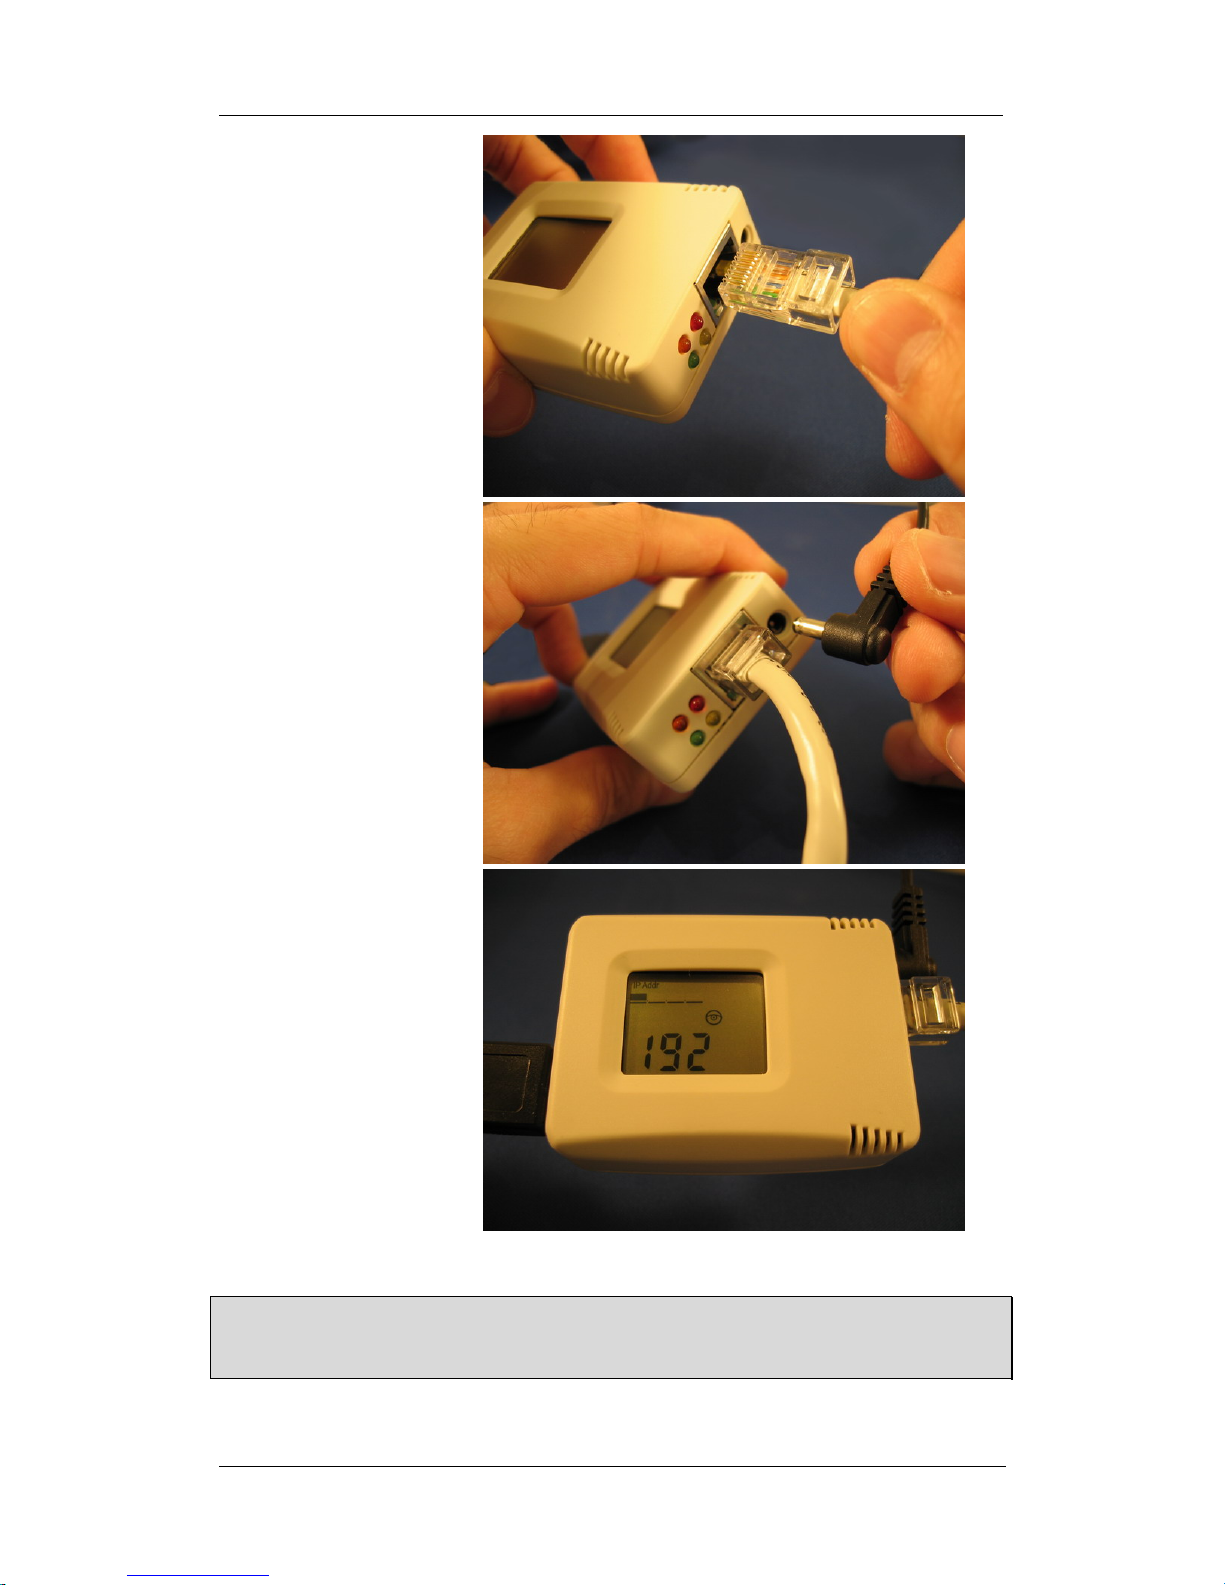
Step 3:
Connect the other end of
the Ethernet cable to
NET101 Ethernet port.
Step 4:
Connect the DC adapter
power output into
NET101 socket, and plug
the DC adaptor into the
wall socket
Step 5:
The LCD will display the
IP, Subnet Mask and
Gateway IP. Use a WEB
browser to login into the
IP address.
Warning:
Please make sure the input Voltage and Frequency of the DC power adapter (DC
5.3V) is correct before plugging into the power outlet!
Tabla de contenidos


