Mamiya C330S Manual de usuario

Mamiya C330S Manual
Mamiya C330 ProfessionalMamiya C330S & C330
This manual was adapted for the web from scans of an original
C330S manual. The scans were done by Erik Jonker. During the
conversion to the web version I made a few style changes as well
as a couple of grammer changes, mainly to make the document
more web friendly. Also thanks to Keven Fedirko for finding all
of my typos.
There are also a few additions that I made; pointing out where the
C330S differs from the original C330, and the color photos on
page 3 are of a C330, and not a C330s. (the color photos are by
Bob Erdman).
Scans of the tables on pages 40 and 41 were difficult to read and I
am hoping to get some better scans so that I can complete them.
At the moment they are empty...eventually they should contain
the depth of field tables for the 7 lenses listed in the manual.
Hope you find this helpful...John M. Brewer of a few
propellerheads.
[START] | Table of Contents | Next ->
file:///E|/c330s/index.html [22-10-2003 15:26:30]

Mamiya C330S: Contents
Mamiya C330 Professional 1
Before using the camera, read these
instructions very carefully, and learn
the correct method of hanlding it. By
becoming completely families with
the Mamiya C330 Professional "S",
you can for many years to come
make the most of the splendid
opportunities this fine camera offers.
Congratulations on your choice of
Mamiya C330 Professional "S"
twin-lens reflex camera.
This mamiya C330S, an
exceptionally high-grade camera, was
designed by emphasizing further
improvements on the popular
Mamiya C series. Retaining the many
features of the Mamiya C series
cameras which have won highest
praise from professional
photographers the world over as
unique twin-lens reflex cameras (2-
1/4 in. square format) with
interchangeable lenses.
Final results reveal that this Mamiya
C330S, an ideal camera for
professional photographers, is also a
wise choice for the many advanced
amateurs who wish to take advantage
of fine details in enlargements which
only a large format camera truly
makes possible.
The Mamiya C330S accepts all
interchangeable lenses of the current
Mamiya C series as well as all of the
accessories except the single
exposure attachment.
Contents
Specifications..........................2
Names of Parts..........................3
Lens Mounting/Removal...................5
Handling the Neck Strap.................7
Handling Focusing Hood..................8
Opening and Closing the Back Cover.....11
Winding and Shutter Test Without Film..12
Before Loading Film....................13
Loading Film...........................14
Photographing..........................17
Distance Scale.........................19
Close-up Photography...................21
Changing the Focusing Hood.............23
Changing the Focusing Screen...........25
Flash Photography......................26
Handling the 105mm f/3.5 Lens..........27
Multiple Exposures.....................29
Precautions on Shutter Operations......29
Mamiya Sekor Lenses....................31
Accessories............................33
Depth-of-Field Tables..................40
System Chart for Mamiya C330S..........42
file:///E|/c330s/page_01.html (1 of 2) [22-10-2003 15:26:31]

Mamiya C330S: Contents
With the wide selection of all these
interchangeable lenses and
accessories, you can further widen
your scope of photography by
making the most of the unlimited
versatility of Mamiya C330S offers.
<- Prev | Table of Contents | Next ->
file:///E|/c330s/page_01.html (2 of 2) [22-10-2003 15:26:31]

Mamiya C330S: Page 2
Specifications 2
Type 6 x 6 Twin-Lens Reflex Camera with Interchangeable Lens System
Picture Size 56 x 56 mm (actual picture area)
Film Size 120 roll film (12 exposures), 220 roll film (24 exposures)
Changeover effected by turning pressure plate
Lens (standard) Mamiya/Sekor 80 mm f/2.8
Shutter Seiko-#0 (B, 1-1/500 sec., M-X synchronization)
Focusing Front extension system by rack-and-pinion with focusing knobs.
Focusing screen Changeable
Focusing hood One-touch operation facilitates interchange of dioptric lenses.
Removable and replaceable by other types of finders.
Film wind By winding crank. Automatic shutter cocking and winding stop. Double
exposure prevention device.
Exposure counter Progressive type, automatic re-set. (120/220 changeover coupled with the
pressure plate)
Other features Parallax and exposure compensation are readable on the focusing screen in the
finder.
Multiple exposure possible. Shutter release lock provided.
Dimensions 123 (W) x 171 (H) x 113 (D) mm
Weight 1,650 grams (with 80 mm f/2.8 lens)
·Due to a modification of the product, specifications and appearance are subject to change without
notice.
<- Prev | Table of Contents | Next ->
file:///E|/c330s/page_02.html [22-10-2003 15:26:31]

Mamiya C330S: Page 3
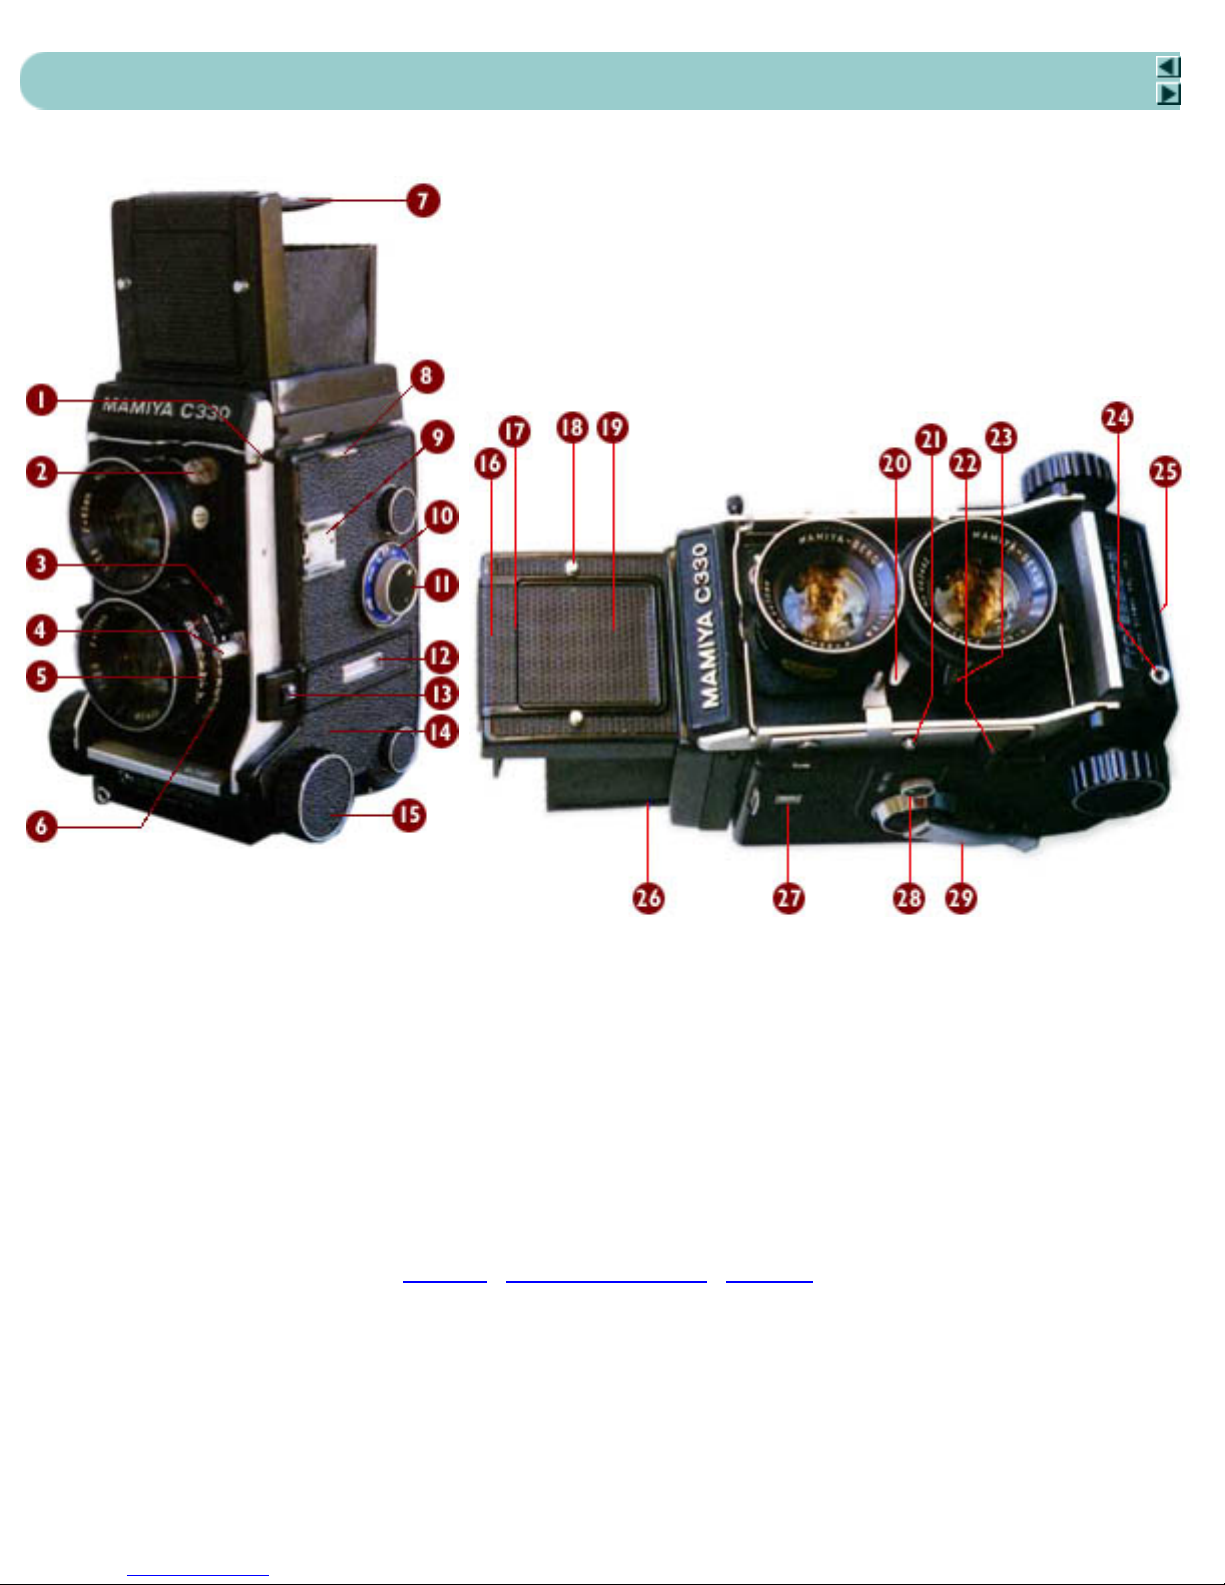
Names of Parts 3
1. Lens clamp bracket
2. Synchro socket
3. M-X synchro selector
4. Shutter cocking lever
5. Aperture ring
6. Shutter speed ring
7. Magnifier
8. Neck strap lug*
9. Accessory shoe
10. Parallax correcting dial
11. Lens lock knob
12. Distance scale window
13. Distance scale revolving knob
14. Focusing knob fixing lever**
15. Focusing knob
16. Sportsfinder frame (for 65mm lens)**
17. Sportsfinder frame (for 80mm lens)
18. Sportsfinder mask stud
19. Sportsfinder flap
20. Shutter release lever
21. Shutter release lock
22. Shutter release button (upper)
23. Aperture control knob
24. Shutter release button (lower) with cable release socket
25. Tripod Socket
26. Release button for sportsfinder frame and flap**
27. Exposure counter
28. Multiple exposure dial
29. Film advance crank
*Standard C330 has loops not lugs. ** Not available on standard C330.
<- Prev | Table of Contents | Next ->
file:///E|/c330s/page_03.html [22-10-2003 15:26:31]

Mamiya C330S: Page 4
Names of Parts 4
30. Back cover lock button
31. Back cover open knob and spool change knob (upper)
32. Spool change knob (lower)
33. Eye opening for sportsfinder
34. Focusing hood lock screw
35. Focusing screen frame lock
36. Take-up spool chamber
37. Start marks
38. Film chamber
39. Film pressure plate
<- Prev | Table of Contents | Next ->
file:///E|/c330s/page_04.html [22-10-2003 15:26:31]

Mamiya C330S: Page 5
Lens Mounting/Removal 5
Wind up the film advance crank
and fold it into the camera
body. Turn the focusing knob
and fully retract the lens into
the camera body. Then, turn the
lens lock knob (11) until the
triangle mark points to
UNLOCK.
Place the camera so that the
lens mount faces upward and
pinch the lens clamp bracket
(1), press the head toward the
camera body, and move it along
the groove to release the lens
clamp. Now the body cap
and/or lens can be removed.
Insert the lens into the lens
mount so that the lens shutter
cocking lever (4) connects with
the cocking lever on the camera
body. This operation is more
easily performed by cocking the
lens shutter with the fingers and
inserting the lens from the
cocking lever side on the body.
Hook the lens clamp bracket (1)
to its original position, and turn
the lens lock knob (11)
clockwise to the LOCK
position.
<- Prev | Table of Contents | Next ->
file:///E|/c330s/page_05.html [22-10-2003 15:26:32]

Mamiya C330S: Page 6
Lens Mounting/Removal (cont.) 6
After changing a lens, set
the parrallax correcting dial
(10) to the focal length
value of the mounted lens.
For 55mm and 65mm
lenses, set the parallax
correcting dial to 80, then
attach the parallax
correction plate for
55mm/65mm lenses to the
focusing hood. (Refer to
p.22). For the 250mm lens,
set the parallax correcting
dial to 180.
Precautions
1If the film advance crank is not kept
positioned diagonally upward, (the same
angle as the crank housing position), the
cocking lever (4) cannot be connected to
the cocking lever on the camera body.
2For the cocking lever on the 180mm
lens, an auxiliary lever for connection is
provided on the side of the lens barrel.
Since this lever is constantly pushed
upward by a spring, when mounting the
lens, hold the auxiliary lever downward
with a finger tip to prevent obstructing
installation.
3When the lens lock knob (11) is in the
UNLOCK position, the portion to which
the picture taking lens (lower lens) is
attached is protected from the camera
interior by a cover to shield the film from
exposure to light and a red warning signal
is visible on the focusing screen surface.
Should this cover be pushed while
removing the lens, light will strike the
film. Don't push it.
4After changing a lens, turn the lens lock
knob (11) to the LOCK position,
otherwise, the shutter release button
cannot be depressed.
<- Prev | Table of Contents | Next ->
file:///E|/c330s/page_06.html [22-10-2003 15:26:32]

Mamiya C330S: Page 7
Handling the Neck Strap 7
Attaching to Camera Place the neck strap fastener
over the neck strap lug on the
camera body and slide it toward
the hanging direction while
pressing it toward the body
until it clicks and locks in place
Removing from
Camera While pushing in on the rear
blade of the neck strap fastener
with your thumb, slide it in the
direction opposite to that for
attaching, and remove the
fastener.
<- Prev | Table of Contents | Next ->
file:///E|/c330s/page_07.html [22-10-2003 15:26:32]

Mamiya C330S: Page 8
Handling the Focusing Hood 8
Raising the Focusing
Hood Raise the rear of the focusing
hood; it will automatically
spring up into position.
Using the Magnifier By pushing in the top of the
sportsfinder flap (19) at the
center of the finder frame, the
magnifier swings up into
position.
While looking into the focusing
screen, turn the focusing knob
until the image becomes clear
and sharp.
<- Prev | Table of Contents | Next ->
file:///E|/c330s/page_08.html [22-10-2003 15:26:33]
Este manual sirve para los siguientes modelos
1
Tabla de contenidos
Otros manuales de Cámara de película de Mamiya

Mamiya
Mamiya RZ67 Manual de usuario

Mamiya
Mamiya RZ67 PROFESSIONAL II D Manual de usuario

Mamiya
Mamiya M645J Manual de usuario

Mamiya
Mamiya M645 1000S Manual de usuario

Mamiya
Mamiya ZE Guía de instalación

Mamiya
Mamiya AUTO-LUX 35 Manual de usuario

Mamiya
Mamiya 645 Manual de usuario

Mamiya
Mamiya UNIVERSAL BLACK Manual de usuario

Mamiya
Mamiya 645E Manual de usuario

Mamiya
Mamiya C330f Professional Manual de usuario