LUMINGTON T3 Manual de usuario

LUMIGON T3
• Quick Start Guide
• Safety Guide
• Warranty
• End-User License Agreement
English

Copyright © 2016 Lumigon A/S - All rights reserved 1
Contents
Quick Start Guide 7
Safety Guide 15
Warranty Terms and Conditions 33
End-User License Agreement 41
Other Legal Information 47

Copyright © 2016 Lumigon A/S - All rights reserved Copyright © 2016 Lumigon A/S - All rights reserved
23
Inside the box
You should nd the following items in the sales box:
• T3 smartphone
• USB cable
• USB power adaptor
• Headset
• This leaet with a Quick Start
Guide, Safety Guide, Warranty and
End-User License Agreement
If something is missing in the box, please contact the
retailer where you bought your phone.
NOTE: The items supplied with your phone may vary
depending on the country or region where you buy
your phone or depending on your mobile service
provider. To buy additional Lumigon accessories,
contact your local Lumigon authorized retailer or visit
our hompage lumigon.com
For more information and the complete user
manual touch the Lumigon icon in order to
launch the Lumigon app or visit lumigon.
com/support to download the manual.
Dear Customer,
Thank you for buying a T3 smartphone created by
Lumigon in Denmark.
For more information on using your phone and its
features, please refer to our user manual and other
online resources available from the Support section
of our web page at www.lumigon.com/support.
If you don’t nd the information you are looking
for, you can contact our Support team by e-mail at
suppor[email protected].
If your product requires service, please contact the
retailer where you purchased your product. To learn
more about warranty terms and conditions, please
refer to the Warranty section in this leaet.
We hope that you will enjoy using our smartphone
just as much as we enjoy creating it.
Best regards,
Lumigon team
Copyright © 2016 Lumigon A/S - All rights reserved Copyright © 2016 Lumigon A/S - All rights reserved
45
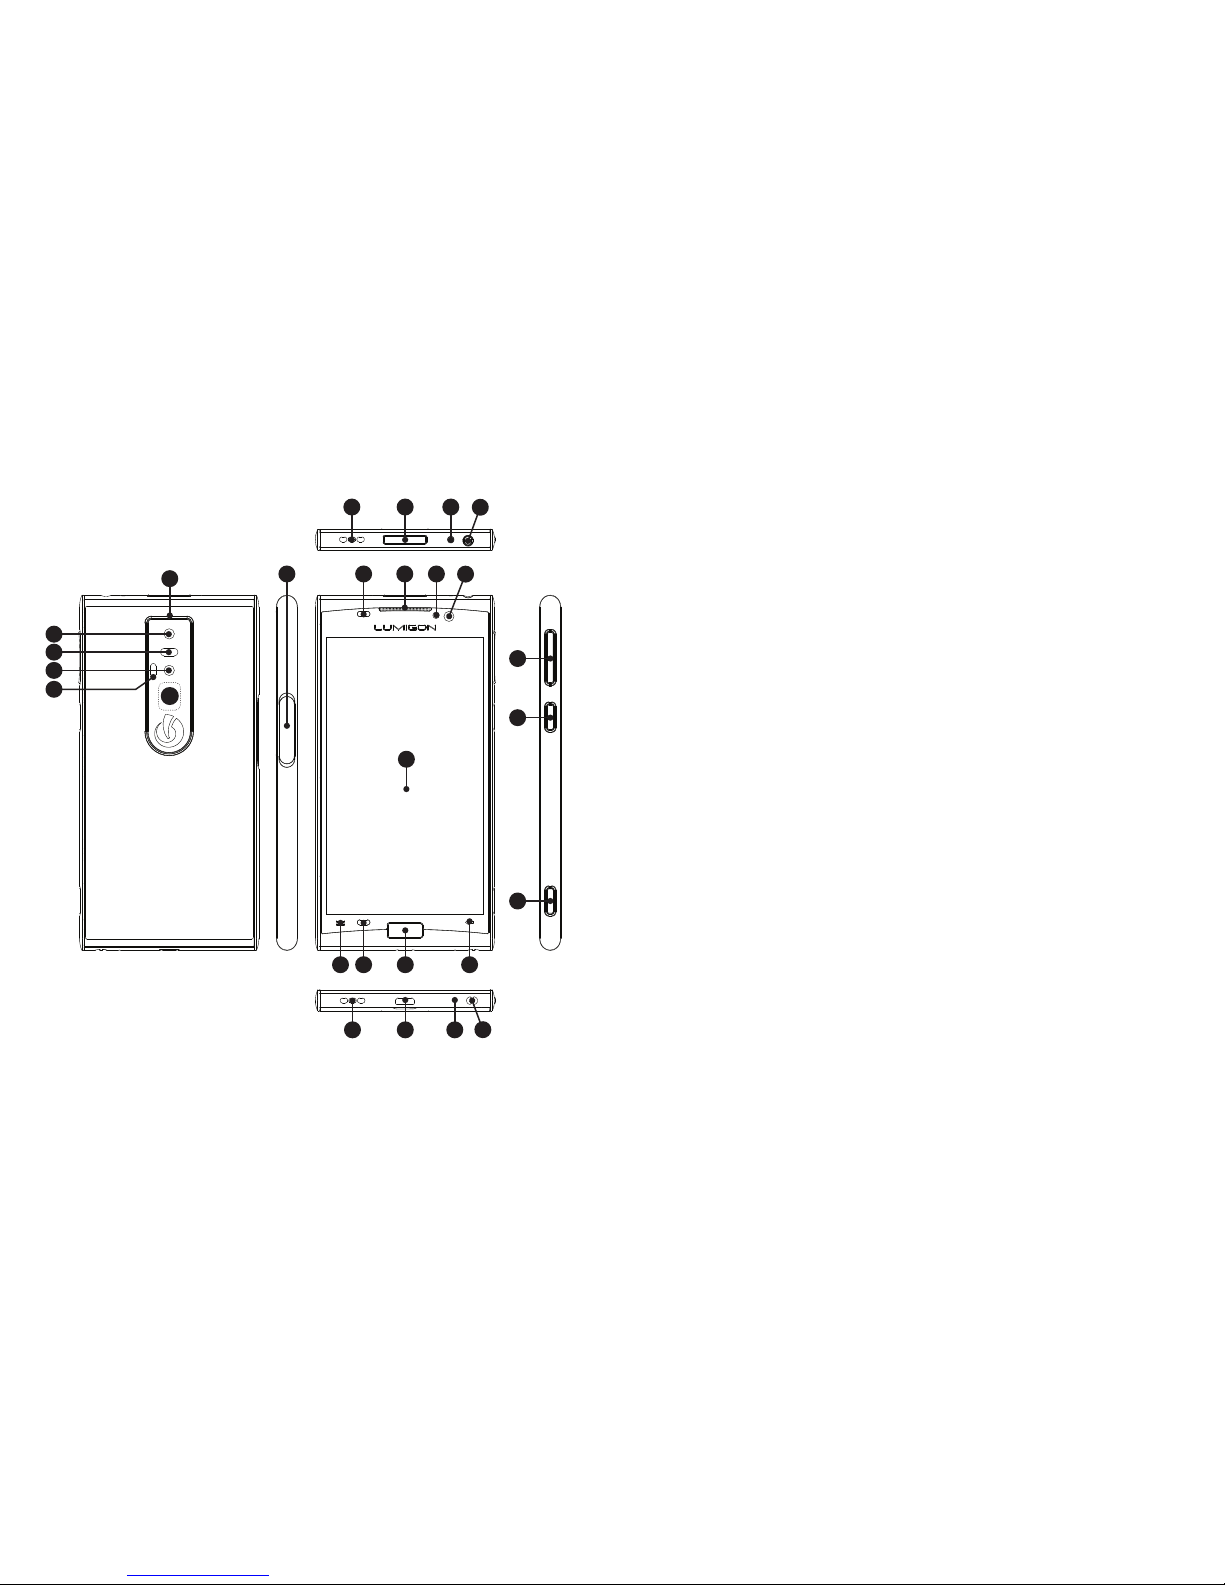
T3 overview
1
5
2 3 4
1211 13 14 15
16
20
21
22
18
6
7
8
910
24 25 2623
17 19
12
1. Speaker (top)
2. Power key
3. Infrared transmitter/
receiver
4. Audio jack connector
(3.5 mm)
5. Noise cancellation
microphone
6. 13 megapixel
back camera
7. Back camera ash
8. Infrared camera
9. Infrared LED light
10. BackTouch area
11. SIM card tray
12. Proximity sensor
13. Ear speaker
14. Front camera ash
15. 2.4 megapixel
front camera
16. Active area
17. Menu key
18. Home key with
ngerprint reader
19. Back key
20. Volume / Zoom keys
21. ActionKey
22. Two-step camera
key with autofocus
23. Speaker (bottom)
24. Micro USB connector
25. Microphone
26. Lanyard attachment
point

Copyright © 2016 Lumigon A/S - All rights reserved Copyright © 2016 Lumigon A/S - All rights reserved
67
Quick Start Guide
Copyright © 2016 Lumigon A/S - All rights reserved Copyright © 2016 Lumigon A/S - All rights reserved
89
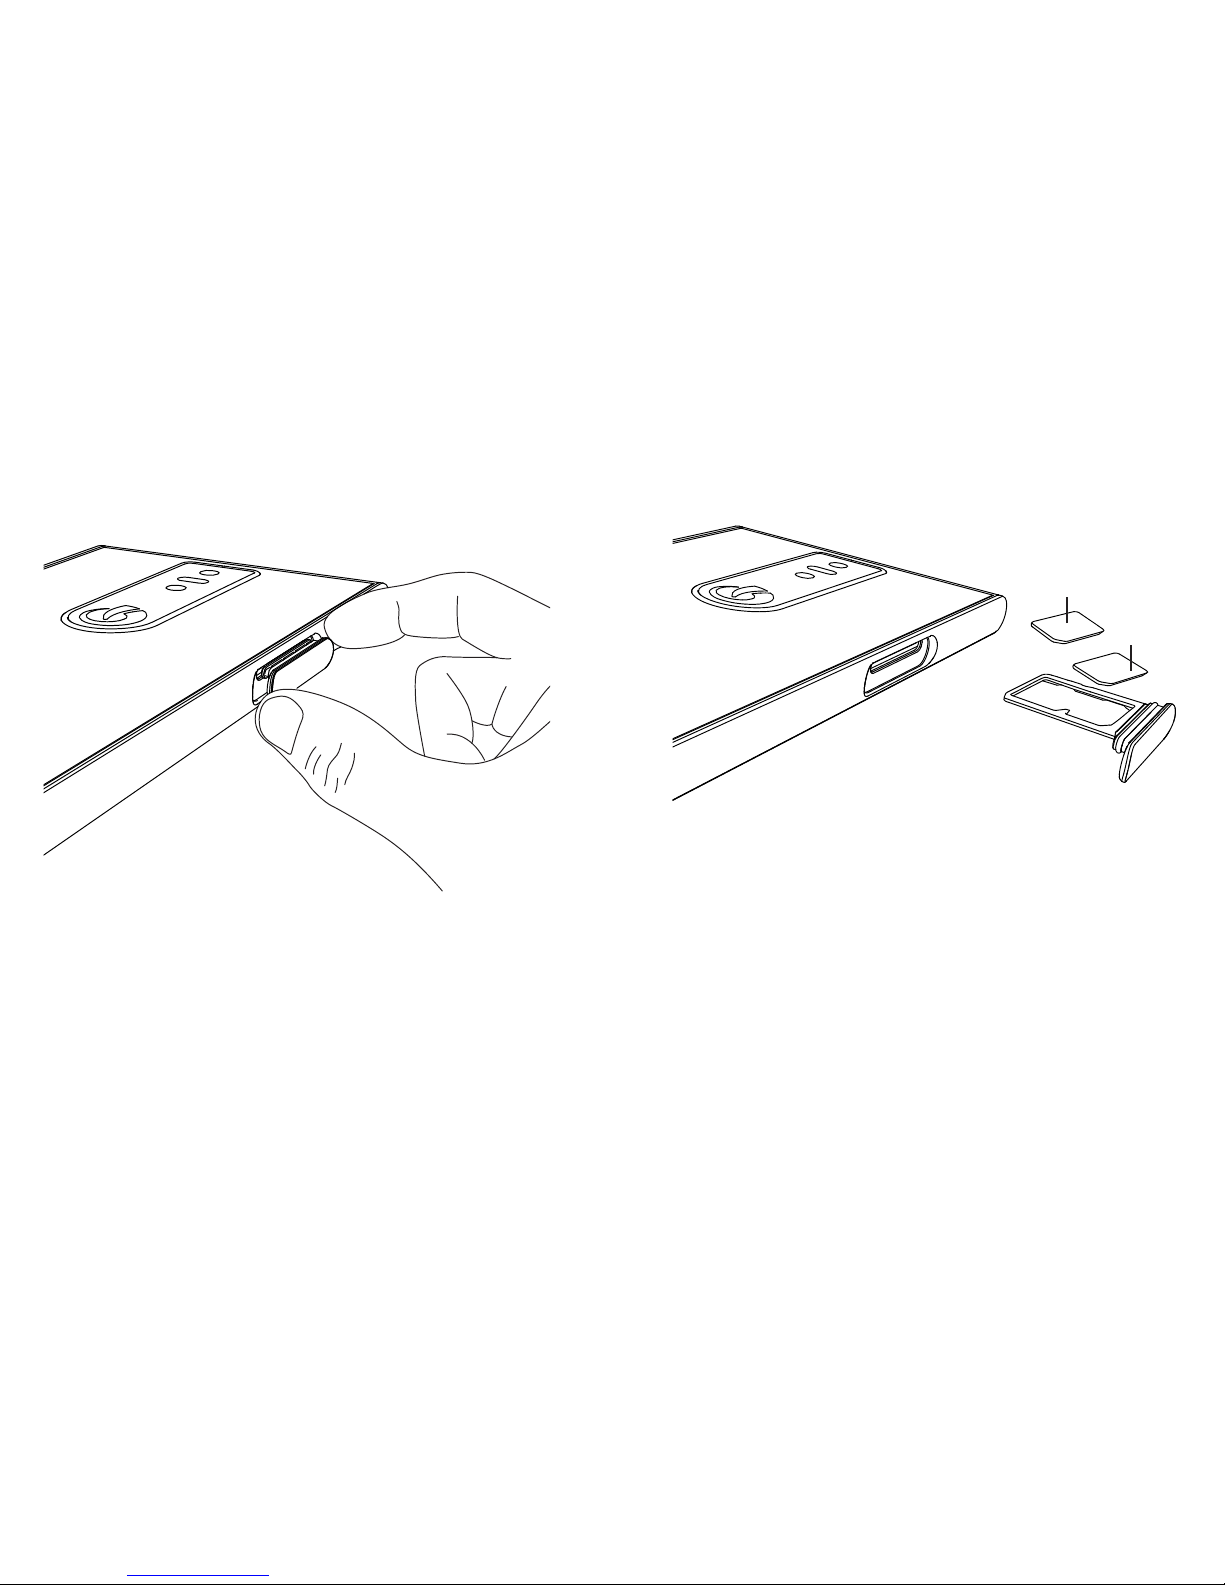
Insert SIM card
With your ngernails of your thumb and index nger
gently pull out the SIM card tray.
Place your nano SIM card into the SIM card tray 1
with gold contracts facing down.
If you use two SIM cards, place your secondary nano
SIM card into the SIM card tray 2.
NOTE: T3 is only compatible with nano SIM cards.
Any other incompatible or modied SIM cards can
damage the SIM card, its data and the phone itself.
Any such damage is not covered by the warranty.
SIM 1
SIM 2

Copyright © 2016 Lumigon A/S - All rights reserved Copyright © 2016 Lumigon A/S - All rights reserved
10 11
To insert the SIM card tray back into the phone make
sure the tray is positioned correctly, then carefully
push it all the way in. Make sure the tray is inserted
properly.
Charge the phone using the USB charger
1. Plug the charger into a power outlet.
2. Plug the end of the charger cable into the
micro USB port of the phone (the USB sign
on the head of the cable facing up).
NOTE: It takes 1.5-2 hours to fully charge the phone.
Copyright © 2016 Lumigon A/S - All rights reserved Copyright © 2016 Lumigon A/S - All rights reserved
12 13
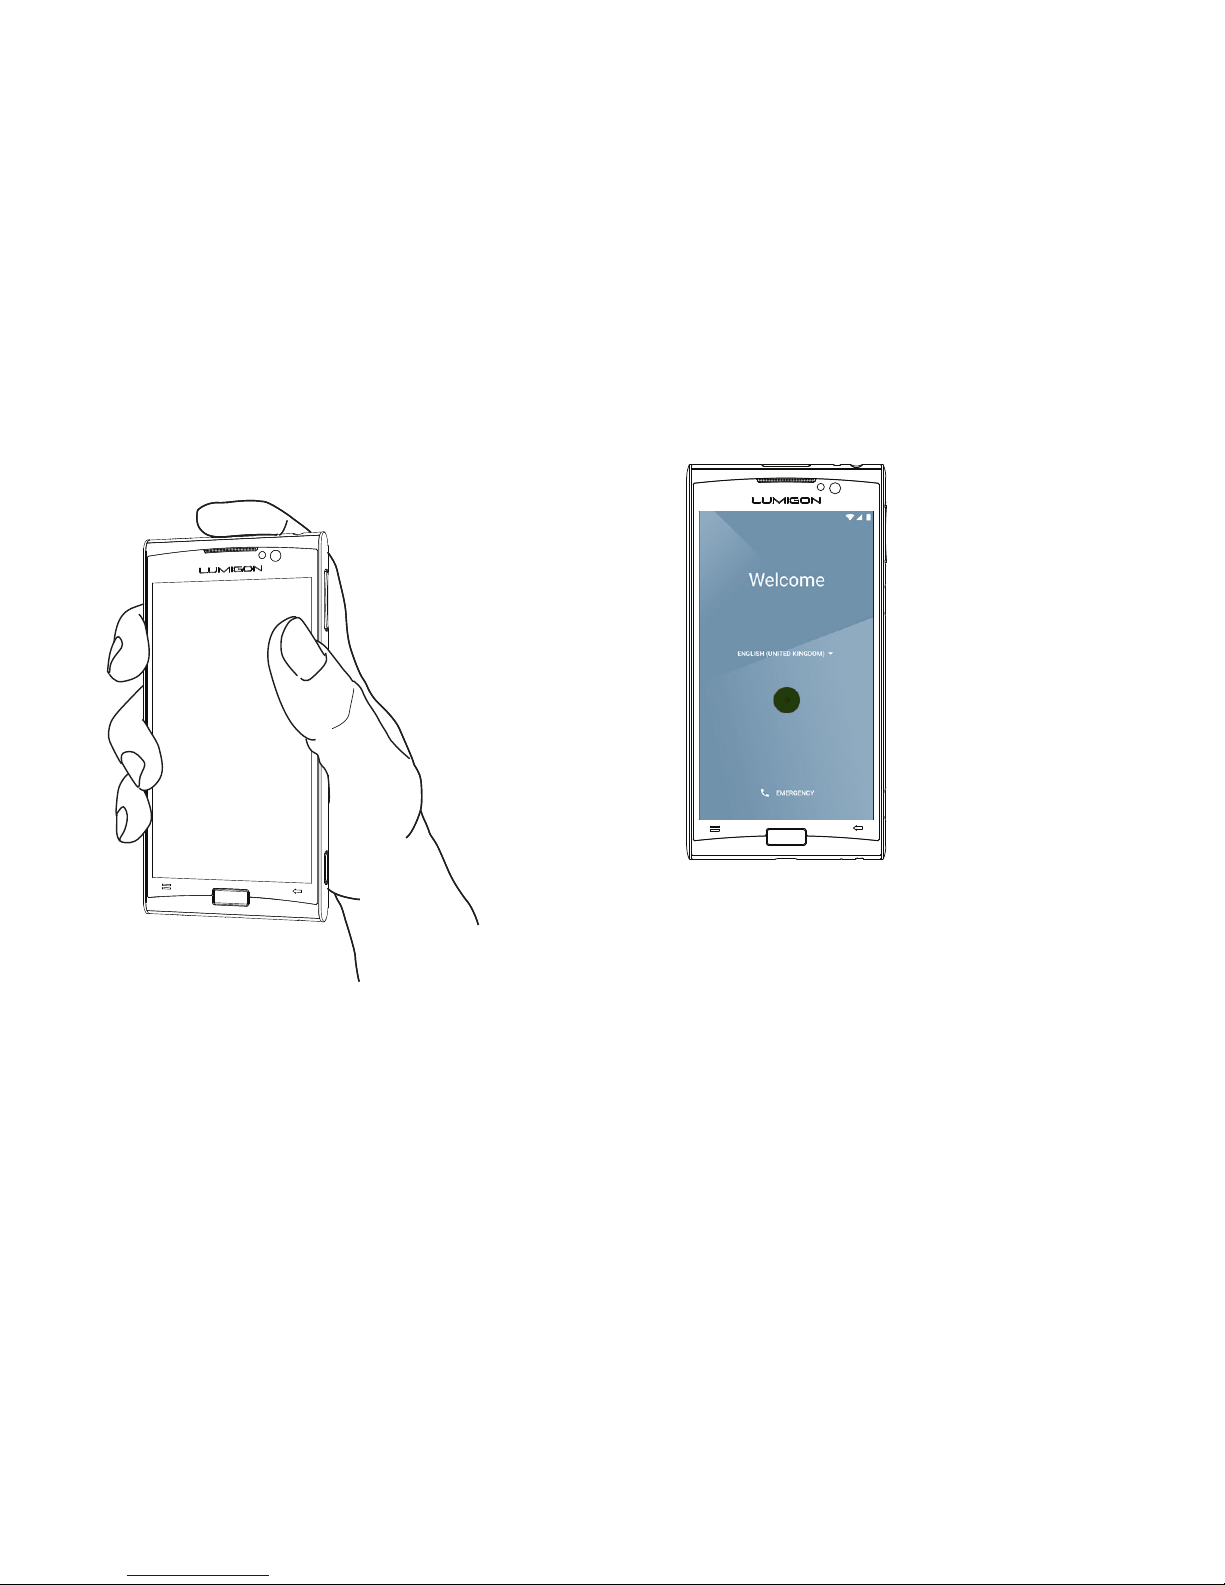
Turn on Phone
Press and hold down the POWER key for 2
seconds until the Lumigon logo appears on
the screen, and then release the key.
Follow the onscreen instructions
NOTE: To sign in with a Google Account, you’ll need
access to the Internet using either a Wi-Fi or a mobile
data connection. You may incur data connection
charges when you connect to the Internet. Contact
your service provider for more information.
By signing in with your Google Account you can
synchronize your e-mail, contacts, calendar events
and other data associated with that account on your
phone.
1. When you turn on
your phone for the
rst time, you’ll see
a Welcome screen.
Select your language,
and touch “Start”.
2. Follow the onscreen
instructions to set
up your phone.
3. When prompted, sign
in with your Google™
Account. If you don’t
have an account, you
can create one directly
on your phone.

Copyright © 2016 Lumigon A/S - All rights reserved
14
Safety Guide

Copyright © 2016 Lumigon A/S - All rights reserved Copyright © 2016 Lumigon A/S - All rights reserved
16 17
READ THIS BEFORE YOU PROCEED
Please read these safety guidelines carefully and make sure to
observe them to ensure proper and safe use of the phone.
Failure to observe the safety precautions and warnings
in this guide or other product documentation may lead to
situations with the risk of bodily injury to yourself or others,
electric shock, re, explosion, damage to your phone and other
equipment as well as possible legal liabilities and damages.
The phone and/or its accessories may only be serviced
or repaired by authorized technical personnel (except as
explained elsewhere in the product documentation). Please be
aware that your warranty will be invalidated if you disassemble
or attempt to disassemble the phone and/or its accessories
or if the phone and/or its accessories are repaired by
unauthorized personnel. To learn more about warranty terms
and conditions, please see the Warranty section in this leaet.
Safety information and precautions
Electricalsafety-avoidelectricshockandre
This phone is intended for use when supplied with power from
the designated battery or power supply unit. Any other usage
may be dangerous and will invalidate any approval given to
this phone.
Proper grounding installation
The phone comes equipped with a USB cable for connecting
with a computer.
Make sure your computer is properly grounded (earthed) before
connecting your phone. The power supply cord of a computer
has an equipment-grounding conductor and a grounding plug.
Make sure the plug is plugged into an appropriate outlet that
is properly installed and grounded in accordance with all local
codes and ordinances.
Safety precautions for power supply unit
Always use the correct external power source. The phone
should only be operated from the type of power source
indicated on the electrical ratings label. If you are unsure,
consult your authorized service provider or local power
company.
CAUTION:
Connecting the phone to improperly grounded
equipment can result in an electric shock to your
phone.
Tabla de contenidos


