
Lindy 32700 Manual de usuario



User Manual English
Introduction
Thank you for choosing the LINDY Wireless Projector Server. This product quickly turns your
existing wired projector into a high-end wireless projector.
A split screen multicasting feature allows up to four users to simultaneously use a single
projector at once, with multiple users logged onto the server. All users need to do to start a
projection is enable their WiFi and connect to the Wireless Projector Server using the Wireless
Projector Server Utility.
These features save you time swapping connection cables between computers or loading
storage media onto a wired in computer helping make your projector part of an easier, simpler
and more professional presentation system.
Package Contents
LINDY Wireless Projector Server
Multi-country 5V 2.5A PSU (UK, Europe, USA, Australia, China)
2x Wireless dipole Antenna with SMA connectors
4 Pozidriv, 2 slot screws & wall mounting bracket
Software CD includes:
Software for Windows & Mac OS, MobiShow for Windows Mobile 5/6
VAC.exe (for audio projection)
VDD.exe (for virtual extended display)
IB Maker (for changing the Wireless Projectors default menu screen)
PtG Converter (for converting PowerPoint files for use with MobiShow)
SNMP Manager (for Wireless Projector Server device management)
This Manual
Features
Supports Windows 2000, XP, Vista & Windows 7, Mac OSX 10.5 and later
4-to-1 split screen projection - connect one projector to four computers
1-to-4 screen projection - connect one computer to four Wireless Projector Servers
Conference Control - allows moderators to control access to projectors
Session security login IEEE standard 64/128 bit WEP, WPA, WPA2 key & Gatekeeper
High Performance screen projection with audio & multimedia playback.
Supports H.264 HD video streaming
Supports OSD (On-Screen Display) image uploading
Supports SNMP (Simple Network Management Protocol) device management
Supports AP (Access Point) Client Mode
Compatible with MobiShow - make presentations from your Smartphone
User Manual English
Specification
Connections
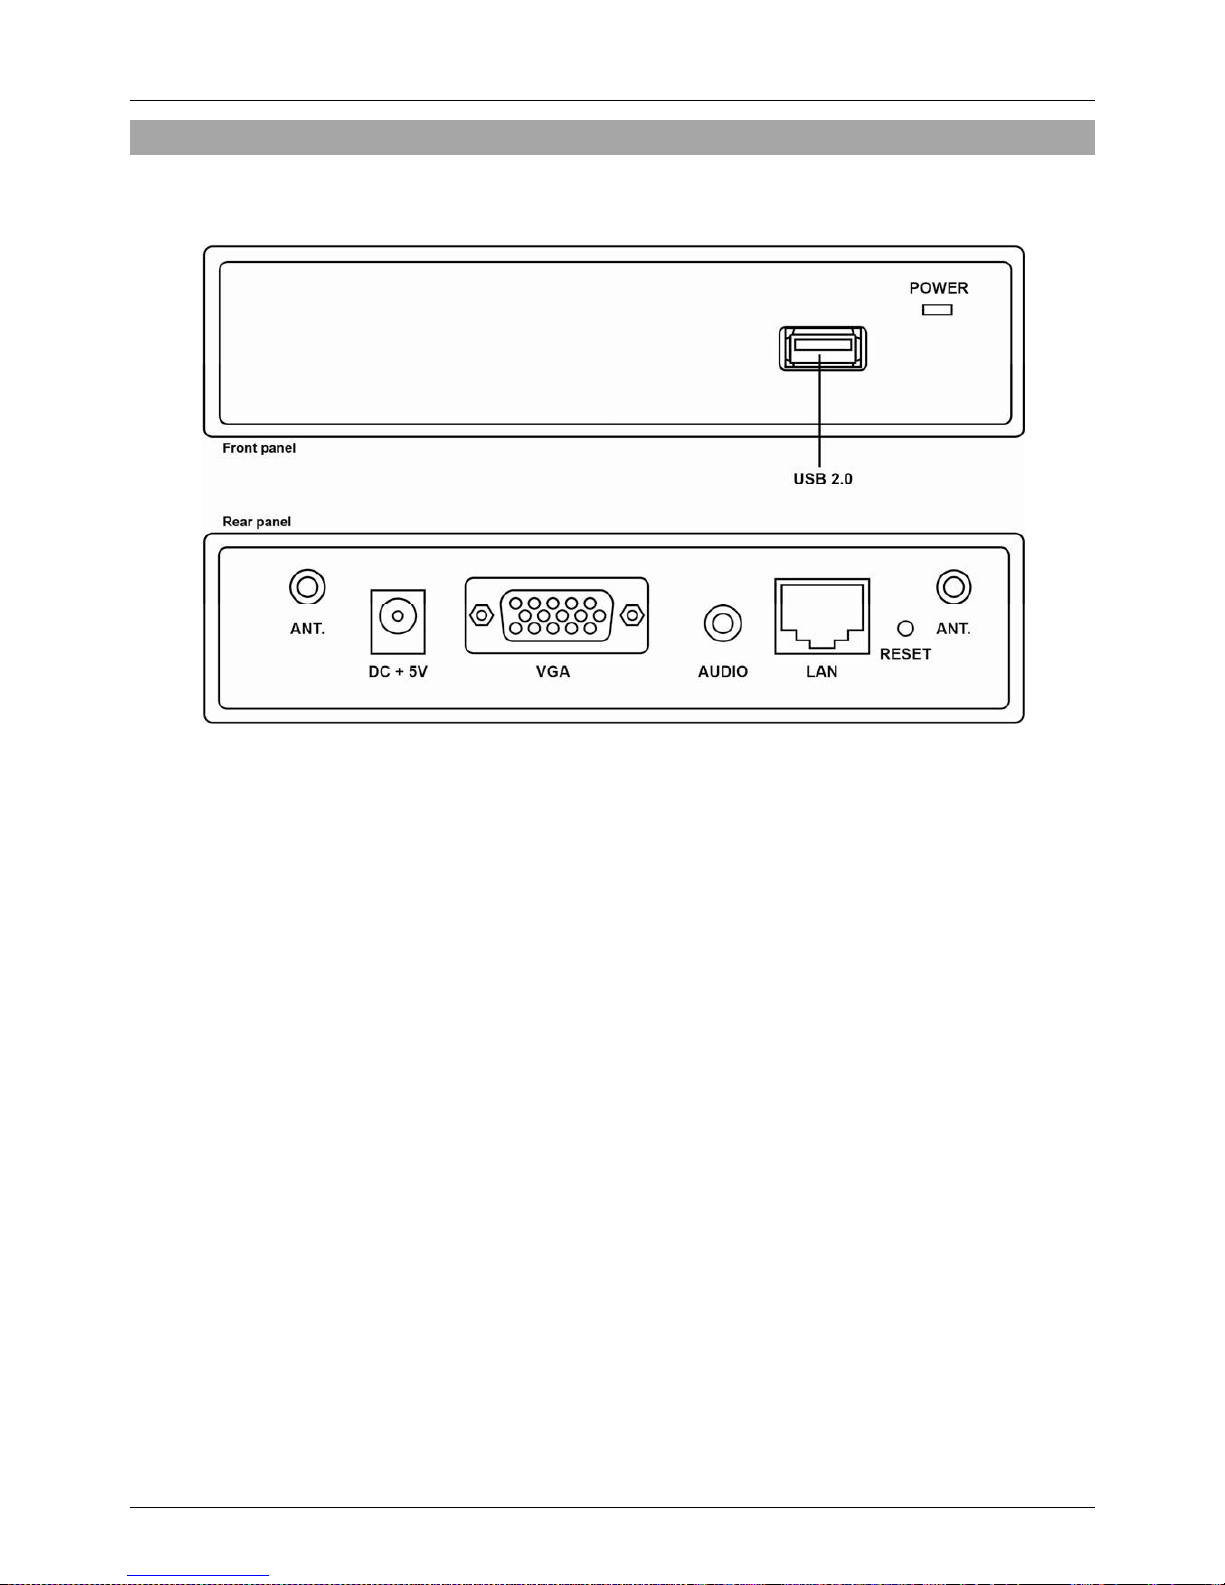
1. USB for mouse and/or keyboard
2. Power LED – Red/Green
3. Antenna ports
4. 5-VDC power
5. VGA Output
6. 3.5mm Stereo Audio Output
7. RJ-45
8. Reset button
Specifications
Standards - IEEE 802.11b/g/n (2.4 GHz), 802.3/3u (10BASE-T/100BASE-TX)
IP Address Configuration – Automatic & Manual DHCP
Channels - 11 US/Canada , 13 Europe , 14 Japan
Wireless Encryption/Key - IEEE standard 64/128bit WEP/WPA/WPA2-PSK
Operating Frequency - 2.4 GHz 300Mbps LAN 10/100Mbps
Wireless Range (Maximum) - 100m (300ft)*
Supported Media Formats - MP3, MPEG1 (.mpg, .dat), MPEG2 (.mpg, .VOB), MPEG4
(.wmv9, .asf), DivX 3/4/5, Xvid, H.264 (.mov)
Output Resolutions - 800x600 / 1024x768 / 1280x768 / 1280x800,16/32 bit colour depth, up
to 30 fps
Dimensions 13.9 x 10.8 x 3.7 cm (WxDxH) / Weight - 0.5 kg
* The actual operational distances depends on the surrounding environment
1.
2.
3.
3.
4. 5. 6.
7.
8.

User Manual English
Installation
Important
BEFORE STARTING AN INSTALLATION ENSURE ALL DEVICES ARE POWERED OFF
The Wireless Projector Server is capable of receiving separate audio & video signals up to
100m from a transmission source. Actual operational distances depend on the construction of
the surrounding building and any walls or floors that are situated between the transmitting
computer and the Wireless Projector Servers receiving antenna.
Quick Setup
These steps follow an installation using VGA equipment with Windows XP
1. Connect the Wireless Projector Server to a projector with a VGA cable.
Power up the projector
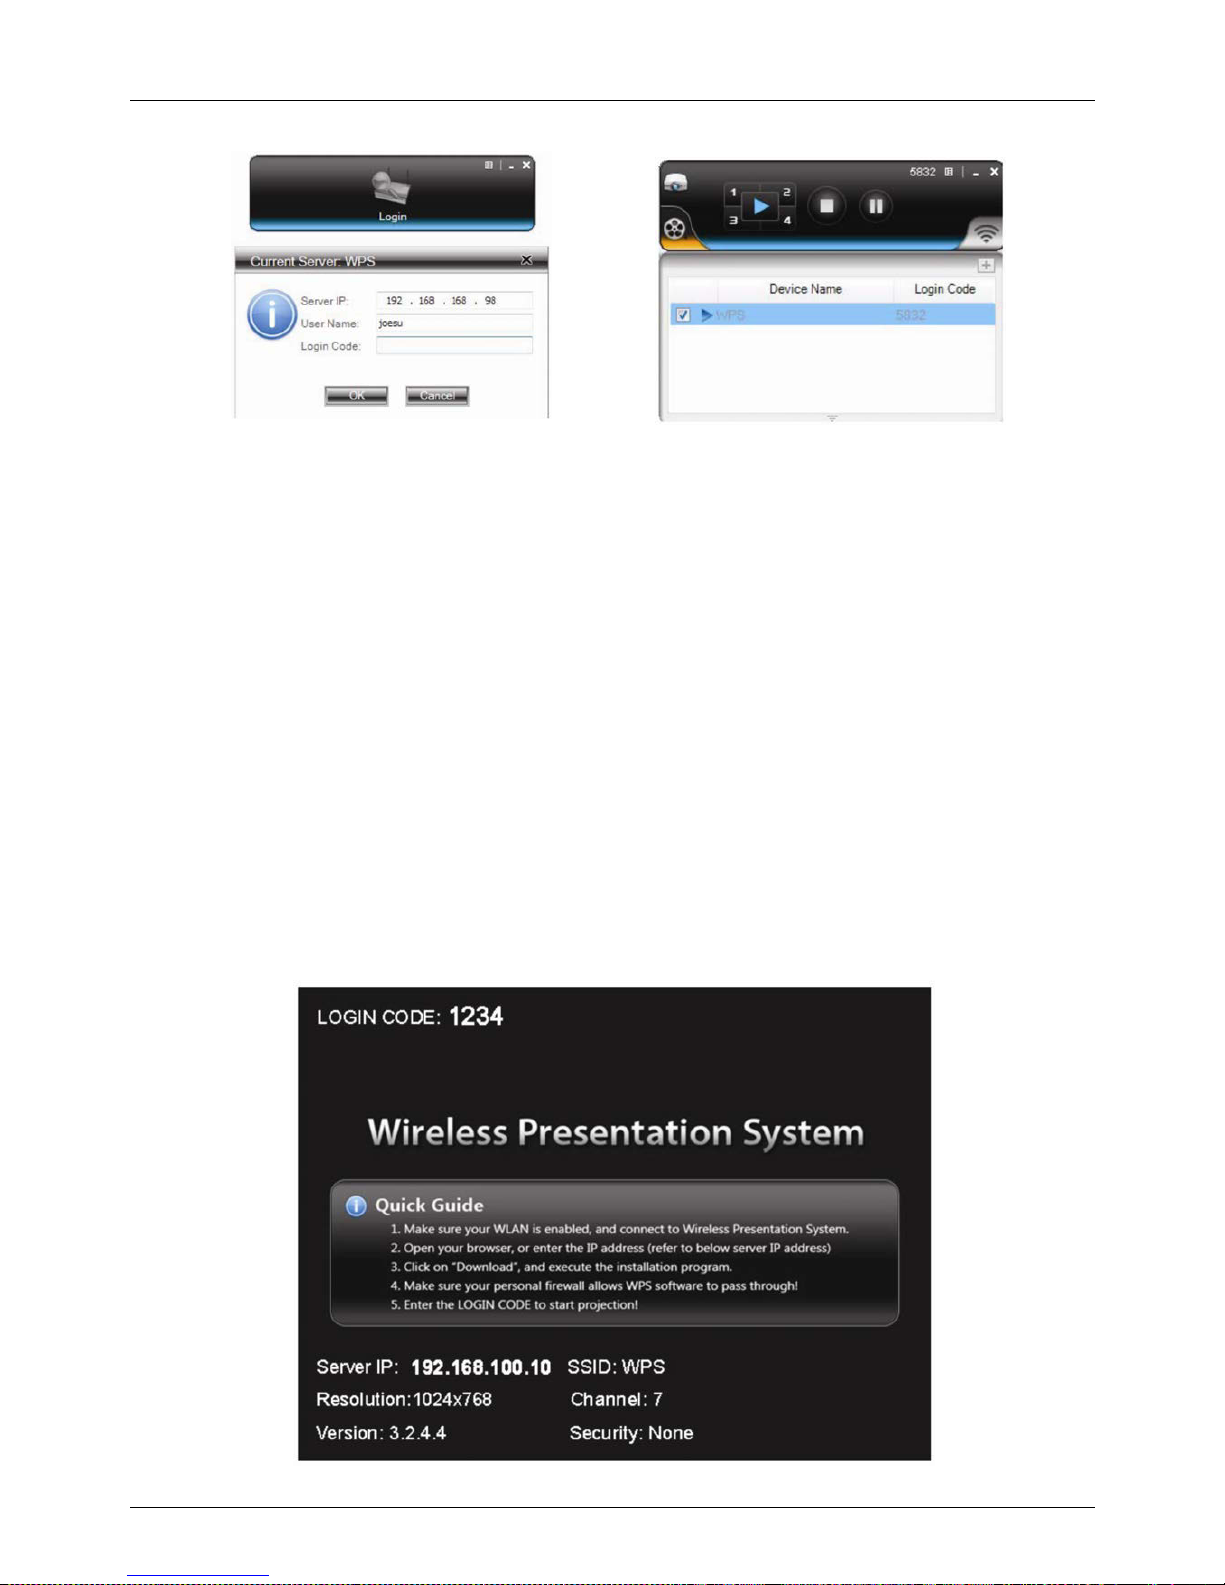
2. Power on the Wireless Projector Server. The Power LED will turn Red to Green and the
projector screen will show the default menu screen as below. The Wireless Projector
Server is now ready to use.

User Manual English
3. Enable your computers WiFi and connect your computer with the Wireless Projector
Server WLAN via Windows Control Panel > Network Settings.
4. Open your preferred web browser. If you use WiFi to connect to the internet this should
redirect automatically to the Wireless Projector Server Management page. If not enter
the IP address. The default IP address of the Wireless Projector Server is
192.168.100.10 or refer to the IP address shown on the left corner of the projector screen
5. Unless already installed from the software disc download the required OS Utility and
follow its Installation Wizard. Ensure your firewall allows the Wireless Projector Server
software to pass through. After installation you will see the Wireless Projector Server
shortcut on your desktop
6. Run the Wireless Projector Server. The following Warning message will display
7. Select Cancel to continue without adjusting your system settings. You can make
adjustments to display settings later via Windows Control Panel > Display
8. Select the Wireless Projector Server you require - identified by the IP Address shown on
the projector screen.
9. Enter the Login Code shown in the top right of the projector screen
10. The Wireless Projector Server user Interface will open
User Manual English
11.Click the Play button to start a mirrored projection of your current desktop or active
program
12.Select the different split screens quadrants by clicking the 1/2/3/4 buttons around the
Play button
13.Select & login to multiple Wireless Projector Servers in the Device List to project to up to
four different projectors at once - multicasting
14.Click the Stop button to stop a presentation and return to the default menu screen
15.Click the Pause button to hold a presentation on its current frame. Any Changes on your
desktop screen will not show on the projector screen until you click the Pause button
again
16.Closing the Wireless Projector Server will return the projector screen to the default menu
screen


User Manual English
Show Login Code
Clicking the four digit code icon in the upper-right corner of the user Interface will display a
Login Code in the upper-left corner of your desktop. This display will close automatically after
10 seconds. Clicking anywhere on the desktop during this time will cancel this display
Utility Menu
Clicking the Utility Menu icon in the top right of the user Interface will open the Utility Menu
Dropdown
Show Login Code - displays the Login Code in the same way as clicking the four digit
code in the user Interface
Web Admin… - opens the Web Admin Management Page, described later
Search Server… - refreshes the Wireless Projector Server list
Projection Quality - gives options to choose between Normal for a faster projection speed with
lower image quality or Best for clearer screen image quality, but slower projection speed
Projection Source - after installing the VDD.exe driver, you can select to project a Virtual
Extended Screen across up to four Wireless Projector Servers. Use Windows Control Panel >
Display to make changes to your Display settings, screen setup and arrangement
Send Audio to Display - after installing the VAC.exe driver, you can select to playback audio
through the Wireless Projector Server’s 3.5mm audio output. For best results it is
recommended that audio is played back via the audio output otherwise there will be noticeable
sync issues with video
Auto WiFi Connect - automatically connects to a previously used Wireless Projector Server

User Manual English
Auto Power Management - changes your computers power management scheme to the highest
performance for making presentations. Selecting this option enables or disables these settings
and restores your previous power scheme settings immediately
Hide UI - hides or displays the user Interface on the projection screen
Advanced Screen Capture - see tip windows and other layered windows, including the main UI
on the connected display. In this mode the mouse cursor may blink from time-to-time on the
projector screen - for the best results it is recommended this feature is disabled
Repeat - plays back the current video/audio file
Make Pns Token... - opens the Plug & Show Token wizard, described later
Copy Application to desktop… - copies the application to your desktop
About - shows system information including product model name, client version, IP address and
additional information
Exit - stops the current presentation and closes the application immediately
Otros manuales para 32700
1
Tabla de contenidos
Otros manuales de Accesorios para proyectores de Lindy


