LENCO MES-205 Manual de usuario

OWNER’S MANUAL
Mobile Video System
• Digital Audio Out-Coaxial
• 7” TFT LCD Monitor
• Multi-subtitle Languages Function
• Multi-audio Languages Function
• Multi-angle Function
• Parental Control
• Remote Control
MES205

Pack ...............................................................................................................3
DVD Features ................................................................................................4
Safety Information ........................................................................................5
Disc Notes .....................................................................................................6
Installation .....................................................................................................7
Install the Monitor and DVD Unit to the Mounting Bag .......................................7
Install the Mounting Bag With the Monitor and DVD Unit ...................................8
Method A ..........................................................................................................8
Method B ..........................................................................................................8
Install the headrest bracket with the monitor .......................................................9
Install TV Display On the Bracket ..............................................................11
Adjust the Angle of the Display ............................................................................11
Electrical Connection .................................................................................12
DVD Player...................................................................................................14
Remote Control...........................................................................................17
Location and Function of Keys ...........................................................................17
Preparing the Remote Control ............................................................................19
Loading a DVD/CD Disc ......................................................................................19
Ejecting a Disc .....................................................................................................19
Basic Operation ..........................................................................................19
On-Screen Display Function ...............................................................................21
Multi-audio Language Function .........................................................................22
Menu Function .....................................................................................................23
Title Menu Function (For DVD only) ....................................................................23
Multi-subtitle Language Function (For DVD only) ..............................................23
Multi-angle Function (For DVD only) ..................................................................23
MP3 Disc Play ......................................................................................................23
Setup ............................................................................................................24
Initial Setup ..........................................................................................................24
General Setup ......................................................................................................24
Speaker Setup .....................................................................................................26
Audio Setup .........................................................................................................26
Preferences Setup ...............................................................................................27
Defaults Table ......................................................................................................29
Trouble Shoting .......................................................................................... 30
Specifications..............................................................................................31
Monitor.........................................................................................................32
Control & Function Keys ......................................................................................33
AC/DC Adaptor .........................................................................................................35
GB-2
CONTENTS

PACK
GB-3
Examine the contents of the box that you DV player was packed in. There should be
the following:
• DVD Player
• 7” TFT LCD Monitor
• Remote Control with 2 AAA Batteries
• Mounting Bag with 3 additional straps
• 2 Sets of Earphones
• Cigarette Lighter Plug
• 9 - Pin AV Lead for Connection to DVD AV output
• Remote Wire for Controlling DVD via Monitor's Remote Sensor
• Digital Audio Out Cable
• Mounting Bracket for headrest mounting
• AC/DC Adaptor for home use
• Instruction Book
• Warranty Card

GB-4
Compatible with PAL DVD (Video CD)
and NTSC DVD (Video CD)
This player can play discs recorded in
either PAL or NTSC format.
• A single LSI chip now integrates all
major DVD playback circuit functions
including MPEG2 decoder, video D/A
converter, and audio decoders.
• L/R stereo analog audio outputs for
connection to existing head unit aux
inputs. Video output is composite
video.
• Supplied remote handles
multi-function software (multi-language
audio-track/subtitle, multi-angle, multi-
story, etc.), plus all basic functions.
USE THIS PRODUCT SAFELY
When Driving
Keep the volume level low enough to be
aware of road and traffic conditions.
When Car Washing
Do not expose the product to water or
excessive moisture. This could cause
electrical shorts, fire or other damage.
When Parked
Parking in direct sunlight can produce
very high temperatures inside your
vehicle. Give the interior a chance to
cool down before starting playback.
Use the Proper Power Supply
This product is designed to operate with
a 12 volt DC, negative ground battery
system (the regular system in a North
American car).
Protect the Disc Mechanism
Avoid inserting any foreign objects into
the slot of this player.
Failure to observe this may cause
malfunction due to the precise
mechanism of this unit.
Use Authorized Service Centres
Do not attempt to disassemble or adjust
this precision product. Please refer to
the Service Centre list included with this
product for service assistance.
For Installation
The unit should be installed in a
horizontal position with the front end up
at a convenient angle, but not more than
30°.
DVD FEATURES

GB-5
CAUTION:
MOBILE DVD PLAYER IS A CLASS I
LASER PRODUCT. HOWEVER THIS
MOBILE DVD PLAYER USES A
VISIBLE/INVISIBLE LASER BEAM
WHICH COULD CAUSE HAZARDOUS
RADIATION EXPOSURE IF DIRECTED.
BE SURE TO OPERATE THE MOBILE
DVD PLAYER CORRECTLY AS
INSTRUCTED.
USE OF CONTROLS OR
ADJUSTMENTS OR PERFORMANCE OF
PROCEDURES OTHER THAN THOSE
SPECIFIED HEREIN MAY RESULT IN
HAZARDOUS RADIATION EXPOSURE.
DO NOT OPEN COVERS AND - DO NOT
REPAIR YOURSELF. REFER SERVICING
TO QUALIFIED PERSONNEL.
WARNING:
• TO REDUCE THE RISK OF FIRE OR
ELECTRIC SHOCK, DO NOT EXPOSE
THIS EQUIPMENT TO RAIN OR
MOISTURE.
• TO REDUCE THE RISK OF FIRE OR
ELECTRIC SHOCK, AND ANNOYING
INTERFERENCE, USE ONLY THE
RECOMMENDED ACCESSORIES.
• THIS DEVICE IS INTENDED FOR
CONTINUOUS OPERATION.
This product incorporates copyright
protection technology that is protected
by method claims of certain U.S. patents
and other intellectual property rights
owned by Macrovision Corporation and
other rights owners. Use of this
copyright protection technology must be
authorized by Macrovision Corporation,
and is intended for home and other
limited viewing uses only unless
otherwise authorized by Macrovision
Corporation. Reverse engineering or
disassembly is prohibited.
SAFETY INFORMATION
Region Management Information
Region Management Information:
This Mobile DVD Player is designed and
manufactured to respond to the Region
Management Information that is recorded
on a DVD disc. If the Region number
described on the DVD disc does not
correspond to the Region number of this
Mobile DVD Player, this Mobile DVD
Player cannot play this disc.

DISC NOTES
GB-6
Disc formats supported by this player
DVD
12 cm disc
(Single-sided disc only)
Video CD
12 cm disc
CD
12 cm disc
MP3
12 cm disc
Discs which cannot be played with this
player
• DVD-ROM
• DVD-R/DVD-RAM
• CDV
• CD-G
Handling and Cleaning
• Dirt, dust, scratches and warping disc
will cause misoperation.
• Do not place stickers or make
scratches on discs.
• Do not warp discs.
• A disc should always be kept in its
case when not in use to prevent from
damaging.
• Do not place discs in the following
places:
1. Direct sunlight
2. Dirty, dusty and damp areas
3. Near car heaters
4. On the seats or dashboard
Disc Cleaning
Use a dry soft cloth to wipe the surface.
If the disc is quite dirty, use a soft cloth
slightly moistured with isopropyl (rubbing)
alcohol. Never use solvents such as
benzine, thinner or conventional record
cleaners as they may mar the surface of
the disc.
Note:
A disc may become somewhat scratched
(although not enough to make it
unusable) depending on your handle it
and conditions in the usage environment.
V
I
D
E
O
Note these scratches are not an
indication of any problem with the player.
Preparing New Discs with Rough
Spots
A new disc may have rough edges on its
inside and outside edges. If a disc with
rough edges is used, the proper setting
will not be performed and the player will
not play the disc. Therefore, remove the
rough edges in advance by using a ball
point pen or pencil as shown below. To
remove the rough edges, press the side
of the pen or pencil against the inside
and outside edges of the disc.
Rough spots
on inside edge
Ball point pen
or pencil
Rough spots on
outside edge
Label side up
Do not touch
the underside
of the disc
Do not bend
Wipe the disc from center
toward the outside edge
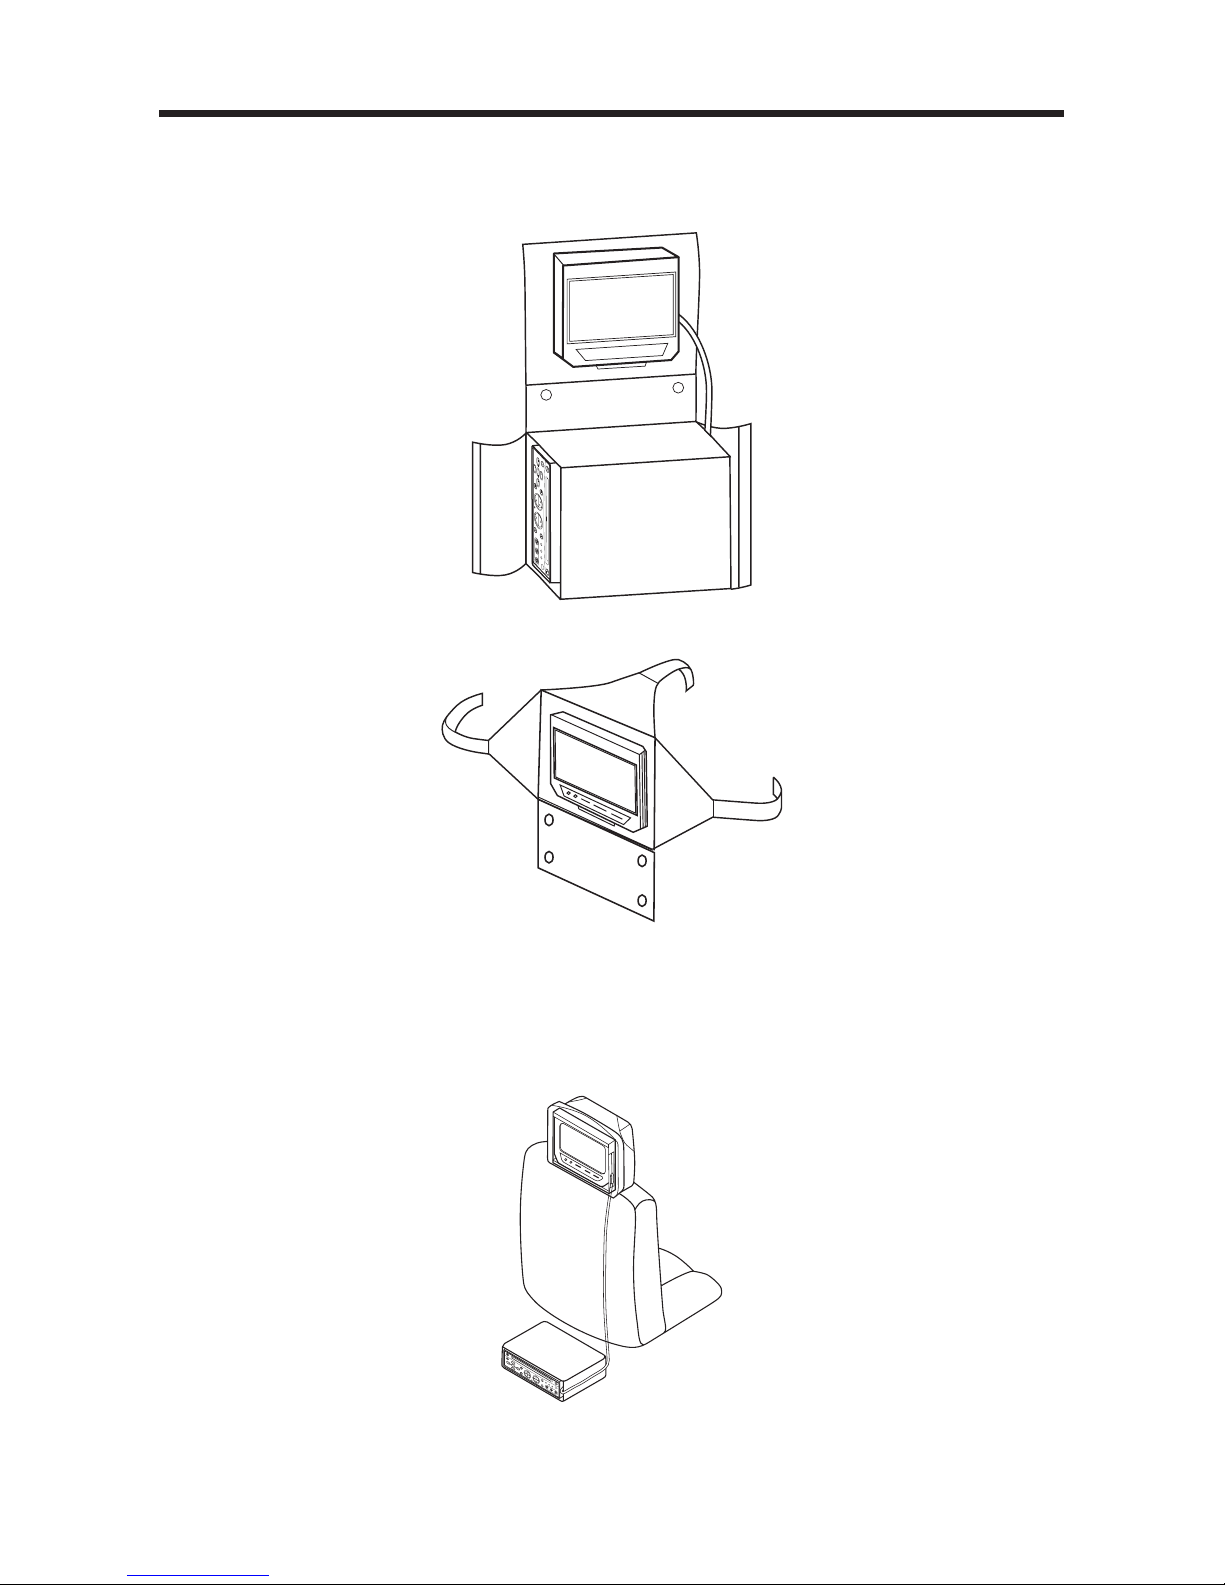
INSTALL THE MONITOR AND DVD UNIT TO THE MOUNTING BAG
1. The monitor is placed on the upper side of the mounting bag.
The DVD unit is placed on the underside of the mounting bag. See Fig.1.
2. As shown in Fig.2, the monitor is well installed in the bag.
INSTALL THE MOUNTING BAG WITH THE MONITOR AND DVD UNIT
METHOD A
1. You can separate the bag and place the monitor and DVD unit individually. Place
the monitor on the headrest and locate the DVD under the seat. The monitor is
fixed by using the straps on the bag as shown in Fig.3.
2. Regular set-up allows only one viewer: By slightly tilting the display to the right,
when mounted behind driver, both rear passengers can view.
INSTALLATION
Fig. 2
GB-7
Fig. 1
Fig. 3

METHOD B
1. Separate the bag and place DVD unit under the seat.
2. The monitor can be positioned between seats. By using “strap extenders”, the
monitor can be mounted on the console between the front seats. Convenient
for differentiation, the three “strap extenders” have been marked 1#, 2#, 3#.
As shown in Fig.4, stick the 1#, 2# and 3# strap extenders to the proper position
of the mounting bag according to the direction of the arrows.
3. Let the right and left straps go around the side of the console with the top
strap coming straight back over the console to meet the right and left. Then
the monitor is mounted on the console between the front seats as shown in
Fig.5 below.
4. Last locate the DVD under the seat.
INSTALLATION
Fig. 4
Strap#1
Strap#2 Strap#3
Fig. 5
GB-8
Fig. 6

INSTALLATION
INSTALL THE HEADREST BRACKET WITH THE MONITOR
Plastic Bracket
1. Press the switch under the headrest of the car seat and pull out the headrest.
2. Assemble the Screen Mounting Bracket (2) to Screen Mounting Bracket (1) and
Rotate combined bracket, then place them on the poles of the removed headrest
to select proper hold position to install the base.
Headrest
Switch
(1)
(2)
GB-9

INSTALLATION
3. Remove the Bracket from headrest and loosen the two screws by using the
screwdriver, then place the two plastic tubes (3) on the holes that you just selected,
then adjust them to proper position as shown in diagram below.
4. Install the base on the poles of the headrest and adjust to proper position, then
use four screws (ø3x10 (4) to fix the base 1 and base 2.
5. Install the headrest with the base and rotate the Mounting Bracket to the car seat
in proper position, then use the screwdriver to fasten the two screws to fix the
base.
(3) Plastic tube
GB-10
(1)
(2)
(4) Screw
Otros manuales para MES-205
1
Tabla de contenidos
Otros manuales de Sistema de vídeo para coche de LENCO


