Leakomatic M3i Manual de usuario

M3i
Installation manual
Asennusohje
Installationsanvisning
14.1.2019

2Installation guide
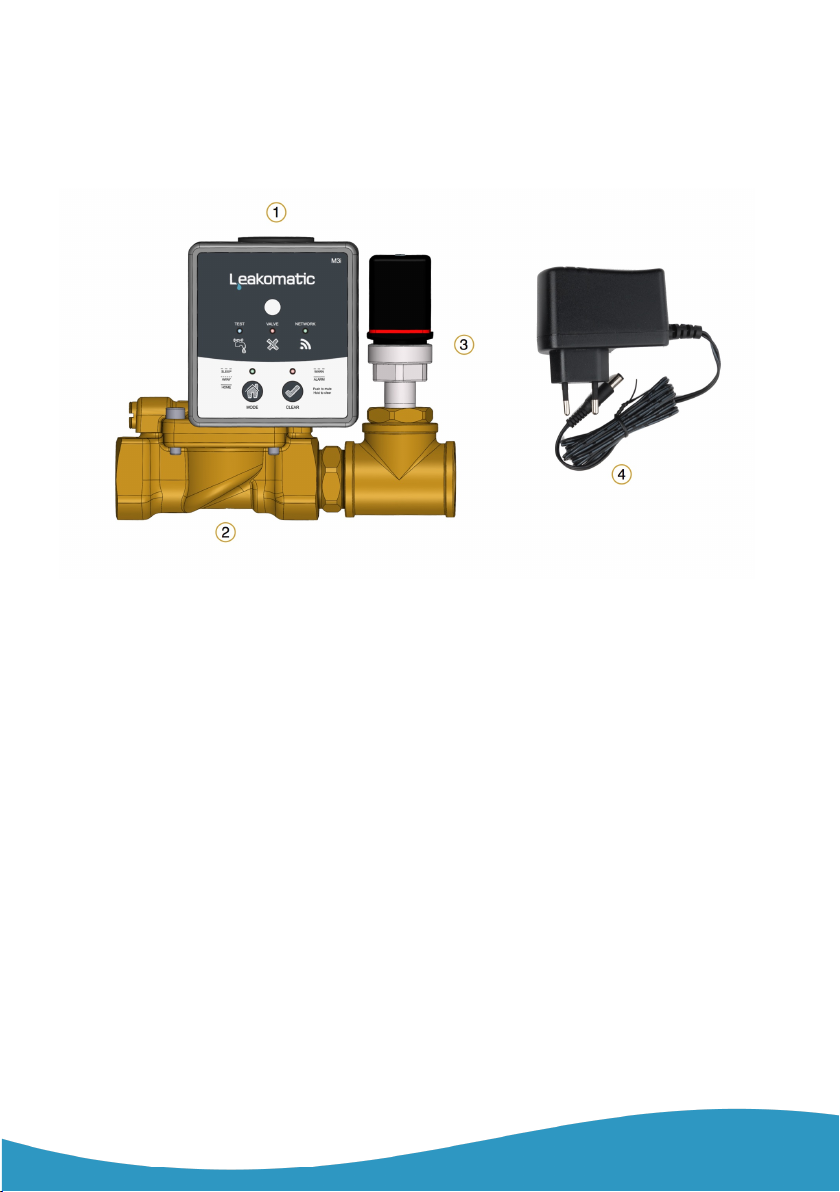
Package contents
1. Control unit
2. Solenoid valve
3. Pressure sensor
4. Power adapter
5. Operating manual
6. Installation manual

EN
M3i 3
Notice!
Ø Installation must be performed by a professional
Ø The valve unit needs to be installed in an environment where there is no
risk of freezing
Ø Incoming water pressure should not exceed 10 bar and the water
temperature shall be between 0–90 degrees Celsius.
Ø M3i unit is an integrated assembly, which is pressure tested before delivery.
If this interconnection is adjusted, the fitter is responsible for the product
being pressure tested in conjunction with reassembly. The measure may
impose restrictions on the product's factory warranty.
Ø Equipment that needs water for safety purposes must be ensured a supply
of water (e.g. automatic fire extinguishing equipment) even when the leak
detection unit is in the closed state.
Warranty
In order for the product's warranty to be valid, it must be installed in accordance
with these instructions. The functioning of the product depends on its correct
installation. It is not permitted to replace or exclude parts of the product package.
Before installation of the M3i
Make sure that you have access to a Wi-Fi network from the spot where you intend
to install the M3i-unit. For instance, try using a cell phone to access the Internet
through Wi-Fi at the location where the unit will be mounted. Good service makes
it likely that connecting the M3i to the cloud service will be successful.
NOTE! It is not enough to check just the strength of the signal (number of bars) in
the Wi-Fi icon of the mobile device. Signal strength displayed on the mobile device
only applies to
reception.
In order to make sure that the wireless connection is
functioning, it is also necessary to check
transmission
by actually using the network.

4Installation guide
Installation of product
Installation of the valve unit
1. First close the shutoff valve of the water network.
2. Before installing the valve unit into any new water pipes, the pipes need to
be flushed carefully, until no particles can be observed in the flushing
water.
3. Any accessories supplied with the product package are manufactured of
brass approved for pressurized tap water, and are installed in copper pipes.
In order to avoid corrosion caused by galvanic current, never use any
parts or materials, which are galvanized, zinc-plated or made of black
steel for mounting purposes.
4. The M3i unit should be installed after the water meter, and as early as
possible in the pipe system. The arrow on the solenoid valve shows the
direction of the flow of water.
Be extremely careful when cutting any pipes for mounting purposes, and
make sure that no thread seal tape or flax fibres are left inside the pipes,
which could be carried by water into the valve unit and prevent the
Leakomatic sensor from working.
5. The valve unit can be mounted into either a horizontal or a vertical pipe.

EN
M3i 5
6. If possible, mount the valve unit such that the coil is facing up, in order to
prevent particles from getting into the coil shaft.
7. The valve unit should be mounted so that it is not affected by any lateral or
longitudinal compression, torsion or traction forces.
8. Open the shutoff valve of the water supply network.
9. Inspect the installation ensuring water tightness of the assembly.
We recommend installing a ball valve after the valve unit to facilitate subsequent
maintenance operations.
Mounting of wiring harnesses
Mounting of the control unit and its connection to the pressure sensor is normally
carried out before the delivery.
Always disconnect power from the control unit before dismantling from the
valve unit to prevent power surges that could damage the electronic
components.
1. Check that the pressure sensor's plug is connected to the sensor and the
other end is connected to the “Sensor” connector on the control unit.
2. The power adaptor is connected to the socket and the connector “Power”
of the control unit.
SensorAUX out AUX in Flow Power

6Installation guide
After installation
Check that ...
• the unit does not register any flow when water supply is turned off
• the test indicator's blue light is on when water is running continuously
• to carry out the functionality test, set the system into the Away and then
run water until the flow is registered. After a moment, the valve unit shuts
off and the red alarm light comes on. If the audio alarm is activated you will
hear the alarm sound.
• warnings and alarms are reset with the Reset button. A short push turns off
the alarm sounds, while holding the button resets the respective alarm
causing the solenoid valve to open; the red alarm light then goes out.
The troubleshooting and leak detection guide are available on our website at
www.leakomatic.com.

EN
M3i 7
Maintenance
Any dirt filter should be cleaned annually. This is done by opening the inspection
space, taking out the strainer and rinsing it clean.
Annually and always after maintenance, check that the unit correctly cuts off the
water supply by inducing a flow alarm according to the function test instructions
above.

Asennusohje
8
Tuotepaketti sisältää
1. Ohjausyksikkö
2. Venttiiliyksikkö
3. Paineanturi
4. Virta-adapteri
5. Kayttöohjeet
6. Asennusohjeet

FI
M3i 9
Tärkeää!
Ø Asennukseen tarvitaan alan ammattilainen.
Ø Venttiiliyksikkö on asennettava tilaan, jossa ei ole jäätymisriskiä.
Ø Sisääntulevan veden paine ei saa ylittää 10 baaria ja veden lämpötilan on
oltava 0–90 celsiusastetta.
Ø M3i-yksikkö on yhtenäinen kokonaisuus, joka painetestataan ennen
toimitusta. Mikäli kokonaisuutta säädetään, asentaja vastaa siitä, että tuote
painetestataan asennettaessa sitä uudelleen. Toimenpide voi rajoittaa
tuotteen tehdastakuuta.
Ø Laitteelle, joka vaatii vettä turvallisuussyistä (esimerkiksi automaattiset
palonsammutuslaitteet), on turvattava vedensaanti ennen vuotohälytintä,
vaikka vesivuotovahti olisi suljetussa tilassa.
Takuu
Jotta tuotteen takuu olisi voimassa, se täytyy asentaa näiden ohjeiden
mukaisesti. Tuotteen toiminta on riippuvainen oikein tehdystä asennuksesta.
Asennuksesta ei saa jättää pois tai korvata jollain muulla osia, kuten mutataskua
tai takaiskuventtiiliä, jotka ovat mukana toimituspaketissa, vaikka sellaisia olisi
putkistossa jo valmiina.
Ennen kuin M3i asennetaan
Tarkista että saat yhteyden Wifi-verkkoon paikassa, johon olet ajatellut kiinnittää
M3i-yksikön. Käytä esimerkiksi matkapuhelintasi paikassa, johon yksikkö
kiinnitetään. Mikäli yhteys toimii, on hyvät edellytykset liittää M3i pilvipalveluun.
HUOM! Ei riitä, että tarkistetaan pelkästään signaalin voimakkuus (viivojen määrä)
mobiililaitteen Wifi-ikonissa. Signaalin voimakkuus, joka lukee mobiililaitteessa,
koskee ainoastaan
vastaanottoa
. Jotta voidaan varmistaa että langaton verkko
toimii, on myöskin
lähetystä
tarkistettava käyttämällä verkkoa.

Asennusohje
10
Tuotteen asennus
Venttiiliyksikön asennus
1. Sulje ensin vesiverkoston sulkuventtiili.
2. Ennen kuin mittausyksikkö asennetaan uusiin vesijohtoihin, johtoja täytyy
huuhdella huolellisesti niin kauan, että huuhteluvedessä ei esiinny hiukkasia.
3. Tuotepaketin mukana tulevat lisätarvikkeet on valmistettu
juomavesihyväksytystä messingistä ja asennetaan kupariputkeen.
Jotta vältetään galvaanisen virran aiheuttama korroosio, asennuksessa ei
tulisi käyttää osia tai materiaaleja, jotka on galvanoitu, sinkitty tai
valmistettu mustasta teräksestä.
4. M3i-yksikkö asennetaan putkistoon vesimittarin jälkeen niin pian kuin se on
mahdollista. Magneettiventtiilissä oleva nuoli osoittaa veden
virtaussuunnan.
Asennuksen yhteydessä tehtävissä putkien katkaisuissa täytyy olla
ehdottoman huolellinen, niin ettei putken sisäpuolelle jää katkaisun
yhteydessä kierreteippiä tai pellavalankaa, jotka voivat veden mukana
ajautua venttiiliyksikköön ja haitata venttiilin toimintaa.
5. Magneettiventtiili voidaan asentaa sekä vaaka- että pystysuoraan putkeen.
Otros manuales para M3i
1
Tabla de contenidos
Idiomas:
Otros manuales de Sensor de seguridad de Leakomatic