Lakeland 18605 Manual de usuario

INSTRUCTION BOOKLET
Model: 18605

2
Thank you for choosing the Lakeland Fortis™.
Please take a little time to read this booklet before you use your machine and keep it in a safe
place for future reference.
The Lakeland Fortis™ is very versatile and makes light work of food preparation. With
attachments for meat mincing, sausage making, and slicing or grating fruit and vegetables. It
also juices soft fruits, and presses biscuits.
An award winning family-owned business, here at Lakeland we still have the same values of
excellent quality, value for money and exceptional customer care as we did when we first set
up the company in the 1960s.
Our products are carefully selected and rigorously tested to meet our high standards, so
you can be assured that any product you purchase will be easy-to-use and highly durable.

3
CONTENTS
Product features .................................................................................................................4-5
Safety cautions ...................................................................................................................6-7
Assembling the attachments for different functions ............................................... 8-12
Using the Fortis™ for the first time ...................................................................................13
Instructions for use ..............................................................................................................13
Hints and tips ........................................................................................................................14
Recipes ...........................................................................................................................15-18
Troubleshooting ....................................................................................................................19
Care and cleaning ................................................................................................................20
Electrical connections .........................................................................................................21
Recycling your electricals ..................................................................................................21
4
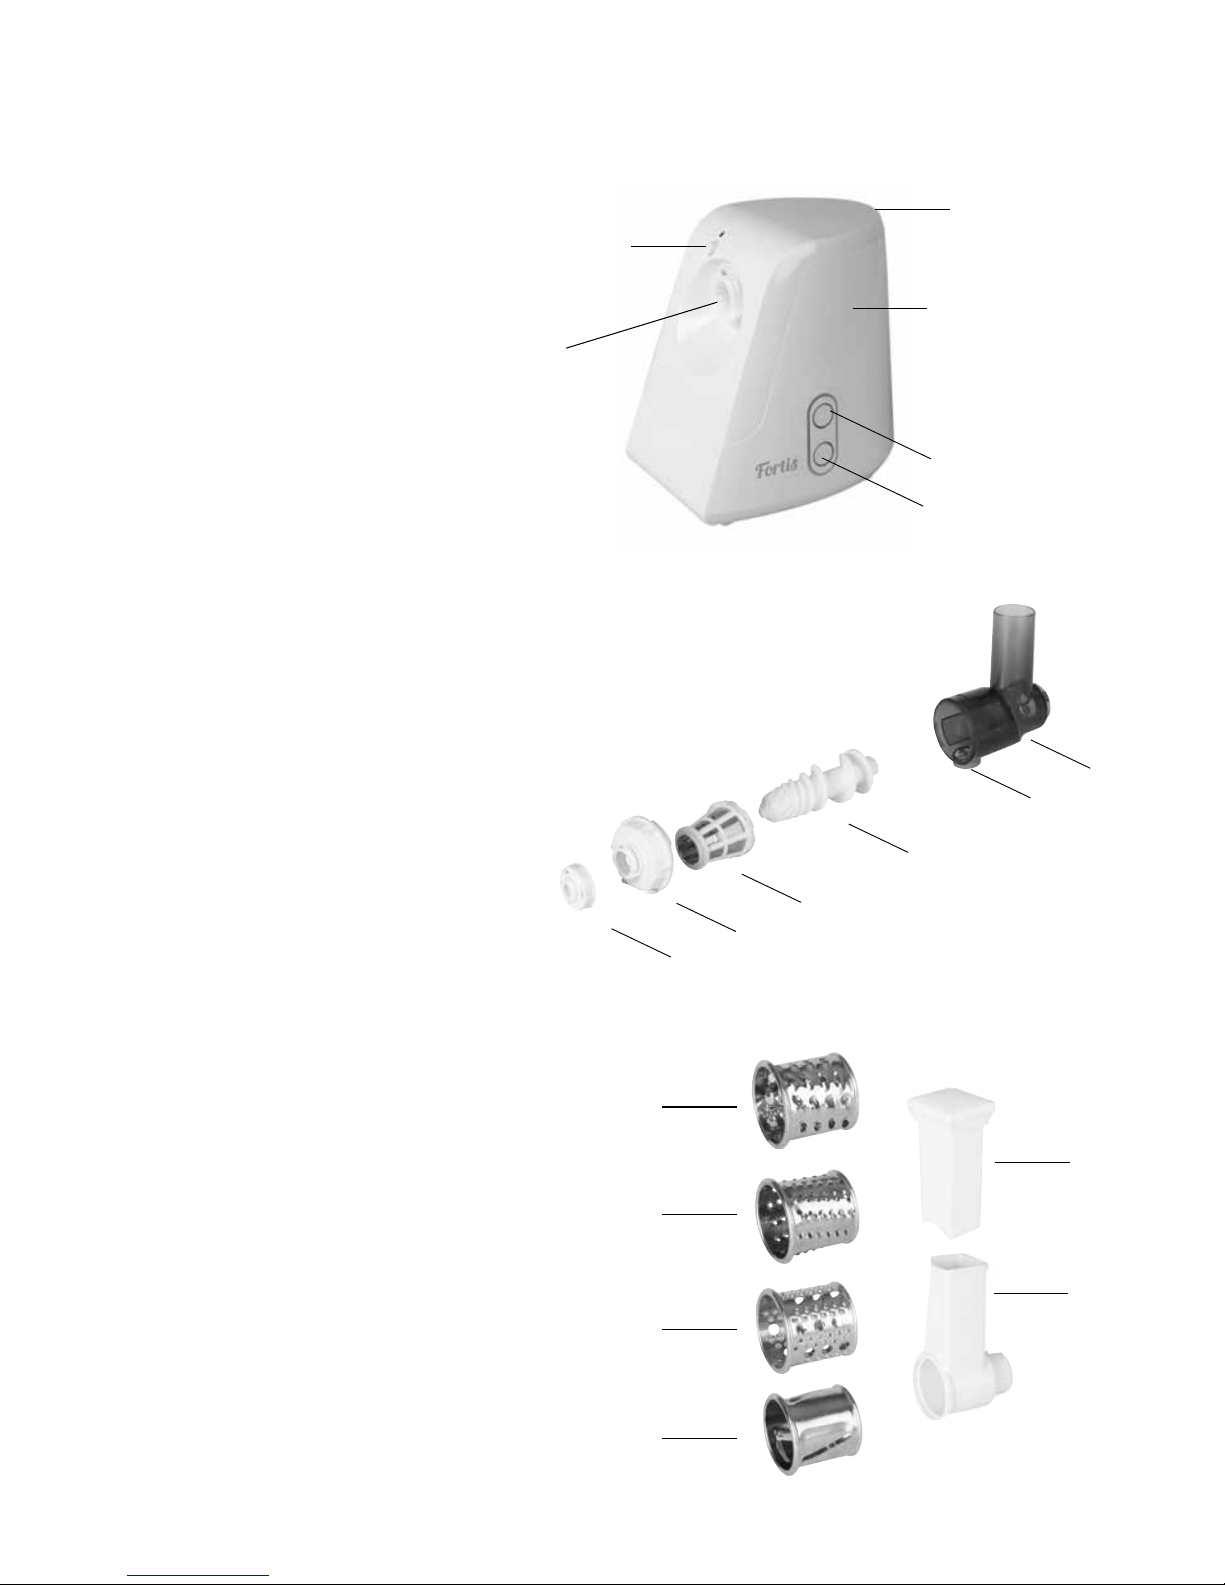
PRODUCT FEATURES
THE BASE UNIT
SOFT FRUIT JUICER
7. Juicer attachment
8. Juicer nozzle
9. Juicer worm shaft
10. Juicer cone
11. Juicer ring
12. Pulp nozzle
1. Base unit
2. On/Off button
3. Reverse button (REV)
4. Release/Lock button
5. Lock
6. Carry handle
VEGETABLE SLICER/GRATER
13. Slicer/grater attachment
14. Pusher for slicer/grater attachment
15. Extra coarse grater
16. Course grater
17. Fine grater/potato ricer
18. Slicer
7
8
9
10
11
12
16
13
14
17
15
18
5
1
3
2
4
6

5
MINCER
19. Mincer attachment
20. Mincer worm shaft
21. Blade
22. Coarse mincing disc
23. Medium mincing disc
24. Mincer locking nut
25. Tray
26. Pusher for mincer
SAUSAGE MAKER
27. Separator
28. Sausage horn
BISCUIT PRESS
29. Biscuit ring
30. Biscuit press 29
30
27
28
26
25
19
20
21
22
24
23

6
SAFETY CAUTIONS
Carefully read all the instructions before using the appliance and keep in a safe place for future reference.
Always follow these safety cautions when using the appliance to avoid personal injury or damage to the
appliance. This appliance should be used only as described in this instruction book.
• Make sure your electricity supply matches the voltage shown on the appliance.
• Ensure all packaging materials and any promotional labels or stickers are removed from the appliance
before the first use.
• Always inspect the appliance before use for noticeable signs of damage. Do not use if damaged or
has been dropped. In the event of damage, or if the appliance develops a fault contact the Lakeland
customer care team on 015394 88100.
• Do not use this appliance if the lead is damaged. If the lead is damaged it must be replaced with a
special lead. Contact the Lakeland customer care team on 015394 88100.
• Always use the appliance on a dry, level, heat resistant surface.
• Unplug from the mains when not in use and before cleaning. Allow to cool before cleaning the
appliance. To disconnect, turn the socket to “off” and remove the plug from the mains socket.
• This appliance is not intended for use by persons (including children) with reduced physical, sensory
or mental capabilities, or lack of experience and knowledge, unless they have been given supervision
or instruction concerning the use of the appliance by a person responsible for their safety.
• Children should always be supervised to ensure they do not play with this product.
• Do not use any accessories or attachments with this appliance other than those recommended by
Lakeland.
• To protect against fire, electric shock or personal injury, do not immerse cord, plug or base unit in
water or other liquids.
• Do not leave the lead hanging over the edge of a kitchen table or worktop. Avoid contact between
the lead and hot surfaces.
• For indoor use only.
• For domestic use only.
• This appliance should be used for preparation of food as described within the instructions for use
that accompany it.
• Always ensure that your hands are dry before removing the plug from the mains socket. Never pull
the plug out of the mains socket by its lead.
• To avoid injury or possible fire, do not cover the appliance when in use.
• Do not connect this appliance to an external timer or remote control system.

7
• An extension cable may be used with care. The electrical rating of the cable should be at least as
great as the appliance. Do not allow the cable to hang over the edge of the worktop or touch any
hot surfaces.
• This appliance complies with the basic requirements of Directives 04/108/EC (Electromagnetic
Compatibility) and 06/95/EC (Safety of Domestic Electrical Appliances).
• WARNING: a cut off plug inserted into a 13amp socket is a serious safety (shock) hazard. Ensure
the cut off plug is disposed of safely.
• CAUTION: the plastic bags used to wrap this appliance or the packaging may be dangerous.
To avoid risk of suffocation, keep these bags out of reach of babies and children. These bags
are not toys.
• The blade is very sharp; handle with care when handling and cleaning.
• Ensure the appliance is switched off, unplugged and wait until moving parts have stopped running
before attaching or detaching any attachments.
• This appliance is not suitable for processing very hard foods e.g. nuts, ice cubes, coffee beans, hard
spices or for grinding bones.
• Always use the pushers to put food into the Fortis™, never reach into the attachments or machine.
• Never operate the appliance continuously for more than 3 minutes at 350W.
• Never press the reverse button (REV) when the appliance is on. The machine must be stopped,
and then reversed.

8
ASSEMBLING THE ATTACHMENTS
FOR DIFFERENT FUNCTIONS
MINCING
Use the mincer attachment for meat, fish, onions and making breadcrumbs from fresh and
dried bread.
1. Insert the mincer worm shaft into the mincer attachment,
wider end first.
Slot the blade onto the mincer worm shaft with the sharp
edges of the blade at the front (facing you).
Slot the medium or coarse mincing disc on top of the blade
and worm shaft. The groove on the edge of the mincing
disc will fit into the notch on the mincer attachment.
Screw the mincer locking nut onto the end of the mincer
attachment, to hold everything in place.
2. Attach the mincer attachment to the base unit by placing it
over the lock and turning it anti clockwise. The release/lock
button on the base unit will click outwards to show it has
locked into place.
3. Place the tray on top of the mincer attachment. Place a large
bowl under the mincer for your food.
The Fortis™ is now ready to mince.
Feed food into the top of the mincer, using the pusher.

9
SAUSAGE MAKING
Meat for sausage making must be minced first.
1. Insert the mincer worm shaft into the mincer attachment,
wider end first.
2. Place the separator on top of the mincer worm shaft,
narrower end first, so the wider lip sits outside the mincer.
The groove on the edge of the separator will fit
into the notch on the mincer attachment.
Place the sausage horn on top of the separator.
Place the mincer locking nut over the sausage horn and
separator, and screw it onto the mincer attachment to hold
everything in place.
3. Attach the mincer attachment to the base unit by placing it
over the lock and turning it anti clockwise. The release/lock
button on the base unit will click outwards to show it has
locked into place.
4. Place the tray on top of the mincer attachment.
The Fortis™ is now ready to make sausages.
Feed your sausage mixture into the top of the sausage
maker using the pusher.

10
SLICING AND GRATING FRUIT AND VEGETABLES
1. Select the slicer/grater drum you wish to use.
Slot it into the slicer/grater attachment, making sure the cog at
the back of the attachment slots into the drum.
2. Attach the slicer/grater attachment to the base unit by placing
it over the lock and turning it anti clockwise. The release/
lock button on the base unit will click outwards to show it has
locked into place.
3. Place a large bowl under the slicer/grater for your food.
The Fortis™ is now ready to slice and grate. The fine grater/
potato ricer can be used to create creamy mash from
boiled potatoes.
Feed food into the top of the slicer/grater, using the pusher.
Tabla de contenidos
Idiomas:
Otros manuales de Exprimidor de Lakeland


