
KREYER Chilly Manual de usuario

INSTRUCTION MANUAL
WTG – Wine Technology GmbH
Moselstrasse 9 •D-54349 Trittenheim
Tel: +49 (0) 65 07 - 938 180
Fax: +49 (0) 65 07 - 938 188
www.kreyer.com •[email protected]m
C
HILL
Y
MAX
COOL
ER
TO
COOL
CHILLY MAX

Operating Instructions 1
OPERATING INSTRUCTIONS
1SAFETY / PREVENTION OF ACCIDENTS 2
2TRANSPORT 4
3INSTALLATION AND INITIAL OPERATION 5
4CARE AND MAINTENANCE 11
5FAULT DIAGNOSIS 13
6IMPORTANT INFORMATION
ON WATER QUALITY 17
7PLATE HEAT EXCHANGER (OPTION) 19
8WASTE DISPOSAL 19
APPENDIX
- TECHNICAL DATA
- TEMPERATURE CONTROLLER
- WIRING DIAGRAM
These operating instructions have to be read carefully before putting the
chiller into operation.
Please observe these instructions, otherwise the manufacturers liability for subsequent damage will be
cancelled. All rights required for further technical development and modification, are reserved.
Proper use of the chiller
This chiller is designed for the cooling of water only. For the use of other agents (e.g. deionised water)
please contact the manufacturer. Limits indicated in the technical data must be adhered to strictly, otherwise
the manufacturers liability for subsequent damage will be cancelled. Chilling of flammable or explosive
substances is prohibited.
Please keep these operating instructions
for further use!
IMPORTANT!
IMPORTANT!

2 Operating Instructions
General information
These operating instructions contain valuable information which has to be observed during initial
start-up, operation and maintenance. Therefore these instructions are to be read by the installer and
operating personnel in charge, before putting the chiller into operation.
All general safety instructions mentioned in this chapter and special security instructions given in other
sections of this manual have to be observed.
Personnel qualification and training
Operating, maintenance, inspection and installation personnel must be qualified. Responsibility and
supervision must be clearly explained to the operator.
Danger due to non-observance of safety instructions
Non-observance of safety instructions may cause injuries, endanger the environment or damage the chiller.
Non-observance of safety instructions will cancel the manufacturers liability for subsequent damage.
Safety conscious operation
The safety instructions given in these operating instructions, including national regulations on accident
prevention as well as any specific chiller safety instructions must be observed.
Safety instructions for user / operator
Protective guards that have been installed to prevent contact with moving parts may not be removed
when the unit is being operated. Danger resulting from the use of electrical power is excluded (for detailed
information, refer to the VDE regulations and the regulations of the local power supply authorities).
Safety instructions on maintenance, inspection, and installation work
Basically none of the cleaning or maintenance tasks may be performed until the unit has come to a com-
plete standstill. As soon as this work has been completed, all the safety devices and protective equipment
must be mounted or installed according to their proper function.
Arbitrary modification and production of spare parts
The unit may be converted only if an agreement has been reached with the manufacturer. Original spare
parts and accessories accepted by the manufacturer serve as safety guarantee. Use of other parts may
cancel the manufacturer‘s liability for subsequent damages
1 SAFETY / PREVENTION OF ACCIDENTS

Operating Instructions 3
Non-permissible operating methods
The operational safety of the delivered unit is guaranteed only if the unit is properly used as intended.
Limits indicated in the technical data must not be exceed
Health hazards with the refrigerant
The refrigerant has only a very low acute health hazard. It has narcotic effects only at extremely high
concentrations. After acute exposure to extremely high concentrations the substance is eliminated over
the lungs very quickly. The refrigerant has a certain irritating effect on skin and mucous membranes. Ex-
posure of the skin to liquid refrigerant can cause frost bite. In the presence of open flames or hot surfaces
refrigerant can decompose and form toxic decomposition products (e.g. hydrogyn chloride, phosgene).
The refrigerant evaporates when exposed to air . Intentional exposure of refrigerant is not permissible. The
chiller must be handled with great care to prevent any damage occuring through transport operations.
1SAFETY / PREVENTION OF ACCIDENTS
Safety symbols
This symbol is to be found next to all the safety instructions involving
work that may result in serious injuries. Observe these instructions and
proceed with extreme caution in such instances. Inform all other users as
well. In addition to the instructions included in this manual, the applicable
general safety and accident prevention regulations must also be taken into
account.
This symbol is to be found next to the items in this manual that must
be strictly observed to ensure proper application of the guidelines, regulati-
ons, instructions and procedure of tasks and to make sure that the machine
or other parts are not damaged or destroyed.
This symbol explains that chiller is designed according to state-of-the-art tech-
nology and is safe to operate. Dangerous situations may, however, be the result
if the unit is used by personnel without adequate qualification or if it is not used
correctly according to its intended purpose. Accordingly, this may affect efficient
operation of the unit.
Warning!
Attention!
Note!
4 Operating Instructions
The chiller may only be transported in original packaging to the site of initial operation. In case of damage
the manufacturer must be informed immediately. If the unit is moved to another location in a factory, all
connections must be disconnected from the unit. Moving the unit to another location must be carried out
without causing damages. If damage occurs despite these instructions, the unit must be checked by an
expert and repaired as required before it is put into operation again.
Note:
The Manufacturers Liability excludes any Damage to the Chiller
subsequent to Transportation.
When transporting the unit, consider the weight limits indicated in the technical data.
Use a fork-lift, truck or a crane with the corresponding load-capacity.
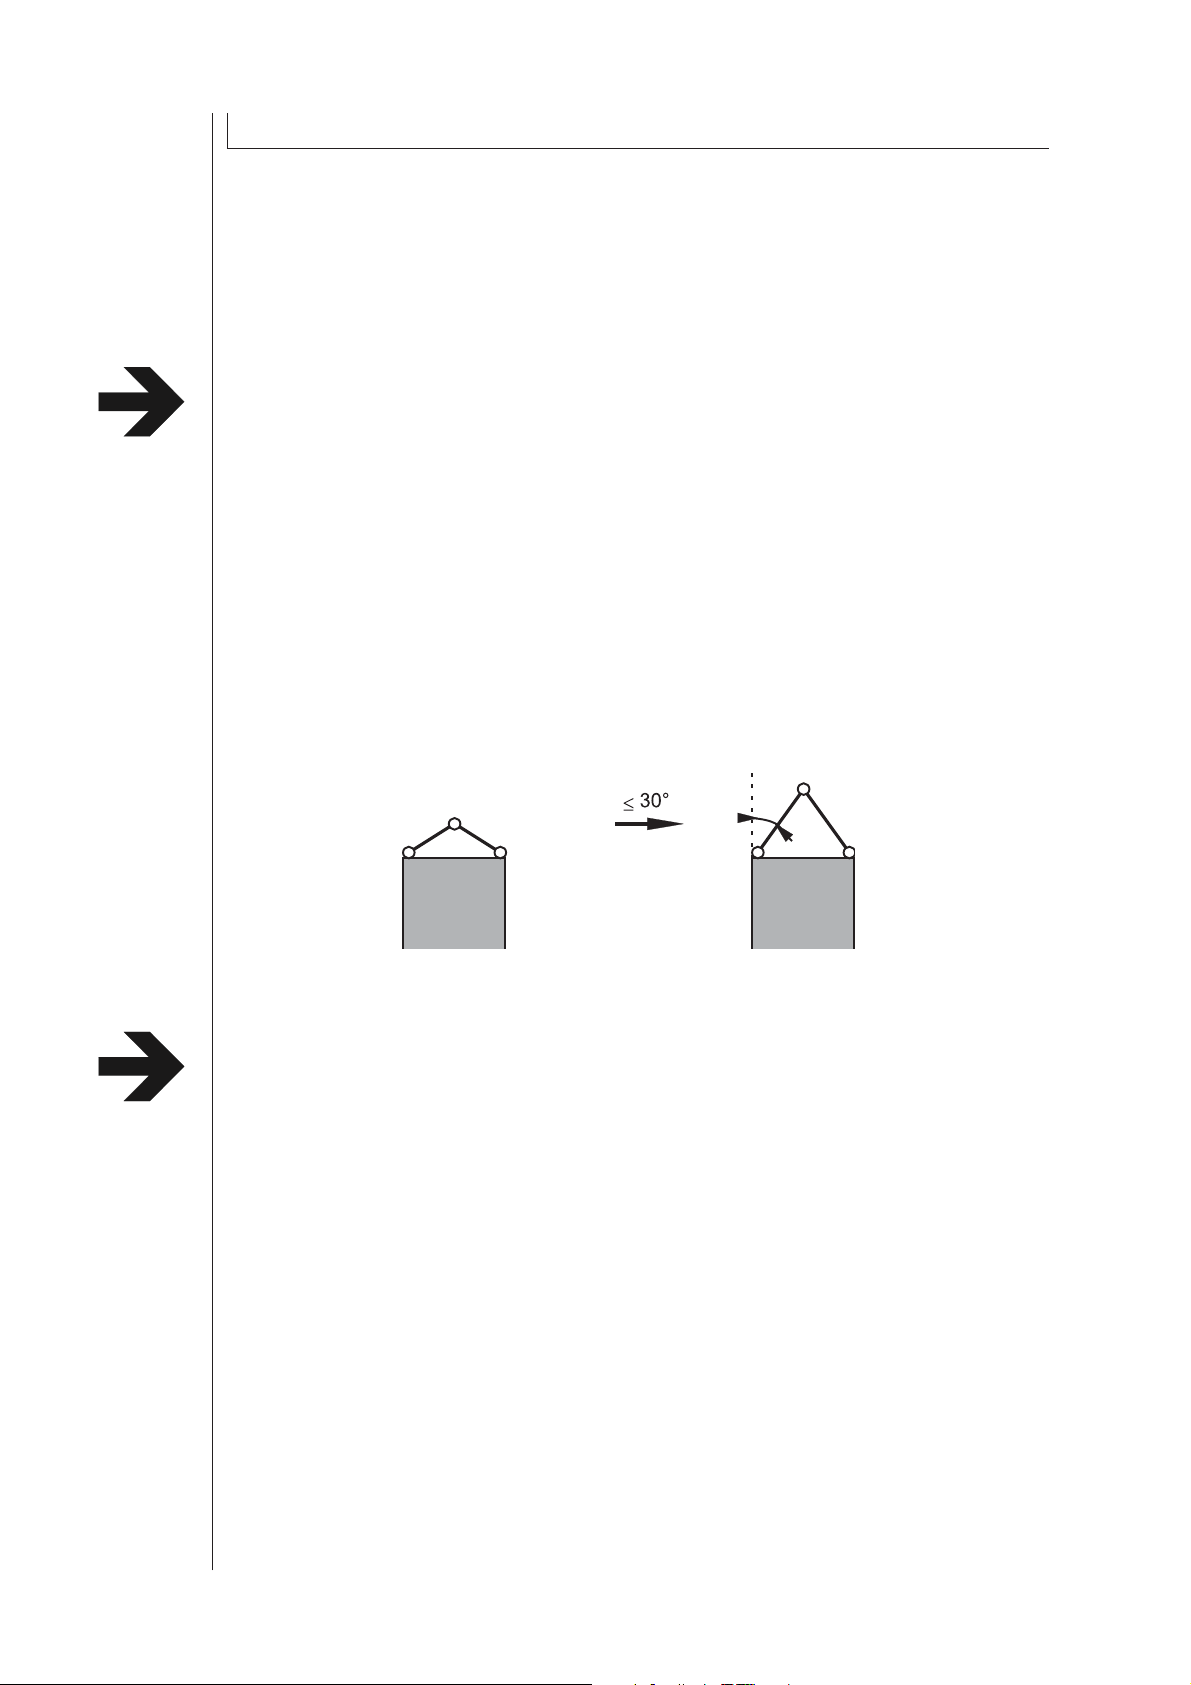
The fully-hermetic compressor is mounted on rubber. Always transport the chiller as
mentioned below. Avoid vibrations during transport. Failure to observe can result in
compressor damage.
Instructions during transport!
Attention: Never remove the top cover if transporting the chiller
by means of a hoist (via eyelets)!
Wrong Right
2 TRANSPORT

Operating Instructions 5
Installation
Prior to installation and commissioning of the chiller, please observe the following points strictly:
The fresh air intake temperature may not exceed the max.ambient temperature
(refer to name plate)
Assure that the required quantity of air is available at air cooled chillers.
Assure that the chiller hot air outlet does not warm up the environment or room excessivly.
Min.distance of fresh air intake: at least 1,0 m (air cooled version)
Min.distance of hot air outlet: at least 3,0 m (air cooled version)
Connection of an air supply and exhaust duct is admitted only for machines with radial fans.
The fresh air intake of the unit (condensor) may not be situated infront of a heat rejecting
device like a pump or electric motor.
The unit must be set up on level, solid surfaces only, in order to ensure the required stability.
For outside erected chillers, the minimum outdoor temperature should be considered from the
technical data.
Floor space
A minimum space must be left free around the installation, so that there is access to the various compo-
nents and to the control cabinet.
The unit can be installed in a corner. However, its movability must be ensured to enable access to the
various components.
The distance from any constructions blocking the air supply must be at a minimum
distance of 1 meter.
Removeable panel
Air intake, condenser
cleaning, reading mano-
meter electricity and
water connections,
removeable panel
Air outlet
Access to control
cabinet and the
removeable panel
Removeable panel
Acces for Suggested
access for after sales
service
3 INSTALLATION AND INITIAL OPERATION

6 Operating Instructions
Option No 1:
The most frequent example. Air is taken in and evacuated
in the same room. A large sized room is required.
Hot air outlet: min. 3 m
Fresh air intake: min.1 m
Note: The hot air outlet may not
shortcycle with the fresh air intake.
Option No 2:
Air taken in from an adjoining room or from outside.If the
incoming air in winter is too cold, provide a condensation
pressure controller and the compressor casing resistance.
A screen can be provided in winter so that taking in the cold
air can however be prevented.
Note: The hot air outlet may not
shortcycle with the fresh air intake.
Option No 3:
Air intake and evacuation to outside or an adjoining room
using ducts.
For the maximum permissible pressure loss, note the
dimensions h+i
Take the same precautions as in Option No 2 for the
air intake temperatures in winter.
Note:Only permissable on chillers with radial fans.
h+i = 5 m max. with grid
h+i = 7 m max. without grid
Option No 4:
Air intake and evacuation at the same floor level,
either to outside or to an adjoining room.
A large bend is required in the duct so as to reduce
pressure loss.
Use the same precautions as in option No 2.
3 INSTALLATION AND INITIAL OPERATION
Options
Hot air outlet to top
Fresh air
intake
Hot air outlet to top
Fresh air
intake
Grid Hot air to top
Fresh air intake
h
i
Fan
Grid
Fresh air intake

Operating Instructions 7
Electrical connection
The chiller is ready for connection and should only be connected to a three phase current network
(mains voltage refer to technical data).
The power supply has to be connected in a right handed rotatory field. In order to confirm the
correct connection the direction of rotation of the fan motor must turn in the same direction as the
arrow.
All electrical connections in the switch board are to be tightened prior to commissioning.
Incorrect connection of power supply and incorrect power supply will cancel the
manufacturers liability for subsequent damage.
Hydraulic connection
After completing the electrical connection it is necessary to connect the Chiller to the consumer VIA
flexible or fixed pipes.
Selection of materials of pipes. PVC, Plastic, Stainless Steel, Copper and Brass are permissible.
Note: Mild Steel and Galvanized Steel is not permissible.
Selection of cross – section of pipes (for advise please refer to manufacturer).
Insulated pipes are to be used if the distance between the chiller and the consumer is greater
than 5 m.
Refer to technical data (pump diagram) for flow rate and pressure available from the chiller.
Before starting up it is always necessary to prime the pump with the medium to be transported.
(refer to BLEEDING OF PUMP in this chapter).
If the consumer is placed on a higher level than the chiller unit, a non-return valve has to be installed
in the water outlet as well as an solenoid valve has to be installed in the water inlet.
Connect water inlet port to cnsumer return line.
Connect water outlet port to consumer inlet line.
Connect water supply port to tap/fresh water supply.
Please test float valve adjustment (option). Float valve is factory adjusted at 3 bar water pressure.
Incorrect hydraulic installation will cancel the manufacturers liability for subsequent damage.
3 INSTALLATION AND INITIAL OPERATION

8 Operating Instructions
Refilling of the tank
Automatic refill (Option)
Tap/fresh water feed connected to water supply port guarantees constant level in the tank, so that eva-
porator always remains submerged.
Manual refill (Option)
Filling of water manually through water inlet port or directly into tank.
The waterlevel can be observed by the water sightglass which can be seen from the outside of the
housing .
Ensure that the evaporator is submerged.
Important:
Prior to filling of the tank it is esessential to test the water quality and if required carry out wa-
tertreatment (refer to chapter 7).
To avoid corrosion at the evaporator, we recommend to use water with a low salt content (chloride content
< 20 mg/l). To avoid thickening of the tank water, we recommend to replace the system content every 1
to 3 months an increasing evaporation of the tank water means an increasing chloride content ( please
refer to chapter 7).
For chillers running at temperatures lower than freezing point, a water/glycol mixture at the
appropriate ratio should be filled.
30% Glycol up to –10°C, at lower temperatures please refer to the manufacturer.
The tank should be filled to the max. level of the water level tube (Option).
Prior to start up it is always necessary to prime the pump with the medium to be transported.
Prior to start up the pump must be bled in order to remove air from the pump.
3 INSTALLATION AND INITIAL OPERATION

Operating Instructions 9
3 INSTALLATION AND INITIAL OPERATION
Bleeding of the pump
Remove bleeding screw P
Reinstall bleeding screw and tighten as soon as medium exits from filler fitting.
Bleeding screw: P
Drain screw
CH pump CR pump
Otros manuales para Chilly
1
Este manual sirve para los siguientes modelos
1
Tabla de contenidos
Otros manuales de Enfriador de KREYER


