KingKutter Free Floating Manual de usuario

FREE FLOATING
REAR DISCHARGE
FINISHING MOWER
PO Box 1200
305 Commerce Drive
Winfield, Alabama 35594
Part No 999994 www.kingkutter.com

2

3
TO THE PURCHASER
This manual contains valuable information about your
new King Kutter Mower. It has been carefully prepared to
give you helpful suggestions for operating, adjusting, ser-
vicing and ordering repair parts.
Keep this manual in a convenient place for quick and
easy reference. Study it carefully. You have purchased a
dependable and sturdy mower, but only by proper care and
operation can you expect to receive the service and long life
designed and built into it.
Sometime in the future your mower may need new parts
to replace those that are worn or broken. If so, go to your
dealer and provide him with the model and part number.
Customer Information
Name _______________________________________________
Purchased From ______________________________________
Date Purchased ______________________________________
Model No. ___________________________________________
Serial No. ___________________________________________

4
It is the purchaser and/or operator’s responsibility to….
zz
zz
zRead and understand the information contained in
this manual.
zz
zz
zOperate, lubricate, assemble and maintain the equip-
ment in accordance with all instructions and safety
procedures in this manual.
zz
zz
zInspect the equipment and replace or repair any parts
that are damaged or worn which under continued op-
eration would cause damage, wear to other parts, or
cause a safety hazard.
zz
zz
zReturn the equipment or parts to the authorized King
Kutter dealer, from where it was purchased, for ser-
vice or replacement of defective parts that are covered
by warranty. (The King Kutter Factory may inspect
equipment or parts before warranty claims are hon-
ored.)
zz
zz
zPayment of all costs incurred by the dealer for travel-
ing to or transporting the equipment for warranty
inspection and or claims.

5
CONTENTS
ITEM PAGE
Safety ......................................................................... 6
Assembly Instructions ................................................ 8
Before Putting Into Service ...................................... 10
Safety Training ......................................................... 11
Transportation Safety ............................................... 15
Attaching To Tractor ................................................. 16
Sizing PTO ............................................................... 18
Operating Instructions.............................................. 19
Maintenance ............................................................. 21
5-6-7 FT. Belt Replacement ..................................... 22
4 FT. Belt Replacement............................................ 24
Maintenance Safety ................................................. 26
Safety Decal's And Locations................................... 27
Replacement Parts................................................... 34
PTO Shaft Parts ....................................................... 36
Spindle Unit Parts .................................................... 37
Gearbox Parts .......................................................... 38
PTO Shaft Cover Removal ....................................... 40
Warranty ................................................................... 43

6
SIGNAL WORDS:
The signal words DANGER, WARNING and CAUTION are used with the
safety messages in this manual and with each safety signs. They are
defined as follows:
DANGER: Indicates an immediate hazardous situation that, if not
avoided, could result in serious injury or death. This signal word is to be
limited to the most extreme situations typically for machine components
that, for functional purposes, cannot be guarded.
WARNING: Indicates a potentially hazardous situation that, if not
avoided, could result in serious or death, and includes hazards that are
exposed when guards are removed. It may also be used to alert against
unsafe practices.
CAUTION: Indicates a potentially hazardous situation that, if not avoided,
may result in minor or moderate injury. It may also be used to alert
against unsafe practice.
If you have any questions not answered in this manual or require additional
copies or the manual is damaged, please contact your dealer or King Kutter,
Inc. P.O. Box 1200 Winfield, AL 35594 (205) 487-3202 or www.kingkutter.com
READ AND FOLLOW THE INSTRUC-
TIONS IN THIS MANUAL AND ESPE-
CIALLY IN THE SAFETY SECTION.
FAILURE TO DO SO CAN RESULT IN
SERIOUS INJURY OR DEATH.
TAKE NOTE! THIS SAFETY ALERT
SYMBOL FOUND THROUGHOUT
THIS MANUAL IS USED TO CALL
YOUR ATTENTION TO INSTRUC-
TIONS INVOLVING YOUR PER-
SONAL SAFETY AND THE SAFETY
OF OTHERS.
SAFETY
THIS SYMBOL MEANS
ATTENTION!
BECOME ALERT!
YOUR SAFTEY IS INVOLVED

7
EQUIPMENT SAFETY GUIDELINES
zSafety of the operator and by standards is one of the main concerns in designing and
developing a mower. However, every year accidents occur which could have been avoided
by a few seconds of thought and a more careful approach to handling equipment. You,
the operator, can avoid many accidents by observing the following precautions and insist
those working with you, or for you, follow them.
zIn order to provide a better view, certain photographs or illustrations in this manual may
show an assembly with a safety shield removed. However, equipment should never be
operated in this condition. Keep all shields in place. If shield removal becomes neces-
sary for repairs, replace the shield prior to use.
zReplace any safety sign that is not readable or is missing. Location of such safety signs
is indicated in this manual.
zNever use alcoholic beverages or drugs that can hinder alertness or coordination while
operating this equipment. Consult your doctor about operating this machine while taking
prescription medications.
zz
zz
zUnder no circumstances should children under the age of 18 be allowed to work
with this equipment. Do not allow persons to operate or assemble this unit until
they have read this manual and have developed a thorough understanding of
the safety precautions and of how it works. Review the safety instructions with all
users annually.
zThis equipment is dangerous to children and persons unfamiliar with its operation. The
operator should be a responsible, properly trained and physically able person familiar
with farm machinery and trained in this equipment’s operations. If the elderly are assist-
ing with farm work, their physical limitations need to be recognized and accommodated.
zUse a tractor equipped with a Roll Over Protective System and seat belts. (ROPS)
zNever exceed the limits of a piece of machinery. If its ability to do a job, or to do so safely,
is in question- DON’T TRY IT.
zDo not modify the equipment in any way. Unauthorized modification could result in seri-
ous injury or death and may impair the function and life of the equipment.
zIn addition to the design and the confirmation of this implement, including safety signs
and safety equipment, hazard control and accident prevention are dependent upon the
awareness, concern, prudence, and proper training of personnel involved in the opera-
tion, transport, maintenance, and storage of the machine. Refer also to safety messages
and operation instruction in each of the appropriate sections of the tractor and mower
manuals. Pay close attention to the safety signs affixed to the tractor and the finishing
mower.

8
FINISHING MOWER ASSEMBLYINSTRUCTIONS
STEP 1
With finishing mower still in crate, lay flat on a level surface. Remove the top
& side sections of the crate, leaving the finishing mower resting on the bot-
tom section. Set aside PTO shaft and tail wheel arm assemblies.
STEP 2
Insert tail wheel arms as shown in Figure A and tighten both the bolt &
jam nut.
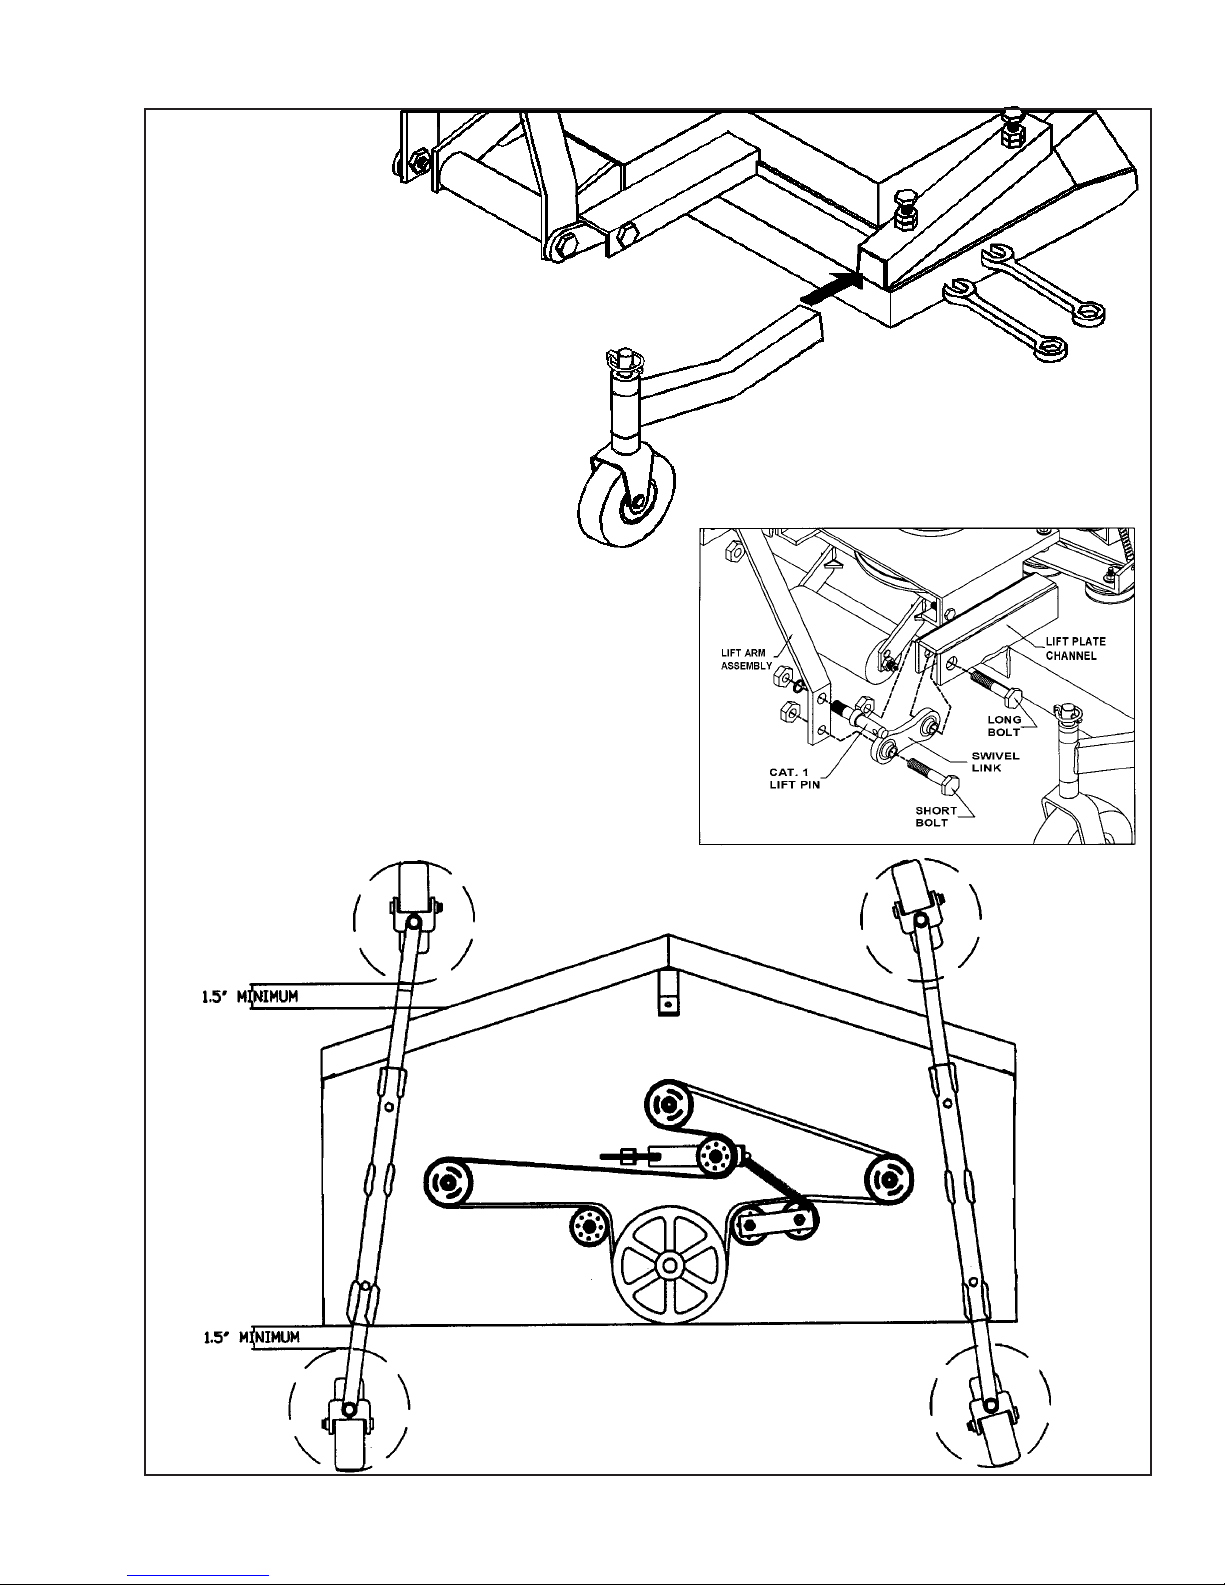
STEP 3
Remove swivel links and lift pins that are wired on the lift arm “A” frame.
Set aside for step 5.
STEP 4
Remove the 4 bolts from the lift arm “A” frame.
Note: There are 2 different lengths of bolts.
STEP 5
Insert the swivel links in the center lift plate channel using the longer of
the 2 bolts, on each side as shown in figure B.
STEP 6
Attach the other end of each swivel link to the outside lower hole on the
lift arm “A” frame using the shorter bolts as shown in Figure B.
STEP 7
Attach the Category 1 lift pins as shown in Figure B.
STEP 8
Tighten all nuts and bolts.
9
Figure A
Figure B

10
BEFORE PUTTING FINISHING MOWER INTO SERVICE
(IMPORTANT-INSTRUCTIONS PRIOR TO START UP)
SHIPPED WITHOUT OIL IN GEAR BOX AND WITHOUT GREASE IN
GREASE FITTINGS. UNIT MUST BE SERVICED BEFORE USING.
•Fill Gearbox using Multi-Purpose Gear Oil (I.E. S.A.E. 80w/90 or
S.A.E. 85w/140 Multi-purpose gear oil.)
•For all Grease Fittings use TYPE/grade II tube grease.
STEP 1 Place finishing mower so that the deck is secure and level.
STEP 2 Remove 1/2” Pipe Plug (Located at top of gearbox) and 1/8” Pipe
Plug (located at lower 1/3 of gearbox.)
STEP 3 Fill gearbox using multi-purpose gear oil through top 1/2” fill hole
until gear oil is level with lower 1/8" hole.
STEP 4 Replace both the 1/2” pipe plug (located at top of gear box) and
1/8" pipe plug (located at lower 1/3 of gear box) and clean away any
excess oil.
STEP 5 Fill spindle units (3) with grease until full. There are easy access
holes in top cover for greasing spindle units. (Figure C page 21)
STEP 6 Grease wheel axles (4), wheel forks (4), front roller axle (1), and
PTO shaft universal joints (2). (Figure C page 21)
STEP 7 Check air pressure in tires, maintain rated PSI listed on the tire at all
times.
STEP 8 Check all bolts, nuts and belt to insure they are tight and secure.
CAUTION:
DO NOT over fill gearbox. This could cause damage to oil seals and can
cause permanent damage to the gearbox. This issue will not be covered
under warranty.
Tabla de contenidos
Otros manuales de Cortacésped de KingKutter


Manuales populares de Cortacésped de otras marcas


TALEN TOOLS
TALEN TOOLS AVR HGM30 Manual de usuario

DEWEZE
DEWEZE ATM-725 Manual de operación

Weed Eater
Weed Eater 180083 Manual de usuario

Husqvarna
Husqvarna Poulan Pro PP185A42 Manual de usuario

Better Outdoor Products
Better Outdoor Products Quick Series Manual de usuario

Cub Cadet
Cub Cadet 23HP Z-Force 60 Manual de funcionamiento


