keylitos PD8-KDE Manual de usuario

DEHUMIDIFIER
USER MANUAL
PD8-KDE

IMPORTANT NOTICE
SAFETY INFORMATION
PRODUCT STRUCTURE
OPERATING INSTRUCTION
WARNING
DRAINING INSTRUCTION
MAINTENANCE INSTRUCTION
TROUBLESHOOTING
SPECIFICATIONS
------------------------------------------------
--------------------------------------------
-------------------------------------------
--------------------------------------
---------------------------------------------------------------
-----------------------------------------
----------------------------------
-----------------------------------------------
----------------------------------------------------
02
04
05
06
08
09
12
13
16
CUSTOMER SERVICE
Email:[email protected]
CONTENT 01
17
WARRANTY AND SERVICE --------------------------------------

IMPORTANT NOTICE BEFORE FIRST USE:
IMPORTANT NOTICE 02
Thank you a lot for choosing Keylitos's dehumidifier, let it be a member of your family to
protect the health of the whole family.
Please read the manual carefully before you use the dehumidifier, it will help you operate the
machine better, so as to achieve the best effect and extend the life of the machine.
• To prevent any internal damage, it is very important to keep dehumidifier upright through
out their journey. Please leave it standing upright and outside the box for 24 HOURS
before plugging it in.
IMPORTANT NOTICE 03
• The recommended ambient operating temperature is between 41°F (5°C) and 89°F
(32°C).The unit will not work properly if the temperature is out of this temperature range, or
the performance of the unit will fall greatly.
• Please check the machine for damage before use. If you have any questions, please
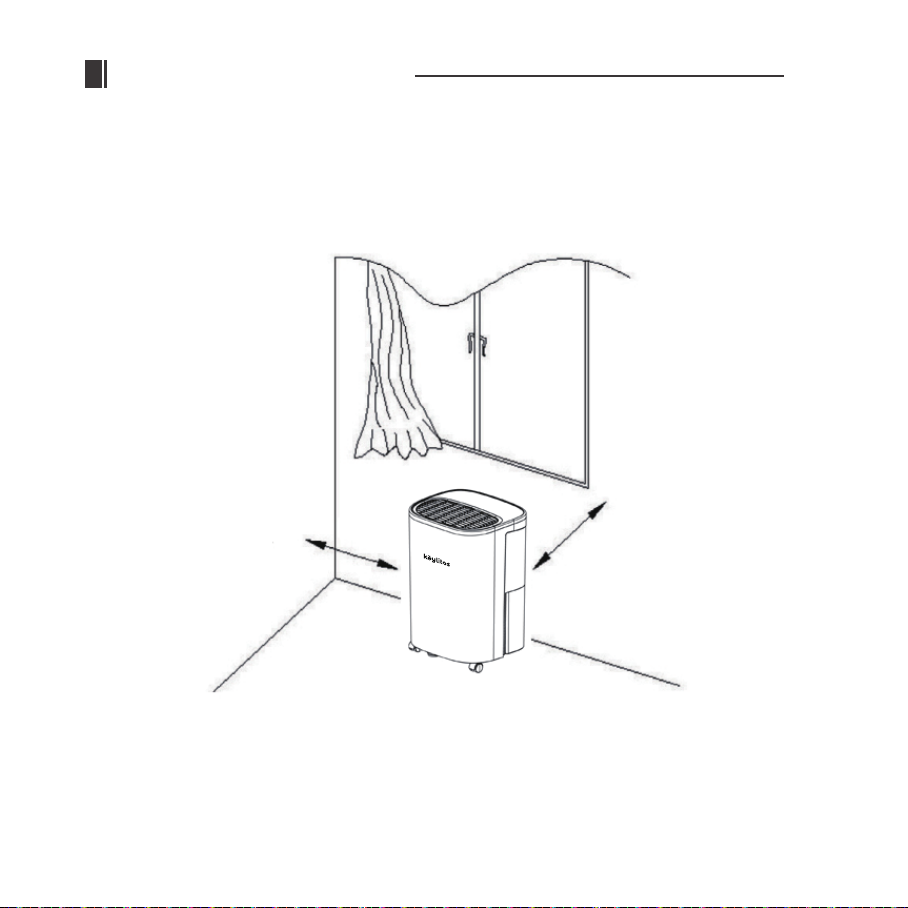
• A badly positioned dehumidifier will have little effect. Place the dehumidifier at least 18
inches (45 cm) away from other objects (e.g. curtains or furniture) that may restrict airflow
from the back or through the air vents of the unit.
• For optimal efficiency, the dehumidifier must be operated in an enclosed area. Keep all
doors, windows and other outside entrances to the room closed.
more than 18 inches
more than 18 inches
41°F-89°F

SAFETY INFORMATION 04
1. Please storage the unit in a safe place to avoid electricity leakage, flaming or personal
injure.
2. Do not put this product in the water or any other liquids.
3. Stop using this appliance in the below situations, or the product might be damaged: power
cord and wire are broken, the unit is dropped or broken down.
4. Please ask a professional service agent to repair the product. The improper repair might
cause damage to users.
5. Disconnect the appliance from the power supply before moving or cleaning the product,
and also when the product is not in use.
6. Please operate the product with specified electricity voltage.
7. Please use this product only for household appliances and follow the designed purpose.
8. Do not put any stuff on the product.
9. In order to avoid water leakage, please clean the water tank before moving the product.
10. Do not incline the product, or leaking water may damage the product.
11. This appliance can be used by children aged 8 years and above and persons with
reduced physical, sensory or mental capabilities or lack of experience and knowledge if
they have been given supervision or instruction concerning the use of the appliance in a
safe way understand the hazards involved. Children shall not play with the appliance.
Cleaning and user maintenance shall not be made by children without supervision.
12. Please keep the product from the wall or other barriers at a minimum distance of 50 cm.
13. Please install the appliance following the country wiring laws.

CONTROL PANEL DESCRIPTION
PRODUCT STRUCTURE 05
1. Control panel
2. Air outlet
3. Handle
4. Housing
5. Drain hole
6. Water tank

OPERATING INSTRUCTION 06
1. POWER
Press this key to turn “on” or “off” corresponding indicating light on or off (While the
indoor humidity reaches the setting value, the compressor will stop running and the
indicating light will flash.)
2. FAN SPEED
Press the key to choose the high speed (HI) or low speed (LOW), and the relating indicat
ing light may follow the instruction to illuminate or extinguish.
3. TIMER
a.Press the key to set the time you need. (1-24 hours in 1-hour increments)
b.When setting a timer in standby mode, the unit will be turned on automatically; when
setting a timer in operating mode, the unit will be turned off automatically.
c.If pressing the power key to turn off the unit before time finishes counting down, the
setting timer will be canceled.
d.While the timer is in use, the indicating light illuminates.
e.After setting the timer, the display may switch back to show the ambient humidity.
4. HUMIDITY SETTING
When the unit is switched ON, the Display Screen shows the current humidity
percentage.
● Press the key to set the relative humidity you need. (From continuous dehumidification
[CO] to relative humidity 30-90%(The humidity level can be set within a range of 30%RH
to 90%RH in 5% increments.), comfort mode [AU], and back to continuous
dehumidification [CO].
The first time you electrify the unit, the unit is set to be continuous dehumidification [CO].
● When ambient humidity is lower than setting humidity by 3%, the compressor will stop
automatically, and return working until the ambient humidity is higher than setting

CONTINUOUS MODE[CO]
OPERATING INSTRUCTION 07
Press to activate the continuous dehumidifying operation. The appliance will work continu-
ously and will not stop except that the bucket is full.
COMFORT MODE [AU]
a.When the ambient temperature is lower than 41°F(5°C), the compressor will stop working.
b.When the ambient temperature is higher than 41°F(5°C) and lower than 68°F(20°C), the
product will set the humidity to 60% automatically.
c.When the ambient temperature is higher than 68°F(20°C) and lower than 80°F(27°C), the
product will set the humidity to 55% automatically.
d.When the ambient temperature is higher than 80°F(27°C), the product will set the humidity
to 50% automatically.
WATER FULL
When the water tank is full, the indicating light will illuminate and the unit will stop working
until empty the water tank.
DEFROST
When the evaporator coil is frosted, the LCD screen displays the defrost symbol. And the
internal compressor will shut off and the fan will continue to run until the frost has melted.

WARNING 08
1.When operating the dehumidifier, please do not set the humidity higher than ambient
humidity.
2.When indicating light illuminates, please pour the water out of the tank and put it back.
Then the product will resume working.
3.When the product shuts down, please wait at least 3 minutes before restarting the unit to
prevent damaging the compressor.
4.If the dehumidifier can’t start (the indicating light does not illuminate) or the dehumidifier
shuts down unreasonably, please make sure whether the plug is connected firmly to the
power supply. If the plug and power supply are in normal condition, please wait for 10
minutes before restarting the unit (because it takes 10 minutes to reposition). If the unit still
does not start after 10 minutes, please ask your local distributor service station to repair it.
5.When the dehumidifier is operating, it’s a normal situation that the working compressor
may cause some heat and bring the ambient temperature up.
6.When the product is defrosting, the related indicating light will illuminate. The compressor
stops while defrosting but the motor keeps running.
7.The unit shows the ambient humidity when it’s operating. If the ambient humidity is higher
than RH95%, the display shows “HI”; if the ambient humidity is lower than RH35%, the
display shows “LO”.
8.Please face the front of the unit to move the machine.
(as Fig a)

1. Use the bucket
DRAINING INSTRUCTION 09
When dehumidifying, the condensing water may be drained to the water tank. The unit stops
working and illuminates the indication when the water tank is full of water. Please pour out
the water that time.
(1)Take out the water tank (as Fig 01) and pour out the water.
(2)Put the water tank back.
2.Continuous drainage
(1)Cut off the power.
(2)Before continuously draining water, please take out the
water tank and plug a draining tube into the draining
hole (as Fig 02.) Then put the water tank back.
(3)Draining tube should place lower than the draining
hole to let water flow out.
Fig 01
Fig 02
Tabla de contenidos
Otros manuales de Deshumidificador de keylitos


