karwala Carlo Manual de usuario

EN/DE/PL/RU
ISOFIX-BASE für My Junior Babyschalen
by

12 3 4
56 7 8 9
10 11 12 13
14 15 16 17
18 19 20

CARLO BASE
Table of contents
1
2
3
4
5
6
7
8
9
14
10
11
12
13
15
1. Foot prop
2. Buon for adjusng the foot prop
3. Buon for adjusng the posion
of the base
4. Child seat release buon
5. Fastened / unfastened display
6. Block release buon
7. Press frame
8. Anchorage points for anchoring
the child seat
9. Isox Catch Arm Hook
10. Buon releasing the Isox Catch
Arm Hook
11. Fastened / unfastened display of
the Isox anchorage
12. Lower cover
13. Upper cover
14. Seat belt guide slots
15. Mounng bars
3,4
6, 7
8
9
10
13
12
13
14
14
14
15
Pictures
Aenon
Dear Customer
Informaon for users
Installing the base with a seat belt
Uninstalling the base installed with a seat belt
Installing the base with Isox
Uninstalling the base installed with Isox
Installing the child seat on the base
Uninstalling the child seat from the base
Cleaning and maintenance
W a r r a n t y

ATTENTION!
Installing the base
This child restraint device is categorised as “semi all-purpose”. It has received a cercaon of approval in
accordance with ECE Regulaon No. 44/04 for general use in vehicles ed with the Isox anchoring system
(see vehicle manuals).
It can be installed on all car seats which are allowed as Isox seats in accordance with the vehicle manual,
depending on the weight class of the child seat and the Isox size category.
The weight class and the Isox size category for which this child restraint device is suitable is C (0-13 kg).
Never use on car seats ed with an airbag
Can be used only if the seat is ed with a 3-point seat belt
with a reel
ATTENTION!
Installing the base with a seat belt
This child restraint device is categorised as “all-purpose”. It has received a cercaon of approval in ac-
cordance with ECE Regulaon No. 44/04 for general use in vehicles and can be installed on most car seats
(however not on all).
A correct installaon is possible if the manufacturer of the vehicle declares in the vehicle manual that the
vehicle has been prepared for the installaon of a child restrain device categorised as “all-purpose” for this
age group. The child restraint device was categorised as “all-purpose” based on more restricve require-
ments than those applied to previous designs, for which this informaon was not provided.
The child restraint device has received a cercaon of approval in accordance with the last version of ECE
Regulaon No. 44/04 for all-purpose devices and it meets more restricve requirements than previous
versions.
It is suitable if the cered vehicles ed with 3-point seat belts with a reel, which are approved as com-
pliant with ECE Regulaon No. 16 or other equivalent standards.
Placing and adjusng the seat belt correctly is essenal for your child’s safety. Never place the seat belt in a
dierent way than specied in this manual.
Make sure that all belts used for installing the device which holds the child seat are stretched ght and the
belt which holds the child is adjusted to its body and is not twisted.

Dear Customer!
Thank you for buying the base for a child seat.
Karwala company has designed this product to provide safety to your child in its rst stage of life. The pro-
duct has been produced in compliance with special quality standards and meets the highest safety stan-
dards dened by the regulaon ECE R 44/04 for child safety seats.
Research has shown that a signicant number of child safety seats are used incorrectly. Please, take your
me and read this manual carefully. Your child’s opmum safety can be guaranteed only if Carlo base and a
child seat are used correctly. A simple and fast system for fastening the child seat to the base decreases the
risk that the child seat will be used incorrectly and increases your child’s safety.
Carlo base has been tested and approved for use in connecon with the following child seats (these pro-
ducts are labelled with symbol):
- Carlo, group 0 (11 kg)
- Avionaut Jet, group 0+ (up to 11 kg)
The base can be used only on car seats facing the front of the car.
The child seat Avionaut Jet (group 0+) or Carlo (group 0) can be placed on the base only in the rear-facing
posion.
Informaon for users
Because there are various seat belt and fastening systems used in cars nowadays, you should prove before
buying the base whether it can be properly mounted in your car. The base is to be used only in a car.
Secure all collapsible seats, make sure that both Isox Catch Arm Hooks are correctly fastened at the ancho-
rage points. Always use the foot prop to ensure safe use. The foot prop must be fully pulled out and blocked
at all mes.
No objects must be put in the leg space in front of the base.
Never leave your child alone in the car.
Do not modify the base in any way. The result may be paral or full loss of its safety features.
The base must be always secured in the car, even if it is not used.
Make sure that the objects transported in the car are well secured. Objects which are not secured may cau-
se injury in the event of an accident.
During longer journeys take short breaks for the child to move a lile.
The manufacturer is aware that the restraint devices can cause depressions in the car seat upholstery. The
manufacturer is not liable for any possible damage done this way.
Aer an accident the base and the child seat may not provide safety due to invisible damage. Therefore
they should be exchanged.
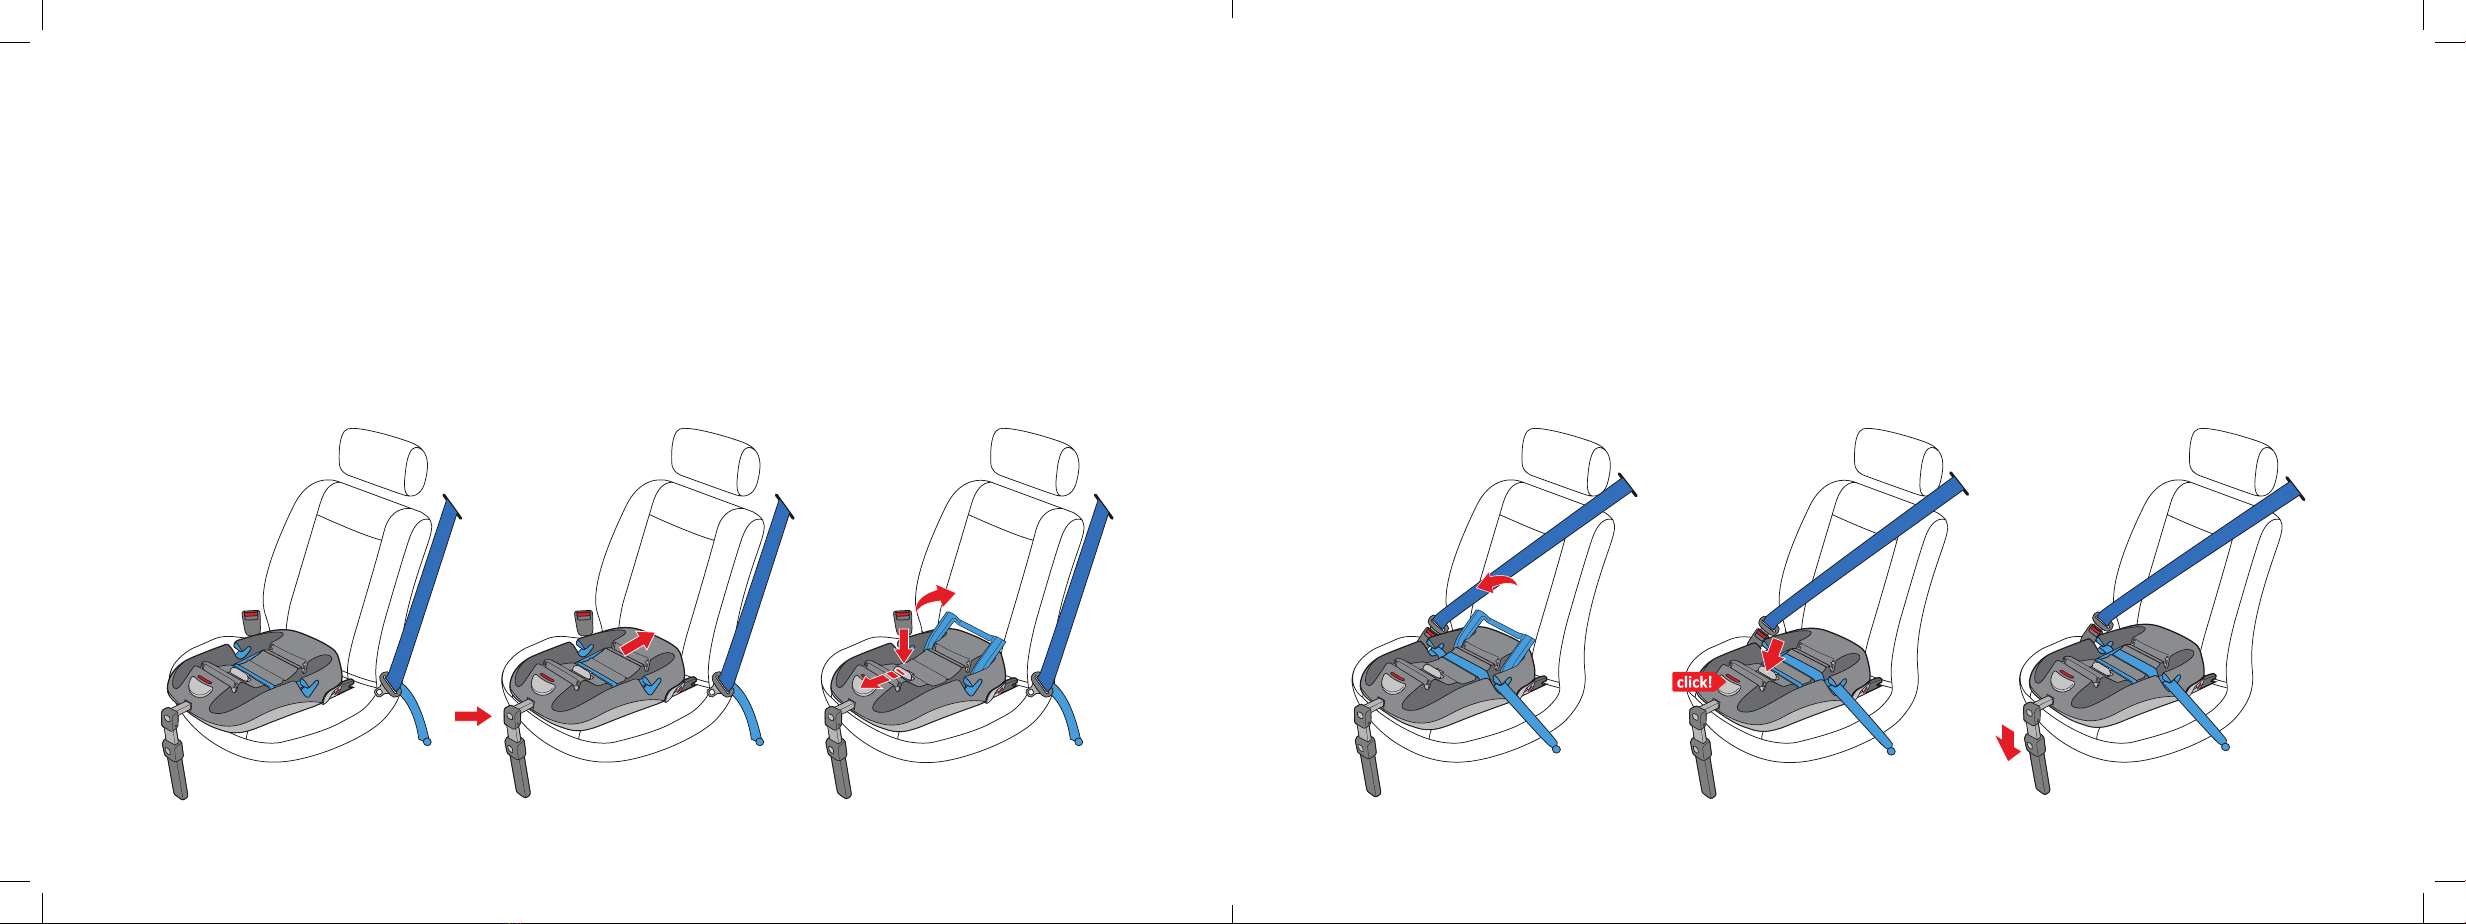
Installing the base with a seat belt
1. Put the base on the car seat so that the foot prop hangs loose in front of the seat.
2. Press buon 3 and push the base to the back of the seat.
3. Push buon 6 and release the press frame 7.
Installing the base with a seat belt
4. Pull the seat belt. Pull its lower part through the blue guide slots 14 and snap it in the seat belt buckle.
5. Tighten the lower part of the seat belt so that the block can be fastened. Press the press frame 7 down
(Click!).
6. Pull the foot prop 1 out so that it presses ghtly against the oor. It is important that the foot prop is
blocked. No objects must be put under it.

Installing the base with
1. Put the base on the car seat so that the foot prop hangs loose in front of the seat. - Fig. 5
2. Snap the Isox Catch Arm Hooks 9 in the Isox anchorage points. When they lock in place, you will hear
click! - Fig. 6
(the display 11 shows green, which means that the base has been fastened correctly). - Fig. 7
3. Press buon 3, push the base to the back of the car seat as far as possible. - Fig. 8
4. Pull the foot prop 1 unl it is ghtly pressed against the oor of the car. - Fig. 9
5. It is important that the foot prop is blocked. No objects must be put under it.
Uninstalling the base installed with a seat belt
1. Unfasten the seat belt. - Fig. 1
2. Shi the block mechanism 6 - Fig. 2. Pull the press frame 7 up and take the seat belt out of the guide
slots 9. - Fig. 3
3. Release the block mechanism of the foot prop 2. - Fig. 4
Uninstalling the base installed with
1. Push the foot prop 1 in by pressing buon 2. - Fig. 10
2. Press buon 9 and pull the base away from the back of the car seat. - Fig. 11
3. Pull the buon releasing the Isox Catch Arm Hook 10 towards you.
Repeat the acon on the other side. - Fig. 12
The display 11 shows red. - Fig. 13

Installing the child seat on the base
The base has been tested and approved for use with the child seats AVIONAUT JET and CARLO (these
products are labelled with symbol), which are ed with mounng bars 15.
1. Place the child seat over the base, facing towards the rear of the car. - Fig. 14
2. Snap the child seat in the anchoring system of the base 8 starng with the fasteners at the front of the base
(You will hear Click! and the display 5 will show green) - Fig. 15
3. Place the handle so that it faces the back of the car seat (the handle must be blocked) - Fig. 15
* When installing the base with the seat belt, pull the breast part of the seat belt through the guide slot at the
back of the child seat. - Fig. 16
Uninstalling the child seat from the base
1. Put the handle of the child seat vercally, pull the shoulder belt from the guide slot at the back of the child
seat. - Fig. 18
2. Press buon 4, which releases the block of the base 8 and pull the child seat up. - Fig. 19
Cleaning and maintenance of Carlo base
The parts made of plasc should be cleaned with warm water and soap. Do not use any aggressive chemical
agents.
Warranty
General condions:
- The warranty period is 24 months from the date of purchase.
- The manufacturer guarantees good quality and funconality of the product on condion that it is used for
its intended purpose and in accordance with the manual.
- Only the rst buyer has warranty rights and they cannot be transferred to third pares.
- Should defects appear, go to the sales point with the product, the original warranty card signed by the
shop, and a receipt or other document of sale.
- The warranty for the consumer goods sold does not exclude, limit, or sustain the Buyer’s rights following
from the sales agreement.
- The warranty is valid on the whole EU territory.
The warranty does not include:
- Natural wear and tear of the individual components of the base.
- Mechanical and thermal damage to the product.
- Losing small elements of the equipment.
- Damage caused by the failure to use the product as specied in the manual.
- Other damage for which the Buyer is to blame.
- Products from which serial numbers have been removed.
- Products repaired by persons not qualied.

CARLO BASE
Inhaltsverzeichnis
3,4
6, 7
8
9
10
13
12
13
14
14
14
15
1
2
3
4
5
6
7
8
9
14
10
11
12
13
15
1. Stützbein
2. Druckknopf zur Einstellung des
Stützbeins
3. Druckknopf zur Verstellung der
Base
4. Druckknopf zur Lockerung der
Befesgung der Babyschale
5. Anzeige der Befesgung der
Babyschale
6. Druckknopf zur Entriegelung der
Sperrvorrichtung
7. Druckrahmen
8. Anschlagpunkte zur Befesgung
der Babyschale
9. Isox-Rastarmhaken
10. Druckknopf zur Entriegelung des
Isox-Rastarmhakens
11. Anzeige der Befesgung der
Isox-Befesgung
12. Untere Decke
13. Obere Decke
14. Schlitzen für die Gurührung
15. Befesgungshalter
Bilder
Achtung
Sehr geehrter Kunde
Informaonen für den Benutzer
Montage der Base mit dem Autogurt
Demontage der mit dem Autogurt monerten Base
Montage der Base mit Isox
Demontage der mit Isox monerten Base
Montage der Babyschale auf der Base
Demontage der Babyschale aus der Base
Reinigung und Instandhaltung
Garane

ACHTUNG!
Montage der Base mit
Die Rückhaltevorrichtung für Babys gehört zur Halbuniversalkategorie. Sie hat eine Bauartzulassung gemäß
ECE-Regelung Nr. 44/04 für allgemeine Nutzung in den mit Isox-Verankerungssystem ausgestaeten Fah-
rzeugen bekommen (sehe Gebrauchseinleitung des Fahrzeugs).
Sie eignet sich zur Montage auf allen Sitzplätzen, die als Isox-Sitzplätze zugelassen sind (gemäß Gebrauch-
seinleitung des Fahrzeugs) abhängig von der Gewichtsklasse der Babyschale und der Isox-Größenkategorie.
Die Gewichtsklasse und die Isox-Größenkategorie, für die diese Rückhaltevorrichtung für Babys vorgese-
hen ist, ist C (0-13 kg).
Niemals auf den mit Airbags ausgestaeten
Sitzen benutzen
Geeignet nur wenn der Sitzplatz mit 3-Punkt-Sichercheitsguten
mit dem Aufroller ausgestaet ist
ACHTUNG!
Montage der Base mit dem Autogurt
Die Rückhaltevorrichtung für Babys gehört zur Universalkategorie. Sie hat eine Bauartzulassung gemäß ECE
-Regelung Nr. 44/04 für allgemeine Nutzung in Fahrzeugen bekommen und eignet sich zur Installierung auf
den meisten Sitzplätzen im Wagen (jedoch nicht auf allen).
Eine richge Montage ist möglich, wenn der Hersteller des Fahrzeugs in der Gebrauchsanleitung des Fah-
rzeugs angibt, dass das Fahrzeug für die Installierung einer Rückhaltevorrichtung der Universalkategorie für
Kinder in diesem Alter geeignet ist.
Die Rückhaltevorrichtung für Babys wurde anhand noch strenger Anforderungen in die Universalkategorie
eingestu, als die Anforderungen, die für die früheren Projekte, die mit dieser Informaon nicht versehen
wurden, galten.
Die Rückhaltevorrichtung für Babys bekam ein Zerkat einer Universalvorrichtung gemäß der neusten
Fassung ECE R44/04 und erfüllt noch strengere Anforderungen, als die früheren Varianten.
Sie ist geeignet, wenn die zugelassenen Fahrzeuge mit 3-Punkt-Sicherheitsgurten mit dem Aufroller ausge-
staet sind, die gemäß der VN/ECE-Regelung Nr. 16 oder anderen gleichwergen Normen zugelassen sind
Der richge Verlauf und Anpassung des Autogurtes hat große Bedeutung für die Sicherheit Ihres Babys.
Führen Sie niemals den Gurt anders, als es in dieser Gebrauchsanleitung beschrieben wurde.
Prüfen Sie, ob alle Befesgungsgurte der Befesgungsvorrichtung der Babyschale gespannt sind und der
Gurt, der das Baby hält, seinem Körperbau angepasst und nicht verdreht ist.
Tabla de contenidos
Idiomas:
Otros manuales de Asiento de coche de karwala


