Kapture KPT-780 Manual de usuario

KPT-780 User Manual
with GPS logger
Full HD In-Car DVR

2
Product Picture & Function 3
a) Device Introduction ................................................................................................................................. 3
b) Button Function...................................................................................................................................... 4
c) LED Light Status List ............................................................................................................................. 5
d) Product Accessories............................................................................................................................... 5
Basic Operation 6
a) Micro SD Card Installation....................................................................................................................... 6
b) GPS Module Installation.......................................................................................................................... 6
c) Power Supply ......................................................................................................................................... 7
d) G-sensor Function.................................................................................................................................. 7
e) Video Mode ............................................................................................................................................ 8
f) Image Capture......................................................................................................................................... 9
g) Playback Mode....................................................................................................................................... 9
Menu Setting 11
a) Video Mode .......................................................................................................................................... 11
b) Playback Mode..................................................................................................................................... 15
Connection 16
a) Connect to TV ...................................................................................................................................... 16
b) Connect to Computer........................................................................................................................... 16
DVR Player - File Playback 17
Product Specification 18-19
3
Product Picture & Function
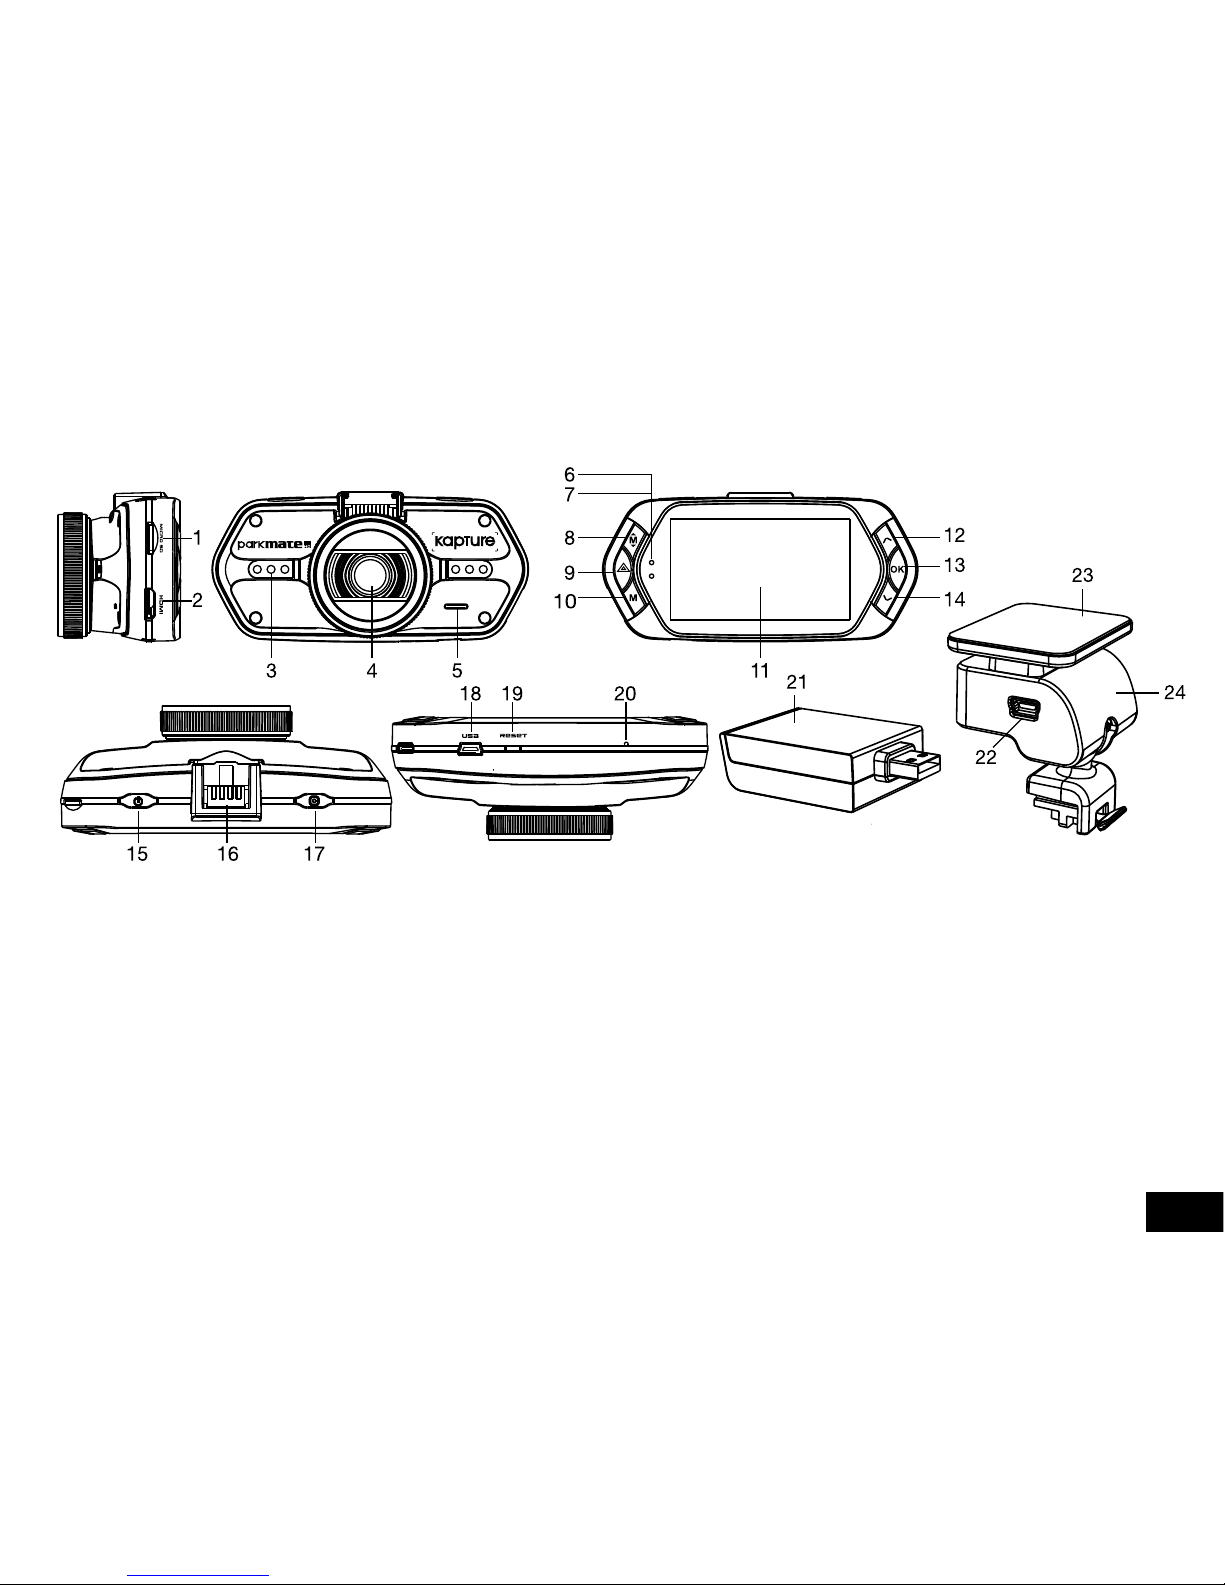
a) Device Introduction
1. Micro SD Card Slot 9. File Protection Button 17. Photo Button
2. HDMI Port 10. Mode Button 18. USB Port
3. LED Light 11. LCD Display 19. Reset Button
4. Lens 12. Up Button 20. Microphone
5. Speaker 13. OK Button 21. GPS Module
6. Status Light (Blue) 14. Down Button 22. Power Input
7. Charging Light (Red) 15. Power Button 23. Interchangeable Mount
8. Menu Button 16. Holder Connector 24. Camera Holder

4
b) Button Function
Power Button Press this button for 2~3 sec. to turn on/off the device.
Photo Button In video mode, at any time, press this button to take picture.
In playback mode, when replaying video, press this button to take picture of current video.
Menu Button Press this button during standby status or playback mode, menu list of current mode will
appear.
During recoding, press this button to change the flash light status “ “, “ “, “ “
File Protection Button
In video mode, during recording, press this button to set the recording video to be
protected manually, so as to prevent it from being overwritten by loop recording.
In playback mode, press this button to lock or unlock the video file. When file protection is
active, the icon “ ” will appear on LCD display.
Mode Button The DVR has two modes, video mode and playback mode.
Pressing this button during standby status switches the camera between video mode and
playback mode.
When the DVR is recording, the Menu Button function is disabled.
Up Button In video mode, press this button to turn on/off LCD display. In menu setting, press this
button to up item.
In playback mode, press this button to choose previous file.
In playback mode, when playing video file, press this button to reverse playback.
OK Button In video mode, press this button to start/stop recording.
In playback mode, press this button to play/pause video file.
In menu setting, press this button to confirm the menu setting.
Down Button In video mode, press this button to start/stop sound recording.
In menu setting, press this button to next item.
In playback mode, press this button to choose next file.
In playback mode, when playing video file, press this button to advance playback.

5
c) LED Light Status List
LED Light Status Meaning
Status Light (Blue)
Flash DVR is Recording
On DVR is in standby or Playback Mode
Off DVR is off
Charging Light (Red)
On Charging Battery
Off Charging finish
d) Product Accessories
1. Car DVR x1 2. Car Charger x1 3. Camera Holder x1 4. Suction Cup x1 5. Flat Mount x1
6. USB Cable x1 7. User’s Manual x1 8. GPS module x1 9. DVR Player Disk x1

6
Basic Operation
a) Micro SD Card Installation
Install the Micro SD Card into Micro SD Card Slot as picture shown.
b) GPS Module
Insert GPS module into camera holder, as pictured below. Install the camera holder onto the DVR by sliding
the camera holder onto the main body of the camera, ensuring that it clicks in place.
Install the DVR on the windshield. (Although the picture
shows the flat mount, there is also the option to remove the
flat mount and replace with the supplied suction cup.)
When DVR is powered up it will automatically search for the
GPS signal.
If a GPS signal can not be found, GPS icon “ “ will be
shown on LCD display
When a GPS signal is found, GPS icon “ “ will be shown
on LCD display.

7
c) Power Supply
Connect car charger to DVR USB port and insert the charger in your car cigarette lighter charging port,
start your engine, the DVR will automatically power on and start recording.
Note: There are two Mini USB ports, one is on the DVR, another is on the Camera Holder.
If the car charger is connected to Mini USB port on DVR, power will be supplied to the DVR only.
If the car charger is connected to Mini USB port on Camera Holder, power will be supplied to both
the DVR and GPS Module.
d) G-sensor Function
When a collision occurs, the Gravity Sensor (G Sensor) records the direction and exact data of the collision.
According to the G sensor sensitivity setting, the DVR will determine whether to set the currently recording
video to protection mode or not, which will ensure the current video is protected from being overwritten by
loop recording.
G-Sensor direction is as per the following image.
9

8
e) Video Mode
In video mode, in standby status, LCD display will be shown as below:
9

9
In video mode, in recording status, LCD display will be shown as below:
f) Image Capture
In video mode, at any time, press photo button to capture an image.
In playback mode, when video is playing, press photo button to take snapshot of current video.
g) Playback Mode
Press Mode Button to enter playback mode, then press Menu Button to choose preview video/picture file in
the inserted Micro SD Card. Use the direction button to control playback operation.

10
Preview in six grids
Up Button Previous file
Down Button Next file
OK Button Confirm
Menu Button Enter menu list.
File Protection Button Lock / Unlock Video / Picture file
Mode Button Change mode
Play
OK Button Play / Pause
Menu Button Delete menu
File Protection Button Lock / Unlock video file
Mode Button Back to six grids preview
Photo Button Take snapshot of current video
Tabla de contenidos
Otros manuales de DVR de Kapture


